(10/1/2008)
If multiple Quietus Spikes trigger at the same time, that player loses half their life when the first ability resolves, then loses half of the remainder when the next ability resolves, and so on. The player does not lose the same amount each time.
It’s identical in your situation; both are triggered abilities, they will be separate events on the stack, so they’ll resolve independently. In this case, two halves make three quarters, not a whole.
Note that because of the ’rounded up’ in the card text, if their life total is 3 or less after combat damage is dealt, that’ll be enough to put their life total to zero anyway (3 → 1 → 0, 2 → 1 → 0, 1 → 0).
Incidentally, in very special cases, the last sentence of the Oracle text is incorrect, namely when the affected player has life total 0 (or lower), but is still in the game due to something like a Platinum Angel. In that case, they’ll lose an equal amount of life, namely 0, both times.
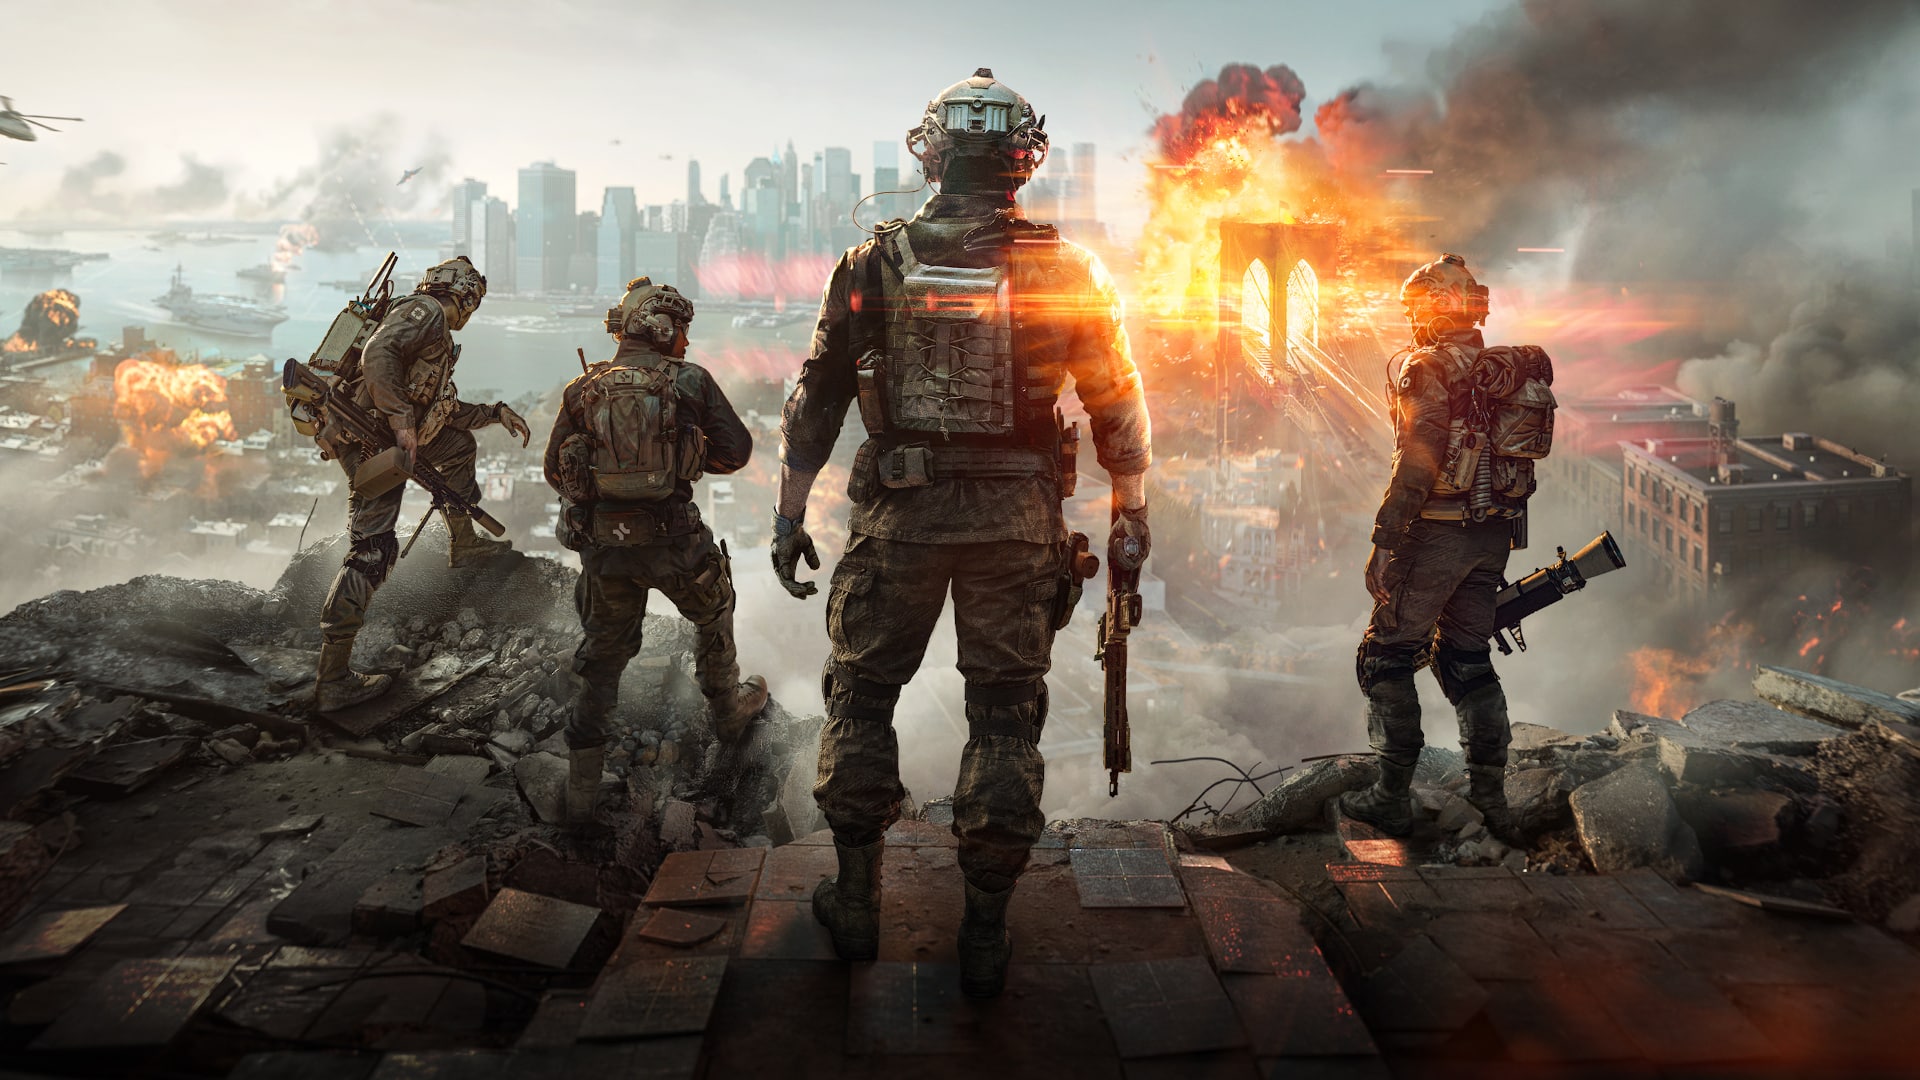
Battlefield 6 is generating some serious buzz in the FPS circles. A seeming spiritual successor to Battlefield 3 and 4, core Battlefield players are hoping it will be a return to form for what Battlefield once was — a class based arcade spectacle sandbox shooter with the potential to produce moments that really no other game can.
However, one thing could destroy that return to form, if streamers get their way: Ranked.
Multiple streamers, including the fast-talking Gamba-obsessed Felix “xQc” Lengyel, have demanded Battlefield add ranked modes (among other things not worth mentioning). For core Battlefield fans, this reads as a foolish demand from someone who doesn’t really get what the core Battlefield experience is about.
The magic of Battlefield is in the scale of it all. And that scale is a big reason why a competitive mode just wouldn’t make the game better.
No, Ranked Won’t Work in Battlefield 6
With 64 and 128-person servers, Battlefield matches are big — huge even. The game is a sandbox where players have a lot of creative freedom to enjoy large-scale combat across a variety of terrains and using a variety of weapons and vehicles. Players log on to be a part of these massive struggles, where you can’t really control the outcome.
Sure, the real sweats are going to make a difference more than the average player, but when the match is 64 v 64, individual contribution is minimal.
Given that fact, competitive modes that promote and demote folks based on if they win or not would struggle to accurately reward players. You could probably reward people based on individual performance, but then you are likely to run into the same problems that other games do with skill-based matchmaking, a system that has long frustrated many players in the Call of Duty community for one.
Among these problems is the risk of min/maxing the fun out of the game with essential meta builds, since the goal is to win a ranked game not to explore the game and have fun.
On top of that, introducing a competitive mode would split the player base between the casual and competitive playlists. Then it would further split the players into their ranks, and with huge servers to fill, the probability is that the higher you climb the harder it will be to find games in a timely manner — or the game will compromise the skill-based match-making, in which case why have it?
And then there is the issue of balancing. When ranked modes are added to games, there is a tendency for devs to balance those games around the ranked experience. This is fine in games designed to be highly competitive, tight-knit shooter experiences — Like Counter-Strike, VALORANT, and more.
But Battlefield (at least the best Battlefield titles) has always been about the general player experience. In fact, Battlefield at its best has historically been based on server browser with no real matchmaking at all.
I’m not suggesting balance changes shouldn’t be made, of course they should be. But the balancing should be done to keep the general player experience good, not privilege the highest ranked players who are sequestered in their own ranked games away from the general population.
In short, Battlefield is meant to be a celebration of arcade shooters, a game that is about teamwork and having fun blowing stuff up. For some people, ranked progress is the only thing that keeps them coming back to a game, and that’s okay. But if you need a ranked mode to motivate you to come back daily, don’t play Battlefield — and don’t come into our game and demand we make it for you.
The incentive to play Battlefield is, and always should be, that it’s damn fun. Battlefield has never been an overly competitive shooter, in fact it has proudly stood as an alternative to that side of the FPS genre. If pushed to become a competitive ranked game it could very well lose the core of its own identity — a sandbox spectacle that makes you feel like the hero in your own story.
The Escapist is supported by our audience. When you purchase through links on our site, we may earn a small affiliate commission. Learn more about our Affiliate Policy
How do you make candy apple in Grow a Garden? If Chris P. the piggy wants a Halloween favorite to see off summer, who are we to deny him? Introduced in the second week of the Roblox Grow a Garden cooking event, these candy apple recipes can deliver plenty of sweet treats into your pocket. As long as you have some rare seeds, that is.
Yes, most of the Grow a Garden candy apple recipes require rare goods like sugar apples and sugarglaze. If you don’t have those, prep for the next craving by learning how to make pie and how to make pizza. If he’s going healthy, see how your farm can help you make salad instead. Any mutated meals he isn’t craving can be handed over to the Food Connoisseur for some new Roblox rewards.
How to make candy apple in Grow a Garden
Here are some candy apple recipes in Grow a Garden to help you hit Chris P.’s sweetest craving yet:
Meal
Easy Recipe
Heavy Recipe
Craving
Mythical
Sugar Apple, Blueberry
Not discovered
Not discovered
Divine
Sugar Apple, Sugarglaze
Sugar Apple, Mango
Not discovered
Prismatic
Apple, Bone Blossom
Not discovered
Not discovered
Transcendent
Sugar Apple, Sugarglaze, Bone Blossom
Not discovered
Not discovered
Prismatic and Transcendent candy apple Grow a Garden recipes
Daring to give Chris. P an even sweeter treat? If you have some rare and event-specific crops on your farm, you can try making Prismatic and even Transcendent versions of the candy cane dish. Delivering him these during a craving could net you some of the best cooking event rewards of the bunch.
Here’s a Prismatic candy apple recipe to try:
New for the second leg of the event is the following Transcendant candy apple recipe:
Sugar Apple
Sugarglaze
Bone Blossom x3
Remember, most Grow a Garden recipes require that ingredient to go into the pot in a specific order. Follow the recipes exactly as they are, and you’ll get what you need. Mess it up and you might end up with soup instead. It’ll get you a reward, but probably not what you’re looking for.
Ready to hang up your chef hat? Take a break with some of the best Roblox games on the platform. Grow a Garden is certainly one of them, but there are many more worth trying out. And if you like the cooking aspect, a few of the tycoon games might scratch that creative itch.
Say you have 2 keepers (Love and War for example), and the current rules allow you to play 2 cards. In your hand you have All you Need is Love (goal) and Trash a Keeper (action).
Can you trash your own War keeper, play the appropriate goal, and win? Trash a Keeper says you can trash any keeper; to me that includes your own.
Similar situations include when the goal is already played, and various configurations involving Peace (no War) and The Brain (no TV).
This came up in my hand in a game with my daughter the other night, I house-ruled against myself and she went on to win.
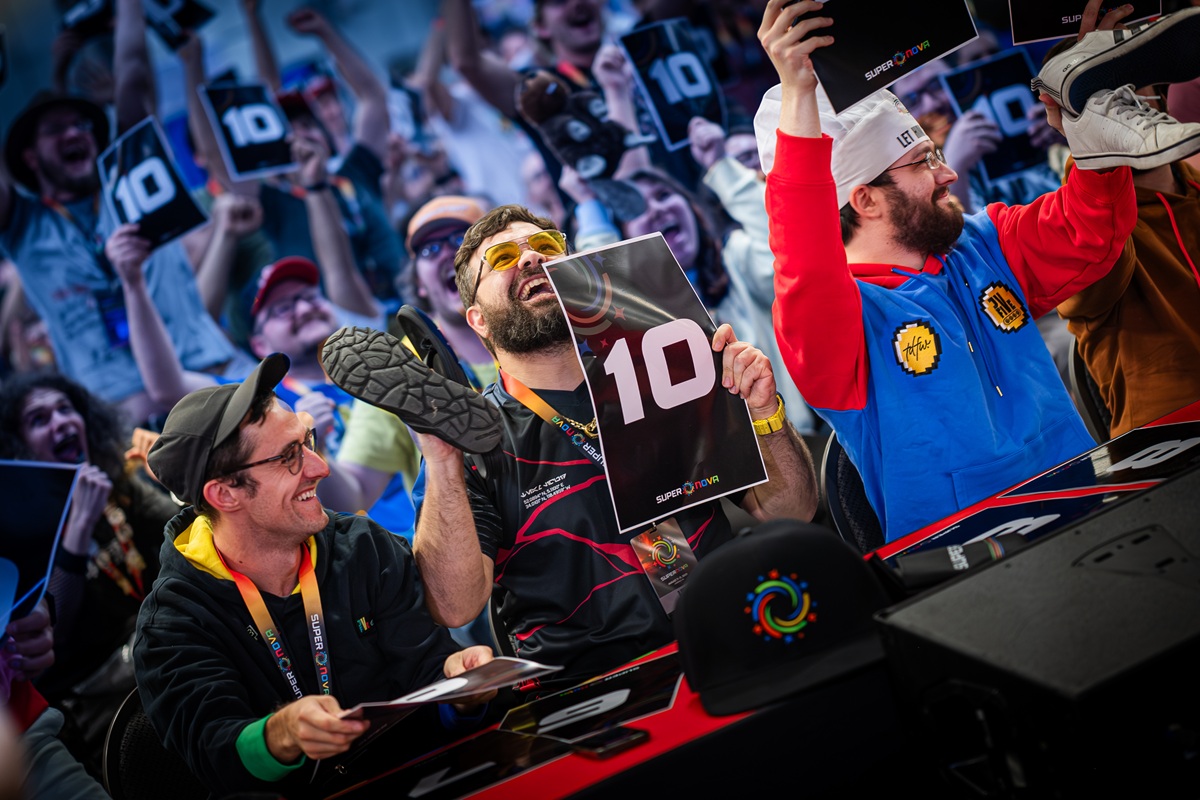
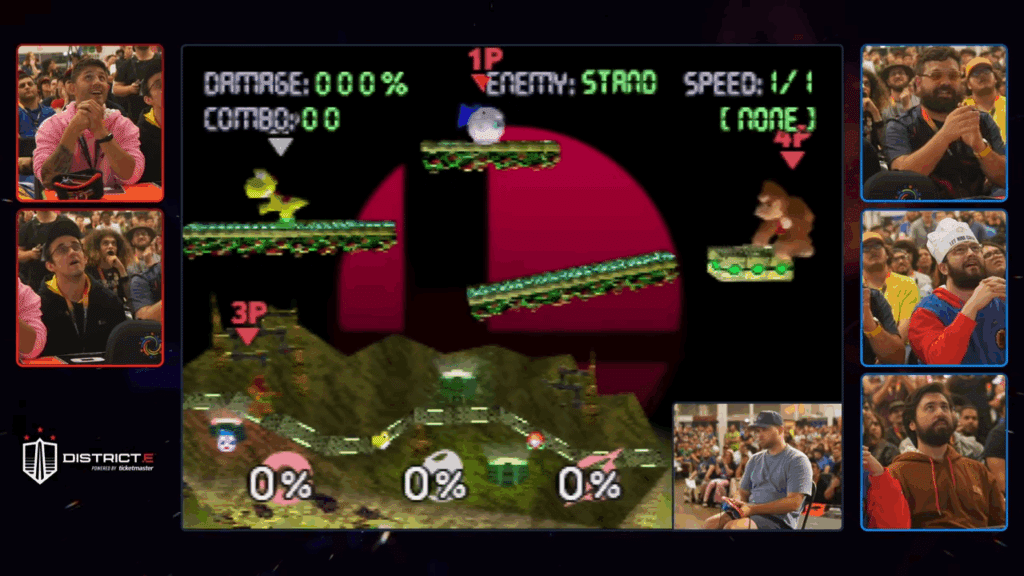
Supernova 2025 is one of the largest Super Smash Bros. events of the year and pros from all over the world are flying to Virginia to compete in stacked Melee and Ultimate tournaments. But if that’s what you came to watch, you’re missing the point.
The best thing to watch all weekend at Supernova is the Combo Contest.
What is the Combo Contest?
The Combo Contest is a Smash 64 event in which players compete to create the longest and most complex combos. It’s not a 1v1. Instead, players use Smash’s practice mode to set up various items and character placements in attempt to pull off some wild combos.
If they don’t hit the opponent or the opponent doesn’t land exactly right, the combo could be dropped. This means the combos require insane accuracy, timing, strategy, and planning. Players are given a few times to try and make the combo work but it’s obviously more impressive if the combo works on the first or second try.
There are a panel of judges, consisting of other Smash players, that will rate the combo a 1 through 10. Players are eliminated from a round if they score the lowest, leaving the top competitors to show off multiple combos to keep progressing.
The first-ever Combo Contest was held at Super Smash Con (the former name of Supernova) in 2016. Since then, many big names have emerged in this niche scene, including Prince, Taco, and Huntsman. They’ve become known for their over-the-top creative and high-tech strategies but also their dedication.
The Combo Contest is barely watched compared to games like Melee and Ultimate. It’s on a Thursday when some fans haven’t even arrived yet. The prize money isn’t anything to brag about and there’s only one tourney a year anyway. This is all about the love of the game, grinding all year to come up with these crazy combos that only a few people will see. But that’s what makes the Combo Contest so great — it’s solely for love of a game that came out in 1999.
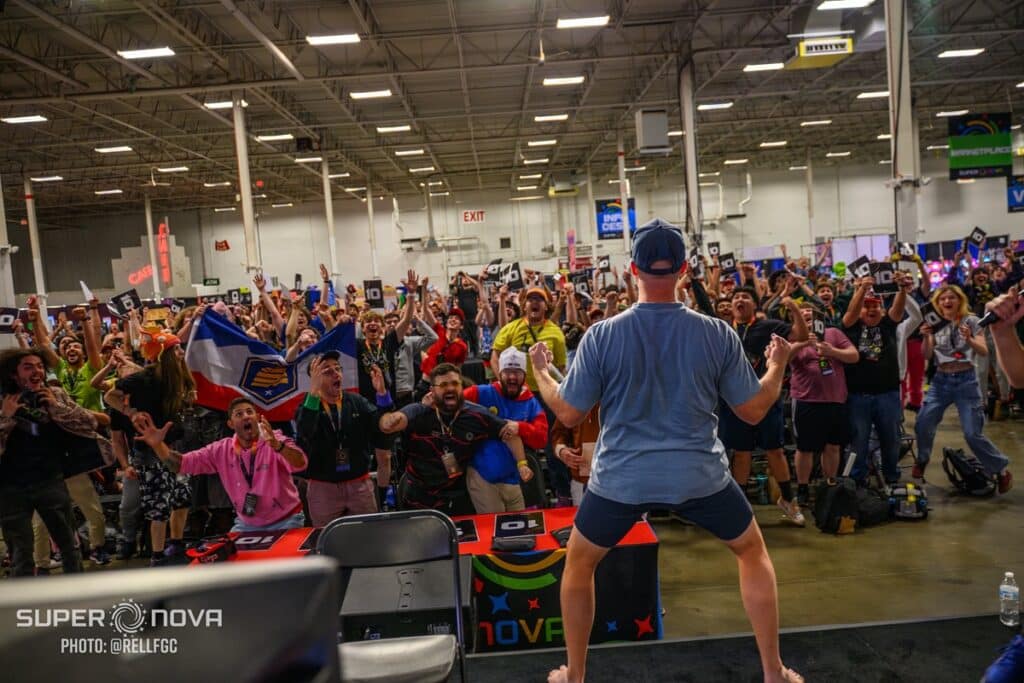
Huntsman Uses High IQ Strats and Feet to Secure the Win
Image Credit: Supernova / @RELLFGC
When I went to Supernova in 2023, I was disappointed that Prince hadn’t returned. Often considered the best-of-the-best at combos, the Japanese N64 player had once signed my shirt at a past Supernova event, which, if anything, made the shirt even less valuable. But to me — priceless.
But I forgot all about Prince when Huntsman took out his grippers on stage and started using his toes to control a second character for a crazy combo the stream unfortunately didn’t catch. The past few years, players have been trying to make the combos more complex with gimmicks, but this was just next-world entertainment.
This year, Huntsman walked onto the stage and immediately took off his socks. But what made this even wilder? Huntsman was controlling three characters — one controller in his left hand, one in his right, and one on the ground with his toes. Would he pull it off?
Image Credit: VGBootcamp
The combo was so complex that the commentators couldn’t comprehend what Huntsman was even trying to accomplish. Why was Donkey Kong made invincible with a star? What was Samus going to do? In the end he almost accomplished what would have been one of the craziest combos ever attempted, but it didn’t quite land. (If you want to see it completed, check this video out.)
Luckily, Huntsman had one more chance to show off yet another combo and this one is now considered one of the best combos ever to be done. Once again, Huntsman took out the toes to have a 3v1. He used Yoshi, Samus, and Falco — and some well-placed items — to land a complex 13-hit combo on Link. It’s wild to think he was able to use one hand to throw two well-timed and well-aimed eggs along with everything else he pulled off perfectly.
Huntsman’s final combo was just as clean and complex, landing things that even the commentators couldn’t understand. The reaction times and extremely high IQ strats were just mind blowing to common folk like me. Otherworldly execution. It was a no-brainer that Huntsman took the title once again.
Honestly, it gives me chills to think of these guys grinding to perfect these insane combos throughout the year, perfecting a craft that almost nobody knows is even happening. This is what the FGC lives for. If you didn’t watch this year, you really should. These are the unsung heroes of the Smash community, keeping a game from the 90s alive and doing it just for the love of Smash.
This is the culture of Smash — and you’re not watching. But you should be.
The Escapist is supported by our audience. When you purchase through links on our site, we may earn a small affiliate commission. Learn more about our Affiliate Policy
I have another question that highlights the importance of correctly wording card text and/or the need to read the text of previous editions of many Magic cards (and not only the available Oracle Text).
Let’s suppose Active Player has a Wardscale Dragon in play from several turns, and it’s the only creature in play.
It’s the draw phase, and immediately after drawing the card, the Defending player –
who has 4 life remaining only –
decides to play his last Magic card:
specifically, a reprint from one of the more recent sets.
Defending player knows perfectly the text of the White Dragon card the Active player owns, and therefore hopes to save himself by casting Fog before the Attack phase,in order to avoid it,since he can’t cast no more spells during the attack phase
(before damage is assigned).
He believes everything is fine, because the recent card text doesn’t mention the need to cast Fog during the Attack phase.
So, he tries to prevent any damage while also evading the protection from spells provided to Active Player by the White Dragon.
The Active player, however, shows to the Defending Player a Fog card from the very early Magic sets, which clearly states that a Player must:
“play [Fog] any time before attack damage is dealt.”
This old card text admits that Fog has to be cast during the Attack Phase (before damage is assigned).
The defending player, however, still complains, pointing out the complete absence of a specific Fog Ruling in its latest reprints.
How do you make pie in Grow a Garden? Whether you have a varied garden or curate only the coolest crops, you’ll have a way to farm Grow a Garden cooking event rewards with these Roblox Grow a Garden pie recipes.
Making pie in Grow a Garden is one of the more complex recipes in the game.
Because of how many ingredients are needed, getting a normal or rare pie seems impossible. And with weight contributing to better rewards, these Grow a Garden recipes are perfect for getting you a heavy pie to fill his belly.
Rarity
Easy Pie Recipe 1
Easy Pie Recipe 2
Heavy Pie Recipe
With Craving
Pie
Not discovered
Not discovered
Not discovered
Not discovered
Rare Pie
Not discovered
Not discovered
Not discovered
Not discovered
Legendary Pie
Pumpkin, Moon Melon
Pumpkin, Pineapple
Pumpkin, Giant Pinecone, Corn, Apple
Not discovered
Mythical Pie
Pumpkin, Beanstalk
Pumpkin, Ember Lily
Beanstalk, Coconut, Coconut, Coconut
Tomato, Corn, Elder Strawberry, Sugar Apple, Ember Lily
Divine Pie
Coconut, Beanstalk
Sugarglaze, Beanstalk
Bone Blossom, Crown Melon, Fossilight, Sugar Apple, Sugar Apple
Any Prismatic (3), Tomato, Corn
Prismatic Pie
Bone Blossom (2), Coconut
Bone Blossom (4). Sugar Apple, Coconut
Bone Blossom (4), Pumpkin
Bone Blossom (3), Sugar Apple, Sugarglaze
To make a pie in Grow a Garden, you’ll need apples, pumpkins, and corn. You’ll also need a Giant Pinecone for some reason. Pumpkins appear to be the perfect base for a pie. Experiment by tossing similar fruits and vegetables in with a pumpkin, and you might just make a pie.
If you’ve been around the garden for a while, you’ll have a much easier way to make pies in Grow a Garden-the Moon Melon. Stick one of these in the pot after a pumpkin and you’ll have a GaG pie recipe with only two ingredients.
Is the Prismatic Pie recipe worth it?
Unless you happen to have bone blossoms, the prismatic pie recipe isn’t likely to be worthwhile. Want to try anyway? Toss these crops into the can by the big pig:
At matchpoints, they’re vulnerable, we’re not. Right hand opponent opens one heart. I would make a (big takeout) double with the following: ♠AKT852 ♡65 ♢AK86 ♣ J. I havd 15 high card points and “distribution” will take me over 16. Over a likely two heart bid from the left hand opponent, I bid two spades.
But suppose my spades and diamonds were reversed sot that I have, ♠AKT8 ♡65 ♢AK8652 ♣ J. Now I would need to go to three diamonds over two hearts if I doubled first.
Should I therefore overcall two diamonds directly? Or do I still have enough to make a “big” double? Or could I possibly have too little to double before bidding spades with the first hand?
I’m sometimes embarrassed to admit it, but I scroll TikTok when I’m bored. TikTok is definitely full of cringe challenges, scripted couple content, annoying culture-stealing dances… But I can often tolerate most of it — most of it. There is one thing I can’t stand: Marvel Rivals’ gooner ads.
Every so often I’ll be mindlessly scrolling past performative men telling women to stop dating, people “surprising” waiters by speaking a different language… All the horrors of quasi-influencers. But then I’ll get a random animated ad featuring a Marvel superhero in a revealing swimsuit, her butt right in my face, and I’ll see it’s from the official Marvel Rivals account.
Welp, it’s time to stop scrolling.
Marvel Rivals Has Turned Into a Gooner Game
I think Marvel Rivals is getting desperate.
When Marvel Rivals came out last year, everyone immediately retracted their Overwatch 2 comparisons and decided it was the only hero shooter they were gonna play. For a while, it’s all my friends talked about and I even tried the game out myself so I could try to relive the glory days of the original Overwatch.
But I quickly got bored. The game felt sorta stale and repetitive, with many of the heroes not feeling very impactful and many overlapping abilities. It’s still a pretty good shooter game, don’t get me wrong, but there’s a reason that the player base has started to decline (though not by much).
Perhaps trying to get ahead of that inevitable drop in players, NetEase Games released revealing skins (for both sexes at least). At first, it was just a few. Just some cheeky one pieces. But as NetEase saw the response from its most thirsty players, it decided to lean into its characters’ assets and raise the skill ceiling for its gooner skins.
At this point, it’s gone from showing some buns beneath a cape if you stare at a certain angle to full-on bathing suit skins. The Psylocke bathing suit that basically gives her a wedgie in the front and back and the Loki banana hammock that shows all eight of his abs and his bulge… Diabolical.
But what really makes this worse is NetEase’s treatment of the skins. The ads with Psylocke’s butt right in my face are just crazy work. But it’s not only TikTok that gets this treatment from developers. On Reddit, there’s an image of Invisible Woman’s booty in the Malice skin with the caption: “When your teamwork is so tight, even Invisible Woman shows up.” Really NetEase?
I’m not offended that the characters are being sexualized really, although that’s clearly never really that great from a predominantly male community. We have Loki so Marvel Rivals really said, “Let’s just equally sexualize all Marvel heroes.” Rocket Raccoon next? But no, the real issue is how desperate NetEase is pushing it.
It’s just sad to see a game market itself more for its revealing skins rather than its gameplay. If you want to say “the world kept spinning” and “there are bigger problems” I’m not gonna argue. But some of us can care about multiple things just because they’re cringe and show a game’s desperation to be relevant.
I’m rooting for you, Marvel Rivals, but maybe focus more on your repetitive gameplay issue instead of getting sex-deprived teens to pay money to see animated butt cheeks.
The Escapist is supported by our audience. When you purchase through links on our site, we may earn a small affiliate commission. Learn more about our Affiliate Policy
Like all permanents, it can become tapped. For instance, if you attack with Sarkhan, the Dragonspeaker after using his first ability and he survives, the next turn you will have a tapped planeswalker.
110.5. A permanent’s status is its physical state. There are four status categories, each of which has two possible values: tapped/untapped, flipped/unflipped, face up/face down, and phased in/phased out. Each permanent always has one of these values for each of these categories.
In the previous scenario, Sarkhan will untap during your untap step. However, there are cards that require you to tap a permanent you control, like Gene Pollinator‘s ability, which can be activated during your upkeep, causing your planeswalker to be tapped during your main phase.
But that doesn’t really matter for loyalty abilities; there is no rule preventing activating loyalty abilities on tapped planeswalkers. This is all what the rules say:
306.5d Each planeswalker has a number of loyalty abilities, which are activated abilities with loyalty symbols in their costs. Loyalty abilities follow special rules: A player may activate a loyalty ability of a permanent they control any time they have priority and the stack is empty during a main phase of their turn, but only if none of that permanent’s loyalty abilities have been activated that turn. See rule 606, “Loyalty Abilities.”
Rule 606 doesn’t mention anything about being (un)tapped either.


Published: Aug 9, 2025 05:05 pm