Anime Saga Roblox doesn’t go in-depth on all controls in the game so we’re here to help. Especially for console controllers since System Arts Studio introduced controller support. Speaking of which this guide will be useful even if you’re playing with a controller on PC. Here’s our Anime Saga controls and keybinds guide for all platforms.
Anime Saga PC Controls
The PC controls in Anime Saga are pretty straight forward and though you can’t customize them they’re quite easy to grasp and use. It’s all about the three ability buttons combined with the Dodge and switch character function. Here are all PC controls:
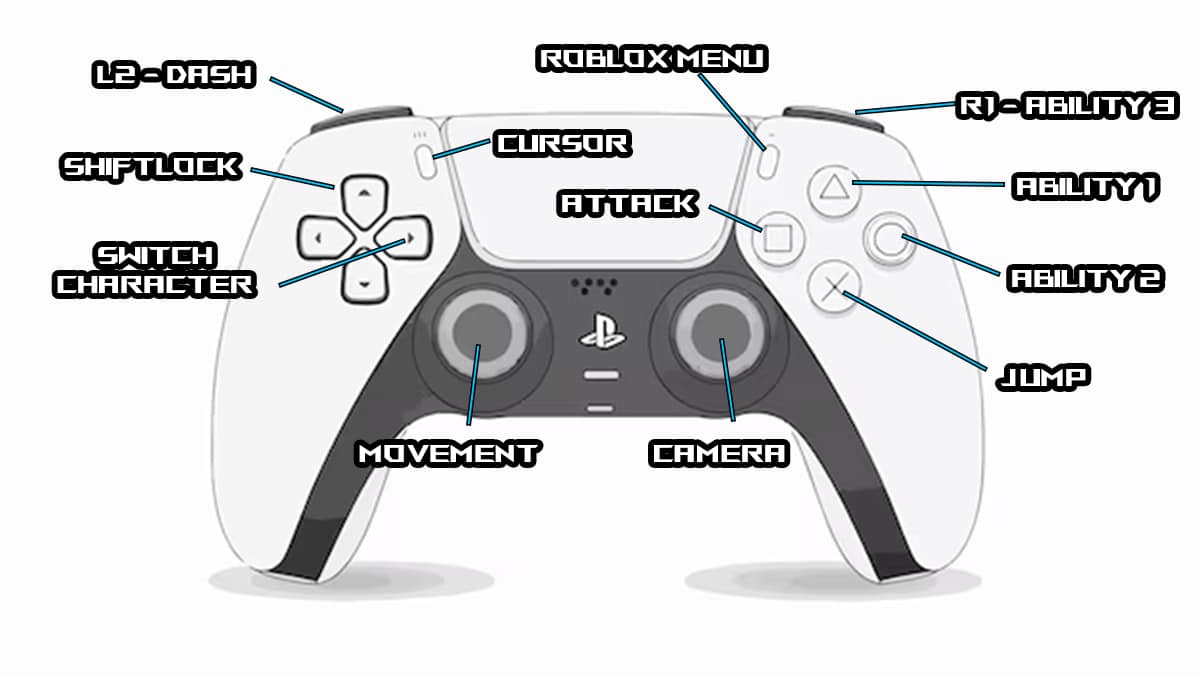
Anime Saga supports PlayStation controllers on PC so you can plug-n-play if you have one. In fact, I recommend using a controller since the game is very smooth with a controller with the camera locked. As you can see in the image above, PlayStation controls are pretty straight forward. You can’t customize them but there’s not a lot of keybinds to keep track off. Note that the third ability is on R1 and not the four face buttons on the right.
Anime Saga Xbox Controls
Image by The Escapist
Anime Saga also supports Xbox controllers. The Xbox controls for the game are similar to the PlayStation ones as you can see in the image. They follow the same pattern with the Ability 3 button being on RB instead of the face buttons.
How to Change Keybinds in Anime Saga
Unfortunately, you currently cannot change controls and keybinds in Anime Saga. This goes both for the PC keyboard controls as well as PlayStation and Xbox controllers you might use. There is a basic Settings menu in the game so System Arts Studio might allow you to customize keybinds in the future.
That’s it for my Anime Saga controls and keybinds guide for PC, PlayStation and Xbox. Check out our Anime SagaUnit and Trait tier list for some expert game play tips.
The Escapist is supported by our audience. When you purchase through links on our site, we may earn a small affiliate commission. Learn more about our Affiliate Policy
In the current update of Dead Rails, the developers introduced a liquid system that lets players mix different liquids to create Potions. You can then drink these Potions to gain various buffs and perks that will help you on your journey. In this guide, I’ll walk you through how to get all Potions in Dead Rails, where to find the ingredients, and what each potion does. Whether you’re looking for healing, fire damage, or full-on necromancy, this is your starting point.
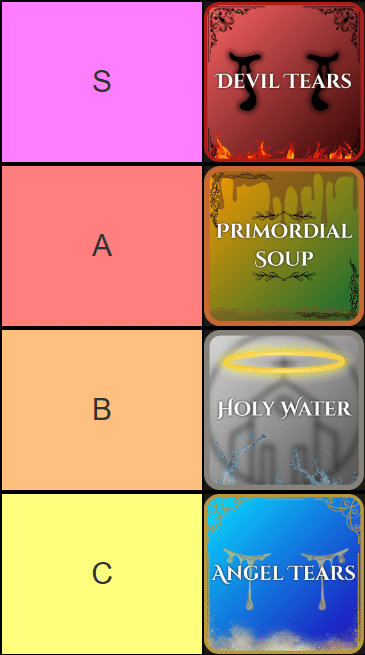
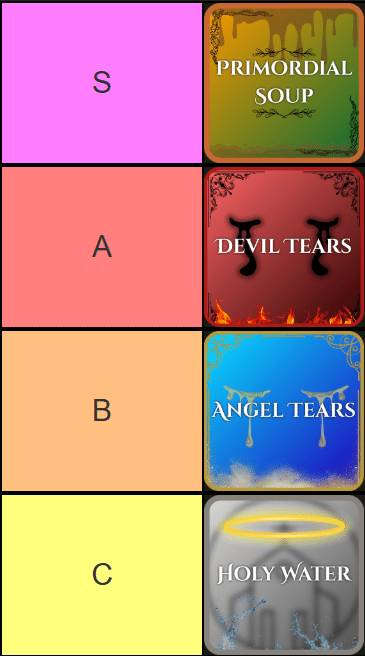
All Potion Effects and Recipes in Dead Rails
Few, but very strong.
The table below lists all the potion recipes in Dead Rails, along with the ingredients you’ll need to make them. Crafting is simple: combine the right substances on the ground, then use an empty Glass Bottle to scoop up the mixture. Be quick, as they evaporate fast once exposed to the air.
Potion
Potion Recipes
Effect
Unicorn Blood + Blood
Angel Tears can heal all injuries almost immediately.
Unicorn Blood + Kerosene
Once ignited, it rapidly engulfs the entire area in flames. Best used by the Arsonist class.
Unicorn Blood + Water
It very quickly kills all enemies around you with green flames, while allied players remain unaffected.
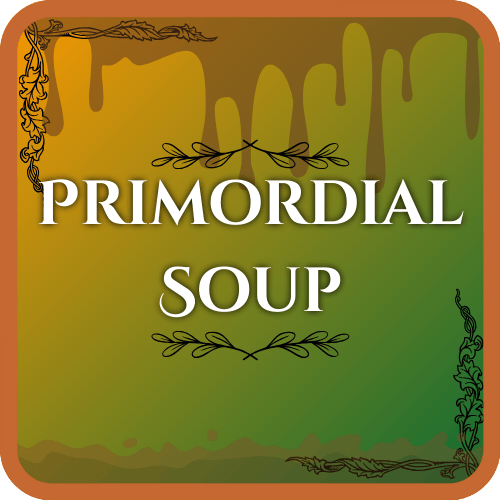
Unicorn Blood + Milk
Corpses soaked in Primordial Soup will come back to life and fight on behalf of the player.
As we can see here, all Potions in Dead Rails require you to have Unicorn Blood. Once you have Unicorn Blood, you will have to combine it with different liquids to produce different Potions. We will explain in detail how to acquire all of these materials and liquids in the section below.
How to Make Potions in Dead Rails
There are four potions you can find in Dead Rails: Angel Tears, Devil Tears, Holy Water, and Primordial Soup. To make them, you’ll need to mix different ingredients and store the result in Glass Bottles, which you can collect while exploring.
Some key ingredients you’ll need are Water, Milk, Blood, Kerosene, Zombie Blood, and Unicorn Blood. Most of these can be found while scavenging, though Zombie Blood and Unicorn Blood must be collected from the bodies of the undead or unicorns. Here is a list of all ingredients:
Ingredient
How to Get
Water
Obtained in a bottle during Rainy Weather.
Milk
You can get it by searching houses in the Urban Town Areas or by choosing the Milkman Class at the start.
Blood
You can collect it by killing non-zombie NPCs and drawing their blood.
Kerosene
You can extract Kerosene by carefully draining it from a Molotov.
Zombie Blood
Obtained by killing any zombie and draining its blood.
Unicorn Blood
You can get it by either striking a liquid puddle with lightning or by collecting blood from a dead unicorn.
To collect liquids in Dead Rails during draining or other specific events, you’ll need a Glass Bottle. This new item lets you store liquids in the game. You can find Glass Bottles all over the map, either empty or already filled with something. Just pick them up and toss them in your sack, then use them whenever you need. Once you’ve got empty bottles, just head over to any liquid puddles like Unicorn Blood, Normal Blood, or Rain, and press the LMB to fill them up. When you want to pour the liquid out, simply press F to spill it onto the ground as puddles.
Dead Rails Potion Tier List
Below is a Tier List of all Potions in Dead Rails, ranked by usefulness and split into the best for solo runs and the best for group gameplay. It goes well with our DR class tier list.
Best with a Group
Best when Alone
Angel Tears are, sadly, just a big Heal. They do not offer much more than that, and you can already heal with bandages. Holy Water is good, but its effect is just a worse Devil Tears, so it is near the bottom. The Primordial Soup is amazing for dealing with hordes of mutated and non-regular zombies, alone or with a group. And lastly, the Devil Tears are amazing for destroying large groups of zombies fast, and the Potion itself is not hard to craft.
And that is all for my Dead Rails Potions Guide. Check out our Dead Rails Codes for goodies that can help you get potions faster.Lastly, check out our challenge guide for DR.
The Escapist is supported by our audience. When you purchase through links on our site, we may earn a small affiliate commission. Learn more about our Affiliate Policy
May 23, 2025: We looked for WWE 2K25 codes and verified our list.
What are the new WWE 2K25 locker codes? It’s all heating up in the ring in WWE 2K25 as players prepare for another fiery year of MyFaction. Assemble your roster of legendary wrestlers throughout the ages as you travel the globe, searching for worthy competitors.
These WWE 2K25 codes provide you with helpful rewards for MyFaction, ensuring you have everything needed to create an all-star lineup of wrestlers. MyFaction can be quite the slog if you’re relying entirely on in-game rewards, so it’s always nice to get an instant upgrade to your squad by redeeming codes in the sports game. You can find the latest WWE 2K25 codes below, along with instructions on how to redeem them.
Active WWE 2K25 codes
Here are the active WWE 2K25 codes:
WMANIA41PACKS – 2x WrestleMania 41 Vol 2 Packs
CHACHING12500 – 12,500 VC
Expired WWE 2K25 codes
SINCITY41WM
DIRTYDOMMASKED
GETREADY4WM
ROADTOWM41EU
ELITEROCK2K25
WELCOMEWWE25
How to redeem WWE 2K25 codes
Once you’ve got your WWE 2K25 codes ready, here’s what you need to do to redeem them:
Launch the game and head to the MyFaction menu from the home screen.
Once you’re in the ‘Live’ tab, select the ‘Locker Codes’ icon.
Type out your code into the redeem box and hit ‘Enter’ to claim the rewards.
If your code contains any packs, go to the ‘Store’ tab and select ‘Unopened Packs’ to view them.
Where to find WWE 2K25 codes
When it comes to finding WWE 2K25 codes, much like 2K’s other popular sports series, codes are usually given out on social media platforms. If you want to seek them for yourself, you should check the WWE Games accounts on X and Facebook. That being said, it’s easier to keep your eyes peeled on this page, so do yourself a favor and keep it bookmarked to stay up to date.
That’s everything you need to upgrade your MyFaction squad using WWE 2K25 codes. Take a break from fighting in the squared circle by checking out our list of the best simulation games. If that doesn’t cut it for you, why not utilize the skills that you’ve earned by sparring against wrestlers in the ring and use them in the best fighting games.
May 15, 2025: We checked for new Throne and Liberty coupon codes.
What are the new Throne and Liberty coupon codes? Getting a coupon code can help you along in your MMO journey, and fortunately, NCSoft drops coupon codes for the game from time to time, awarding all sorts of in-game goodies that you can use to improve your character.
The Throne and Liberty coupon codes we’ve seen so far have offered all sorts of rewards, including growth stones, skill books, crafting materials, and more. NCSoft has given these out during livestreams and live meets, so expect to see more codes for the MMO game when major events and update streams occur. We’ve collated all the codes we’ve found so far below.
New Throne and Liberty coupon codes
There aren’t any active Throne and Liberty coupon codes. We expect new coupons to arrive during update livestreams and other major game-related events, though NCSoft has yet to confirm fresh rewards are on the horizon.
In the meantime, keep an eye on the Throne and Liberty Twitch drops to redeem even more freebies just for watching your favorite streamers.
Expired codes
hauntedharvest2024
DCAMA920
DISCOPARTY09
FARM DUNGEON
TRAITFORALL
PLAYREWARDINLIVE2
SKILLFORALL
GEARGIFTINLIVE2
WELCOME622
THXSEVERY1
NICETOMEETUP
TOTLLOVER
MEETUPBYE
MEETUPS2
CUSOONAGAIN
WEGOHIGHER
PLAYTLTHX
BLESS4ALL
BLESSINGOFSOLISIUM
THANKS100DAYS
MOREGROWTHSTONE
MORESKILLBOOK
MOREWEAPON
100DAYSFOOD
How to redeem Throne and Liberty coupon codes
Redeeming Throne and Liberty codes is incredibly simple, as getting to the redemption screen only requires a few clicks when you’re in-game. Here is how to do it step-by-step:
Open the main menu (the icon with nine dots in the bottom right corner of the game’s UI).
Four square icons will appear above the main menu icon, the top one being ‘Coupon’. Click it.
Manually enter or paste in your coupon code to redeem it.
And those are the latest Throne and Liberty coupon codes. To make sure you get off on the right foot, check out our comprehensive Throne and Liberty weapon tier list to find out which combinations will serve you best in Solisium.
What is the next Monopoly Go event? With so many limited-time events in Monopoly Go, it can be hard to keep track of the rewards you can get your hands on. Monopoly Go events can last anywhere from a few hours to a week, so bookmark this page as we’ll keep it regularly updated with the next events and their start and end dates.
Monopoly Go is the latest online board game sweeping the globe, but completing all of these events won’t be easy without some free Monopoly Go dice links, so check out our daily updated guide for some freebies and rewards before you get started on the next Monopoly Go tournament.
Current Monopoly Go events
Here are the Monopoly Go events active right now:
Tatooine Nights: Land on corner squares to collect event tokens and reach milestones for dice rolls, Peg-E Tokens, sticker packs, and more. Event ends Friday, May 9, 2025 at 10am PDT / 1pm EDT / 6pm BST.
Stampede Sprint: Land on Shutdown and Bank Heist tiles to earn tokens and reach milestones for dice rolls, sticker packs, and more. Event ends Saturday, May 10, 2025 at 10am PDT / 1pm EDT / 6pm BST.
Tatooine Treasures: Use Blaster Tokens to excavate treasures and reach milestones for dice rolls, sticker vaults, and more. Event ends Sunday, May 11, 2025 at 12pm PDT / 3pm EDT / 8pm BST.
Star Wars GO: You have until Wednesday, July 2, 2025 at 9am PDT / 12pm EDT / 5pm BST to complete the current Monopoly Go! sticker album.
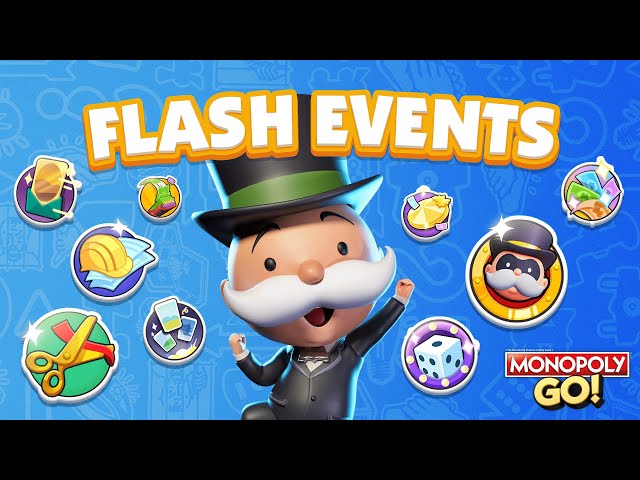
Daily Flash events: Mega Heist, Cash Boost, Rent Frenzy, Roll Match
Next Monopoly Go events
Here are the next Monopoly Go events:
Daily Flash events: Free Parking, High Roller, Mega Heist, Builder’s Bash.
All Monopoly Go events and tournaments
There are so many Monopoly Go events and tournament types that it can be difficult to wrap your head around at first. We’ve got all of the information on every event or tournament that could pop up, so you’re prepared to win big.
Partners Event –The Partners Event is one of Monopoly Go’s biggest social events where you can select friends to be partners to build structures on your board and win prizes. After reaching the fifth board, you are eligible for the Partners Event. To build and upgrade attractions, you’ll need to spin a wheel and gain points. To spin the wheel, you’ll need to collect event tokens that work as currency, for example, the recent puzzle pieces. Once you create a partnership, you cannot change partners, so choose carefully!
Golden Blitz – This event was introduced for players to trade gold stickers. You can trade up to five per day that are featured in the event. You cannot trade gold stickers outside of this event. Find out when the next Monopoly Go Golden Blitz event is in our guide.
Tournaments – Tournaments are limited-time events during which you’ll compete against other players in order to earn a limited-time currency and earn rewards. Each tournament will earn currency differently, so check the in-game event icon to be sure of the specifics.
Daily Treats – These are rewards you can earn by playing the game daily. Get a longer login streak for bigger rewards.
Quick Wins – These daily objectives give you progress towards a weekly reward when completed. You’ll hit different milestones along the way, which also gives its own reward. You can check your progress by tapping the ‘Wins’ button in the bottom left of the screen.
Community Chest – Every time you land on a Community Chest tile, you will add money to the chest in the middle of the board. To open the chest, you must invite friends to join the game. When enough friends have accepted your invitation, you can open it with your friends, and all enjoy the rewards.
Free Parking – This event is very special and only happens once every few days, at seemingly random times. As you go around the board, free dice rolls will begin to stack up. The next time you land on the Free Parking tile, all of those free dice rolls will be yours, along with a load of cash.
Milestone – Milestone events are limited-time only and give different objectives to you. Achieving these objectives grants huge rewards. These events are different from one to the next.
Peg-E Prize Drop – These events last for a few days. Collect tokens from playing the game as normal and then drop the tokens from the top of the board for a chance to win prizes. The more often you play, the more progress you make towards filling the bottom bar for even more rewards. Using a multiplier is key to progressing the Prize Drop event quickly.
Monopoly Go Flash events
These events are shorter, and appear throughout the day for just a few hours, a few different Flash Events could be active whenever you log in.
Sweet Partners – Complete up to four sweets with friends to claim the grand prizes and a bunch of Valentine’s rewards.
Landmark Rush – Every time you complete a landmark in this limited-time event, you will earn additional rewards.
Board Rush – Every time you complete a board in this limited-time event, you will earn additional rewards.
Bank Heist – Landing on a Railroad tile triggers this minigame. Choose a vault door and another until you’ve matched three symbols. Depending on the symbols matched you’ll either win a small heist, large heist, or jackpot.
Rent Frenzy – During this limited-time event, you’ll have more rent targets on the board, meaning you will earn more rent income.
Cash Grab – This minigame simply requires tapping the floating notes on the screen to earn Monopoly money.
Cash Boost – During this limited-time event, cash earned from simply playing the game as normal is doubled. This includes rolling, shutdowns, hists, and more but does not apply to cash earned from live events.
Property Wheel Boost – Every time you complete a set and land on one of the hotel tiles, you will have the chance to spin the wheel twice in this limited-time event.
Past Monopoly Go events
These events have already run their course in Monopoly Go, but they may reappear in the future:
Riches on Set
Stunt Stars
Sticker Boom
Aqua Partners
Pearly Cove
Harmony Hustle
Trident Toss
Atlantean Adventure
Shell Showdown
Spring Awakening
Metro Rush
Juggle Jam
Desert Drift
Midnight Drive
Rue de La Pace
Urban Photo Finish
Tycoon Racers
City Racers
Thorny Triumph
Captain’s Quest
Roll Treasures
Barrel Roll
Paddy’s Partners
Peg-E Roll Drop
Roll Treasures
Juggle Jam
Roll and Conquer
Tycoon Empire
Space Sprint
Jurassic Journey
Nine Lives Luxuries
Seasonal Splendors
Tycoon Empire
Tycoon Fair
Riviera Riches
Vacation Voyage
Tycoon Cookout
Firework Fortunes
Chef’s Journey
All You Can Win
Ecological Escapade
Showtime Splendor
Fortune Footrace
Make sure to check out other free PC games if you’ve had your fill of Monopoly Go for now, or check out some great upcoming games that we think you should be keeping an eye on.
How does being an Oblivion Remastered vampire work? We get it, sometimes you need to add a little sparkle sparkle to your life in Cyrodiil. And what better way is there to do that than to inherit the skin (and powers) of a supernatural killer?
Whether you’re looking to become a vampire in Oblivion Remastered or need to cure vampirism before you have to cancel that sunny holiday to Hammerfell in the RPG, we’ve got everything you need to know about the affliction. To help you make that big decision, we’ve even broken down what makes becoming a vampire in Oblivion worth it, as well as the pesky drawbacks (silver) bolted on.
How to become a Vampire in Oblivion
You become a Vampire in Oblivion through the Porphyric Hemophilia disease.
This is contracted by taking damage from an afflicted person or creature, such as vampires in dungeons like Memorial Cave southeast of the Imperial City, Crowhaven northwest of Anvil, or one of the many named forts you’ll find infested on your travels.
One easy location is in the Imperial City itself. Head down into the Imperial City sewers through the town’s many floor grates, follow the tunnels until you arrive under the arena’s Bloodworks, and you should find two vampires there.
You’re also given the open opportunity to become a vampire by Vicente Valtiera at the end of the Dark Brotherhood questline.
The effects only kick in once you rest in a bed 72 hours after the event. This makes dealing with it early much simpler than leaving the wound to fester.
How to cure Vampirism in Oblivion Remastered
To cure Vampirism in Oblivion Remastered, you have two options depending on the state of the disease. You can either consume an item with Cure Disease (or visit a shrine) within 72 hours of the bite or, if you’ve already succumbed to it, by speaking with Raminus Polus at the Arcane University in Skingard and completing the lengthy Vampire Cure questline.
The Cure Vampire questline is a long fetch quest involving five empty Grand Soul Gems, Bloodgrass, Garlic, Nightshade, the Blood of an Argonian, and the Ashes of Hindaril. Here’s how to get each item:
Item
Location
Grand Soul Gems (x5)
Sometimes found in dungeon loot (when above level 11) or stolen from display cases.
Bloodgrass (x2)
Tall red grass is commonly stocked at Alchemy stores or found growing by Oblivion gates.
Garlic (x6)
A common sight in houses or sold at shops and inns
Nightshade (x5)
Found around the West Weald or bought at the Alchemy shop in the Imperial City.
Argonian Blood
Stab an Argonian with the Enchanted Dagger.
Ashes of Hindaril
Kill Hindaril in Redwater Slough.
After turning in the ingredients to complete the quest, Melisande will provide you with the Cure for Vampirism potion. Use it from your Potions tab to be cured, becoming immune to Vampirism in the process.
While you can contract the Porphyric Hemophilia disease after being cured this way, it acts like a standard debilitating debuff and can be removed through normal means. Sleeping while afflicted won’t turn you back into a Vampire.
Is it worth becoming a vampire in Oblivion?
Becoming a Vampire in Oblivion has various benefits and drawbacks, like resistance to damage, bonuses to Strength, Willpower, Speed, Acrobatics, Athletics, Destruction, Hand to Hand, Illusion, Mysticism, Sneak, access to unique skills, and a chronic aversion to sunlight.
These pros and cons can fluctuate, with the benefits growing stronger the longer you go without feeding, though amplifying the cons of being a servant of the night as well. Here’s a breakdown of the pros and cons:
Oblivion Remastered Vampire pros
Time between feeding
Skills/Attributes
Normal weapon resistance
Ability
Ability effect
1 day (25%)
+5
5%
Hunter’s Sight
Applies Night Eye (30 seconds) and Detect Life (100ft for 30 seconds)
2 days (50%)
+10
10%
Vampire’s Seduction
Applies Charm for 50 points for 20 seconds once per day.
3 days (75%)
+15
15%
Reign of Terror
Applies Silence for 60 seconds and Demoralize (on level <7 target) for 60 seconds once per day.
4+ days (100%)
+20
20%
Embrace of Shadows
Night Eye for 90 seconds and Invisibility for 180 seconds.
Oblivion Remastered Vampire cons
Time between feeding
Fire weakness
Damage from the sun
1 day (25%)
20%
0 HP per second
2 days (50%)
30%
1 HP per second
3 days (75%)
40%
4 HP per second
4+ days (100%)
50%
8 HP per second
Given you only take damage from the sun at Stage 2 of hunger, you can maintain some of the benefits of being a Vampire in Oblivion while maintaining the ability to sit in the sun by feeding every day.
Feeding once will return you to Stage 1 (25%) no matter which stage you’re currently on.
Becoming a vampire doesn’t unlock any unique quests outside of the one needed to cure you.
You won’t attract unwanted attention from anyone for being a vampire, but you will need to limit your exposure to the sun at higher levels. This can make exploring Cyrodiil (and taking on quests) uniquely difficult.
Where are the best places to feed as a Vampire in Oblivion?
If you’re looking to avoid making a spectacle of your need to consume the blood of other humanoids, it’s best to target places where hosts frequently sleep.
Camps and inns make feeding easy for this reason. The unlucky victims are unlikely to notice, witnesses are scarce, and you won’t have to worry about the sunlight.
If you can’t handle the thought of completing a lengthy sidequest to right the wrong of becoming a vampire, take a break with the best RPGs on PC right now.
With Chapter Six, Season Three, Fortnite is reliving the thrill of the Galactic Battle with Star Wars as its central theme. Despite being a short season, popular characters from the franchise are expected to arrive throughout the month-long celebrations.
Epic Games has finally revealed the roadmap for this season, including all the characters and the weapons that will arrive over the next few weeks.
What to Expect in the Fortnite Chapter 6 Season 3 Galactic Battle Roadmap
Galactic Battle is expected to be the shortest season so far, coming to a close in a little over a month. Here’s what Epic Games is adding to the island in the forthcoming updates:
May 8
Han Solo, Luke Skywalker, and Princess Leia skins will make it to the Item shop.
Mace Windu Holograms will give you the Purple Lightsaber and teach you the Force Pull ability.
Darth Maul Holograms will give you the Red Lightsaber and teach you the Force Throw ability.
May 15
Chewbacca is set to make a comeback to the island along with the Wookie Bowcaster and the CA-87 Jawa Scatter Blaster.
May 22
Mandalorian NPCs will join the battle. You will be able to recruit a Heavy, Scout, Supply, or Medic Mandalorian to your team.
Heavy Jetpack returns along with the Amban Sniper Rifle and the new dual-wield WESTAR-34 Blaster Pistols.
Image by Epic Games
May 29
You finally get to use a Star Destroyer in Fortnite during the Galactic Battle season. A portal to the control room will spawn in every match. In the control room, you take control of the turbolaser and obliterate your enemies.
June 7
This is the final showdown of the season and will include an in-game narrative live event where you go up against Emperor Palpatine. This could likely be followed by a downtime, leading into the new season.
Epic Games announcing the roadmap for Fortnite Chapter Six, Season Three Galactic Battle so early makes it unlikely that it will be extended or the schedule will change. We’ll be sure to update this page with more information if they announce any changes.
The Escapist is supported by our audience. When you purchase through links on our site, we may earn a small affiliate commission. Learn more about our Affiliate Policy
Beaks just had its first major update, and with it came Quests. These are completely optional, but still a great way to earn some extra XP, currency, and even darts. We’re going to tell you how to start and complete every single one in this All Roblox Beaks Quests Guide.
All Benny Beaks Quests in Roblox Beaks
Screenshot by The Escapist
When you first start playing the game, you’ll be at Beakwoods Camp. On the Right of the sign, you should see Benny Beaks, who has a few tutorial quests for you. Even if you already have a high-level character in Beaks, you should still do these because they take less than a few minutes, and they give you a bunch of darts. You have to finish these in order.
Capture 10 birds Quest
Screenshot by The Escapist
Just like it sounds. Equip your gun and capture 10 birds. Any will do, so feel free to capture 10 Pidgeons or 10 Parrots, which are all over the place. Go back and talk to Benny when you’ve captured 10.
Reward: 50 Coins, 20 XP
The Bird Collector
Screenshot by The Escapist
After catching your 10 birds, Benny tells you to sell them to the Bird Collector. Walk up to the Bird Bazaar NPC (it’s just next to you), and ask to sell all your birds (or if you want to keep a few, just sell 10). Return to Benny for your reward.
Reward: 50 Coins, 20 XP
The Dartsmith
Screenshot by The Escapist
This is actually a great way to see how the Beaks developers reworked the Dartsmith. Before the update, you had to pay 200 Coins to get around 4-5 random darts. Now, you can pick the darts you need, and buy them in sets from just one to up to 10.
Visit the Dartsmith who is next to the notice board and craft any dart. We recommend you get 10 Iron Darts, but you only really need one for the quest. Return to Benny for your reward.
Reward: 15 Steel Darts, 100 Coins, 25 XP
The Gunsmith
Screenshot by The Escapist
This one can take a few minutes. You need to have 1,500 Coins to buy the Hunter Rifle from the Gunsmith at Beakwoods. So, go into the field and start gunning down birds and then selling them to the Bird Collector. This is a great way to learn the loop of the game. Once you have 1,500 Coins, buy the gun from the Gunsmith. Return to Benny for your reward.
Now, if you already bought the Hunter Rifle before the quest was added, simply talk to the Gunsmith, then unequip and equip the Hunter Rifle again. You won’t get the progress, but with your Hunter Rifle equipped, talk to Benny, and that should finish the quest.
Jimmy is the innocent-looking NPC just outside Beakwoods camp (on your way to Quill Lake). He has a few quests that further teach you about different kinds of birds.
Jimmy’s First Quest!
Screenshot by The Escapist
Jimmy wants you to collect 5 common and 2 uncommon birds. You’ve probably already figured out that birds like Parrots and Pigeons are really common, while Bulbuls, Sparrows, and Goldflinches are somewhat uncommon (but you really shouldn’t have a problem finding two of them). Once you capture the birds, talk to Jimmy for your reward and next quest.
Reward: 50 Coins, 25 XP
Beakwood’s Rare Birds!
Screenshot by The Escapist
Jimmy wants you to catch 3 rare birds. Rare birds (in Beakwoods) include: Crossbills, Woodpeckers, and Hummingbirds. Out of all of these, Crossbills and Hummingbirds are the easiest to notice. Just look for anything blue flying around or anything red flying somewhat high. If you can’t see them right away, try to shoot some common birds until these rare ones eventually spawn. It shouldn’t take you too long. Return to Jimmy for your reward and one more quest.
Reward: 75 Coins, 50 XP
Beakwood’s Mutated Birds!
Screenshot by The Escapist
Jimmy wants you to capture 3 mutated birds in Beakwoods. These can be of any rarity, so even 3 mutated Pidgeons are good. For this one, just look for any bird with weird colors or glowing eyes and gun it down. It shouldn’t take you much longer than the Rare Birds quest. Once you gun down the 3 mutated birds, report to Jimmy for your reward.
Reward: 30 Smoke Darts, 75 Coins, 50 XP
All Moon Quests in Roblox Beaks
Screenshot by The Escapist
Just before you arrive at the Quill Lake sign, you should spot Moon the Beakwoods Guardian.
Moon’s Quest
Screenshot by The Escapist
Moon wants you to complete the Beakwoods bestiary. Honestly, out of all bestiaries, the Beakwoods one is likely the easiest. Simply shoot birds until you fill it out (don’t forget about the birds that fly high above the trees) and return to Moon.
Reward: 25 Smoke Darts, 20 Golden Darts, 250 Coins, 100 XP
All Star Quests in Roblox Beaks
Screenshot by The Escapist
When you reach Quill Lake, you can find Star (Quill Guardian) standing on one of the elevated piers. She actually gives you a choice between two quests, and you can even repeat one (but you probably shouldn’t).
Lake Birds
Screenshot by The Escapist
Getting into some tougher quests. What you need to do is complete the Quill Lake Bestiary. Refer to our Roblox Beaks All Birds Guide for a list of all birds in the game. When you have the full bestiary, return to Star, and you can then accept the other quest. We recommend you pair this quest with other ones (such as Garden of Eden) because it can take a while.
Reward: 25 Golden Darts, 20 Smoke Darts, 20 Steel Darts, 25 Iron Darts, 1,000 Coins, 500 XP
The Wishing Well
Screenshot by The Escapist
This one is entirely luck-dependent. You need to use a regular bird on a Wishing Well and (hopefully) get the Bio-Luminous mutation on this same bird. Refer to our Ultimate Roblox Beaks Beginner’s Guide to learn where the Wishing Well is. Essentially, grab any common bird (a Swan worked for us) and dunk them until you get the Bio-Luminous Mutation. Needless to say, this can take a while, so just be patient and if you get bored, just go and do something else. It’s RNG after all.
Note: this quest is repeatable (for some reason)
Reward: No reward (because reasons)
All Laken Quests in Roblox Beaks
Screenshot by The Escapist
Find Laken in Quill Lake, who is just under the Camp NPC.
Garden of Eden
You need to capture 10 vibrant birds that reflect the beauty of nature. What the game actually means is that it wants 10 birds with nature-like mutations. These are the Cherry and the Mossy Mutation. This can take a while, so we recommend you pair it with the
All Vito Quests in Roblox Beaks
Screenshot by The Escapist
Vito the Quill Lake Veteran is stationed in Silverstone Camp (the place where you can get the Night and Thermal Vision Goggles).
Big Birds of Quill
Vito’s first quest is for you to capture bigger birds. Pretty much, anything bigger than a Swan is considered a big bird on Quill Lake. So go and hunt down Flamingos, Storks, Sandhill Cranes, Pelicans, and Great Egrets. This shouldn’t take you too long.
Reward: 750 Coins, 500 XP
The Wishing Well (Vito)
Screenshot by The Escapist
After you finish the quest above, Vito wants you to “sacrifice” a bird to the Wishing Well, so go and do just that. Simply put ANY bird into the wishing well, and once it comes back, you’ll get the progress. Simple as that.
Reward: 100 Coins, 75 XP
Double Trouble
Screenshot by The Escapist
Vito wants you to capture 5 different species of birds, each with two different mutations. Honestly, just do this one as you do any other quest because you should get it naturally. We recommend you just shoot everything at Quill Lake, and eventually you should have all of them. You can also just go for the common birds like Swans, Black Swans, Ducks, Parrots, and Pidgeons and just focus on them until you capture two versions of each.
Alex the Wanderer is an NPC on the cliff above the Mount Beaks campsite.
Eye on the Skies
Screenshot by The Escapist
Alex wants you to buy your first set of binoculars. You can buy Binoculars from the Glider merchant. Night Vision Goggles or the Thermal Vision Goggles do not count as Binoculars (we thought we could get away with them). A regular pair of Binoculars costs 1,500 Coins, and an Advanced pair of Binoculars goes for 2,500. You only need the basic ones. Buy it and take it back to Alex for your reward.
Reward: 100 Coins, 50 XP
A Small Ask!
Screenshot by The Escapist
Alex wants you to capture 10 small birds at Mt Beaks. Believe it or not, this actually isn’t that straightforward. Most Mountain Beaks birds are huge and fly really high. Only occasionally can you see the really tiny birds, and they tend to stick low. So simply aim around the trees until you spot them. These include birds like the Chickadee, the Mountain Bluebird, the Brown Creeper, and the Snowfinch. Once you capture 10 small birds, report to Alex for your reward.
So, here’s a ridiculous one. You need to capture 10 (or 5) high-flying birds with a Golden or Gold-spotted mutation. Here’s where we would post info on how to do it… IF WE HAD ANY! The quest is bugged. Yep, we took down several Golden and Gold-Spotted birds that were definitely flying high, but none of them counted towards the progression. Many other players have been complaining about this, so it’s only a matter of time before it’s fixed. It also seems like this quest is preventing further quest progression.
Reward: 50 Golden Darts, 25 Crystal Darts, 500 Coins, 250 XP
Those are all the quests we have so far. We’ll keep updating the list as we discover the rest. In the meantime, check out our Beaks codes, and to stay up to date with Beaks, check out our Official Beaks Trello and Discord Links.
The Escapist is supported by our audience. When you purchase through links on our site, we may earn a small affiliate commission. Learn more about our Affiliate Policy
Anime Power decided to give their players a real treat for this Easter: the Easter 2025 Easter Event is here, and below is everything you need to know about it. From new Champions to some amazing Accessories,
Anime Power Easter 2025 Event
The Easter 2025 Event in Anime Power is located on the Easter Island, a mysterious land covered in Easter Eggs of different colors and pink trees. It has a bunch of new enemies, new champions, and new items overall. First, we need to see how to get to the Easter Island.
How to go to Easter Island
Easy as pie.
To travel to the Easter Island, you simply need to click on the Teleport button and navigate to the Easter Island, which will be the first option from the top. Once you click on it, you will be instantly teleported to the Easter Island, where you can start your Easter adventure.
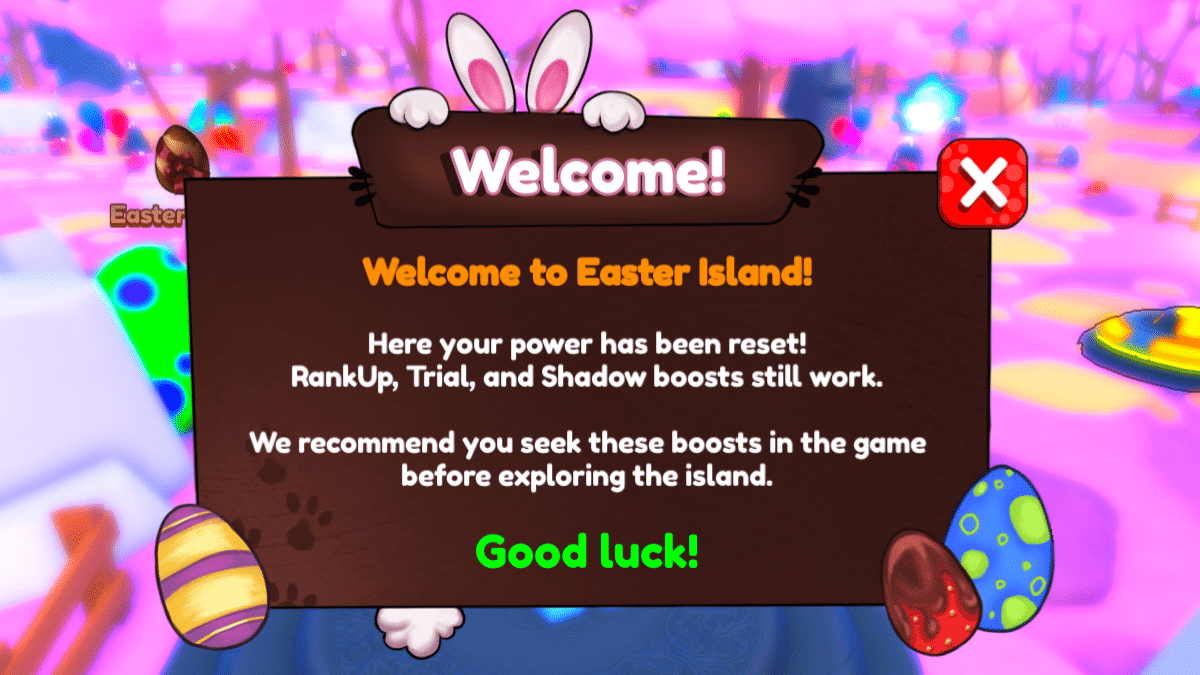
Good luck, indeed…
You will be greeted with a ‘Welcome!’ message that will explain that all of your power has been reset to 0 while you are on this island. But don’t panic, as this does not affect your Base Game level and power. You are allowed to bring your Champions, Swords, and Equipment, but your stats will be base-level. But do not worry, as leveling up on the Easter Island is fun and fast.
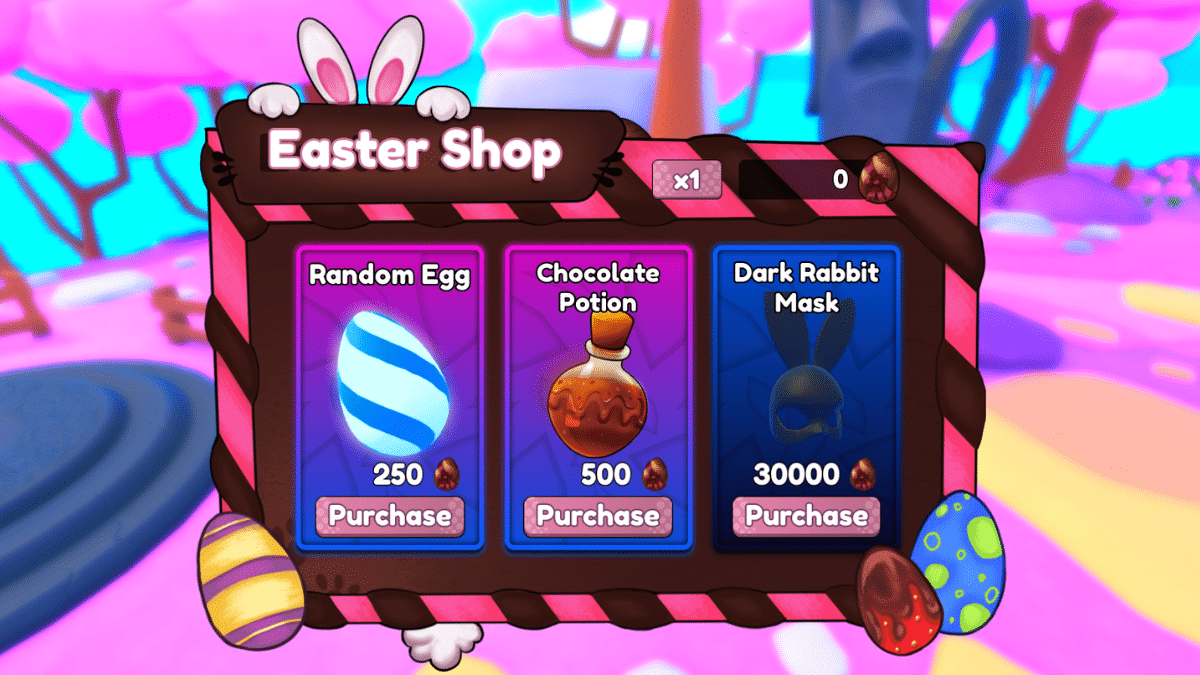
Easter Shop
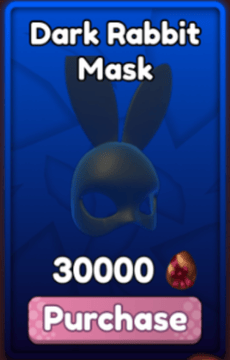
I know you’re here for the Mask.
When you get teleported to the Easter Island, on your left, you will be able to see the Easter Shop, offering unique and powerful items in exchange for Chocolate Eggs, which can be collected from playing on the island and from the Bunny Pass. Below is a detailed explanation of each item in the Easter Shop:
Random Egg
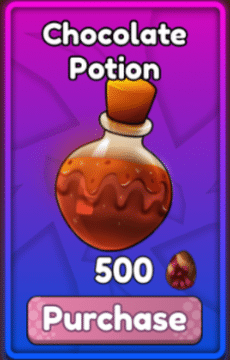
Chocolate Potion
Dark Rabbit Mask
◉ Gives a Random Reward.
◉ Boost all of your stats by 2x for 5 minutes.
◉ 5.5x Coins ◉ 7x Power ◉ 7x Damage ◉ 2.5x Luck
The possible rewards from the Random Egg include: Gems, Fingers, Grimoires, Shadow Stones, Haki Shards, etc.
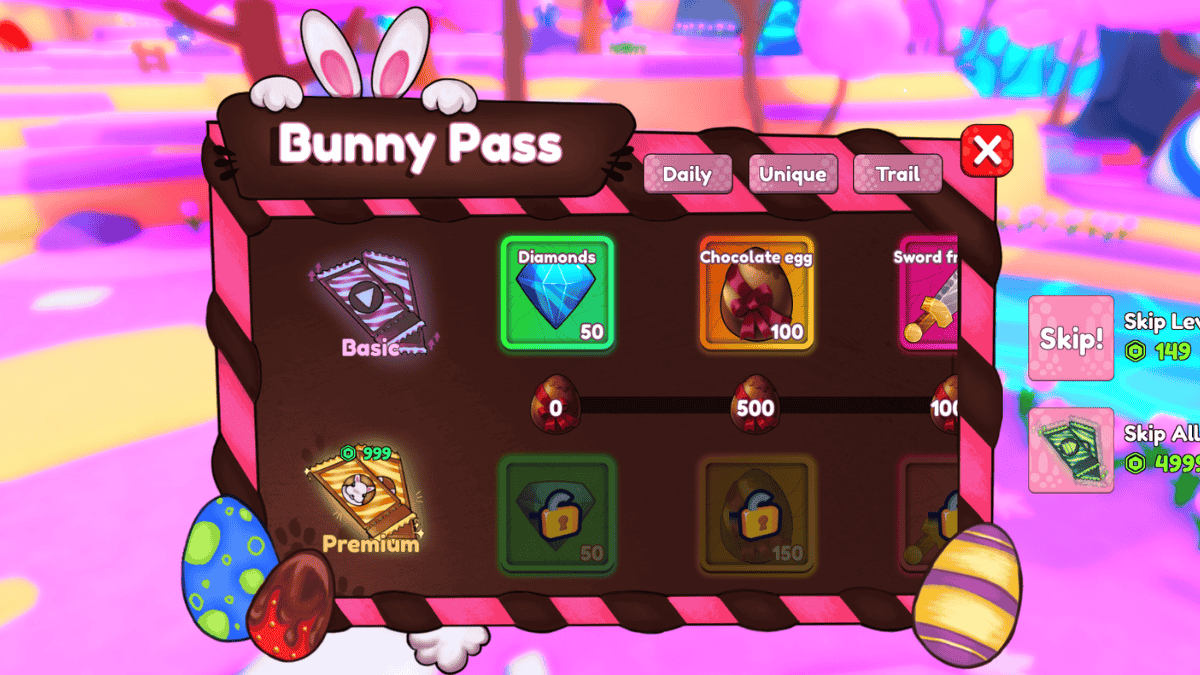
Easter 2025 Bunny Pass (Battle-Pass)
Some incredible rewards for the dedicated players.
Included in the new event is a unique new Battle-Pass, called the Bunny Pass. You can find this Battle-Pass right above the Power display on your screen by clicking on the icon. You can progress the Bunny Pass by completing Daily Quests, as well as Unique Quests. Here are the available rewards:
Gems
Chocolate Eggs
Sword Fragments
Haki Shards
Lineage Crystals
Shadow Stones
Fingers
Grimoires
Unique Accessories
Unique Champions
Wheel of Fortune Rolls (Normal & Easter)
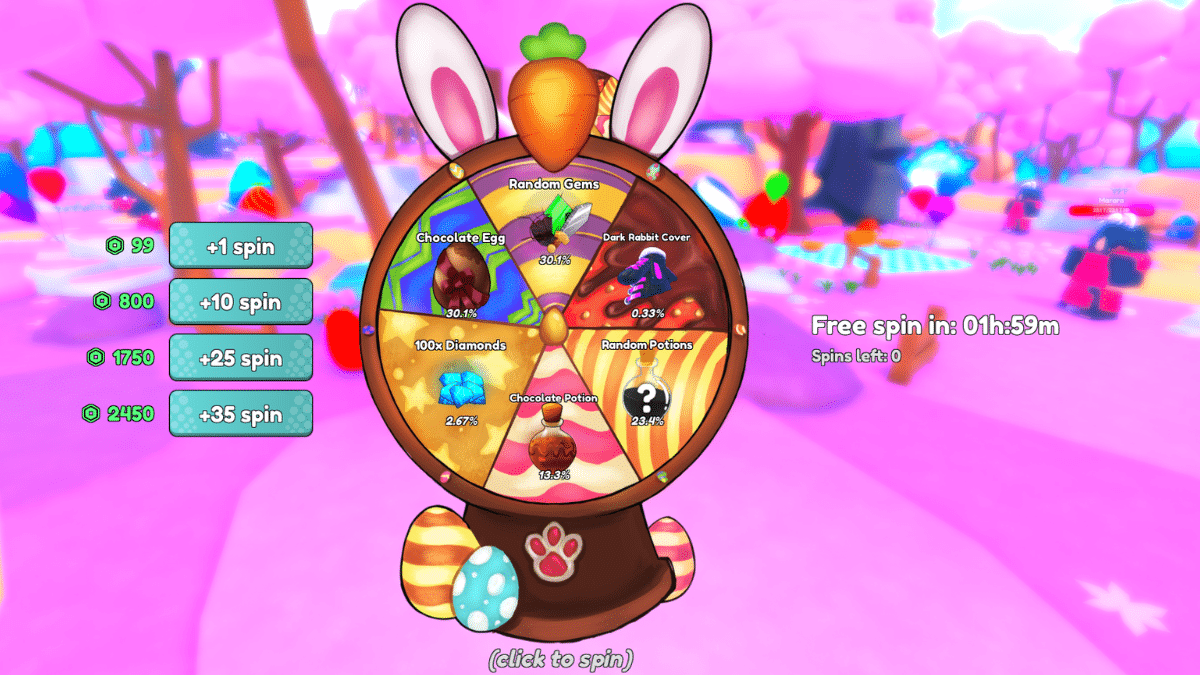
Easter 2025 Wheel of Fortune
These things are always rigged, right?
The Wheel of Fortune makes a return with this Easter Event. You get a free spin every 2 Hours, but you can also purchase them with Robux. Here are the possible rewards and their drop rates:
Reward
Drop Rate
Random Gems
30.1%
Chocolate Egg
30.1%
Random Potions
23.4%
Chocolate Potion
13.3%
100x Diamonds
2.67%
Dark Rabbit Cover
0.33%
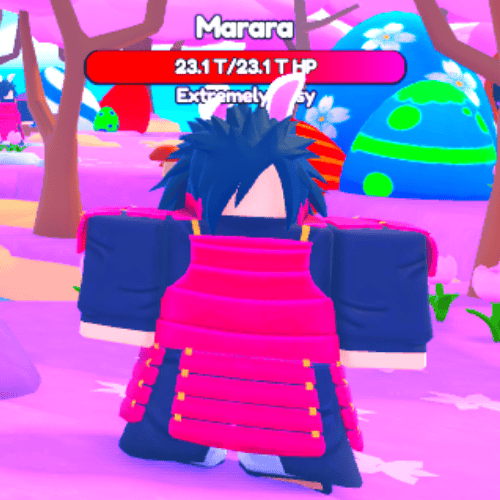
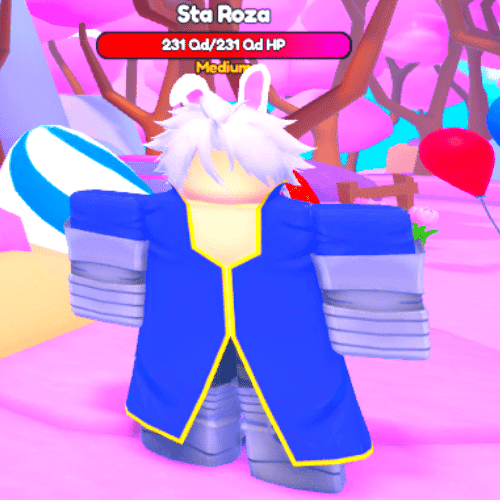
Anime Power Easter 2025 Enemies
The Easter 2025 Event in Anime Power introduces a bunch of new enemies to fight, but actually beating them is a challenge. As you start with zero power, you have to climb your way back up again in order to defeat them. But defeating them yields some very good rewards, so it is worth it.
Easter Island Enemy List
Below is a complete and detailed list of all new enemies on the Easter Island:
Enemy
Health
Marara
Extremely Easy 23,100,000,000,000 HP (23.1 Tr)
Obico
Easy 2,310,000,000,000,000 HP (2.31 Qq)
Sta Roza
Medium 231,000,000,000,000,000 HP (231 Qd)
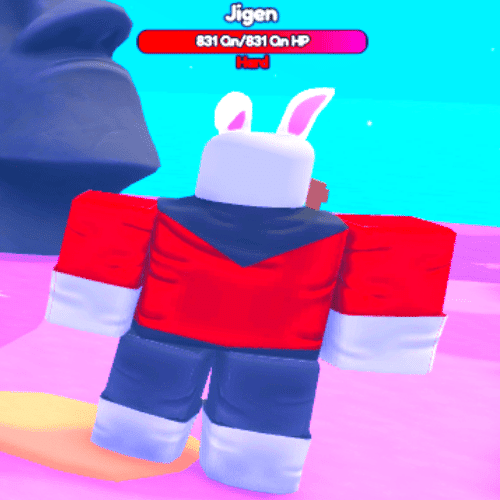
Jigen
Hard 831,000,000,000,000,000 HP (831 Qd)
Brola
Insane 53,100,000,000,000,000,000 HP (53.1 Sx)
Some of these have a ludicrous amount of health for a normal enemy, so we recommend trying to kill them with some friends or other players who are on the island at the same time as you.
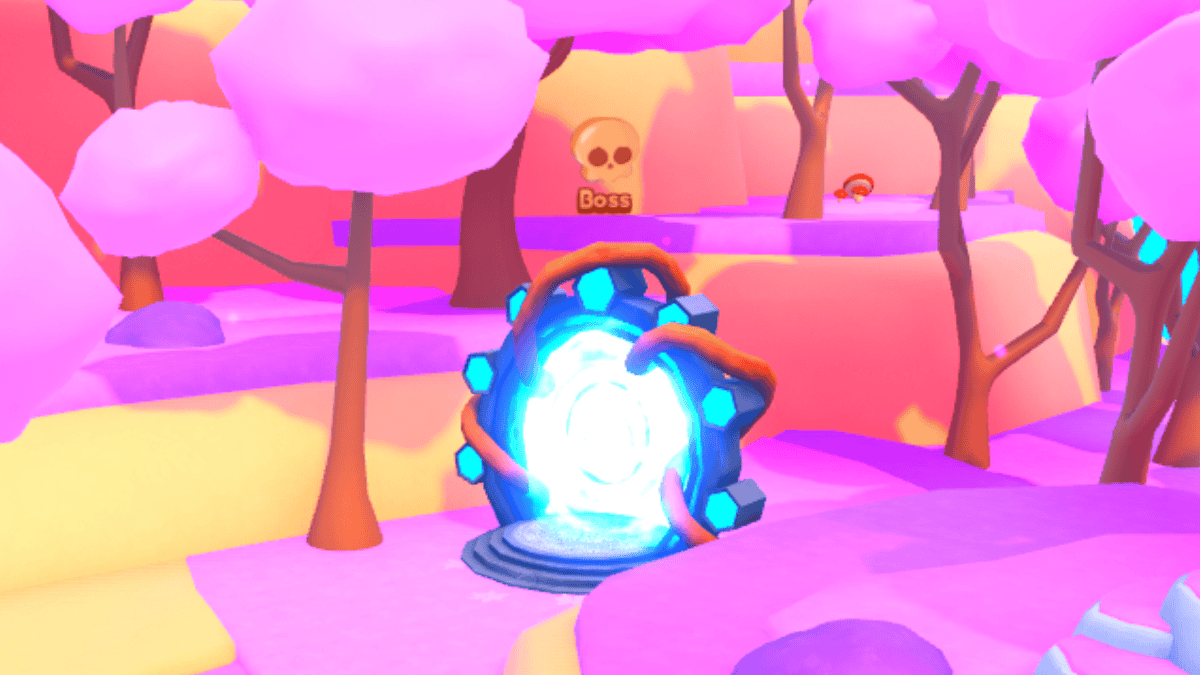
Easter Island Boss
Follow the yellow-stone road.
There is, of course, a Boss. To find the Boss Arena, you have to follow the right path that you will see right after you spawn. After a few Marara fights on the Easter Island, you reach a blue Portal. Entering the portal will teleport you to the Soruke Boss arena.
Better being a friend for this one.
The Boss of the Easter Island is Saruke, a behemoth with an unbelievable amount of HP: 20,000,000,000,000,000,000,000,000 HP. Beating him usually requires 3-6 people fighting at the same time, unless you are a god of Anime Power and can solo it. After defeating him, you will have a chance to get one of his drops:
Easter Egg Necklace – 15%
Bunny Mask – 5%
Easter Bunny Hat – 1%
Anime Power Easter 2025 Champions
Who could they be?
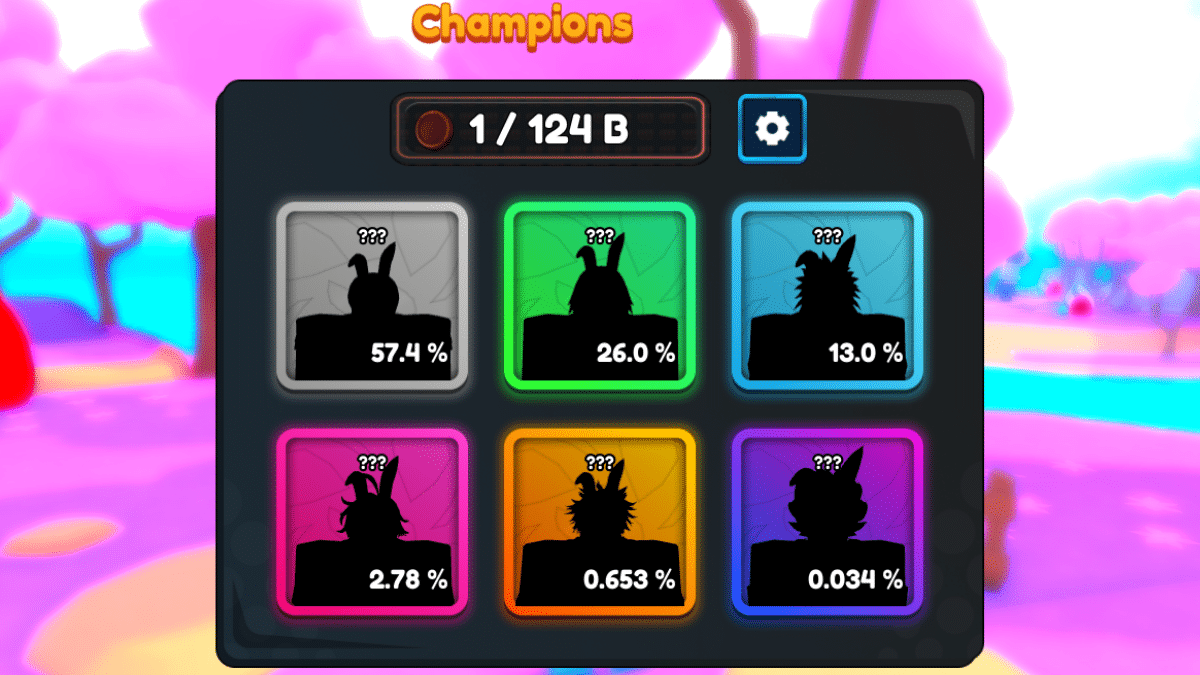
As usual, the Easter Event brings us new Champions for which we can roll. They are, on average, better than their same-level counterparts from the base game. There is one that is the goal of everyone rolling: Vegega. He has a measly 0.034% drop chance, so if you want him, be ready to grind this area.
Easter Island Champions List
Below is a complete and detailed list of all the new Champions available on the Easter Island:
A weird mix, for sure.
Champion
Normal Luck Rarity
High Luck Rarity
Power
Namm
57.4%
42.9%
45
Sarura
26%
26.5%
60
Jivaya
13%
19.9%
110
Melioras
2.78%
7.67%
130
Ichito
0.653%
2.66%
150
Vegega
0.034%
0.197%
180
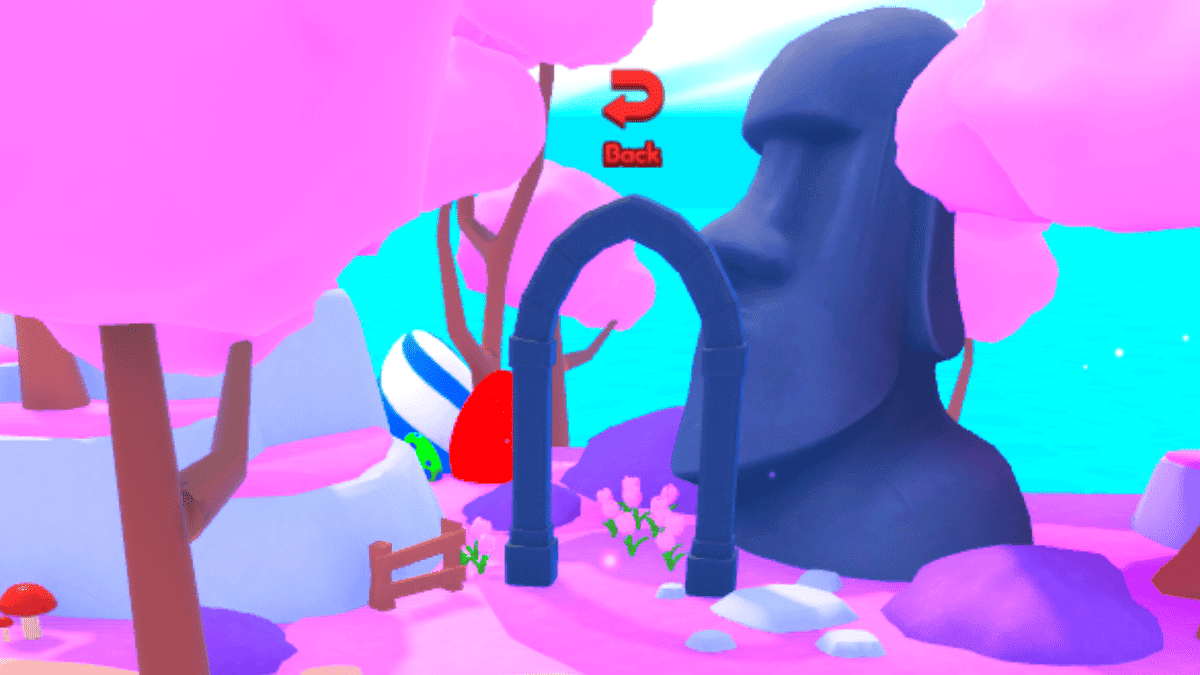
How do I Leave Easter Island?
Time to go back!
After you finish farming or you get everything you want, you can head back to the Base Game. To return, you need to find the ‘Back‘ gate. It is located on the left side of the spawn, and it teleports you back to the Shinobi World. If you don’t feel like walking or are in a hurry, you can also press the Teleport button and select where you would like to go.
And that is all for our Anime Power Easter 2025 Guide. Check out our Anime Power Codes article to grab some freebies and goodies that can help you progress the Easter Event more easily.
The Escapist is supported by our audience. When you purchase through links on our site, we may earn a small affiliate commission. Learn more about our Affiliate Policy
To let players enjoy the Easter season, Big Games Studio has launched an exciting Easter Egg hunt within Pet Simulator 99. The goal of the event is to collect 12 unique Easter Eggs scattered across the various worlds in the game, with helpful clues provided to guide you along the way. Whether you’ve already discovered a few Eggs or are just getting started, this comprehensive location guide will show you where to find each one.
All 12 Easter Egg Locations in Pet Simulator 99
Look at those cute eggs!
Below is a list of all 12 Easter Eggs in Pet Simulator 99, along with the fastest way to find each one. Just follow the steps, and you should be able to track them down without too much trouble.
Royalty Egg – Living like Royalty (Easy)
In Area 3 of Pet Simulator 99, you’ll come across a Castle on the left side. Once you go inside, look to the right of the entrance, where you’ll see a black egg with a crown hovering above a pile of gold. That’s the Royalty Egg, and you can collect it from there.
Ocean Egg – Under the Sea (Easy)
You can find this Egg in Area 23 of Pet Simulator 99, which is also known as the Atlantis area. Once you arrive, look for a pedestal directly across from the portal you used to enter. The Ocean Egg will be sitting right on top of it.
Tree Egg- Chop Chop (Easy)
Head to Area 233, also known as Nebula Forest, and go through the Woodcutting Portal. Once you spawn in the Woodcutting area, look to the left of the portal to spot the Forest Egg.
Rocket Egg – One Small Step for Dogs (Easy)
Make your way to Area 133, the Spaceship Dock in World 2. There, you’ll see a large grey and orange rocket on the left side. Just to the right of that rocket, you’ll find a red and grey rocket-shaped egg.
Magma Egg – Little Toasty (Medium)
Go to Area 209, also known as Volcano Island in World 3. Climb the small steps around the volcano, following them like an obby course, to reach the top of the first volcano. From there, jump to the second one, and then make your way to the third mountain. Near the boiling lava, you’ll find the Magma Egg waiting.
This one’s pretty easy. Just send a Huge Pet through the Mailbox to a friend or even to one of your own accounts, and you’ll receive the Paw Egg.
Lucky Easter Eggs – Odds Increased
You can find Lucky Easter Eggs by breaking regular objects throughout the game. Collecting these eggs increases your chances of getting the Huge Marshmallow Kitsune. It’s a good idea to keep an eye out for them as you play.
Hunt Easter Eggs – Huge Bunny?
During the Easter Egg Hunt event, you’ll come across special Hunt Easter Eggs scattered around the map. Picking these up increases your chances of hatching the Huge Basket Bunny, so it’s worth grabbing as many as you can while the event is active.
Secret Easter Eggs – Where is the room?
Secret Easter Eggs can be found in the Secret Easter Room, which you can access by using the Easter Secret Key. This key is randomly dropped during the event, and once you unlock the room, the Secret Easter Eggs will help increase your chances of getting the Huge Spring Griffin.
The Escapist is supported by our audience. When you purchase through links on our site, we may earn a small affiliate commission. Learn more about our Affiliate Policy


![Anime Power Easter Event Guide (2025) [EASTER] – All Enemies and Rewards](https://histream.ir/wp-content/uploads/2025/04/anime-power-easter-2025-event-guide.png)
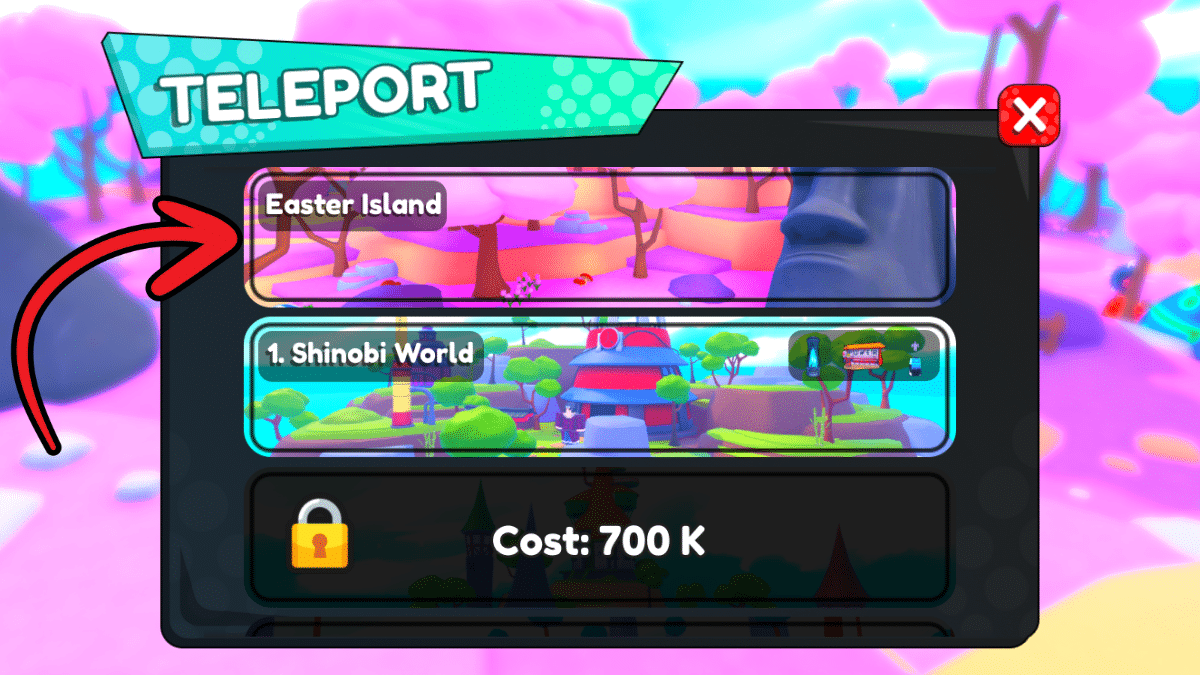
 button and navigate to the Easter Island, which will be the first option from the top. Once you click on it, you will be instantly teleported to the Easter Island, where you can start your Easter adventure.