A House Divided now includes event cards, one of which is drawn each turn, and there are unique decks for each of the years of the war after 1861. Every card is drawn and played once, and so every one of the historic events portrayed by the card occur, but players are unsure in what order within the year they will happen.
Work in Progress Event Card Samples (not final artwork)
One of the functions of the cards is to add weather effects to the game. There are three weather cards in each full year of the game, and their main effect is to have that turn represent the passage of two months instead of one. This shortens each game year from 12 turns to 9, because game length, particularly when playing the historical campaign, was an issue in the original game.
But most of the weather cards also have an additional effect, and they are all tied to historical events. Here are the weather events represented in the game.
January/February 1862: STORMS (advance turn marker one additional month)
January of 1862 was particularly cold and snowy in the east and very wet further west.
August/September 1862: DROUGHT (advance turn marker one additional month, no cavalry jump moves allowed, Confederate player removes one unit to recruitment or promotion pool)
The heat and drought in the summer of 1862 severely restricted army movement. The widespread Southern crop failures also caused unrest and much desertion, as men went home to help their struggling families.
November/December 1862: STORMS (advance turn marker one additional month, no naval invasions of naval jump moves)
Heavy rains and flooding in the last months of 1862 severely limited Union efforts to drive down the Mississippi. Offshore storms disrupted the Union fleet at Port Royal and sank the US ironclad Monitor on its return voyage north.
January/February 1863: STORMS (advance turn marker one additional month)
January of 1863 was particularly wet, and the Union attempt to launch an early campaign turned into a fiasco, Burnsides’s famous “Mud March.”
August/September 1863: DROUGHT (advance turn marker one additional month, no cavalry jump moves allowed)
The heat and drought in the summer of 1863 again caused widespread crop failures and restricted army movement.
October/November 1863: STORMS (advance turn marker one additional month, no naval invasions or jump moves, no unit can take more than one march)
Heavy rains, cold, and snow in the last months of 1862 limited army maneuvers.
January/February 1864: STORMS (advance turn marker one additional month, no naval jump moves)
May/June 1864: INTENSE HEAT (advance turn marker one additional month, no cavalry jump moves, both players remove one active infantry unit to the recruiting or promotion pool)
The early hot weather in May of 1864 during the Wilderness Campaign restricted movement and increased casualties from heat exhaustion and forest fires started by small arms fire.
November/December 1864: STORMS (advance turn marker one additional month, no naval jump moves)
Fierce winter weather toward the end of 1864 effectively ended Hood’s campaign in Tennessee.
January/February 1865: STORMS (advance turn marker one additional month, no naval jump moves)
Heavy rains in the spring of 1865 slowed most armies but did not keep Sherman from pushing on toward the sea.
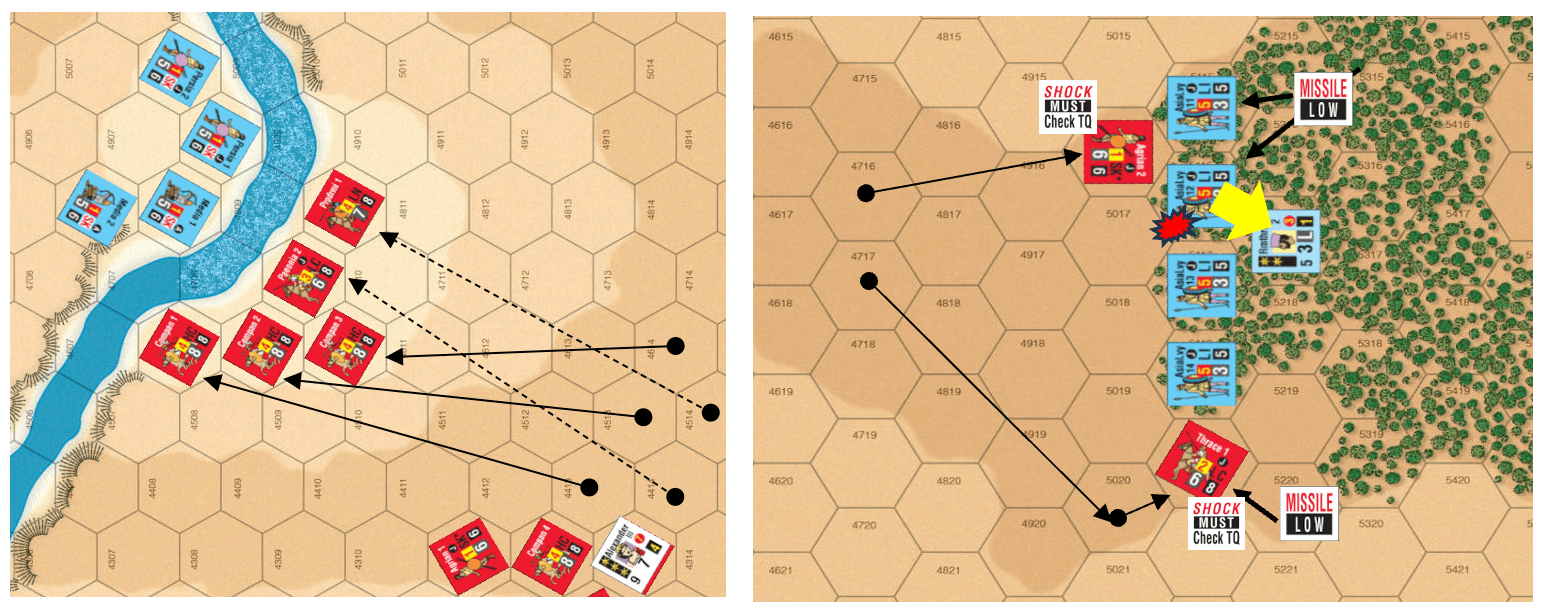
The Persians have the bulk of their Light Cavalry across the Pinarus and poised for an assault on the rather disorganized Macedonian left flank. Meanwhile on the Macedonian right flank, the Macedonians have cleared the skirmishers guarding the “easy” Pinarus crossing and have a portion of the Companion cavalry on the Persian side of the river. In the area right of center, the Macedonians have a couple of peltasts across the river having dispersed the skirmishers manning the abatis along the riverbank.
As with the first Game Turn, Alexander will have the first Player Turn due to the Elite Initiative Orders phase. The next three Player Turns will go Rheomithres, Aristodemus and Darius with the Persians choice as to the order. Thymondas has the next Player Turn followed by Nazarenes. The Macedonians follow with Player Turns for Parmenion and Craterus, Macedonians choice as to the order. Alexnader will have the last Player Turn.
Elite Commander Initiative
Movement and Missile Fire Segment
Alexander takes the EIO Player Turn (neither subordinate is in command range anyway) so he can get the balance of his cavalry over the river and begin the process of regrouping his wing in preparation for his drive against the Persian left wing. He will need to move to put the three cavalry units already across the river into command range. His first of seven orders goes to move himself 4 MP to hex 4411. That position keeps his Hypaspists in range along with his cavalry and coverage for the area across the river where some of his cavalry will be at the end of this Orders Phase.
His second is a Move order to Companion 4 (4608) which changes facing due east and moves across the river to 5007, incurring 3 Hits (1 river, 2 up slopes). His third is a Move order to the Agema (4609) which follows the same path across river ending in 4907 facing northeast, incurring 2 Hits (river, up slope). Order four moves Companion 3 (4610) along that same tried and true path into hex 4808 facing northeast, garnering the same 2 Hits as its predecessor. With no room on the other side of the river, Alexander leaves the Paeonians where they are and uses his remaining three orders to recover 2 Hits each from Companion 2, Companion 1, and the Prodromoi.
Since there is a crowd of units just over the river, I flipped the three Companions to their Moved side as a memory aid. This concludes the EIO Orders Phase.
Rheomithres
Movement and Missile Fire Segment
Play now proceeds in Initiative order starting with one of the Persian 3-rated leaders. The three leaders are spread out over the battlefield so any one leader’s actions will have no effect on the other. So once again the Persians start the Game Turn with Rheomithres.
Rheomithres’ first order removes the 2 Hits on Asia Levy in 5018. He will need to move to be able to rally the routed Asia Levy in 5210. With his second order, he moves 6 MP into hex 5114 and stops there (the extra MP cost for Woods and slopes adds up fast). His last order goes to Rally the routed Asia Levy, and he succeeds (barely, 4 DR). However, the 6 DR on the Rally Table undoes this and the Asian Levy must rout move two hexes, first into 5209. The Sheer slope is impassable to infantry and prevents the unit from moving directly toward the Retreat Edge. The Asian Levy adjusts its facing and sidesteps into hex 5109.
Decision time for the Persians. During Game Turn 1, the Persians were reluctant to attempt Momentum with the expectation that the Macedonians would jump at the chance to deny any further Momentum attempts by the Persians. On Game Turn 1, guaranteeing a Momentum chance for Nabarzanes, who is leading the Persian offensive, made sense. But are the Macedonians keen on taking the risk of a failed Trump? Losing the opportunity to act at all in the Game Turn can be critical. To quote the Design Note from The Trump Option section (Alexander, 5.4) “… The non-Macedonian player will often find that, for him, its best application is when it backfires on the Macedonian player. For that reason, players should be aware that this option should not be used indiscriminately.”
Given that Alexander was a bit careless in leaving himself alone in a hex, it’s time to test the Macedonian’s resolve and the prowess of Alexander with some potential Personal Combat (Alexander, 9.2). Rheomithres makes a Momentum attempt … and succeeds (2 DR)! Decision time for the Macedonians. It seems clear that Rheomithres will take his chances with Personal Combat. A successful Trump by any of the Macedonian leaders will put a stop to such heroics but risks losing a Player Turn, and depending on who makes the attempt, the potential for Momentum, should the Trump attempt succeed. Alexander is not backing away from a fight, so no Trump.
Momentum Orders Phase
Rheomithres’ first order is another Rally attempt for the routed Asian Levy … but a 7 DR eliminates the unit. Here I mistakenly violated the Rally rule (Alexander, 10.27), in that a given leader is allowed only one Rally attempt per unit per Game Turn, one of those nuances in the rules that are often overlooked. Rheomithres’ second order moves him to hex 4511 (7 MP), staying at the same elevation. Why not issue an order to one the two remaining Asian Levy units first? His last order is kept in reserve should he survive the Personal Combat. He has 2 MP left which would allow him to move away, and should he have a second Momentum Orders Phase, move adjacent to Alexander again and force another Personal Combat.
The Personal Combat mechanics, which aren’t present most other GBoH games, are straightforward; each side rolls a die and adds the result to the respective leader’s Personal Combat rating. High total is the “winner”, insomuch as that the winner is unaffected while his opponent suffers the adverse effects. The difference between the two totals is used in conjunction with the Leader Casualty Table to determine the extent of the adverse effects. In our case, both sides rolled a 7, Alexander wins due to his 7 PC rating (Rheomithres has a 3 PC rating), the differential is four so Rheomithres is Wounded (Ratings reduced by 1) and Finished.
Aristomedes
Aristomedes job is to shore up the Persian left flank so will go next. He orders the Sittaceni Archers 6, 5, and 4 in that order to hexes 4501, 4403, and 4203. These Skirmishers will serve as a screen and speed bump to slow the Macedonian advance. It will take some time to coax those cumbersome Cardaces into a defensive line, so Aristomedes will go for Momentum. A 5 DR doesn’t cut it; Aristomedes is Finished.
Darius
Now to Darius. His generous eight hex command range makes him an asset in a support role in that he often need not expend an order to move into range. He will let Thymondas handle the pesky Peltasts. Order one tries to rally Persia 1, but an 8 DR sends the unit off the field – eliminated. Orders two and three remove the Hits on the Syrian Archers (2213) and Cardaces 1 (2115-2016). Note that there is no requirement that the entire two-hex counter be in command range to receive an order. None of the other in-range Persian units with Hits qualify for recovery.
Time for a Momentum decision. The Macedonian left has issues. Parmenion’s “crisis” left a gap between the left wing and center that is beckoning Nabarzanes’ cavalry to exploit. Sensing that the Macedonians are looking for chance to have Parmenion go before Nabarzanes, Darius decides to pass on the Momentum attempt. Aristomedes failure was perhaps a blessing.
Thymondas
Thymondas, the only 4-rated leader, is next in Initiative order. The two Thracian Peltasts on the Persian side of the river are within one Hit of routing, so Thymondas will use his Skirmishers to see if they can be driven off with missile fire.
His first of four orders is a Fire order to the Arabian Archers in 2714 who fire at the adjacent Thrace 1 (recall the Skirmishers can fire through a flank hex) and hits. Thrace 1 faces the Macedonian retreat edge and rout moves into hex 2617. So far so good for Thymondas. There are no other shots, so a Skirmisher will need to move into position to take one. Although the rules allow for firing over a friendly unit (Alexander, 8.14), the “blocking” friendly needs to be closer (not halfway) to the firing unit, so firing over a friendly at an opposing unit adjacent to that friendly is not possible. The hex with the abatis (2416) is open, so Thymondas issues a Move order to Syria 4 which proceeds into 2416 passing through Cardaces 3. There is no penalty when Skirmishers move through other friendly units (Alexander, Stacking Chart). Entering the abatis does cost a Hit (I’ll play this as written, though I suspect that the penalty was directed at the Macedonians). Unlike its compatriots, Thrace 3 has missiles, so it uses Entry Reaction Fire and hits (4 DR). The Syrians ignore Thrace 3 and shoot at Thrace 2 (love those flank shots) and hit (0 DR, +1 for moving). Thrace 2 faces toward its retreat edge and rout moves into 2517 moving through Thrace 3 (an enemy ZOC does not block the path if occupied by friendly unit). Thrace 3 passes its “moving through” TQ check, incurring the minimum 1 Hit (now has 4 Hits). Order three goes to Syria 1 (2412) which moves into 2515. Thrace 3 reacts again and hits again (2 DR). Syria 1 shoots and misses (7 DR, +1 moving), ending Thymondas’ hot streak.
Unfortunately, Syria 3 (2213) is just out of range, so Thymondas is unable to use it to occupy hex 2615 (and, no I am not going to move the Royal Guard HC there). His last order removes the Hit on Cardaces 3. Thymondas declines the Momentum opportunity to ensure that Nabarzanes goes next.
I flipped none of the Skirmishes that moved not by choice but based on an exception often overlooked. Skirmisher units do not incur a Hit for moving again during the Game Turn (Alexander, 6.13).
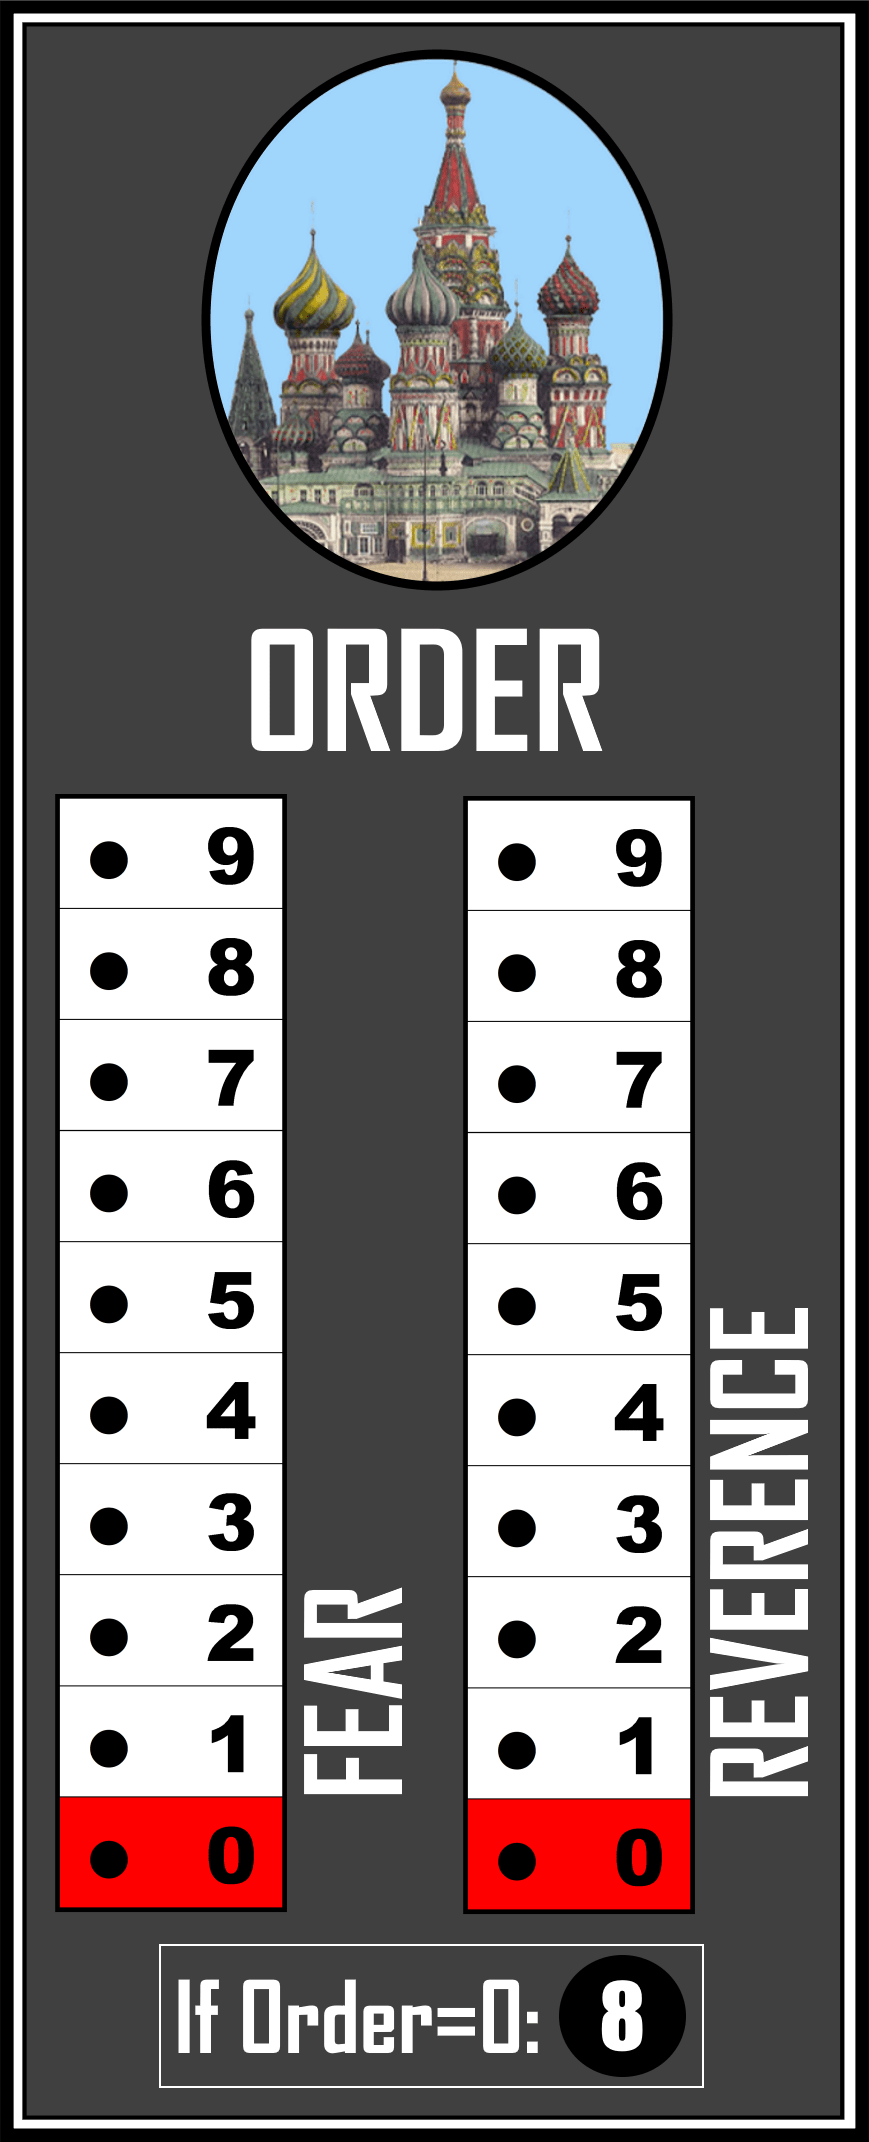
Nabarzanes
Movement and Missile Fire Segment
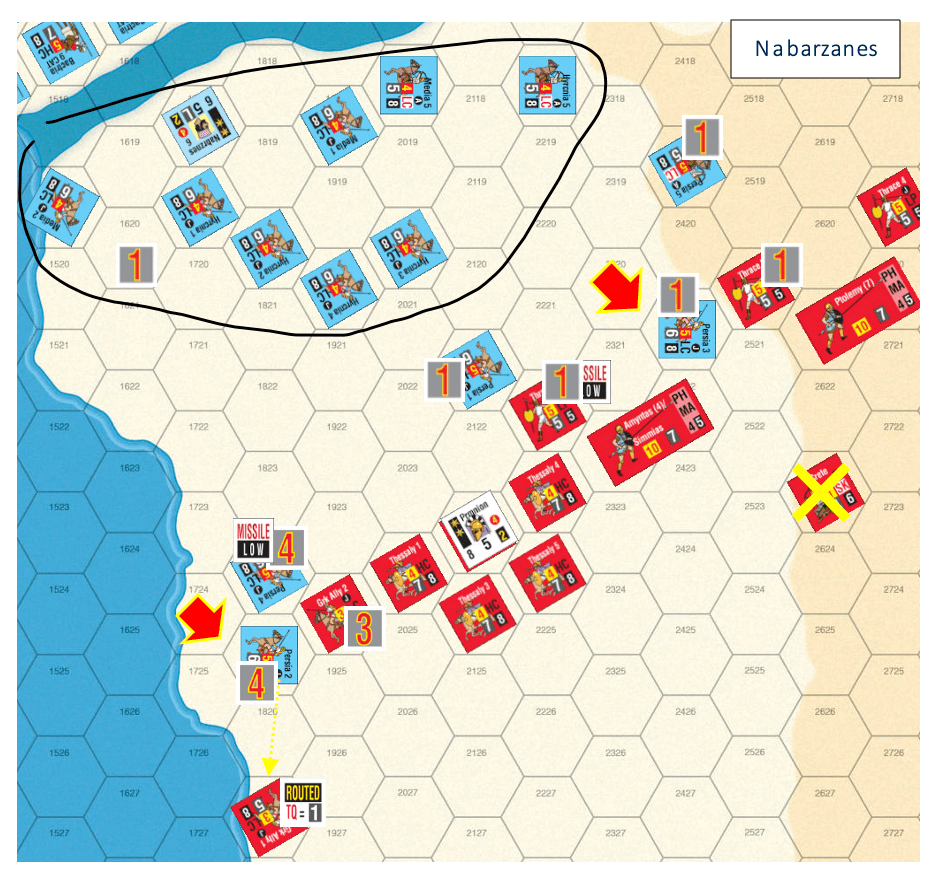
Nabarzanes has eight LC within three hexes (his Line Command range) so issues a Line Command with Move orders to the group (as Wing Commander, using a Line Command is automatic in his initial Orders Phase). His primary targets are the Amyntas and Ptolemy Phalanxes that have exposed flanks and the nearby damaged Thessalians and Thracians. Although some players may be tempted to use those horse archers to do away with the nearby routed Thracians, they would be doing away with some valuable assets. Routed units are as good as “eliminated” unless orders are expended to save them, and as happened with Parmenion’s rally attempts, a success is not a guaranteed outcome. Moreover, while they are headed for home, they can inflict Hits on their brethren on the way there. So why expend orders to help your opponent out unless you have nothing better to do with them?
Here are the moves and fires in order:
Persia 5 (2219) moves to hex 2223, facing the two Macedonian units. The Thracians reaction fires and hits. Technically, I should hold off on the shots until after everyone moves (Alexander, 8.21), but since this is the only reaction shot there is no point in complying. Persia 5 is not Shock capable, so sitting astride Thessaly 4’s flank is not worth the hit to react. However, facing in the other direction could possibly block infiltration around Thessaly 4, but in doing so present a flank in the direction of the enemy. Thessaly 4 rotates to the west to block the infiltration, passes its TQ check and incurs the mandatory 1 Hit penalty. The archers fire at the Thessalians scoring a hit. Thessaly 4 closed the path to the flanks of the Thracian Peltasts and the Amyntas Phalanx
Hycarnia 1 (1719) moves to hex 1925 (7 MP); Thessaly 2 changes facing, passes its check, and incurs the mandatory 1 Hit; The Hyrcanians fire and miss; Missile Low. Shock Must Check TQ placed
Hycarnia 3 (2020) moves to hex 2521, facing east (6 MP); fires at the Ptolemy Phalanx and misses, Missile Low . Shock Must Check TQ marker placed
Hyrcania 4 (1920) moves to 2522, facing Thessaly 5 (8 MP); fires and misses; Missile Low. Shock Must Check TQ marker placed
Hycarnia 2 (1820) moves to hex 2025, facing east (6 MP); fires at Thessaly 1 and misses ; Shock Must Check TQ marker placed
Media 1 (1918) moves to hex 2122 (5MP); fires at Thessaly 4 and hits ; Shock Must Check TQ marker placed
Nabarzanes has two horse archers and himself yet to move.
Media 5 (2019) moves to hex 2423 (7MP); fires at Thessaly 5 and misses. The hex chosen pins the Amyntas Phalanx.
Hyrcania 5 (2218) moves around the Thracian ZOC to hex 2419, facing the Thracians (7 MP). The archers are not Shock capable so making a facing change with a +3 DRM to the TQ check would be reckless. Hyrcania 5 fires and hits.
Nabarzanes (1919) has all units except for the two Media LC on the other side of the river in range, so remains where he is.
Shock Combat Segment
There are five Shock combats. Starting from the left side of the map, the Pre-Shock checks go as follows:
Hyrcania 1/Thessaly 2 – both pass
Hyrcania 2/Thessaly 1 – both pass
Media 1/Thessaly 4 – both pass
Hyrcania 3/ Ptolemy – both pass
Hyrcania 4/Thessaly 5 -Hyrcania 4 incurs 1 Hit
Rather uneventful, but not overly surprising when good quality units are involved. As my usual practice, I will resolve steps 9.14 through 9.16 together for each combat. There are no leaders involved, so that step can be ignored.
The Hyrcania 1 has a frontal attack on Thessaly 2. The combat is resolved on Shock CRT Column 5 (LC vs. HC, no SRD or terrain shift) with no adjustment for superiority. The result is 2(2). Hyrcania 1 (4 Hits), Thessaly 2 (3 Hits). The Hyrcania 2/Thessaly 1 combat is resolved on the same Column 5 with no adjustment for superiority, and with the same 2(2) result. Hyrcania 2 (3 Hits), Thessaly 1 (2 Hits).
The Media 1 has a flank attack on Thessaly 4. The combat is resolved on Shock CRT Column 6 (there are no shifts). Media 1 has Position Superiority due to the flank attack and thus is Attack Superior (AS). Note that when cavalry fight cavalry, flank/rear attacks don’t move the Shock CRT column much. The result is another 2(2), adjusted to 2(4) for the AS. Media 1 (3 hits), Thessaly 4 (10 Hits). Here we have a Breakthrough situation; Thessaly 4 incurs 2 more Hits which is irrelevant in this circumstance.
Hyrcania 3 has a flank attack on the Ptolemy Phalanx. The base Shock CRT Column is 5 which will shift to Column 2 due to the Size Ratio Difference (SRD) and the slope. Note since the Hyrcanians move to the attack, the ratio is rounded in their favor. The Hyrcanians have Position Superiority and so are AS, but the doubling of hits is halved when an LC attacks a Phalanx. The result is 3(2) with no adjustment (8 DR). Hyrcania 3 (3 Hits), Ptolemy (3 Hits)
Last combat. Hyrcania 4 has a frontal attack on Thessaly 5. We are back on Shock CRT Column 5 with no adjustments and another 2(2) outcome. Hyrcania 4 (3 Hits), Thessaly 5 (5 Hits).
For the Collapse step there is one rout. Thessaly 4 faces south and rout moves to hex 2125. None of the other combatants are within 1 Hit of a rout, so no TQ checks. Media 1 advances into 2123, where the Thracians take an entry reaction shot and hit – Media 1 (4 Hits).
Without hesitation, Nabarzanes will go for a Momentum Phase … and succeeds. A timely success. Nabarzanes is in position for another round of mostly survivable Shock combats. The intent here is to inflict another couple of Hits on each of the engaged Macedonians before the inevitable counterattack, which in most cases would be Attack Superior, enough to rout most of the Persian engaged cavalry even if they did not attack. The shock attacks require no orders, so those orders can be used instead to bring the Bactrians across the river and into a position to finish off the weakened Macedonians.
Trump decision time for the Macedonians. Parmenion cannot afford to lose a Player Turn so won’t make the attempt. Craterus has no better chance of succeeding and will be needed to help put out any fires on the left flank. Alexander has the best chance to succeed but at the possible cost of a delay on his wing and the loss of Momentum opportunities for both Craterus and Parmenion. Alexander will Trump …and succeeds (barely with a 7 DR). Nabarzanes is Finished.
Alexander
Movement and Missile Fire Segment
Alexander uses six of his seven orders to remove Hits from the six cavalry units across the Pinarus: Companion 1 (1 Hit), Companion 2 (2 Hits), Companion 3 (None), Companion 4 (1 Hit), the Agema (None), and the Prodromoi (2 Hits). Order seven is a Move order to Agriania 1 (4311) who has been loitering on the high ground since the start of the battle. The Agrianians face east and start to move toward Rheomithres who withdraws 3 MP to hex 4712. The Agrianians move into hex 4411 to keep Alexander company. No reason to risk another Personal Combat.
Momentum Orders Phase
Alexander succeeds in his Momentum attempt. Since he will have the first Orders Phase next Game Turn, there is no need to move the Companions now since some are already within striking distance of the Persians. Rather, Alexander uses four orders to remove the Hits from Companions 1, 2, 4 and the Prodromoi. At some point, Alexander will need to cross the Pinarus since the Steep/Sheer slopes are impassible to leaders and thus obstruct the tracing of command range (Alexander, 4.21). That can wait till his next Orders Phase. His remaining three orders will go to move his Hypaspists in the following order.
Agema (3912) moves to 3511, 1 Hit for the slope – 2 Hits total
Hypaspist 2 (3813) moves to 3412, 1 Hit for the slope – 1 Hit total
Hypaspist 3 (3713) moves to 3413, 1 Hit for the slope – 1 Hit total
The Hypaspist are positioned outside Slinger range and within Move distance for an assault on the Greek Hoplites. Alexander is Finished.
Parmenion
Movement and Missile Fire Segment
The Macedonian player has the choice of either Parmenion or Craterus for this Player Turn. Knowing how Parmenion fares will determine what Craterus will do, so Parmenion goes next. And Parmenion’s options are limited since has only three units in command range that could receive a useful order. There is no benefit in having the Amyntas Phalanx wheel and incur the Hit(s) (Alexander, 6.45) since its attack would remain frontal (Alexander, 9.15).
His first order is to move Thessaly 3 (2126) to 2124 (5 MP). Media 1 fires in reaction and hits. Shock Must Check TQ marker placed. With his second order, he has Thrace 6 fire at Persia 5 and hits. Persia 5 uses Return Fire (Alexander, 8.23) and misses. Order three is a Rally to Thrace 5. A 5 DR does the trick and breaks Parmenion’s Rally losing streak. A 9 DR on the Rally Tables leaves the Thracians with 3 Hits. The Thracians face north and receive a Missile No marker (Alexander, 10.27).
Order four sees Parmenion move to 2325 placing the routed Mercenary Peltasts (3022) in range. His last order is a Rally order to that same unit and again Parmenion gets the job done (3 DR). Mercenary 5 ends up with 3 Hits from the Rally Table, then faces west, and receives Missile No marker.
Shock Combat Segment
Now for some additional Shock combats. Shock No TQ markers go on Thessaly 2 and Thessaly 1 which attack Hyrcania 1 and Hyrcania 2 respectively. Shock No TQ markers are also placed on Thrace 6, Amyntas, and Thessaly 5 which attack Persia 5, Media 5, and Hyrcania 4.
Thessaly 4 must shock Media 1 which is the only Pre-Shock TQ check situation. The Thessalians pass, but the Medians incur 1 Hit (5 total).
The attack by Thessaly 2 is resolved on Shock CRT Column 9 (Sizes are the same, no terrain effects). HC are Attack Superior against LC. The result is 2(3) adjusted to 2(6) for the superiority. Thessaly 2 (5 Hits); Hyrcania 1 (10 Hits). The attack by Thessaly 1 is resolved the same way with the same 2(3) result adjusted to 2(6). Thessaly 1 (4 Hits); Hyrcania 2 (9 Hits). Thessaly 3’s attack breaks the pattern with a 2(2) result adjusted to 2(4). Thessaly 3 (3 Hits); Media 1 (9 Hits) – breakthrough is irrelevant.
Thrace 6’s attack is resolved on Shock CRT Column 8 with no shifts or adjustments and a 3(2) result. Both Thrace 6 and Persia 5 have 5 Hits. The Amyntas’ attack is resolved on Shock CRT Column 12 which includes the shift for the SRD but there is no superiority. The result is a 2(3). The Amyntas (4 Hits); Media 5 (4 Hits). For Thessaly 3’s attack it is back to Column 9, Attack Superior for a 2(2) result adjusted to 2(4). Thessaly 3 (7 Hits); Hyrcania 4 (7 Hits).
Now the Collapse step. Hyrcania 1, Hyrcania 2, and Media 1 face northeast and rout move to 1923, 2023, and 2121 respectively. Both Thrace 6 and Persia 5 are right at their break point. A Thrace 6 advance would not cause any terrain hits, so by the tie breaker rule (Alexander, 10.15) Persia 5 (the defender) routs, while Thrace 6’s Hits are reset to 4. Persia 5 daces northwest and rout moves to 2221. There is a similar situation with Thessaly 5 and Hyrcania 4, both are at or over their break points, but Hyrcania 4 is over, so it routs, and Thessaly 5 has its Hits reset to 6. Hyrcania 4 faces northwest and rout moves first to 2521, passing through Hyrcania 3 which incurs 1 Hit, and moving to 2421, avoiding Ptolemy’s ZOC.
Media 5 is within one Hit of its TQ and in an enemy ZOC so must make a TQ check (Alexander 9.18 #2). It passes and has its hits reduced to 3.
The victorious Macedonians advance: Thessaly 2 into 1925, Thessaly 1 into 2025, Thessaly 3 into 2123, and Thrace 6 into 2223 now Missile No. No facing changes. Thessaly 5 advances into 2522 where Hyrcania 3 reacts by changing facing, passes its TQ check incurring 1 Hit, fires (now Missile No) and hits, routing the Thessalians! Thessaly 5 changes its facing, and rout moves into 2624 avoiding Media 5’s ZOC.
Aside from Thessaly 5’s rout, a successful counterattack though not unexpected given the heavy cavalry’s superiority. Parmenion is Finished – the price the Macedonians paid for the Alexander’s successful Trump.
Craterus
Craterus is next with the final Orders Phase of the Game Turn. Should he support Parmenion or recover Hits on the Hypaspists and position himself to assault the Persian Hoplites next turn? He cannot rally the Thracians next to the river or the nearby Thessaly HC since they are in Persian missile range and LOS. He can reach (barely) Thessaly 4 for a rally attempt and be able to recover Hits on two other units but then would be too far to put all the Hypaspists in range next turn – he does not have a Momentum opportunity. Given the Persian disarray and the distance from the fresh Bactrians, Parmenion should have time to recover and reform his flank, so Craterus will take command of the Hypaspists.
Craterus’ first of five orders recovers the Hits on the Meleager Phalanx. With his second order, he moves himself to hex 3515 (3 MP) placing all the Hypaspists in range along with several Peltasts. His remaining three orders recover the hits on the three Hypaspists. Ineligible for Momentum, Craterus is Finished.
Rout and Reload Phase
On to the Rout and Reload Phase. The first step is to remove the Rallied markers from Thrace 5 and Mercenary 5. Next come the rout moves. Moving from left to right across the map, Persia 2 (1718) rout moves to 1708. Persia 4 (1814) follows suit and rout moves to (1806). Hyrcania 1 (1923) rout moves through Nabarzanes to hex 1915, followed by Hyrcania 2 (2023) which passes through Cardaces 1 into 2015. The latter passes its TQ check incurring the minimum 1 Hit. Media 1 (2121) and Thessaly 4 (2125) are in the same hex row. The Medians are furthest from the bottom edge so they will go first, not that it matters in this situation. Media 1 rout moves through Cardaces 1 and stops in Syria 2’s hex where it must move one more hex to 2112 (Alexander, Stacking Chart). Cardaces 1 fails its TQ by one, so it still incurs only 1 Hit. The Syrians fail their check by two so incur 2 Hits.
Thessaly 4 rout moves off the map and is eliminated. Persia 5 (2121) rout moves through Cardaces 2, stopping atop Syria 3 and moves one more hex to 2212. Cardaces 2 passes its TQ check and incurs 1 Hit while Syria 3 fails and incurs 3 Hits. Hyrcania 4 (2421) rout moves through Hyrcania 5, goes west to avoid Thrace 4’s ZOC and ends up in 2716. Keep in mind that routing units pay the MP costs for terrain. Hyrcania 5 pass its TQ check and incurs 1 Hit,
Thrace 2 (2517) is next, and rout moves around two different Persian ZOCs onto hex 2721. Ptolemy passes its TQ check and incurs 1 Hit. Thrace 1 rout moves through Ptolemy and skirting the Persia ZOC lands atop Thrace 2. Time to check the Stacking Chart. Thrace 1 moves one more hex to 2722. Ptolemy once again passes and incurs a hit. Thrace 2 is eliminated. Thessaly 5 (2623) rout moves through the recently rallied Thrace 5, exits the map, and is eliminated. Thrace 5 fails its TQ check by three causing it to rout and move its two hexes off the map where it is eliminated. If by chance it stayed on the map, it would then rout move its full MA. That the unit routed in this phase does not exempt it from the rout moving (Alexander, 10.22).
This segment was a bit messy, so here is a summary of the Hit count of those units impacted during this segment.
Macedonians: Ptolemy (5 Hits) … and two Peltasts eliminated.
Withdrawal Phase
The Macedonians lost the two Thessaly HC (14 RP) and two Thrace LP (10 RP) for 24 RP this turn. Added to the 12 RP from the last turn the Macedonians have lost 36 RP.
The Persians lost another Asia Levy (3 RP) and Persian LC (6 RP) for 9 RP. Added to the 17 RP from last turn the Persians have lost 26 RP.
All somewhat misleading since the Macedonians have only one routed unit on the map due the nearness of their retreat edge while the Persians have seven.
End of Game Turn Commentary
Although the Persian Light Cavalry onslaught on the right flank was repulsed (five routed units), the damage to the Macedonian wing was significant with four eliminated units, one routed, and the remainder with three or more Hits. Aleander’s Trump prevented a follow up set of favorable Persian shock combats, but more importantly it denied the Persians the opportunity to bring the fresh Bactrian cavalry across the river and in range for another assault.
On other fronts, the Persian skirmishers were able to drive off the peltasts that crossed the river, positioned more units to protect the Persian left flank, and the daring Rheomithres exploited a bit of Macedonian carelessness to engage Alexander in Personal Combat, coming out on the losing end.
For the Macedonians, Alexnader’s Trump blunted the Persian momentum on the Macedonian left allowing Parmenion the opportunity to counterattack and send most of the Persians lights toward their side of the field. The Trump prevented any follow-up. On the Macedonian right, Alexander moved all his Companions and the Prodromoi across the river in striking distance of the Persian line and importantly removed all the hits incurred in the river crossing and combats. With the Macedonian left temporarily stabilized, Craterus recovers the Hits on the Hypaspists, preparing them for cross river assault against the Greek Hoplites.
Both sides continued to pursue their overall battle plan. The Macedonian Trump was effective in minimizing the impact of the Persian assault without preventing the Macedonians from getting their right wing in order for offensive operations.
Introduction by Ancient Civilizations of the Middle East’s Game Developer, Fred Schachter: When ACME Designers Chris & Mark, as well as myself, first read in BGG James Lowry’s entertaining ACME Game After Action Report, we thought “Wow, wouldn’t this, with a bit of editing, be grand to share with InsideGMT’s audience?!?” and so this article came to be.
Hopefully, readers will enjoy the Ancient Civilizations of the Middle East gaming experiences of James and his three fellow ACME adventurers as they seek victory to become “The King of the Fertile Crescent”. What’s remarkable is that this was their first time playing the game! James has a wonderful blog covering gaming as well as a range of other topics of interest to gamers, so if you enjoy his ACME presentation, there’s more, much more, available at: www.rindis.com/blog
Back on the 25th of May (the day before Memorial Day), I had some people over to my home for FtF gaming. Patch was originally scheduled to attend so we could have a five-player game, but he couldn’t make it, thereby leaving me, Dave, Mark, and Jason to learn the rules for a four-player game of Ancient Civilizations of the Middle East.
It has been a while, but our group has played its brother game, Ancient Civilizations of the Inner Sea a few times and enjoyed it, so I figured this would be easy for us to get into. I panicked when I looked at the rules before everyone arrived that morning and realized I didn’t remember nearly as much as I thought I did. But once we were looking at the actual game spread out on the table, everything started coming back. Short of the new rules, we just needed to go through the details of conflict (again) and follow the sequence of play on the aid cards.
Mark and I had gone over the ACME Playbook ahead of time, and we decided upon the “Cyrus the Great” scenario as the only historical four-player scenario utilizing the full map. In hindsight, a more compact scenario would have been better, as we needed a bit of the board to save table space; notably my smallish table held the main board and our supplies of tokens fine enough, but we didn’t have a good place for the cards of available deities. The random draws for civilizations gave me the bullseye—I mean Babylon.
The scenario’s other civilizations use the game’s standard, somewhat compact, setups, but this scenario’s special rules grant Babylon the entire Fertile Crescent at the start of the game. The real changes in ACME from its ACIS predecessor are the terrain rules, and the game board’s green fertile areas are powerful, as instead of only growing with two-disk settlements, you can just have single disk camps and grow, or, best of all, have three disk cities to get VPs and growth disks.
With that setup, my initial growth was phenomenal, and only stalled later for a single turn, when a horde of barbarians came storming out of the deserts which kept me from having control of a bunch of fertile areas. After that, they were largely cleared out and my growth resumed to put me back from a poor board position to max out the number of disks in use. (Each civilization has fifty disks available for board position and growth, which then get sent back to stock by events played against you and competition. It’s very much like the stock in Tresham’s classic Civilization board game.)
Mark had the Medes & Persians to Babylon’s east and was a constant thorn in my side (as he should be). But I didn’t have a lot of other troubles, so while he got more powerful as the game went on, he could never really challenge me in the Fertile Crescent for longer than a turn at a time but progressively took control of areas just east of there. He also refused to join in on the initial rush to acquire a deity, so he didn’t get VPs that way, and at the end of Epoch III (which the scenario starts in), he was trailing well behind in points.
Dave had the Lydian Kingdom of the board’s northwest, and Jason Egypt, safely tucked in the board’s southeast with the Nile—the board’s other fertile area (but only five areas to the Tigris and Euphrates’ thirteen). To my relief, the two of them largely focused on each other, partially powered by Dave’s aggressively sea-oriented offensive strategy as he strove to gain a foothold on Egypt’s Mediterranean coast. I was more focused on pure growth and managing my frontiers at first, so Dave also took a lead in cities, followed closely by Jason, and I slipped into third place in VPs.
We broke for a late-ish lunch at the end of Epoch III, and Epoch IV saw the earlier conflicts come into ever-sharper focus. Mark was getting his act together and caught up to me in points (fueled by that bad turn with the barbarian invasion), and he started catching up to the other Civilizations as well. I swept away the Fertile Crescent’s barbarian invaders and concentrated on cities (and growth!) for a revival during the game’s last two turns that put me near the VP lead again, but I didn’t quite catch up to my rivals.
Both Epochs ended after three turns (it varies from two to four), and IV concluded with a Lydian (Dave -Blue disks) win with 36 VPs, followed by Egypt (Jason – Green Disks) at 34, Babylon (me – Light Colored Tan Disks) at 33, and the Medes & Persians (Mark – Red Disks) at 27 VP.
Presumably, a fourth turn could have favored me for a win, but the VP gain caused by twelve cities caught everyone’s attention, and with the borders of Egypt and the Lydians now truly at my doorstep in the west, I was looking at a lot of negative attention at that point. (On the other hand, you can see in the photo below that Dave was still dealing with the aftermath of two rounds of barbarians.) I had actually gambled on this turn to build as many cities as I could (and since my cities could generate growth and VPs it’s not the serious decision it is for everyone else) to get back in the lead. Sadly, I didn’t quite make it, and didn’t have the extra turn to carry the momentum forward.
I think I like the long, skinny map set up of ACIS better, and I don’t see enough difference between the wonder and deity mechanics for it to matter all that much save that an ACME civilization can have but a single deity. But the terrain mechanics (including desert and mountain, which are also important) really make ACME the better game in my view.
Certainly, all of us have enjoyed both “brothers”, ACIS and Ancient Civilizations of the Middle East, and they will see the table again. ACME has a wealth of scenarios and seventeen different civilizations, each with their own unique abilities (we didn’t leverage ours very well; too busy getting used to the flow of the game), and options for putting together any mix of them in non-historic scenarios. We’re really still just in the wading section of this game. Thanks for this gem of a game GMT!
Our Ancient Civilizations of the Middle East’s gameboard at the end of Epoch IV’s Turn 3. Note how red, the Medes & Persians, had established a city in the Fertile Crescent next to my homeland (the big tan square block). This was his third, and most successful, incursion into fertile terrain, and I’d been too busy to push him out. A theoretical turn four would have turned into a big fight in there. We’d had comparatively few barbarians this game, but two turns of them in Anatolia had taken a severe toll on blue’s, Lydian home, which had been full of cities for almost all of Epoch III. Perhaps the most surprising board position is the VP markers. Nine VPs from first to last isn’t much, and I was surprised at how much the “pack” stayed together for the entire game.
Designing a game with the scope of Combat Commander: Vietnam requires a lot of testing. Before the game is opened up for broader playtesting, the core design team has to ensure that all of the pieces of the design are working to provide the play experience we want. In the previous article we discussed how the Random Scenario Generator (RSG) and the data behind it is the anchor for the whole system. Indeed the RSG data serves as a validator for all 24 of the designed scenarios that will come with the base game.
Scenario design for the Combat Commander series is very delicate when looking at specific historic engagements, and perhaps even more for generalized engagements. Data models trend towards the average, so the RSG system uses player agency to tilt the odds with their choices. In written scenarios, the designer is the one that tilts the odds, often to align with the historical record. Without these little tweaks the scenario might feel too generic, but tweaked too much and things can end up on the rails.
The scenarios for the base game of Combat Commander: Vietnam are pulled from the archival records of the participants. The maps are drawn from 1:50,000 scale maps from the period, zoomed in to match the scale of Combat Commander. The scenarios designed for these maps fit the details we know historically into the framing of the game. The goal is for the core system rules to cover 85% or more of any scenario. Adjustments are then made with a few special rules to bridge the gaps between historicity and playability.
What follows is an After Action Report from a recent playtest of scenario #9, “Brown Water Brawl”. This is a key scenario in the base game because it introduces Amphibious Assault rules. Amphibious and Air Assaults are among the many things we’ve heard fans say they want to see in the system. This was a playtest to see how the rules affect gameplay for both attackers and defenders.
SITUATION REPORT:
Rach Ruong Canal, IV Corps, South Vietnam, December, 1967 – Although initially blocked from deploying forces to the Mekong Delta due to opposition from the South Vietnamese Government, in 1967, the Mobile Riverine Force (MRF) became America’s force in the Delta. Pairing the 2nd Brigade of the 9th Division with Navy brown water assault craft, the MRF sought out NLF forces along the many rivers and canals of the Delta.
After receiving rocket fire from the west bank, a company of the MRF lands with support from Monitor assault crafts to engage elements of the NLF’s 502nd Local Force Battalion.
Information display showing the scenario year, victory points, and other details (playtest graphics)
The NLF gets to set up its detachment first with three bunkers provided by the scenario rules. One of the bunkers is set up forward to contest the coastline where the MRF will land. The other two bunkers are placed in the open, one to cover the forward treeline, while the other defends the treeline in the rear. A few squads are also placed forward in order to contest the Americans before they get off the coast and toward the open area.
Gray NLF units set up to resist the American landing and hold key positions (playtest graphics)
As an Amphibious Assault, the Americans will have three waves of platoons enter the map from the water in the northeast, one per turn. The first wave picks the landing zone which will be used by all subsequent waves. The Amphibious Assault rules provide the defender with the ability to contest the landing zone after the first wave has deployed. One of the things that came out of this play was the need to encourage aggressive play from the NLF to actually contest the landing zone. As it is, that possibility does not come up in this playthrough.
While the landing zone is not really contested, the landing parties can be, which leads to the other key part of the amphibious rules that allow the landing craft free attacks during each deployment. Recognizing this is one of the reasons the NLF play it safe with their setup, but playing it safe does not prevent them from taking fire.
Victory in scenarios is measured by VP which are scored in a number of ways. The clearest is combat attrition. Both sides earn 1-4 VP for eliminating opposing units. Additionally for Attacker Defender scenarios VP are scored at each time check for any held objectives. Because the defender starts in control of the objectives, it is on the attacker to take those objectives as quickly as possible to keep the defender from scoring them.
Finally each side holds a secret objective which is only revealed and scored at the end of the game. The end game is triggered either on turn 8, by one side choosing to Break Contact after the Time marker reaches the Support marker, or one side having to Break Contact the Time Check after their casualties are equal or greater than their Break Point level (we will save the discussion of Break Contact and the other new mechanics which support it for a future article).
Time 0
VP: 0
US Casualties: 0
NLF Casualties: 0
Support Marker: 5
The Americans start by picking their landing zone. They choose a spot whose line of sight is blocked by huts, to allow some of the units to deploy into cover. On landing, the platoon leader spots the forward NLF bunker for the assault craft to perform its free attack. The bunker makes for strong cover, protecting the units inside whose return fire suppresses the leader. One of the squads outside of the bunker however, does take a hit from the bombardment.
The NLF in the bunker continue firing, their recoilless rifle wounding the leader while small arms fire suppresses the machine gun team with him. Two American squads and the other machine gun team use the vollying fire to screen their movement in the opposite direction, where they find cover in the huts to the south behind the treeline. The platoon leader at the landing zone targets the bunker with mortar fire, failing to break the units inside but giving the units with him a little time to recover.
The lead squad to the south, hearing rustling ahead, moves into the treeline guns at the ready to assault fire as they make contact. The NLF local force squad there is slow to react and takes a hit.
The American group by the landing zone spray fires at the bunker and the squad hiding in the woods next to it. The bullets do nothing to the bunker but are able to hit the units in the woods.
The wounded NLF to the south are able to rally before moving out of sight of the Americans. Another NLF squad reacts to the gunfire and moves to flank the squad in the woods, but have to slow to cross the canal which is particularly high for this time of year.
The Americans by the landing zone all fire into the woods by the bunker and are able to eliminate the NLF squad there. The American squad in the southern woods continues to close on the retreating NLF squad, suppressing them with their assault fire.
Time 1
VP: NLF 1
US Casualties: 0
NLF Casualties: 1
Support Marker: 5
As the second American platoon arrives at the landing zone, the assault craft targets the bunker again, this time breaking the NLF squad inside, through the cover. An American squad in the south closes in to flank the retreating NLF unit in the woods. The other NLF squad makes its way across the canal to assault fire the initial American squad, but the Americans manage to use the cover of the woods to their advantage.
The other suppressed NLF squad moves back through the rice paddies to avoid being attacked. The American squad on the treeline counters the NLF that assaulted from the canal before they can pull back. The ambush breaks the NLF unit before they are eliminated in the ensuing melee.
With the woods to the south now clear, the Riverine forces move the arriving platoon in from the south avoiding the forward bunker all together. Another call is made from the first platoon leader for Fire Support. The NLF uses the opportunity to rally the squad in the bunker, then the recoilless rifle lands a shot at the group hiding in the huts, eliminating the leader.
Down a leader, the Americans try to regroup. More NLF emerge from hiding near the bunker on the other side of the canal, preparing for a stronger defense against the attackers coming from the treeline. The NLF recoilless rifle continues firing at the coastal huts, breaking the remaining units there. The broken units try to immediately recover but instead end up suppressed. One of the American squads on the treeline opens fire at the NLF units by the bunker, breaking them before they counterattack.
Time 2
VP: NLF 3
US Casualties: 1
NLF Casualties: 2
Support Marker: 5
The final wave of the Riverine Force arrives at the landing zone with their platoon leader joining the units in the huts to spot for the assault craft, but it cannot find the target. Instead of returning fire, the local force leader calls in for Fire Support. The NLF squad in the paddies recovered, then heads back into the woods to contest the approaching Americans.
The last platoon leader helps rally the team in the huts by the landing zone, while the Americans at the treeline keep firing at the broken NLF squad in the clear across the canal until they are eliminated.
Time 3
VP: NLF 4
US Casualties: 1
NLF Casualties: 3
Support Marker: 5
The other American squad in the woods moves to assault fire the NLF squad at the treeline, suppressing them. The second platoon leader by the canal calls in a request to delay the rear support as he prepares his men. The NLF at the treeline again retreats back to the paddies before it can be attacked.
The second platoon leader makes the call and the Americans move into positions along the treelines on both sides of the canal. The squad already there makes a dash through the clear past the suppressed NLF to secure the objective at the turn in the canal.
Unable to recover from their wounds the broken American squad from the first wave is sent back to the landing zone while the freshly landed platoon uses the activity in the woods to make their move north. The lead squad manages to avoid taking fire from the group in the forward bunker and surprise the NLF unit in the woods off the path with an assault that breaks them. Some of the platoon follow behind into the huts off the path in the north, while the remaining squads go to reinforce the groups in the trees across from the bunker.
The broken NLF squad in the north pulls back through the clear behind the trees and out of line of sight. They warn the other broken squad there about the coming wave, so they can make their way into the trees for cover. The Americas charge in before the warning NLF squad can follow, leaving them extremely vulnerable in the open.
The second American platoon leader makes another call back for Fire Support as a squad in the rear moves towards the action in the south. The squad on the canal objective tries to fire at the suppressed NLF unit through the hinderance of the paddies but can’t hit the target. The NLF leader from the bunker in the open calls back for their own fire support.
In the north, the broken NLF squad tries to fall back through the paddies. The Americans open fire but are unable to land any shots on the retreating unit. The NLF squad in the south also falls back through the paddies without taking any opportunity fire.
At that moment the second platoon leader gets confirmation on their approaching close air support and helps them spot the bunker across the canal. Napalm comes down on target forcing all of the units in the bunker, and the one behind it, out before the bunkers are destroyed by the blaze. All of the NLF units break from the attack as they run into the clear. In the midst of this an NLF sniper manages to hit an American squad still by the landing zone.
One American squad on the southern treeline jumps the gun and rushes across the canal to assault fire the NLF trying to escape the napalm fire managing to suppress the squad and the leader. The NLF try to rally but only the leader manages to do so.
Time 4
VP: NLF 5
US Casualties: 1
NLF Casualties: 3
Support Marker: 6
The NLF leader escaping the flaming bunker urges the other units to withdraw but the Americans don’t hesitate to fire on their retreat, eliminating the squad with the mortar and the team with the recoilless rifle. Now alone in the open the leader takes fire from the American squad on the objective and the one that crossed the canal, but manages to avoid taking hits. With the air support still in the area the third platoon leader calls in another strike on the forward bunker. The spotting is off this time, missing the NLF with its package of more conventional bombs.
The NLF leader in the bunker finally connects with their Fire Support and calls in mortar fire that drifts south to break the Americans that crossed the canal and suppress the leader at the treeline. Understanding the reality of the situation the NLF leader then tells the group with them to start falling back. The squads creep through the smoke from the American bombardment but the leader stays with the recoilless rifle team hoping to eliminate more Americans before pulling back.
While the Americans in the south rally, the fire group in the north opens fire through the hindrance of the paddies to eliminate the remaining broken NLF unit. More Americans start pushing out from the treeline as the NLF squad in the southern paddies crosses the canal to link up with the leader from the bunker.
The Americans in the north rush the forward bunker to surround and cut off the retreat. The NLF in the south pull back even further. Then the Americans converge on the last bunker going into melee.
Time 5
VP: US 1
US Casualties: 2
NLF Casualties: 6
Support Marker: 6
An ambush breaks a US squad but they still manage to eliminate all of the units in the bunker, hitting the NLF break point.
The surviving group in the south continues to withdraw without taking fire until they are behind the flames of the napalm. Everyone still alive manages to Break Contact, except the NLF leader that gets captured when the Americans secure the area.
Endgame
VP: US 4
US Casualties: 2
NLF Casualties: 9
Support Marker: 6
An ambush breaks a US squad but they still manage to eliminate all of the units in the bunker, hitting the NLF break point.
The surviving group in the south continues to withdraw without taking fire until they are behind the flames of the napalm. Everyone still alive manages to Break Contact, except the NLF leader that gets captured when the Americans secure the area.
Illusions of Glory: The Great War on the Eastern Front (“IoG”) is a card-driven game simulating the First World War in eastern Europe. Its first edition was published by GMT Games in 2017 after the award-winning Paths of Glory, which simulated the entire war in Europe and the Near East in army/corps scale. IoG also came after the popular Pursuit of Glory, which focused on the war in the Near East and the Eastern Balkans in corps/division scale. IoG’s corps/division focus displays the relative strengths and weaknesses of the opposing armies in greater detail than an army/corps treatment does.
For those of you planning to attend this year’s ConsimWorld Expo in Tempe this July, you can attend a “Learn the Rules/Play the Game” Session and experience the upcoming Second Edition of IoG.
IoG Second Edition Mapboard
In IoG, the Allied Powers (“AP”) player brings massive forces to bear against Germany, Austria-Hungary, and their allies in the east while trying to avoid a game changing revolution in Russia. The Central Powers (“CP”) player must defeat Russia, hold off Italy, and win the upper hand in the Balkans or face demoralization and rebellion at home.
IoG Combat Unit Counters
Battlefield losses detrimentally affect the Troop Quality of major AP and CP combatants. Excessive troop losses and reinforcement call-ups will degrade their manpower pools and impair military capabilities. Territory losses may drain their National Will and cause domestic uprisings— which includes revolution in Russia’s case.
Strategy Cards give a player the choice of several actions—move units, make attacks, strategically redeploy, or rebuild damaged units. Each card also gives the player a choice between these actions and an historical event that provides a powerful and specific action (or combat advantage).
IoG Strategy Cards
Cards give the player Operations (OPS) Points to use in activating spaces containing his units for movement or attack. OPS Points can also be used to strategically redeploy units. OPS Points appear in the upper left-hand corner of the card. If they appear in a yellow square, the Event is played also. If they appear in a red square, the card is a Combat Card whose capability can be used in attack or defense.
Two OPS Points Used: One to Attack and One to Move
Separate sets of cards are provided to the AP and CP players. Each player increases his deck by elevating his War Status from Mobilization to Limited War, and then from Limited War to Total War. Since quite a few cards are discarded once their events are played, the momentum towards Total War builds as the game proceeds.
War Status Markers on the IoG General Records Track
There are Summer, Fall, Winter, and Spring Turns representing 3 months apiece. However, this is where the similarity to Paths of Glory and Pursuit of Glory ends.
Turn Marker on the IoG Turn Record Track
IoG can be played by more than two players. With team play, the dynamics of player decision-making and interaction add an enjoyable social element to the game. While this might lengthen the game, the fun of negotiations between players is worth it!
The Impact of Cumulative Losses—“Troop Quality”:
IoG simulates the drain casualties have on available manpower and a nation’s officer corps. As Russian (“RU”), German (“GE”), Austro-Hungarian (“AH”), and Italian (“IT”) casualties mount, the drain on their national manpower reserves and officer corps is reflected by a Troop Quality Index.
Troop Quality Markers on the IoG General Records Track
Each of these Nations have a Troop Quality Marker that starts at a maximum value. When a GE, AH, RU, or IT corps is destroyed, the Troop Quality marker of that Nation moves –1 on the General Records Track (but the destroyed LCU can be rebuilt). When a GE, AH, RU, or IT corps is permanently eliminated, the Troop Quality marker of that Nation moves –1 on the General Records Track (and the eliminated LCU cannot be rebuilt). If a Strategy Card is played to bring GE, AH, RU, or IT reinforcements onto the mapboard, the Troop Quality marker of that Nation moves –2 on the General Records Track. These reductions will soon vex the affected player.
When the RU, IT, GE, or AH Troop Quality marker reaches “Poor Troop Quality”, reinforcements of that Nation are placed on the mapboard with a step reduction for each unit. Things do not get better—they can only get worse!
Political Considerations—“National Will”:
IoG simulates political upheaval in Germany and Austria-Hungary, in addition to Russia. The loss of home Victory Point spaces and Events may cause Rebellion to break out in Russia, Germany, or Austria-Hungary. These are represented by a National Will Index.
National Will Markers on the General Records Track
Each of these Nations has a National Will Marker that starts at a set value, moves -1 on the General Records Track for each home Victory Point space that it loses, and moves +1 for every home Victory Point space recaptured from enemy control. The National Will Level for each of those Nations is also affected by Events.
If downward movement of a National Will Marker reaches the “National Demoralization Level”, rebellion may break out in the that Nation. Rebellion is represented by placing two Uprising Units in that Nation during the Rebellion/Revolution Phase. Uprising Units can cut off supply to combat units, cause CP governments to collapse, and trigger the Russian Revolution.
Rebellion Markers in Petrograd and Pskov!
If all VP spaces in Austria-Hungary are occupied by Uprising Units in the War Status Phase, Austria-Hungary collapses and is out of the war. (Germany does not collapse.) If there is an Uprising Unit in Russia after the RUSSIAN FOOD RIOTS card is played, then comes the Russian Revolution . . . or does it? The RUSSIAN REVOLUTION card must still be played.
Strategy Cards Bringing the Russian Revolution
The Russian Revolution—Maybe or Maybe Not:
IoG does not make success of the Russian Revolution inevitable. The game represents the revolution with a Russian Revolution Track having four Stages. During each of the following Rebellion/Revolution Phases, the Revolution Marker moves ahead one Stage on the Russian Revolution Track.
However, the Russian Revolution cannot advance Stages if all Uprising Units on the mapboard have been destroyed. This places Russia in a dilemma—either divert decreasingly effective combat units from facing the Central Powers or leave revolution back home unchecked.
As the Russian Revolution enters each Stage, the following occurs:
Revolution Stage 1: Russian reinforcement cards can no longer be played.
Revolution Stage 2: Russian units can no longer receive Replacement Points.
Revolution Stage 3: All full-strength Russian units are reduced one step.
Revolution Stage 4: All corps-sized Russian units are replaced by division-sized units.
The AP player can suppress the Russian Revolution entirely by playing a LONG LIVE THE TSAR! card when all Uprising Units are destroyed. After it is played, Russian reinforcement cards can again be played, and Russian combat units can again receive Replacement Points.
Strategy Cards Suppressing or Hastening the Russian Revolution
The revolution remains suppressed until the CP plays a FALL OF THE TSAR card when Uprising Units are again placed in Russia. The Russian Revolution restarts, but still cannot advance Stages if the AP player destroys all the RU Uprising Units on the mapboard before the next Rebellion/Revolution Phase.
A Russian Collapse Does Not Assure CP Victory:
The Central Powers must still fight Italian, British, French, and Serbian units capable of capturing Victory Point spaces. If the CP player presses his advantage against Russia too far by triggering a revolution, the AP can play the TREATY OF BREST-LITOVSK card to end the Russian Campaign, send German units to the Western Front, and weaken the Central Powers’ ability to fight other AP armies in the East. The decision to play TREATY OF BREST-LITOVSK as an Event is momentous because the AP player loses the use a card worth 5 OPS Points or, alternatively, 10 Replacement Points!
Although TREATY OF BREST-LITOVSK takes Russia out of the war, it has another role to play against a CP victory. When the CP plays RUSSIAN WAR WEARINESS, the game comes closer to Armistice—and perhaps a CP victory-point win—at the end of each Turn. This effect is canceled by playing TREATY OF BREST-LITOVSK.
In IoG’s Second Edition:
(1) The mapboard has been revised to show terrain effects on combat and place names more accurately. There are also more Victory Point spaces.
(2) Casualty and reinforcement card effects on Troop Quality have been moderated so that reinforcement step reductions do not occur until 1916, as is historically accurate.
(3) The player taking fire must apply as much of it as possible to his units using adaptable guidelines instead of clunky scripted procedures.
(4) A unit that is Out-Of-Supply can still move or attack, but its movement and attack strength are minimized.
(5) A unit that can only trace a supply line to Supply Sources of other friendly nations can still activate for movement or attack, but at a cost of one additional OPS Point.
(6) Only German, Austro-Hungarian, Italian, and Serbian units may attempt to build a Trench in a Mountain space, only one trench building attempt may be made per space in an Action Round, and entrenching is attempted by rolling a die. A unit can move or entrench in the same Action Round, but not both.
(7) A defending unit forced to end its retreat in an overstacked friendly space is not destroyed, but is reduced by one step and continues retreating to the nearest friendly-controlled space or region where it will not overstack.
(8) Defending units in Forest, Mountain, or Swamp spaces can reduce a two-space retreat by one space by taking a step loss from any of those units, but a one-space retreat from those spaces cannot be stopped except by Combat Card.
(9) Defending units in Trenches do not have to retreat, and a retreating unit taking a two-space retreat can stop if its first retreat space is a Trench.
(10) Reduced-strength units that take another step loss are destroyed and go into the Replaceable Units Box. Units destroyed by combat when Out-Of-Supply are permanently eliminated. Reduced-strength units that are Out-Of-Supply during the Attrition Phase are permanently eliminated. Reduced-strength units that are forced to retreat into or through a space that contains enemy units, an unbesieged enemy Fort, or an Uprising Unit are permanently eliminated.
(11) A unit can move or assemble/disassemble in the same Action Round, but not both.
(12) Division-sized units in the Replaceable Units Box that are rebuilt go immediately into the Reserve Box. They can use Strategic Redeployment to go from the Reserve Box onto the mapboard or they can use Strategic Redeployment to go from the mapboard into the Reserve Box.
(13) Units that move or retreat into neutral nations are immediately interned to the Replaceable Units Box, but Serbian and Montenegran units entering neutral Albania are not interned until the end of the Action Phase and may use Strategic Redeployment to leave neutral Albanian ports.
(14) If a nation’s National Will reaches the National Demoralization Level before the Rebellion/Revolution Phase, the opposing player can immediately place two Uprising Units in separate spaces and/or regions of that Nation.
(15) If a Strategy Card cannot be played for its Event, it can still be played for its War Status Points.
Conclusion:
These features create a play-balanced game that is relevant, fun, exciting, challenging, and tense. You will enjoy playing the Second Edition of Illusions of Glory: The Great War on the Eastern Front.
This guide is intended to give players helpful hints on playing the Great Battles of Alexander. The format is like my SPQR: A Guide to Playing the Game available on the GMT website. That guide provided a comprehensive review of the SPQR rules using the Battle of Heraclea as a case study. For this guide I am going to dispense with the comprehensive rules review that I did for SPQR since, aside from some specific rules related to the Romans, it would be a repeat of what was written in that guide. For those players looking for a comprehensive discussion on the rules for the Great Battles of Alexander, they should read Part 1 and Part 2 of SPQR: A Guide to Playing the Game.
I picked the Battle of Issus as a case study because, as ancient battles go, it was uncommon due to the lay of the battlefield which was dominated by difficult terrain. Most generals of the day would not fight a battle in such terrain unless they were desperate. Darius and his generals were able to maneuver their army astride Alexander’s line of communication back to Macedon and deployed their army in highly defensible terrain along the Pinarus river. Alexander had little choice but to fight (he fell into that desperate category) and that he won is testament to his generalship and the high quality of his veteran army (see the Historical Background section for the Issus scenario for more details). From a game play perspective, the terrain provides the Persian side, which has a large but “light” army, the necessary ingredient to provide a balanced contest.
For the game I will not use the following rules most of which are optional or not relevant to the scenario:
5.6 Macedonian Contingent Commanders
6.5 Drift to the Right
6.6 Column Movement
6.8 Pre-Arranged Withdrawal
9.4 Cavalry Pursuit
10.3 Engaged
11.1 War Elephants (there are none)
11.7 Double-Depth Phalanx
11.8 Artillery (there are none)
11.9 Cavalry Charge Formations
Pre-Battle Preparation
In addition to setting up the scenario, there are two things that you need to do to prepare for play. One is to understand the flow of activity within a given Game Turn (each battle is different in this regard) and the other is to have an overall battle plan considering the composition of the forces, their deployment, and the victory conditions. As with most GBoH battles, victory at Issus is determined by forcing your opponent to withdraw by eliminating units.
Sequence of Play
To a new player, the Sequence of Play (Alexander 3.0) is unusual compared to many other wargames. In a Game Turn, we have a Leader Activation, followed by an Orders Phase conducted by the activated leader, which may be repeated one or two times (Momentum). This procedure is repeated for each leader present at the battle, after which routed units head for their side of the map, missile units reload, and the players flip counters and remove markers. Lastly, the players see if one side or the other withdraws, and if so, the game ends. The concept of a Player Turn present in most games is there but not obvious from the Sequence of Play. The number of Player Turns within a Game Turn varies by scenario, based on the number of leaders present, while the order of those Player Turns is determined by the Initiative Ratings of those leaders. Depending on the distribution of those Initiative Ratings, the Player Turn order will often vary from Game Turn to Game Turn.
Leader Activation
Leaders are the engines that drive the game. Other than a few limited reactions and involuntary actions, non-leader units (i.e., combat units) can do nothing without direction from a leader. Alexander 4.0 details what leaders can do. For constructing a sequence of play (“course of play” is perhaps a better descriptor), from a player’s perspective, we need just the Initiative Rating which all leaders possess.
At Issus, the Persian player has five leaders; the Macedonian player has three leaders. Alexander is one of the leaders present, so the Macedonians will have an extra Player Turn due to his Elite Commander status (Alexander, 5.6). Thus, for Issus each Game Turn will consist of nine Player Turns.
Player Turn Order
The first Player Turn goes to the Macedonians due to the Elite Commander Initiative rule. This can be Alexander or either of the other Macedonian leaders if within Alexander’s Command Range. Given the initial setup, only Alexander is eligible despite his extensive 9 Command Range. The Player Turns are performed starting with the lowest Initiative-rated leader and moving, in sequence, to the highest Initiative-rated leader regardless of which side the leader is on. In case of ties, the non-Macedonian (Persian) player goes first, after which the players alternate Player Turns among the remaining similarly rated leaders. If a player has two or more leaders with the same Initiative Rating, he chooses which to use for that Player Turn.
After the initial Macedonian Player Turn, play will continue with three consecutive Persian Player Turns using the three Persian 3-rated leaders, then Persian player’s choice as to which goes when. The fifth Player Turn belongs to the 4-rated Thymondas while the sixth Player Turn belongs to the 5-rated Nabarzanes. Though tied with Parmenion and Craterus, the Persian leader goes first. Player Turns seven and eight go to the Macedonian leaders Parmenion and Craterus, who goes first is up to the Macedonian player. Player Turn nine is Alexander’s.
The leader activations at Issus are not as dynamic as, say, Heraclea from SPQR, discussed in SPQR: A Guide to Playing the Game Part I, where there are 13 leaders, five different Initiative Ratings, and two groups of similarly rated leaders of both sides where a die roll determines which leader goes first.
Trump
The Trump Option (Alexander, 5.4) gives the players an opportunity to alter the Player Turn order described above to a degree by allowing a player to use a higher rated leader to jump ahead of another of his leaders. This is usually done to jump ahead of an opposing leader to preempt whatever that leader might be planning to do. At Issus, there are no opposing leaders to jump over, so there is little reason to use Trump in this way, especially since a successful Trump will deny Momentum to his lower rated leaders and present a Trump opportunity to the other player.
The other Trump opportunity presents itself when an opposing leader succeeds in a Momentum attempt (Alexander 5.3). The only Persian leader able to Trump in this fashion is Nabarzanes, but since he goes before all the Macedonian leaders, he will only get the chance if Parmenion or Craterus succeed with a Momentum attempt after an Orders Phase gained through a Trump. All three Macedonian leaders, on the other hand, can Momentum Trump at will, but failure finishes the leader (in effect the leader loses its Player Turn), and success may deny Momentum to another Macedonian leader.
Issus Leader Activation Order
Leader Orders
Let’s now look at what happens within a Player Turn. The leader associated with the Player Turn is the driver of the action. The Initiative Rating is a key factor here as well, but three other ratings are in play: Command Range, LineCommand Rating, and Strategy Rating. All leaders have ratings for Command Range and have a Movement Allowance. Some Persian leaders have the Line Command ability while Persian Overall Commanders and Wing Commanders have a Strategy Rating. Macedonian leaders do not have either rating. At Issus, the only leader with the Line Command rating is Nabarzanes who is also a Wing Commander. The Wing Commander ability allows Nabarzanes to issue a Line Command without the use of Darius’ (the Persian OC) Strategy Rating, though Nabarzanes’ Strategy Rating is needed to issue a Line Command in a Orders Phase generated by Momentum. Furthermore, Darius and Alexander, as OCs, have several other “special abilities” that separate the OC from the other leaders (Alexander 4.4). Macedonian Wing Commanders are used to activate the optional Contingent Commanders rule (Alexander 5.6) which I chose not to use.
Orders Phases
The leader granted the Player Turn conducts one and possibly up two more Orders Phases (Alexander 3.0 Phase B), with the additional two Orders Phases via the Momentum rule (Alexander 5.3). The Orders Phase has two segments conducted sequentially. In the Movement/Missile Fire segment, the player uses his leader to order combat units (the OC can also order other leaders). There are two mutually exclusive methods to do so: Line Commands (LC) or Individual Orders (IO). With the LC method only Move and Fire orders are allowed, while an IO can be used for all orders, some of which are limited to the OC (Alexander 5.22). In the Shock Combat Segment, the player’s units with Shock markers perform Shock combat.
In the Issus scenario, Individual Orders rule the day. The only leader with a Line Command ability is Nabarzanes and there are only two eligible Lines: the Light Cavalry (LC – 15 units) and the Heavy Cavalry (HC – 8 units). The three Royal Guard HCs are positioned elsewhere on the field and are best left to protect Darius (Alexander 9.24), so there is no benefit using an LC here. The Persians are guaranteed in being able to move 18 units by IOs. If Nabarzanes can issue an LC to al 15 LC, that number climbs to 28. The Macedonian player is guaranteed in being able to move 24 units by IOs – Alexander receives an extra Player Turn due to the Elite Commander Initiative (Alexander, 5.6) rule.
I want to draw your attention to the important Army Size and Troop Quality chart which is present in every scenario. The Persian player, with 79 units in his army, is limited to moving roughly 1/3 of his army per Game Turn without successfully using Momentum. The Macedonian player, on the other hand, has 49 units and will be able to move 2/3 of his army per Game Turn without using Momentum. When to use Momentum (for the Persians) and when to Trump a successful Momentum (for the Macedonians) provide the players with some tough choices. Although it would seem desirable to always try for Momentum, a Macedonian Trump can not only negate a successful attempt but also remove the ability of his other leaders in the Initiative order from attempting Momentum at all. For the Macedonian player, a successful Trump is not guaranteed and using Alexander, the leader most likely to succeed, would deprive his other two leaders of the Momentum opportunity. And, of course, there is the Die Roll of Doom (Alexander 5.33) which has a slight chance (3%) of turning a Momentum attempt into a significant boon to the opposing player.
At this point in the discussion, it’s time to consider the second most important leader rating, Command Range, since it puts a constraint on the use of IOs and LCs (Alexander 4.21). The larger the Command Range the more real estate over which the leader can project his influence. The leaders at Issus have generous ranges compared to other scenarios in the series. Note that for LCs, the rating is halved (rounded up). This means the Persian player will need to keep those LC within a 3 hex range of Nabarzanes to use the LC to maximum effect. In the Shock Combat Segment, combat units within the leader’s Command Range may be given (must if when using the optional Engaged rule) Shock markers (the No TQ Check variety), enabling them to conduct Shock combat. The positioning of leaders, therefore, is critical.
Battle Plan
Now that we have an idea on how an Issus Game Turn will likely unfold, we need a plan to win the game. This means doing away with enough of your opponent’s units to force his army to withdraw. From a rout ratio perspective, the Macedonian army is in its prime and the Persian army is at its best. The number of Rout Points (RP) triggering withdrawal is the same for both sides at 135 RP. The Persian player loses if Darius is killed, the Darius the Target rule (Alexander 9.24) makes it easy to have Darius leave the map. As for Alexander, he is worth 70 RP dead, not an automatic withdrawal, to encourage players to be somewhat aggressive with him.
The historical setup has the Persian army deployed in a good defensive position behind the Pinarus River. Historically, the Persian plan was to defend with its infantry along the river and use its excellent cavalry on the right wing to drive across the river, dispense with the weak Macedonia left wing, and take the Macedonian center in the rear. For The Macedonians, the plan was for Alexander, at the head of his elite cavalry, to cross the river at a fordable point on the Persian left and then drive toward the Great king, while concurrently assaulting the Persian center with his phalangites.
Terrain
Let’s look at the Issus terrain.
From the Persian perspective, the terrain on the right wing, where the Persian assault will occur, is relatively easy going. The crossing of the Pinarus will cost a Hit but no additional MP. The area across the river is eight hexes wide with no slopes – perfect cavalry country. There is not much point to advance any of the Persian foot across the river. None are a match for the phalangites in open terrain and the cost to do so over the “mild slope” portion of the river (hexes 2516 to 3410) would spot them 2 or 3 Hits depending on the Type. The cost to cross over the steep slope section is 5 Hits (1 less for Skirmishers) which would rout most units.
The Macedonian right wing is another matter. Cavalry can only cross into four hexes: 4707, 4708, 4809, and 4909. Their journey from the starting gate is all downhill which will cost an extra MP for each slope but no Hits. The Rocky River will cost them 2 MP and 2 Hits to enter and another 2 MP plus a Hit to move upslope and exit the river on the far side. Once the opposing Skirmishers are cleared, units can avoid the Rocky River hexes by using hex 4707 reducing the MP and Hit cost for cavalry.
As noted above, the cost to cross the river in the steep slope section is prohibitive, so the Macedonian infantry assault will necessarily be along the “mild slope” section of the river. Even there the cost to enter the river is 2 MP and 2 Hits (1 Hit for the Peltasts) and another 2 MP and a Hit to leave the river up slope. Note that terrain Hits are incurred during an Advance after Combat (Alexander 9.31).
The Persians have an added advantage of some manmade terrain in the form of eight Abatis markers which may be placed on any unit deployed adjacent to the river. The benefit here is a +1 TQ increase for combat purposes and 1 Hit penalty to enter the hex although should a Macedonian unit do so, the marker is removed. The requirement that a two-hex unit have markers in both hexes seems to be a waste, so I decided to buff the Skirmishers in the five hexes from 2416 to 2814, and the Slingers in 3014, 3013, and 3112.
Matchups
The terrain is a significant challenge for the Macedonians. I will delve a bit into the combat characteristics to look for some offsetting advantages there. The Persians’ 20+ Skirmisher (SK) units are not capable of offensive shock combat. The Macedonians have a dozen or so light units, mostly shock capable Peltasts. A look at the Shock combat charts (Alexander 9.52, 9.53 and my condensed version at the end of this section) shows that an LP attack is resolved on the Shock CRT Column 10 against Skirmishers, shifted leftward a two or more columns depending on the terrain, with the all-important Attack Superiority. Should the SK stand their ground, they are looking at 4-8 Hits but are only able to inflict a maximum of 1 Hit in exchange. Moreover, units attacking Skirmishers do not make a Pre-Shock TQ check though the Skirmishers still do (Alexander, 9.13). Offsetting this to a degree is the Skirmishers’ missile fire capability, primarily Entry Reaction Fire (Alexander, 8.21) which, when coupled with the Hits due to the terrain, can be deadly. Most other types will produce comparable results except for the SK+ which do not gain Attack Superiority. Compared to the Peltasts, however, the Skirmishers are expendable at 1 RP versus 5 RP.
The bulk of the Persian non-Skirmisher infantry are on the lighter side: Cardaces LP/CA and low TQ Light Infantry. The Macedonia Phalanx (PH) and Hypaspists (HI) are Attack Superior with a similar Shock CRT column to that of the LP vs. SK match producing a similar 4-8 Hit result but with 2-3 Hits on the attacker. The only significant competition will come from the four Greek Mercenary Hoplites (HI/HO) where there is no Attack Superiority and resolution on Columns 7-8. The Macedonian units have a marginal advantage in Hit potential but there is a good chance the Hoplites will more than hold their ground given the Macedonian terrain disadvantage.
A look at the combat charts shows that cavalry has no business attacking the infantry heavy types unless they can achieve a positional advantage. You never want to be in a Defender Superiority situation. Given the HC’s attack Superiority, LC are best used in the attack with a “first strike” to their advantage.
The chart below summarizes the frontal attack Shock relationships for the most common matchups at Issus. Flank and rear attacks generally have a column or two rightward shifts, but the most important aspect is that those attacks are always Attack Superior, negating any Shock Superiority advantage. Although the higher the Shock CRT column the better, that advantage is subtle. The Selected Shock Column Probabilities chart shows the combat result probabilities for the center section of the Shock CRT where most attacks are resolved. The key takeaway here is that you will incur hits, and the hit difference between attacker and defender is but 1 Hit most of the time unless superiority or a special case (defending Skirmishers) is in play.
Enough setting the stage, it’s time to play the game.
The following is a “play by play” with commentary of my solitaire play through of the first Game Turn of the Battle of Issus. The game play was subsequently revisited to correct gross rules violations (Cardaces shooting missiles, the various Skirmisher penalties, etc.). There are a few cases of missed opportunities, along with some decisions that (in the light of hindsight) may not have been the best, which were left as is. There are frequent references to specific rules sections that should be helpful to players new tothe GBoH series games.
When I play solitaire, I tend not to flip units unless I must as a memory aid. You will not see leaders on their Finished side nor combat units on their moved side in the diagrams.
Elite Commander Initiative
Movement and Missile Fire Segment
The Macedonians start the festivities with an Elite Initial Orders Phase (Alexander, 5.5). The EIO Player Turn may be used by Alexander or any other Macedonian leader in his command range. Here there are none in range, so Alexander will conduct the Orders Phase. My view is that unless there is an incredible opportunity to do otherwise, Alexander should always get the nod. Following the battle plan, Alexander orders units toward the river.
Using three orders, he moves Companion HC 1-3 (in that order) into a line of hexes 4608, 4609, and 4610. There is no Hit cost to move down slope but there is a 1 MP cost to do so. The intent here is to cross the river via the “clear” river hex (4707). These three units are moved first to clear the way for the Paeonia and Prodromoi cavalry. There is no point in unnecessarily moving through your own units and incurring the Hit penalty (Alexander, Stacking Chart).
Alexanders’ fourth and fifth orders move the Prodromoi LN to hex 4810 and the Paeonian LC into hex 4709.
Alexander has two orders left. It seems best to use those orders to discomfort Rheomithres and those Asia Levy lights atop the hill. The first of those orders goes to the Thrace LC which has enough MP to move to 5119 and face the Persian LI for flank attack. The Persian player could try to change facing (Alexander, 7.16), but with the +3 DRM MA difference, there is a good chance the unit would outright rout. If not, the minimum 1 Hit for doing so and the 1 Hit for changing facing in the Woods, would guarantee a rout in the subsequent Shock combat. The low-odds shot taken by the Thrace LC misses with a 9 DR (adverse DRMs for movement and the Woods) so the unit is now Missile Low. The Thrace LC is tagged with a Shock Must Check TQ marker.
The Thrace LC’s flank attack is not optimal since the Asia Levy can react and force the cavalry into a DS situation and the only good reason for making the attack is the Asia Levy’s low TQ and the Woods penalty for the facing change.
Alexander’s final order goes to the Agriania SK* which moves to 5016. Why take on two units? Size doesn’t matter given that a Skirmisher type is involved, and both defenders will have to make a Pre-Shock TQ Check (Alexander, 9.13) and with a 3 TQ there is a good chance that the Asia Levy will run before needing to resolve the remainder of the Shock sequence. Furthermore, Rheomithres needs to decide whether to stay around for the fight or withdraw. Rheomithres wisely withdraws to 5217 (Alexander, 4.62) – slow going in the Woods. Having your leader in an enemy ZOC prevents that leader from issuing orders (Alexaner, 5.25) a situation that is best avoided in most circumstances. The two Asia Levy units use Entry Reaction Fire (Alexander, 8.21), both miss, and both end up Missile Low. The Agrianian’ s fire at the Asia Levy in 5116 and fares better scoring a Hit. Shock Must Check TQ marker placed. Alexander is out of orders, so play moves to the Shock Combat Segment.
Shock Combat Segment
I prefer to conduct Shock combats from left to right across the map. The Agrianian SK* is slightly leftward so I will start there. The first step is the Charge or Pre-shock TQ check (Alexander, 9.13). The 6 DR for the Agrianian has no effect. For the Persians, a 9 DR puts 6 Hits on the Asia Levy in 5515 causing a rout; the unit is faced toward the north edge of the map (the Persia Retreat edge) and rout moves two hexes into 5113. Implementing the rout is immediate in the Charge segment. Given the grain of the hex grid on the Issus map, a hexside (not a hex vertex) points in the direction of the retreat edge. Which side of that hexside the unit faces is immaterial since the “most direct path to the side’s Retreat Edge” will be through the hexside facing the Retreat Edge and along that hex row unless blocked (Alexander, 10.21). Since the Agrianians are in an enemy ZOC, the unit does not advance. A 2 DR doesn’t faze the other Asia Levy so it will face the Agrianians alone for the remainder of the Shock resolution sequence.
The Thrace LC charge did not go well for the Macedonians; the Thracians incurred 3 Hits, the Asia Levy none.
There are no leaders involved so there is nothing to do in the Leader Casualty step. I will resolve the next three steps (Alexander, 9.15-917) together for each combat. Combining these steps speeds play while still satisfying the intent of the rules (Alexander, 9.0 Procedure).
The Agrianian SK* combat is a frontal attack using Shock CRT Column 5 (Alexander, Clash of Spears Chart), shifted to 4 for the Woods (Size does not apply here) and no superiority (Alexander, Shock Superiority Chart). An 8 DR results in 2(2), both units incur 2 Hits. Note that the Agrianians are Shock capable, so the maximum 1 Hit Skirmisher effect does not apply to them. The Asia Levy now has 3 Hits, same as its TQ, but does not rout yet. There are no additional Hits for breakthrough. The Thrace LC combat is a flank attack using Shock CRT Column 6, shifted to a Column 4 (1 for Woods, 1 for Size rounded in favor of the moving LC). The LC is Attack Superior due to its Position which takes precedence over the DS from Shock Superiority Chart. A 0 DR results in a 4(2) adjusted to 4(4) due to the Attack Superiority. Both units suffer 4 Hits. There are no additional Hits for breakthrough.
Next, the Collapse step (Alexander, 9.18). The Asia Levy facing the Agrianians routs and moves to hex 5215, retreating around the Agrianians’ ZOC (Alexander, 10.21). In the Thracians’ combat, both units have exceeded their TQ Rating by the same amount (i.e. 1), so the tie breaker formula comes into play (Alexander 10.15). Since the Thracians would incur a 1 Hit for advancing into a Woods hex, it would exceed its TQ by 2 so it is the unit that routs, rout moving to 5121. The Asia Levy then has its Hits reset to 2 (TQ minus 1).
Back to the Agrianians – that unit advances into 5116 (as it must) where it changes facing one vertex (1 Hit for doing so in the Woods hex) to place the uninvolved Asia Levy in its ZOC. Rheomithres once again withdraws, this time into 5316.
Rheomithres
Movement and Missile Fire Segment
Play now proceeds in Initiative order starting with one of the Persian 3-rated leaders. At this point, there is no compelling reason to use one over another.
Rheomithres gets the nod. Recovery (Alexander, 10.16) and Rally (Alexander, 10.27) for the two units in Woods hexes are not possible due to the Rough terrain. However, there is another routed unit in Clear terrain and within Rheomithres’ command range, so Rheomithres issues a Rally order to that unit. Note that there is no line of sight requirement for issuing IOs. This may bother some players but keep in mind that there are a host of other leaders not represented by cardboard counters involved in making these armies function. Unlike most other GBoH games, a Rally attempt in Alexander uses the leader’s Initiative rating plus 1 for the die roll comparison. Rheomithres will need a 4 or less to succeed. An 8 DR doesn’t do it and since the DR is higher than the unit’s 3 TQ, it is eliminated.
Rheomithres next issues a Move order to the damaged Asia Levy unit in the Woods. Changing facing in the Woods costs a 1 Hit which would rout the unit, so it will move straight ahead to clear the Woods. A move into 5019 looks like a great opportunity for an attack on the routed Thrace LC, but, unfortunately, the Asia Levy unit does not have enough MP to place the routed LC in its ZOC. The down slope Hit penalty does not apply to LI, but the +1 MP is enough to prevent the second facing change. So, it moves into 5018 instead. Going after the Agrianians is possible since the unit is stuck – it cannot withdraw into a Woods hex (Alexander, 6.75) and hex 5016 is no further from the moving unit. However, the likelihood that the Asians would survive Entry Reaction Fire to take its low odds shot (+3 DRM; Woods, Skirmisher) is not worth the risk, and Shock is a guaranteed rout. The Asia Levy stays put and rotates one vertex in the direction of the Thrace LC.
Rheomithres last order is a Move order to the unscathed Asia Levy sitting in the Agrianians ZOC. It is not fast enough to leave the hex (Alexander, 7.23) but can and does change facing one vertex (Alexander, 7.25) for 1 MP and incurs 1 Hit. The Persian player would like to take a shot but can’t since the unit didn’t move closer to its target (Alexander, 8.11) – the unit was issued a Move (not Fire) order and expended MP. This is one of those nuanced rules that players often miss (or choose to ignore). Not a great shot anyway, and the Agrianians would get to fire back (Alexander, 8.23) with a better chance of success. The facing change allows the placement of a Shock No TQ Check marker (Alexander, 7.33) since the Asians did not move from an adjacent hex. With TQ 3 unit, not having to make a Pre-Shock TQ check is a good thing.
Shock Combat Segment
The Asia Levy combat will be resolved using Shock CRT Column 9 (10 + 1L Woods) with Attack Superiority. A 9 DR gives a 2(4) result modified to 2(8) – there is no Hit maximum for SK* types. The Asia Levy ends up with 3 Hits, the Agrianians now have 11 Hits. Breakthrough ups the Agrianians’ hit count to 13, not that it matters. The Agrianians are done for the day – eliminated. The Asia Levy advances and has its Hits set to 2. The unit does not change facing to avoid routing itself.
Now the Momentum decision. Nabarzanes is the Persian’s best leader and the one leading the army’s offensive so allowing him to have a chance at Momentum is critical. Rheomithres will not make the attempt, to avoid giving the Macedonians a Trump opportunity since, if successful, it would deny a Momentum chance to all the Persian leaders (Alexander, 5.44). A Momentum attempt here would not accomplish enough to risk Nabarzanes losing his chance at an attempt. Anyway, it is not likely that the Macedonians would harass Rheomithres before he activates again. So ends the Orders Phase and Rheomithres is Finished.
Aristomedes
Aristomedes will go next. At some point, three or more of the Cardaces deployed along the river from 4405 through 3807 will need to be pulled to a form a line to protect this flank from the inevitable Macedonian cavalry assault. But that can wait until it is clear where the Hypaspists will cross the river. The two Median Archers are within range, so Aristomedes issues a Fire order to the closest Median archer which misses the Companions in hex 4608 earning a Missile Low for the attempt. A second Fire order goes to the other Median archer who misses the Paeonian cavalry. One of the Persian Javelinists is in range, but the intervening terrain and the target type preclude an H&D shot (Alexander, 8.31-2). Aristomedes’ third order is a Move order to the Cardaces 10 at the end of the line which performs reverse face (3 MP) and a pivot (1 MP) incurring a Hit in the process (Alexander, 6.43). With no Shock combats and no inclination to risk a Momentum Trump, Aristomedes is Finished.
Darius
Darius, the last of the 3-rated leaders, is next. He issues Move orders to the three Sittaceni archers in hexes 3705, 3606, and 3605) which move into hexes 4002, 3902, and 3803 respectively (it costs Skirmishers only 1 MP to change facing in any direction) to cover the extreme left flank, keeping their distance from the Cardaces’ pivot hexes, and maintaining their current elevation. With no Shock combats and no inclination to risk a Momentum Trump, Darius is Finished.
Thymondas
Thymondas, the only 4-rated leader, is next in Initiative order. Satisfied with the positions of the combat units within his 5 hex Command Range (not as generous as that of the two previous leaders), Thymondas orders himself to move two hexes (2 MP) toward the left flank into 3211 and then issues Move orders to the two Sittaceni archers in hexes 3307 and 3407 that are now in Command Range. The latter moves to 3405 and the former to 3206, using their ability to change facing in any direction for 1 MP to return to their original facing. The last order goes to Thymondas who moves 4 MP (now 6 of his allowed 9 MP) toward the right flank into hex 2813. Once again, there is no Momentum attempt; Thymondas is Finished.
Here we have a bit of fine tuning of the defensive position. The archers are moved back to give room for the Cardaces in 3309-3409 to maneuver or to accommodate an initial rout move. Thymondas’ move to the right flank places the two archers in 2416 and 2515 in range and position himself at the center point of the anticipated Macedonian attack.
Nabarzanes
Movement and Missile Fire Segment
Nabarzanes is one of three 5-reated leaders, the other two Macedonian. The tie breaker for this scenario is that a non-Macedonian leader goes first rather than a determination by die roll (Alexander, 5.12). The Persian plan is to use their numerical superiority to overwhelm the Macedonian left flank and then work to get behind the line of phalanxes and attack them from the rear. Nabarzanes, the only leader with the Line Command ability in this scenario, can issue a Line Command to one of two groups: Light Cavalry or his Bactrian Heavy Cavalry. He has enough orders for the Bactrians, so a Line Command would be unnecessary. Nabarzanes will open by sending his mass of Light cavalry forward to overwhelm the Macedonian cavalry while keeping his Bactrians in reserve for use against the Macedonian phalangites. Nabarzanes has 13 LC within his 3 hex Line Command range (it is half his normal command range – Alexander, 4.33) so issues a Line Command to those LC.
Here are the moves and fires (in order). The river does not slow movement but all units that enter it incur 1 Hit.
Persia 2 to hex 1724; both units fire and miss; Shock Must Check TQ placed
Persia 1 to hex 2121; Thrace 6 misses with a Missile Low; Persia 1 Hits
Note that a moving LC is not required to Shock. LP are tough defenders against cavalry – DS on the Shock Superiority Chart. Against LC, they lose that DS if out or missiles. Given that the Peltast is Missile Low, the unit is unlikely to fire, so moving a Persian LC adjacent would effectively give that unit a free shot. But there are other opportunities …
Persia 3 to hex 2320; Cretans Hit as do the Persians; Shock Must Check TQ placed
Persia 5 to hex 2419, fires at Thrace 5 and Hits
With no Shock capability, the horse archers pulled up short, out of javelin range. Ending in 2319 and avoiding the up slope Hit would have been better but at the time I thought that the LOS was blocked by the higher elevation in 2420. Firing at the Cretans (+2 for SK) gives the target a better chance to hit with Return fire (Alexander, 8.23) than to receive from the firing unit. Besides, the Shock is certain to finish the Cretans so no point wasting the shot.
With regards to the elevation blocking the shot mentioned above, that is a mistake. The LOS rules in GBoH regarding elevations are simple: only an elevation higher than both firer and target blocks the LOS and if both firer and target are on higher elevations than any blocking obstacle (units, Woods) their LOS is clear.
Hycarnia 5 to hex 2218, facing east
Hycarnia 4 to hex 1920
Hycarnia 3 to hex 2020
Hycarnia 1 to hex 1719
Hycarnia 2 to hex 1820
Due to the way units head for the Retreat Edge, the Hyrcanians are careful to position themselves in different hex rows to minimize the number of units run over by their routed compatriots.
Media 2 to hex 1519, facing southwest
Media 5 to hex 2018, facing east
Media 1 to hex 1918.
Nabarzanes moves to 1718 to keep all the cavalry within command range.
Shock Combat Segment
Now to resolve the three shock combats. There is no choice in who is attacking who (Alexander, 9.12). Moving from left to right across the map, the Charge (Pre-Shock check) DRs are undertaken. Bad luck for the Macedonians. Greek Ally 1 takes 4 Hits while Persia 2 escapes unscathed. Persia 4 and Greek Aky 2 each incur 1 Hit. Bad luck for the Cretans – they fold (9 DR) and are immediately eliminated. Persian 3 advances into the vacated hex and rotates to face Thrace 5’s flank (there is no Pre-Shock TQ check when attacking Skirmishers).
Back to the first combat. The combat will be resolved on Shock CRT Column 8, right one column from the base due to the Size Ratio Difference (SRD, Alexander, 9.16 Step 2). Persia 2 gets the benefit of the rounding since it moved into the attack. A 0 DR produces a 3(2) result. Greek Ally LC now has 6 Hits and the Persia LC 4 Hits.
Persia 4’s combat uses the same Shock CRT Column. This time the result is reversed, a 2(3). Both LC now have 4 Hits. A quick look at the two results shows there are no Breakthroughs. So on to the Collapse step. There is one rout, so the Greek Ally rout moves to 1827. The second Greek Ally has Hits one less than its TQ so must make a TQ Check and passes (barely) and has its Hits reduced by one to 3. The victorious Persia LC advances into 1825 where it changes facing one vertex (Alexander, 9.13) toward the Greek Ally LC.
Momentum Orders Phase
Now, for the Momentum attempt. Since Nabarzanes is the last of the leaders on his side in the Initiative order, there is little reason not to make the attempt. The only downside is the Die Roll of Doom (Alexander, 5.33) and of those results only the Crisis of Faith would cause the Persians a problem here. Nabarzanes succeeds with a 3 DR. Decision time for the Macedonian player. Given a 40% probability of failure for Parmenion (if considering Alexander, keep in mind the Bypassed leader rule), the downside is not worth the benefit. Parmenion would be lost for this turn and Nabarzanes would get another go next turn before Parmenion could act. The Macedonian player does what Parmenion would have done and declines the Trump opportunity.
Movement and Missile Fire Segment
There is not much room to bring any additional units over the river and moving any of the units on the Macedonian side would incur a Hit for moving a second time. Persia 2 and Persia 3 had advanced out of range (should have anticipated that), so one order will go to Nabarzanes to move to 1919 to place those two and their potential advance hexes in range. Nabarzanes then follows with four orders to remove the Hits from Persia 5 and Hyrcania 2, 3, and 4.
While having a unit move again and incurring a Hit is not optimal, there are times when it’s worth the Hit cost. Moving at least one LC into 2023 would tangle up two of the Thessalian HC where they are. And if followed by a Shock attack, which the LC would most likely survive, the LC would inflict some Hits and force the Thessalians to Shock to untangle themselves, suffering more Hits in doing so. Passing on the Shock attack reduces the number Hits the HC will inflict and, given the HC’s Attack Superiority, the LC will earn enough Hits to rout anyway. More aggressive still, would be to move three LC into hexes 1923, 2023, and 2122 and Shock the three Thessalians separately. None of the LC will survive the counterattack, but the Thessalian HC will each have a minimum of 4 Hits making them vulnerable to a second attack should Nabarzanes gain another Momentum Orders Phase or another wave of LC attacks on the following Game Turn.
Shock Combat Segment
The first order of business in the Shock segment is the placement of Shock No TQ Check markers on Persia 2 and Persia 3. Optional here but mandatory when using the optional Engaged rule (Alexander, 10.3).
On to the resolution. There are no Pre-Shock checks. Both attacks are from the flank, so the Persians have Attack Superiority. For the LC vs. LC combat it’s Shock CRT Column 7 – there is no SRD advantage (non-moving attacks round down). The result is a 2(4), adjusted to 2(8) for the Attack Superiority. Since this combat has no effect on the other I am going to complete the combat. The Greek Ally has 11 Hits while the Persia LC has 6 Hits. The Greek Ally exceeds its TQ by more than his opponent, so routs to 2026 moving around the ZOC of Persia 2. The victorious Persian LC has its Hits set to 5 and advances into 1924 keeping its current facing.
The LC vs. LP combat will also be on Shock CRT Column 7. The result is a 2(2) adjusted to 2(4). Note that Position Superiority supersedes Weapons System Superiority. Persia now has 3 Hits while Thrace 5 has 5 Hits, enough to rout it. Due to Persia 3’s ZOC, the rout move will take it from 2621 to 2622 passing through the Ptolemy Phalanx which incurs 1 Hit (it passed its TQ check, but there is a minimum of 1 Hit). Persia 3 advances into 2521 keeping its current facing.
Now for Nabarzanes’ last Momentum attempt. A success here will be a great opportunity to damage the Ptolemy phalanx and eliminate the Peltasts. A Shock attack against the Thessaly HC would be risky but could worth it … and more Hits removed. No luck. Nabarzanes is Finished.
Parmenion
Movement and Missile Fire Segment
The Macedonian player has the choice of either Parmenion or Craterus for this Player Turn. Knowing the status of the left flank before launching the attack in the center is preferable, so Parmenion gets the nod. With no guaranteed Momentum Phase and the looming Retreat Edge, Parmenion will try to reserve two of his five orders to Rally the Greek Ally units (the Thracians aren’t eligible). The weakened flanking Persian cavalry must be dealt with first.
The lethargic Thessaly 1 missed its chance to change facing when the Persia 2 advanced, so will need an order to rectify the situation. Instead, Parmenion will use that order to move Thessaly 2 to 1923, facing the flank hexes of both Persian units (4 MP). If the Persians units react, Persia 2 will outright rout so stays put – staying around for the Shock will at least put a couple of Hits on the Thessalians. Persia 4 does react, however, passing its check but incurring 1 Hit. Its shot misses so is out of missiles. Shock Must Check TQ marker placed on Thessaly 2.
Parmenion’s second order goes to Thessaly 5, which moves to 2522 (4 MP) against the flank of Persia 3. The ensuing shock will rout it regardless of its orientation (Alexander, Shock Superiority Chart), so Persia 3 reacts by changing its facing toward the Thessalians so that it can take a shot. It passes its TQ check, incurs the mandatory Hit, shoots and Hits. Shock Must Check TQ marker placed.
With the immediate threats addressed, Parmenion will do his rallies. Note that Thessaly 2’s attack on Persia 4 stopped the potential H&D fire from interfering with the rallies. Greek Ally 2 first. Unfortunately, the 9 DR eliminates that unit. Parmenion fares no better with Greek Ally 1 where an 8 DR eliminates it as well. With his last order, Parmenion sends Thessaly 4 to 2122 (2 MP) where Persia 1 fires and Hits. Shock Must Check TQ marker placed.
Shock Combat Segment
Who will attack who in each of the three combats is straightforward. The decision for Parmenion is whether to include the Thracians in the attack on Persia 1. The gain is a column shift for the SRD and the ability to distribute the Hits all without a Pre-Shock TQ check for the Thracians. The downside is the loss of the unit’s DS against cavalry since javelin armed units are Missile No if involved in Shock. The shift to Column 10 doesn’t help enough so the Thracians will sit this one out.
Starting from the left side of the map, the Pre-Shock TQ checks DRs for Persia 2 and Persia 4 are high enough to rout both units, while the Thessalians are unaffected. Persia 4 rout moves to 1822. Persia 2 rout moves to 1724, moving around the Thessalian’s ZOC. Thessaly 2 advances into 1924 (either of the two vacated hexes are eligible) changing facing due west. The opportunity to cut off Persia 2’s rout path is enticing, but exposing Thessaly 2’s flank is not attractive.
Moving to Thessaly 4’s combat, Pre-Shock bad luck continues for the Persians … Persia 1 incurs the maximum 3 Hits, while the Thessaly 4 is unaffected. With the final pair the roles are reversed (no pun intended); Thessaly 5 receives 2 Hits, while Persia 3 is unaffected.
For the remaining two combats, the parameters are the same: Shock CRT Column 9 with Attack Superiority. For Thessaly 4 the result is 2(3) adjusted to 2(6); Thessaly 5’s is the same … 2(3) adjusted to 2(6). Thessaly 4 has a breakthrough, but the extra Hits are meaningless. Persia 1 rout moves to 2119 then Persia 3 rout moves to 2420 avoiding Ptolemy’s ZOC. Thessaly 4 advances to 2121 and keeps the same facing. Thessaly 5 advances to 2521 and rotates one vertex to face the Persians.
Momentum
So far a good start for Parmenion. The Momentum DR is important here since success will allow a rally attempt on the Thracians, the recovery of some Hits, and a chance have the Thessalians that haven’t moved enter the fray.
This is not to be … the 9 DR means it’s time for the Die Roll of Doom … and another 9! Parmenion and all units within half of Parmenion’s command range must withdraw 2 hexes toward the Macedonian Retreat Edge using the Orderly Withdrawal procedures (Alexander, 6.72).
Given the grain of the hex grid, all withdrawals will be directly down the hex row. Thessaly 1-5 withdraw to 2026, 1926, 2126, 2123 and 2523 respectively, all surprisingly passing their TQ checks. The Amyntas Phalanx withdraws to 2324-2424, incurs the automatic 1 Hit for infantry, and fails its TQ check for another 1 Hit. Thrace 5 withdraws to 2224, incurs 1 Hit, and passes is TQ check. Lastly, Parmenion withdraws to 2125 and is Finished. Although the Hit damage was light, the “Crisis” pushed the left flank uncomfortably close to the retreat edge. Perhaps the more troublesome aspect was the loss of the Orders Phase.
Craterus
Movement and Missile Fire Segment
The Macedonian plan for this section of the battlefield is to use his Peltasts to clear the skirmishers along the river before moving his phalangites forward. However, Parmenion’s crisis has caused some concern over the integrity of his left flank.
Craterus’ first order goes to Thrace 4 (2719) which moves to 2619, where Persia 5 withdraws to 2318, passing its TQ check, to await further developments. Thrace 4 moves to 2518 and Persia 5 withdraws to 2219, expends 1 MP to change facing due east (Alexander 6.72), and then it fails its TQ check incurring 1 Hit. Thrace 4 moves to 2418. The two Persian Archers hold their ground rather than put themselves directly in the path of routing Persia 1. Thrace 4 changes facing due west and ends its move.
Now for the assault. Craterus’ second and third orders go to Thrace 3 and 2. Thrace 3 (2819) moves into 2617, stopping to see if the three Susa Skirmishers withdraw – they don’t – and continues into 2516, incurring a Hit for the river but not for the down slope move. Both Susa archers score Hits as does the Peltast (on Susa 2); Shock Must Check TQ marker placed. Thrace 2 moves to 2716, the Skirmishers stay put, and continues to 2616 (1 Hit, river). Susa 3 misses and is Missile Low; Susa 4 also misses – a break for the Macedonians. Thrace 2 misses and is Missile Low; Shock Must Check TQ marker placed.
With two IOs left, Craterus could move and attempt to rally Thrace 5, but its rout move will keep it on the map so the rally will be postponed for now. Order four goes to Thrace 1 which moves to 2715 (1 Hit) – no Persian withdrawal again. Susa 4 hits but Arabia 1 misses as does Thrace 1 earning a Missile Low. Shock Must Check TQ marker placed. The last order goes to Mercenary 5 which moves to 3015 (1 Hit) – no Persian withdrawal. The Slingers hit as do the Mercenaries. Shock Must Check TQ marker placed.
So why not withdraw the Skirmishers? The reaction fire can be deadly and coupled with the terrain hits and TQ benefit of the abatis gives the Skirmishers a good chance at surviving the Shock. If they don’t survive, their loss is but 1 RP. A withdrawal may save the units, but it is unclear if they would be of any future value in the battle. Furthermore, the Slinger’s withdrawal would earn both it and one of the Greek Hoplites a hit due to the stacking “Stopping In” penalty (Alexander, Stacking Chart).
Shock Combat Segment
Now for the Shock combats. Thrace 3 will attack Susa2, Thrace 2 Susa 3, Thrace 1 will deal with Susa 4 and Arabia 1, and the Mercenaries will handle the Rhodians.
First the Pre-shock checks. All the defenders are Skirmishers so none of the attacking LP make this check (Alexander, 9.13). No hits for Susa 2, 3 Hits for Susa 3, and 4 Hits on Susa 4, and no hits on the Slingers. A good start for the Macedonians.
All combats will be resolved on Shock CRT Column 7 (10 Shifted 1 River and 2 slope) with Attack Superiority. Size does not matter, and the Skirmishers will inflict a maximum 1 Hit. The Thrace 3/Susa 2 result is a 2(2) .. revised to 1(4) for the Attack Superiority and SK penalty. The Thrace 2/Susa 3 revised result is the same at 1(4). The Thrace 1/Susa 4 plus Arabia 1 is revised to 1(6) as is the Mercenary 5/Rhodes 2 result. The Thrace 2 combat is a breakthrough though the extra hits are superfluous.
Susa 2 with 5 Hits does not rout due to the presence of the abatis. Susa 3 routs and is eliminated as does Susa 4 and Rhodes 2. Thrace 3 and Susa 2 face a TQ check (Alexander, 9.18 #2) which both pass with Hits reduced to 3 and 4 respectively.
Thrace 2 advances into 2515, incurring 2 Hits (Slope, abatis) and removing the abatis. Thrace 1 advances into 2615, incurring the same two Hits placing it at its break point, but since this is due to the advance after combat, its Hits are reset to 4 instead. Abatis removed. The Arabians may fire – a SK ZOC extends into their flank hex – does so but misses.
Mercenary 5 advances into 3014, same Hit cost and same resetting of it Hits as done for Thrace 1. The abatis there is removed. Arabia 3 and Rhodes 2 have shots. Arabia 3 fires first and Hits, routing the Mercenaries to 3016. All the LP are set to Missile No (well, for the routed Mercenaries this is unnecessary since they will be Missile No if they rally).
Momentum
Time for the all-important Momentum attempt. Craterus has all sorts of options here. One common practice is to rally and recover. Moving towards Parmenion, he could rally the Thracians and remove Hits from three other units, while keeping Thrace 1 in range for Shock combat. Alternatively, he could simply continue his attack by moving the Peltasts on his right forward with the Phalanxes following. But not to get the cart before the horse, Craterus must succeed in the attempt … and fails! Craterus is Finished.
Alexander
Movement and Missile Fire Segment
Alexander is the last leader to go. Progress needs to be made clearing the Skirmishers defending the river crossing, so Alexander orders his light units forward, accepting the Hit for moving a second time. Paeonia 2 moves to 4708 (1 Hit for moving again, 2 Hits Rocky River). The Median Archers miss and earn a Missile Low marker. The Paeonians also miss. Shock Must Check TQ marker placed. The Prodromoi move to 4909 (same 3 Hits), where the Persia Javelinists fire and Hit. Shock Must Check TQ marker placed.
Alexander wants to position his Hypaspist for an assault across the river against the Hoplites and Cardaces where it’s easier to cross the river. He uses two of his five remaining orders to first move Mercenary 5 and the Macedonian archers to clear the way. The Macedonian archers move to 3710 and fire at the Cardaces 4 – scoring a Hit (2 DR or less was needed since the archer moved). Mercenary 5 then moves to 3611 (5 MP). Alexander’s last three orders are used to move the Hypaspists: Hypaspist 1 to 3713 with a change of one vertex to the west along the way; Hypaspist 2 to 3813 in the same manner as Hypaspist 1; and the Agema to 3912 in the same manner as Hypaspist 2 but incurring 1 Hit for moving down slope. Unlike cavalry and the light infantry types, the heavy infantry earns 1 Hit when going down slope.
Shock Combat Segment
Shock time. Who is attacking who is clear. For the Pre-Shock step, only the defending Skirmishers check. Media 1 takes 4 (another nasty nine), the Persian Javelinists none. The Paeonia LC’s attack will be resolved on Shock CRT Column 6 (9 with 1L river; 2L slope) with Attack Superiority. The result is a 2(2) adjusted to a 1(4). For the Prodromoi, the Shock CRT Column is 7 with the same shifts and with Attack Superiority. The result is the same 2(2) adjusted to 1(4). During the Collapse step, Media 1 is eliminated. The Javelinists pass their TQ check so their Hits are reduced to 3.The Paeonians advance into 4808 where they incur a Hit for the slope. Media 2 fires and Hits, routing the Paeonians to hex 4810. Media 2 is now Missile No as are Persian Javelinists.
Alexander Momentum
Movement and Missile Fire Segment
Alexander is limited to one Momentum try and this time the Macedonians succeed. Time to exploit the gap at the river crossing – Skirmishers that do not have missiles lose their ZOC. First order goes to Companion 1 who changes facing one vertex due east then moves to 4907 (3 Hits – move again, river, up slope). Persia 2 fires and Hits. Shock Must Check TQ marker placed. Alexander’s second order goes to Companion 2 which uses 7 MP to move to 4808 facing Media 2 (3 Hits – move again, river, up slope). Shock Must Check TQ marker placed.
Order three rallies the Paeonians. The Paeonians are given 2 Hits from the Rally Table die roll and then are refaced towards the river. Alexander uses his fourth order to move himself to 4416 (3 MP) to place the routed Thracian LC in range while also keeping the Prodromoi in range. Order five rallies the Thracians (3 Hits from the Rally Table roll) and then are refaced towards the Persians. Orders six and seven are used for Move orders to the two Companion HC that have yet to move. Companion 4 moves to hex 4608 and Companion Agema moves to hex 4609.
Shock Combat Segment
The Prodromoi receives a Shock No TQ Check marker. Who is attacking who is clear. The Pre-Shock TQ checks inflict 2 Hits on Media 2, none on the Persia 2 Javelinists. Companion 2’s combat will be resolved using Shock CRT Column 9 (2L for the slope while Companion 1’s combat will use Column 11 (no shifts). The Prodromoi combat will be resolved using Column 7 (as before). All three combats have Attack Superiority.
The adjusted results for Companion 2 and Companion 1 are both 1(6); for the Prodromroi 1(4). Media 2, Persia 2 and Persia 1 are eliminated. Companion 2 advances to 4807, incurring a Hit for the slope and then faces north. Companion 1 advances to 5008 and faces northeast. The Prodromoi advance to 4908, incurring a Hit for the slope.
Alexander is Finished.
Rout and Reload Phase
The Orders Phase is complete, now on to the Rout and Reload Phase. The first step is to remove the Rallied markers from Thrace 1 and Paeonian 2. Next come the rout moves, of which there are several. The rules don’t specify which player goes when and in most cases it doesn’t matter. As with Shock combat, I will move from left to right across the map. In this segment, routed units use their entire MA to move toward the retreat edge expending MP for terrain and facing changes but ignoring any terrain Hits (Alexander, 10.22). Given the grain of the hex grid, the units will travel along a hex row unless blocked (Alexander, 10.21).
First to go is Persia 2 (1724) which routs along the hex row to 1716, passing through Hyrcania 1, which passes its TQ check incurring the minimum 1 Hit. Persia 4 (1822) is next, which rout moves along the hex row to 1814, passing through Hyrcania 2 which passes its TQ check incurring 1 Hit. On to Persia 1 (2119) which rout moves along the hex row to 2111 passing through Cardaces 1 and Syria 2. The Cardaces fails its check but still only incurs 1 Hit. The Syrians pass, incurring 1 Hit.
Persia 3 (2420) rout moves along a circuitous path behind Thrace 4. Blocked by Thrace 3, Persia 2 changes facing toward the west (4 MP so far) and moves into the river then into 2416 atop Susa 2, exhausting its 8 MP. Per the stacking chart, it moves one more hex atop Cardaces 3 and is eliminated. Susa 2 fails its TQ check by 2 giving it enough Hits to rout, despite the abatis benefit, and is eliminated. Cardaces 3 fails its check by one so incurs only the 1 Hit minimum.
Keep in mind that rout movement in this segment works the same way as the initial two hex rout move in that an enemy ZOC does not block or stop the move if occupied by a friendly unit (historically, the depth of the units was extremely shallow relative to the unit’s frontage so there was ample room for routing units passing behind the action).
Continuing, Thrace 5 (2622) rout moves along the hex row to 2627. Mercenary 5 (3016) rout moves along the hex row to 3021 atop the Greek Allies 1, where it moves one more hex to 3022. The Meleager Phalanx fails its TQ check and incurs 2 Hits, while Greek Allies Hoplite 1 passes theirs, incurring the 1 Hit minimum. And lastly, the Asia Levy (5215) rout moves to 5210.
The units with Missile Low/No can have those markers removed in some circumstances. Thrace 2 and Thrace 3 qualify since they are out of enemy missile range and not in a ZOC (Alexander, 8.18). In the final segment, leaders are flipped from their Finished side as are units on their Moved side and any Moved markers removed. For this play through, I didn’t do any flipping to speed things up.
Withdrawal Phase
The Macedonians lost the two Greek Ally LC (10 RP) and two Skirmishers (2 RP) for a total of 12 RP.
The Persians lost 1 Persian LC (6 RP), an Asia Levy (3 RP), and eight Skirmishes (8 RP) for a total of 17 RP.
Ready for the next Game Turn …
End of Game Turn Commentary
The Persians made decent progress on their right wing with a little help from Parmenion’s Crisis of Faith. Nabarzanes’ was a bit timid in his Momentum phase and should have anticipated a vigorous counterattack by Parmenion. A more spirited use would have been to send three of his LC to hit the Thessalians first and accept the hit for moving a second time.
On the Persian left, the Median archers being Missile Low should have held their fire (I had forgotten that Skirmishers lose their ZOC when out of missiles) to prevent those sneaky Companions from infiltrating the Persian position to attack the Persian Javelinists. The Skirmisher river defense did its job, which was somewhat undone by the flight of the Persia 3 light cavalry.
The Macedonians cleared the river crossing on their right wing but at a heavy Hit cost to three units. The three other Companions are set to cross during the upcoming EIO phase.
Craterus’ Peltasts were mostly successful in clearing the opposing riverbank, but a failed Momentum prevented further gains. Parmenion conducted a spirited and successful counterattack only to be spurned in his attempt to rally the Greek Ally cavalry and then lose his nerve with a failed Momentum and a Crisis of Faith retreat.
The period covered by Baltic Empires saw the Ottoman Empire at the absolute height of its power. The steppes of southern Ukraine and Russia were controlled by the Tatars of the Crimean Khanate, who were vassals of the Ottoman Empire, while the southern border of the Poland-Lithuania was inhabited by semi-independent Cossacks federations. Tartar raids to capture loot and slaves were a common problem along this border. Most of the time the Tatars served as a buffer between the Ottoman Empire and Poland-Lithuania. The Ottomans generally had no direct interest in this region, as their attention was primarily focused on the Habsburg and Polish lands to the south and west of the Baltic Empires map, but Polish and Russian reactions to Tatar raids at times forced the Ottomans to come to the aid of their vassals which resulted in large scale wars between Ottoman and Russian or Polish forces in the region.
Sultan Mehmed IV(1642-1693)
Mehmed came to the throne of the Ottoman Empire at the age of only 6 after his father was overthrown in a coup. He would become the longest reigning sultan in Ottoman history after Suleiman the Magnificent and was known by contemporaries to be a particularly pious ruler. In a Baltic context he is mostly known for his wars against Poland and Russia in the 1670s. The greatest of these was the War of the Holy League or Great Turkish War of 1683-99, which saw the legendary siege of Vienna in 1683 and the equally legendary relief of the city by allied forces led by the Polish king Sobieski with his winged hussars. Mehmed would be overthrown in 1687 by soldiers disenchanted with the course of that war.
Getting the Mehmed IV card into your court in Baltic Empires represent your Power securing an alliance with the Tatars and/or the Ottoman Empire. He thus represents not only himself but also the Ottoman Empire and other associated peoples more generally. By later discarding the card, you are calling on the Ottomans to intervene in the region with a major army. Placing three Independent units at once and allying with them all for one turn (as well as with any other units that might already be in the Ottoman & Tartar Lands) can be truly devastating for the unfortunate target. But once the blow has been struck the effect is over and the region might then be filled with Independent units that anyone can ally with, which can cause of lots of problems for both the Poles and the Russians. This card is obviously of major value for both the Russian and Polish players, but can be just as valuable for any power fighting against Russia and/or Poland as it allows them to devastate their enemies or at least force them to spend scarce resources to defend against Mehmed. Indeed historically the Swedes allied with the Tatars on several occasions and Charles XII even sought refuge in the Ottoman Empire after his disastrous defeat at Poltava in 1708.
As the card is lost when used it is worth considering the timing of its play, as there can be many circumstances where the continued threat of unleashing Mehmed can be at least as useful as actually using the card.
The Habsburgs and the Holy Roman Empire
Compared to the Maritime Powers and the Ottomans the interests of the Holy Roman Empire and the Habsburg dynasty that controlled them were mostly defensive in nature when it came to Baltic matters. The religious divide across Europe in general, and Germany in particular, caused by the Reformation just prior to the start of the game was however a cause for conflict, as the Catholic Habsburgs wanted to restore the true faith throughout the Holy Roman Empire (as well as centralizing Habsburg power in the process). These religious conflicts culminated in the Thirty Years War of 1618-1648, which became intertwined with Baltic affairs as first Denmark and then Sweden saw an opportunity to expand their realms into the wealthy German lands by intervening into the war on the Protestant side. As Sweden was simultaneously fighting a war with Poland, who was allied with their fellow-Catholic Habsburgs, and Prussia-Brandenburg was being steamrolled by the armies of both sides, Northern Germany had suddenly become the focal point for most Baltic rulers.
The period from the end of the Thirty Years War in 1648 to 1721 (the end of the period covered by Baltic Empires) saw Sweden entrenched as a major power in Europe with holdings in Germany, and with a firm alliance with France – the Habsburg’s main rivals. This situation naturally led to more Habsburg involvement in Baltic matters, such as when an Imperial contingent was sent to Denmark to fight against Sweden. In Baltic Empires the Independent provinces in Northern Germany are very attractive. They mostly start the game with their full complement of Cities and Workshops and several of them produce rare Goods or even, as is the case for Hamburg, contain one of the three super valuable Trade Centers. Compared to the similarly rich, but completely undefended, Independent provinces in the Livonian region (the modern day Baltic states) the provinces of Northern Germany are not easy pickings, however, as most of them start out with enough Fortresses and other Independent units to rival the starting strength of most of the player’s armies.
Emperor Leopold I(1640-1705)
Elected in 1658, Leopold became the longest ruling Habsburg emperor, and the first to understand that the Treaty of Westphalia in 1648 meant a marked decrease in importance of the role of Holy Roman Emperor. To compensate he sought to strengthen Habsburg authority within their own lands along absolutist lines. His reign saw many large wars against both France and the Ottomans, but in the Baltic context he is mainly known for the direct Imperial intervention against Sweden in the Northern War of 1655-60, which saw Imperial troops campaigning as far as Denmark as part of a Danish-Polish-Imperial coalition army. The infamous “Habsburg jaw” was most prominent in Leopold, and after his jaw was depicted unusually large on a 1670 silver coin, he was nicknamed “the Hogmouth”.
In Baltic Empires Emperor Leopold I represents the advantages of securing a firm alliance with the Habsburgs and their network of vassals and/or rulers within the Holy Roman Empire. You get to produce Independent units in Independent Provinces each Production Phase, an ability otherwise restricted to the Prussian player. You also get to ally with a unit in the Habsburg Lands for free during the War Phase, so by using the ability to place in the Habsburg Lands you in effect get a free unit you can throw after the other Powers each turn if they cause trouble for you. This is obviously very powerful if you are involved in securing Provinces for yourself in the area, but can also be used by Powers such as Russia, who are normally far removed from the Habsburg Lands, as constant attacks from the Habsburgs can be a great way of distracting other players who would otherwise cause trouble in your lands.
Albrecht von Wallenstein(1583-1634)
A Bohemian military entrepreneur, Wallenstein was Born into a poor Protestant noble family but converted to Catholicism in 1606 and married a rich widow. Wallenstein made an enormous fortune and a name for himself as a mercenary captain in the service of the emperor in the early part of the Thirty Years War, where he was awarded confiscated estates for his services. His massive armies were instrumental in first defeating the Danish, and then slowing the Swedish, during their interventions in the war. His meteoric rise to power and growing independence from the emperor would prove to be his undoing as he was assassinated in 1634 by army officials with the emperor’s approval.
Technically speaking Wallenstein didn’t intervene directly into Baltic affairs but only fought against Danish and Swedish intervention into German affairs. As this happened within the area covered by the map of Baltic Empires, he is however included in this article and the game. In the game, as in history, the coming of Wallenstein will pose great problems for whoever is trying to take control of the independent areas in Germany. The player who gets Wallenstein into their Court gets to place a total of five Independent units within the German lands (as defined by being adjacent to Hannover). As befits Wallenstein’s historical conquering army these units can be placed in any of these areas and not only in friendly or Independent-controlled areas, and can therefore really set back an opponent who has spent lots of effort and expense to carve out an empire in Germany. As in history Wallenstein only works for the Emperor (and himself) and not for the player who got him in their Court, so he won’t directly help the player gain a foothold in Germany. On the contrary, the second part of Wallenstein’s card text even specifies that no Protestant powers may ally with Independent units for the rest of the Round, as well as the next, so the arrival of Wallenstein often shuts down players’ ambitions in Germany for some time.
This is the third in a series of InsideGMT articles from Paul Hellyer about his board game Tsar, currently on GMT’s P500. You can view the previous article here.
As the new year arrived in 1917, Russia’s Tsarist regime teetered on the brink of collapse. Public opinion had turned against it, its army was struggling in the war, the economy was falling apart, and the capital of St. Petersburg faced a severe food shortage. In late February, hungry workers went on strike, demonstrated in the streets, and looted granaries. The regime had a short window of opportunity to reassert control, but this proved difficult. Its most loyal and capable troops were away at the front, as was the Tsar himself. The Tsar boarded a train and ordered troops to return to the capital, but they all found themselves stranded on blocked railway lines. Some officials in St. Petersburg tried to use the unreliable local garrisons to put down the disorder, but the soldiers instead murdered their officers and joined the revolutionaries. Left with few options, Nicholas II signed his abdication in a railway car.
Tsar turns the clock back to 1894 when Nicholas acceded to the throne. To give players a chance to set a different course, the game aims to capture all the factors that ultimately led to revolution: public support, army and navy morale, the regime’s political authority, agricultural and industrial production, infrastructure, and external factors like international trade, foreign relations, and war. As you play the game, you can change the inputs and watch the game engine respond. The end result might be a repeat of history, a stable constitutional monarchy, a fearsome police state, or a dysfunctional kleptocracy hanging by a thread.
In this article, we’ll take a closer look at these factors and discuss how they relate to the regime’s survival, starting with popular support. Tsar measures this in four key “Sectors”: Nobles, Bourgeoisie, Peasants, and Proletariat. One angle is the total level of support in all Sectors combined, which determines the number of Unrest Cards featuring incidents such as general strikes, demonstrations, insurrections, and assassinations. Another angle is the level of support in individual Sectors: different Sectors react differently to various events, with the Bourgeoisie and Proletariat Sectors tending to be more troublesome for the regime. Low support in the Bourgeoisie Sector triggers a recurring Dissidents Coded Card and trouble in any Sector can trigger economic production penalties. If support in any Sector falls to zero, players draw a Revolt Coded Card which can rapidly lead to revolution if left unchecked.
But as an autocrat, the Tsar doesn’t necessarily rely on public support. Depending on other factors, his regime might easily counter domestic opposition. One of these other factors is army and navy morale, which are also tracked on the game board. High morale gives the regime more options to suppress unrest, while low morale can itself become a threat to the regime—when morale reaches zero in the army or navy, a Mutiny Coded Card appears which can be even more dangerous than a civilian revolt. Another key factor in the military is the availability of “Elite Army Units” that always remain loyal. They’re based on historical regiments such as the Preobrazhensky Life Guards Regiment that drew their officers from the ruling class. Assuming resources and transport are available, these units can always be used to put down strikes, revolts, and mutinies. But with only three of these units, they can easily become overstretched. That’s especially true in wartime, when players are pressed to send the best units to the front, meaning they are not immediately available to respond to internal threats —creating the same situation that brought down the real-life regime in 1917.
The regime’s political authority is measured by the game board’s “Order Tracker,” shown on the left. It consists of two parts, Fear and Reverence. Order is defined as Fear or Reverence, whichever is higher. Fear refers to the government’s reputation for oppression and punishment, while Reverence depends on the Tsar’s mystique and cultural authority. The former is easier to manipulate, but actions that raise Fear tend to come with negative side effects. For instance, you can opt for capital punishment for the Tsar’s enemies, but this lowers popular support in the Bourgeoisie Sector, which may trigger a dissident movement and lead to a cycle of violence.
When Order is high, the regime has more options for responding to domestic unrest and maintaining military discipline. The highest levels of Order often allow the regime to silence its critics through surveillance and intimidation without the expenditure of any resources, whereas lower levels of Order may restrict the regime’s ability to issue orders and use force. But as with popular support, high levels of Order aren’t necessary to the regime’s survival. If you govern through popular consent, you won’t need the most oppressive options offered by the highest levels of Order. This lets players aim for different models of stability, emphasizing either Order or popular support. Having a coherent strategy is important: once you commit to political reforms that lower Order, you need to be vigilant about maintaining popular support; if you alienate the public through Fear, you need to be vigilant about maintaining Order. Avoiding extremes is also important: you need to maintain some minimum levels of popular support and Order, regardless of your strategy. High levels of public unrest will eventually exhaust the regime’s resources, while a total collapse of Order triggers Coded Card 8 (Revolution) and ends the game.
As in real life, the Russian economy affects the regime in many ways, and so the game leans heavily into resource management. The game board tracks five key economic factors: income for the treasury, grain production, industrial production, transport infrastructure, and international trade. The regime needs cash to pay troops, advance government programs, and keep the Tsar happy. Grain keeps the population fed and functions as Russia’s key export in this time period. Industrial production drives the development and maintenance of infrastructure and the military. A robust transport network is needed to move grain from the countryside to cities and ports, to move and supply troops, and keep the economy functioning. Finally, the regime can’t import or export unless it has willing trade partners and infrastructure such as ports and canals. Through trade, the regime typically earns cash through grain exports and (on occasion) pays to import industrial products. All these economic factors are connected and a failure in any one area will weaken the regime, either by angering the public, lowering army and navy morale, or limiting the regime’s scope of action.
Finally, the game tracks foreign relations, which affect trade levels, access to credit, the regime’s reputation, and the possibility of war. France was Russia’s main creditor in the late Tsarist period, and the game creates opportunities for loans and financial aid conditioned on relations with France. Relations with other countries can affect trade, Russia’s international objectives, and the possibility of armed conflict. The game captures the effects of soft power through state visits and reactions to Russian cultural exports; it also captures foreign reactions to Russia’s internal politics—for example, too much political oppression can trigger rebukes from Western nations, while performative amnesties can improve the regime’s public image abroad.
War is the most significant aspect of foreign relations. In real life, war was the catalyst for revolution, both in the incomplete Revolution of 1905 and the February Revolution of 1917. The story of Nicholas II could not be told without war. When war arrives, you’ll find that Tsar is not a traditional war game of tactics. War is treated at a macro level and we’re mainly concerned with the way it affects the regime’s stability. Outcomes mainly depend on the economic factors discussed above and the regime’s ability to maintain internal cohesion. The effects of war may include blockades, public unrest, economic stress, and faltering morale. For instance, drafting a large army reduces grain production, while at the same time increasing the cost of paying and supplying the soldiers. In short, war will present the regime with a stress test.
Notice how all these different factors are connected to each other. Nothing stands on its own. Popular support affects the economy, and the economy affects popular support. The regime’s troops need economic support, and the economy may need the intervention of troops. Healthy trade levels are needed to develop the economy, and a healthy economy is needed to develop the infrastructure for trade. So there are many feedback loops in the game, which can be either positive or negative. When things go badly, the game reaches a tipping point where revolution becomes inevitable.
Watching these feedback loops and forecasting the regime’s stability is an important part of gameplay, because victory conditions are radically different for games that end in revolution and games that end with the Final Scoring Card. If the regime survives to the end of an Era, players win according to their VP scores, based on their Faction’s policy objectives. Gold that they stole through corruption is deducted from their VP scores. But in multiplayer games, revolution ignores VP and awards victory to the player with the most gold. You’ll need to closely watch the game board for signs of collapse and consider what the other players are thinking: when everyone at the table loses faith in the regime’s survival, they’ll focus on hoarding gold through corruption, which accelerates the slide into revolution. In solitaire games, revolution means you lose—so your first goal is always to avoid revolution, which requires careful long-term planning and perhaps some desperate measures at the end.
As a final note, I’ll share some thoughts about the regime itself and its depiction in the game. In real-life terms, was the regime’s collapse in 1917 a good or bad outcome? My feeling is that the late Tsarist regime occupies a morally ambiguous space, comprised by its many atrocities and failings, and yet relatively benign compared to the Stalinist regime that followed. But whatever my views may be, I don’t try to convey them through the game. My aim as designer is to make a game that’s enjoyable to play, historically accurate, and thought provoking. I’m content to let players create their own narratives through the choices they make and form their own opinions about the regime’s place in history.
In the next InsideGMT article in this series, we’ll focus on the players’ factional objectives and scoring.
The historical power struggles occurring during the period covered by Baltic Empires (1558-1721) did not happen in a vacuum, but were of great importance to the interest to major powers on the edges of the map of Baltic Empires: England, France, the Netherlands, the Habsburg-controlled Holy Roman Empire, and the Ottoman Empire. Each of these powers were in their own way affected by affairs in the Baltic region, and in turn attempted to influence events there to their own advantage by various means. The scale of this ranged across the spectrum from minor trade deals to outright invasions and attempts at dictating foreign policy. The focus on this article is therefore on these foreign powers and how their interference and intervention in Baltic affairs are represented in the game.
The map of Baltic Empires has many areas that are uncontrolled by the playable powers at the start of the game. These are called Independents, and most can be conquered by the players. Along the edge of the map there are also some special areas that can never be entered or controlled by the players. These are the “Habsburg Lands”, the “Ottoman & Tatar Lands”, and in the North Sea, the “Maritime Powers” – an amalgamation of France, England and The Netherlands. Independent units start in these areas and more can be placed each round by the Prussian player (see my previous article on Prussia in Baltic Empires for an explanation on how and why). During their turn, players may spend thalers (the money resource of Baltic Empires) to ally with Independent units and control them during their turn. This simple mechanism in itself does a great job at representing the minor interventions in Baltic affairs, where rulers could secure outside assistance in their wars.
The Dramatis Personae (DP) mechanism, where players add a card to their Power Mat and gain the abilities of that card, adds another layer of showing the actions of admirals, rulers, and diplomats from these foreign powers that played a major role in the history of the Baltic region. In addition to the DP cards mentioned in this article, there are several other DP cards representing individuals from outside the Baltic region who were not representatives of these major powers, but rather of the major banking houses of Europe or simply individuals whose deeds as merchants, industrialists or military thinkers had a big impact on the events covered by the game.
The Maritime Powers(The Netherlands, England, and France)
The Sound Due was a source of immense wealth to the Danish kings, as the flow of trade between the Baltic ports and England and the Netherlands all had to pass through the narrow Danish-controlled waters. It was collected at Kronborg Castle in Elsinore (of Hamlet fame) and was from 1548 onwards based on the value of a ship´s cargo. In order to combat fraud, the local authorities there were authorized to buy a cargo at the declared price if they had a suspicion that it was deliberately set lower than the market value (the effect of the Sound Due in Baltic Empires, and how it generates thalers for Denmark is described in detail in my earlier article on Denmark-Norway). This toll was a source of immense irritation to the maritime powers who were heavily dependent on their Baltic trade for timber, flax, hemp, grain and various other goods to sustain their fleets and growing urban populations.
In Baltic Empires this trade with the Dutch and English is represented in the “Maritime Trade Phase”, where players may trade a number of their collected goods depending on their position on the Mercantile Hegemon Track, and in exchange draw an equal number of special Maritime Trade Goods. These are either rare Goods types not found on the map (and thus valuable for the players since you pay for things with sets of different Goods) or Thalers (which are even more valuable as they are wild-card goods and are the only resource you can use to pay upkeep and repay loans). Besides its economic importance, the Baltic region was an integral part of the European balance of power. As such the region was of interest to major powers such as France, whose very active policy of subsidies and alliances meant that several of the wars fought in the Baltic during the period covered by the game (1558-1721) were to a large degree proxy wars or parallel wars to those fought by Louis the XIV in western Europe.
Cornelis Tromp(1629-1691)
Tromp was a Dutch naval officer sent to Denmark during the Scanian War against Sweden (1675-79) to serve as an admiral in the Danish Navy. He performed well in this role and was instrumental in the victory in the battle of Öland in 1676. As an officer Tromp was infamous for his insubordination. He was a very aggressive commander who relished the fight, and as a result often had to change ships during battle, but he was nevertheless popular with his crews despite the danger he put them in. At home, without fighting to distract him, he had the reputation of being a heavy drinker, so much so that many inns at the time were named after him.
In Baltic Empires, the Tromp card represents an alliance with the Dutch, rewarding you with a special Leader unit. Leader units move and fight as normal units of their type (in this case a Ship of the Line), but with some benefits that either effect the unit or all friendly units with it, as detailed on the card. Tromp´s skill as a successful naval commander is represented by an ability which transforms one enemy “Probably Hit” result into a “Miss”, thus potentially reducing friendly losses when Tromp. This might seem counterintuitive considering Tromps record of daring and danger, but these exact qualities also ensured that naval battles would be decided far quicker and in a more decisive manner, which ensured overall lower losses than those seen in a protracted battle.
Another benefit to this Leader unit is that, for most Powers, the cost of a Ship of the Line unit is higher than the cost of a Dramatis Personae card, so if you were considering building ships anyway, the draw of a card that gives you an even more potent unit for a lower cost is often a welcome bonus.
A painting of the battle of Öland (1676), showing Dutch and Danish ships fighting against the Swedish navy
Coenraad van Beuningen(1622-1693)
Van Beuningen was the Dutch Republic’s most experienced diplomat, burgomaster of Amsterdam for many years, as well as the director of the Dutch East India Company. He keenly understood the importance for the Dutch Republic of not having a single power controlling the entrance to the critical Baltic region and is credited with saying that: “The keys of Öresund lay in a dock in Amsterdam”. Van Beuningen was a highly intelligent man with interests in art, theology and natural sciences, but also with a strong interest in mysticism, astrology, dream-interpretation, and supernatural wonders. The shock of losing his fortune through speculation in shares in 1688 made him bipolar, and he was locked up after writing letters to the ecclesiastical authorities about the coming apocalypse and painting Kabbalistic signs on his house. He died in poverty, leaving only a cape and two dressing gowns, a few pieces of furniture, and “a man’s portrait” by Rembrandt valued at seven guilders (three dollars).
In Baltic Empires, Coenrad van Beuningen directly reflects Dutch foreign policy and the goal of opening up the Sound to Dutch trade. This would happen by creating a situation where no single power held both shores of the Sound. By aligning your Power with the Dutch views on the Sound (in game terms, having van Beuningen in your Court) you are rewarded with beneficial trade deals and access to lots of capital. This is represented with the +2 modifier to the Mercantile Hegemon track, as well as increasing your Loan Limit. Should the situation in the Sound be resolved in favor of the Dutch you are rewarded even further with annual subsidies.
Van Beuningen can be useful to all players, as there is no requirement for your power to be actively part of events in the Sound, although he will likely appeal more to those powers who are already heavily committed to the affairs of the Sound: Denmark and Sweden. For the former, Beuningen is obviously mostly interesting if you fail to keep your control of Scania, in which case he helps cushioning the blow of losing the Sound Due Thalers and let you pursue other paths to victory – which is more or less exactly what happened in the Baltics after Sweden acquired control of Scania in 1658 and Dutch policies shifted from supporting Sweden to one of supporting Denmark defend their islands from the Swedes.
George Rooke (1650-1709)
Goerge Rooke was an English naval officer who saw extensive action against the Dutch, French, and Spanish during his long career. In the Baltic context he is mainly known for commanding the Anglo-Dutch Squadron that cooperated with the Swedish fleet in 1700. This squadron attacked Copenhagen and made it possible for King Charles XII to land and knock Denmark out of the Great Northern War (1700-21) in its opening phases. After the short Danish campaign Rooke would fight in the War of Spanish Succession (1701-14). Here he would capture the Spanish treasure fleet in the Battle of Vigo Bay in 1702 and command the Allied naval forces that captured Gibraltar in 1704, where a statue of him was raised in 2004.
The Baltic Empires version of George Rooke closely mirrors the historical Rooke. He is represented as a Ship of the Line Leader unit that gives you control over Independent units in the same sea area and must enter the game in the in the North or Norwegian Sea. Due to his entry restrictions Rooke will likely only be interesting for the Danish player, or for Powers that want to contest Denmark’s control of the seas. His benefits are highly situational, and if the North Sea is empty of Independent ships or if Denmark´s naval situation is too strong and secure he will likely be passed over for the other four cards available that round, or any other pressing concerns troubling the players at the time. But if the English offers of naval support come at a critical time and the conditions are right the questions of who gets George Rooke will cause lots of angst in the Production Phase, and will be one of the most talked about events after the game.
Thomas Roe(1581-1644)
Thomas Roe was an English diplomat whose voyages ranged from Central America to India, and who worked as ambassador to the Mughal Empire, the Ottoman Empire. and the Holy Roman Empire. During the Thirty Years War (1618-48) he brokered a peace between Sweden and Poland and strove to get Denmark and Sweden to join the Protestant anti-Habsburg coalition.
In Baltic Empires, Thomas Roe is shown more as an abstract representation of British diplomatic and economic pressure in general, and less as a representation of Roe’s personal achievements specifically. He allows the Power allied with Britain (represented by having Roe in your Court) to choose any one of the other powers in the game and effectively cripple their Maritime Trade Phase by limiting them to only trading a single Good. As a side benefit, he also increases your Power’s position on the Mercantile Track to represent increased trade with England. During a game the former is a hugely interesting power to wield as it can be used both to hurt enemies but also as a tool for diplomacy/blackmail, and it is my experience that Thomas Roe is a card that increases the intensity of the table talk.
King Louis XIV(1638-1715)
Louis XIV, the “Sun King”, was king of France from 1643 and his reign of 72 years is the longest recorded reign of any monarch in European history. Louis’s France was emblematic of absolutism as exemplified in the quote: “L’état, c’est moi”(“I am the state”). His revocation of the edict of Nantes in 1685 abolished the rights of the Protestant Huguenots and the resultant stream of Huguenot refugees to the Baltic region brought with them valuable technical skills. In the Baltic context he is mainly known for thoroughly intertwining Baltic power politics with the greater European power politics, as he sought to distract his Habsburg enemies by subsidizing the standing army of his ally Sweden.
No game on early modern power politics and war would be complete without Louis XIV! In Baltic Empires, the Louis XIV card reflects the massive impact on the Baltic scene of the Sun King’s many wars against his English, Dutch, and Habsburg rivals. His effects are two-fold, and one of only a handful of multi-category cards (Immediate and Permanent effects in this case). Upon getting Louis in your court the strong French armies will cause an abrupt diversion of Habsburg attention away from the Baltic and towards the borders with France, as represented by the removal of all independent units in the Habsburg Lands at that time. As with George Rooke above, the impact of this effect is largely situational. His other effect, representing the substantial subsidies Louis offered Sweden to maintain a large army at all times (so France’s German opponents would always have to watch their back), is a permanent effect. A -2 reduction of your Power’s upkeep costs is a significant boost, and especially so since upkeep costs can only be paid using ever scarce Thalers. Just as in history, an alliance with Louis XIV will allow your Power to maintain a far larger army without going bankrupt.
That’s all from the Netherlands, England, and France! In the second part of this article we will look at some personalities from the Ottoman Empire and the Holy Roman Empire who played an important role in Baltic affairs.
More of GMT’s Digital Offerings that allow you to “Play GMT Games Anytime, Anywhere.
As I noted in our first article, we have created, in cooperation with individual programmers and digital game platforms, numerous ways for customers to experience our boardgames on your digital devices. We’ve done this for one large, underlying reason: We want players to be able to engage with and experience the learning, fun, challenge, and historical insights of our boardgames with other players from around the world on digital platforms where they can play the games generally much more quickly than they can on their physical game tables.
Online Multi-player Games that enforce the boardgame rules but have no solo AI opponents. We’ll talk about these today.
Traditional VASSAL and TableTop Simulator Game Modules. We’ll feature these in our next installment of the series.
Free-to-Play Online Games
Today we’ll talk about all of the Free-to-Play Games that we have authorized to be published on Popular Online Platforms. First, a few notes about these games:
Most GMT Games on online free-to-play platforms look and play like the boardgame. You can play them multi-player with friends or multi-handed “hot seat” solo, but there is no AI built in, so there is no “against the computer” solo play.
A nice feature of Rally the Troops, one of the platforms listed below, especially if you want to familiarize yourself with gameplay before you play yourself, is that you can “Watch” a game in progress or “Review” a completed game.
All we ask for those of you who play our games online is that at least one of you who are playing owns the physical boardgame. That’s how it would be if you were meeting friends face to face to play – ONE of you would bring the game. But there’s no requirement that all players own the game to play online. We WANT you to use online free-to-play options to “try before you buy” our boardgames.
Here’s the list of games we have authorized that are currently available on free-to-play online platforms:
Rally the Troops.com
GMT Games Available to play for free on Rally the Troops as of April 21, 2025:
1989: Dawn of Freedom (2-player Card-driven game (CDG) set in Eastern Europe in 1989)
Andean Abyss (1-4 player COIN series game on the struggle for power in Columbia in the 1990s )
Nevsky (1-2-player Levy & Campaign series game about the clash between Latin Teutonic and Orthodox Russian powers along the Baltic frontier in the mid-13th-Century.)
Plantagenet (1-2-player Levy & Campaign series game of the War of the Roses)
Red Flag Over Paris (2-player Card-driven game on the Rise and Fall of the Paris Commune, 1871. )
Time of Crisis (1-4 player Strategy game of Ancient Rome)
Vijayanagara (1-3 player Irregular Conflict Series game of Medieval India, 1290-1398.
Washington’s War (Strategic 2-player CDG about the American Revolution.)
Wilderness War (Strategic 2-player CDG about the French & Indian Wars)
I hope this article and “all in one place” listing of games gives you insight into what’s available to you for our free-to-play digital games offerings. We want all of you to have plenty of options to find your favorite ways to “Play GMT Games Anytime, Anywhere.”
Next Time: VASSAL, TableTop Simulator Module, Cyberboard for almost all of our games, plus Solo Apps!