The Persians have the bulk of their Light Cavalry across the Pinarus and poised for an assault on the rather disorganized Macedonian left flank. Meanwhile on the Macedonian right flank, the Macedonians have cleared the skirmishers guarding the “easy” Pinarus crossing and have a portion of the Companion cavalry on the Persian side of the river. In the area right of center, the Macedonians have a couple of peltasts across the river having dispersed the skirmishers manning the abatis along the riverbank.
As with the first Game Turn, Alexander will have the first Player Turn due to the Elite Initiative Orders phase. The next three Player Turns will go Rheomithres, Aristodemus and Darius with the Persians choice as to the order. Thymondas has the next Player Turn followed by Nazarenes. The Macedonians follow with Player Turns for Parmenion and Craterus, Macedonians choice as to the order. Alexnader will have the last Player Turn.
Elite Commander Initiative
Movement and Missile Fire Segment
Alexander takes the EIO Player Turn (neither subordinate is in command range anyway) so he can get the balance of his cavalry over the river and begin the process of regrouping his wing in preparation for his drive against the Persian left wing. He will need to move to put the three cavalry units already across the river into command range. His first of seven orders goes to move himself 4 MP to hex 4411. That position keeps his Hypaspists in range along with his cavalry and coverage for the area across the river where some of his cavalry will be at the end of this Orders Phase.
His second is a Move order to Companion 4 (4608) which changes facing due east and moves across the river to 5007, incurring 3 Hits (1 river, 2 up slopes). His third is a Move order to the Agema (4609) which follows the same path across river ending in 4907 facing northeast, incurring 2 Hits (river, up slope). Order four moves Companion 3 (4610) along that same tried and true path into hex 4808 facing northeast, garnering the same 2 Hits as its predecessor. With no room on the other side of the river, Alexander leaves the Paeonians where they are and uses his remaining three orders to recover 2 Hits each from Companion 2, Companion 1, and the Prodromoi.
Since there is a crowd of units just over the river, I flipped the three Companions to their Moved side as a memory aid. This concludes the EIO Orders Phase.
Rheomithres
Movement and Missile Fire Segment
Play now proceeds in Initiative order starting with one of the Persian 3-rated leaders. The three leaders are spread out over the battlefield so any one leader’s actions will have no effect on the other. So once again the Persians start the Game Turn with Rheomithres.
Rheomithres’ first order removes the 2 Hits on Asia Levy in 5018. He will need to move to be able to rally the routed Asia Levy in 5210. With his second order, he moves 6 MP into hex 5114 and stops there (the extra MP cost for Woods and slopes adds up fast). His last order goes to Rally the routed Asia Levy, and he succeeds (barely, 4 DR). However, the 6 DR on the Rally Table undoes this and the Asian Levy must rout move two hexes, first into 5209. The Sheer slope is impassable to infantry and prevents the unit from moving directly toward the Retreat Edge. The Asian Levy adjusts its facing and sidesteps into hex 5109.
Decision time for the Persians. During Game Turn 1, the Persians were reluctant to attempt Momentum with the expectation that the Macedonians would jump at the chance to deny any further Momentum attempts by the Persians. On Game Turn 1, guaranteeing a Momentum chance for Nabarzanes, who is leading the Persian offensive, made sense. But are the Macedonians keen on taking the risk of a failed Trump? Losing the opportunity to act at all in the Game Turn can be critical. To quote the Design Note from The Trump Option section (Alexander, 5.4) “… The non-Macedonian player will often find that, for him, its best application is when it backfires on the Macedonian player. For that reason, players should be aware that this option should not be used indiscriminately.”
Given that Alexander was a bit careless in leaving himself alone in a hex, it’s time to test the Macedonian’s resolve and the prowess of Alexander with some potential Personal Combat (Alexander, 9.2). Rheomithres makes a Momentum attempt … and succeeds (2 DR)! Decision time for the Macedonians. It seems clear that Rheomithres will take his chances with Personal Combat. A successful Trump by any of the Macedonian leaders will put a stop to such heroics but risks losing a Player Turn, and depending on who makes the attempt, the potential for Momentum, should the Trump attempt succeed. Alexander is not backing away from a fight, so no Trump.
Momentum Orders Phase
Rheomithres’ first order is another Rally attempt for the routed Asian Levy … but a 7 DR eliminates the unit. Here I mistakenly violated the Rally rule (Alexander, 10.27), in that a given leader is allowed only one Rally attempt per unit per Game Turn, one of those nuances in the rules that are often overlooked. Rheomithres’ second order moves him to hex 4511 (7 MP), staying at the same elevation. Why not issue an order to one the two remaining Asian Levy units first? His last order is kept in reserve should he survive the Personal Combat. He has 2 MP left which would allow him to move away, and should he have a second Momentum Orders Phase, move adjacent to Alexander again and force another Personal Combat.
The Personal Combat mechanics, which aren’t present most other GBoH games, are straightforward; each side rolls a die and adds the result to the respective leader’s Personal Combat rating. High total is the “winner”, insomuch as that the winner is unaffected while his opponent suffers the adverse effects. The difference between the two totals is used in conjunction with the Leader Casualty Table to determine the extent of the adverse effects. In our case, both sides rolled a 7, Alexander wins due to his 7 PC rating (Rheomithres has a 3 PC rating), the differential is four so Rheomithres is Wounded (Ratings reduced by 1) and Finished.
Aristomedes
Aristomedes job is to shore up the Persian left flank so will go next. He orders the Sittaceni Archers 6, 5, and 4 in that order to hexes 4501, 4403, and 4203. These Skirmishers will serve as a screen and speed bump to slow the Macedonian advance. It will take some time to coax those cumbersome Cardaces into a defensive line, so Aristomedes will go for Momentum. A 5 DR doesn’t cut it; Aristomedes is Finished.
Darius
Now to Darius. His generous eight hex command range makes him an asset in a support role in that he often need not expend an order to move into range. He will let Thymondas handle the pesky Peltasts. Order one tries to rally Persia 1, but an 8 DR sends the unit off the field – eliminated. Orders two and three remove the Hits on the Syrian Archers (2213) and Cardaces 1 (2115-2016). Note that there is no requirement that the entire two-hex counter be in command range to receive an order. None of the other in-range Persian units with Hits qualify for recovery.
Time for a Momentum decision. The Macedonian left has issues. Parmenion’s “crisis” left a gap between the left wing and center that is beckoning Nabarzanes’ cavalry to exploit. Sensing that the Macedonians are looking for chance to have Parmenion go before Nabarzanes, Darius decides to pass on the Momentum attempt. Aristomedes failure was perhaps a blessing.
Thymondas
Thymondas, the only 4-rated leader, is next in Initiative order. The two Thracian Peltasts on the Persian side of the river are within one Hit of routing, so Thymondas will use his Skirmishers to see if they can be driven off with missile fire.
His first of four orders is a Fire order to the Arabian Archers in 2714 who fire at the adjacent Thrace 1 (recall the Skirmishers can fire through a flank hex) and hits. Thrace 1 faces the Macedonian retreat edge and rout moves into hex 2617. So far so good for Thymondas. There are no other shots, so a Skirmisher will need to move into position to take one. Although the rules allow for firing over a friendly unit (Alexander, 8.14), the “blocking” friendly needs to be closer (not halfway) to the firing unit, so firing over a friendly at an opposing unit adjacent to that friendly is not possible. The hex with the abatis (2416) is open, so Thymondas issues a Move order to Syria 4 which proceeds into 2416 passing through Cardaces 3. There is no penalty when Skirmishers move through other friendly units (Alexander, Stacking Chart). Entering the abatis does cost a Hit (I’ll play this as written, though I suspect that the penalty was directed at the Macedonians). Unlike its compatriots, Thrace 3 has missiles, so it uses Entry Reaction Fire and hits (4 DR). The Syrians ignore Thrace 3 and shoot at Thrace 2 (love those flank shots) and hit (0 DR, +1 for moving). Thrace 2 faces toward its retreat edge and rout moves into 2517 moving through Thrace 3 (an enemy ZOC does not block the path if occupied by friendly unit). Thrace 3 passes its “moving through” TQ check, incurring the minimum 1 Hit (now has 4 Hits). Order three goes to Syria 1 (2412) which moves into 2515. Thrace 3 reacts again and hits again (2 DR). Syria 1 shoots and misses (7 DR, +1 moving), ending Thymondas’ hot streak.
Unfortunately, Syria 3 (2213) is just out of range, so Thymondas is unable to use it to occupy hex 2615 (and, no I am not going to move the Royal Guard HC there). His last order removes the Hit on Cardaces 3. Thymondas declines the Momentum opportunity to ensure that Nabarzanes goes next.
I flipped none of the Skirmishes that moved not by choice but based on an exception often overlooked. Skirmisher units do not incur a Hit for moving again during the Game Turn (Alexander, 6.13).
Nabarzanes
Movement and Missile Fire Segment
Nabarzanes has eight LC within three hexes (his Line Command range) so issues a Line Command with Move orders to the group (as Wing Commander, using a Line Command is automatic in his initial Orders Phase). His primary targets are the Amyntas and Ptolemy Phalanxes that have exposed flanks and the nearby damaged Thessalians and Thracians. Although some players may be tempted to use those horse archers to do away with the nearby routed Thracians, they would be doing away with some valuable assets. Routed units are as good as “eliminated” unless orders are expended to save them, and as happened with Parmenion’s rally attempts, a success is not a guaranteed outcome. Moreover, while they are headed for home, they can inflict Hits on their brethren on the way there. So why expend orders to help your opponent out unless you have nothing better to do with them?
Here are the moves and fires in order:
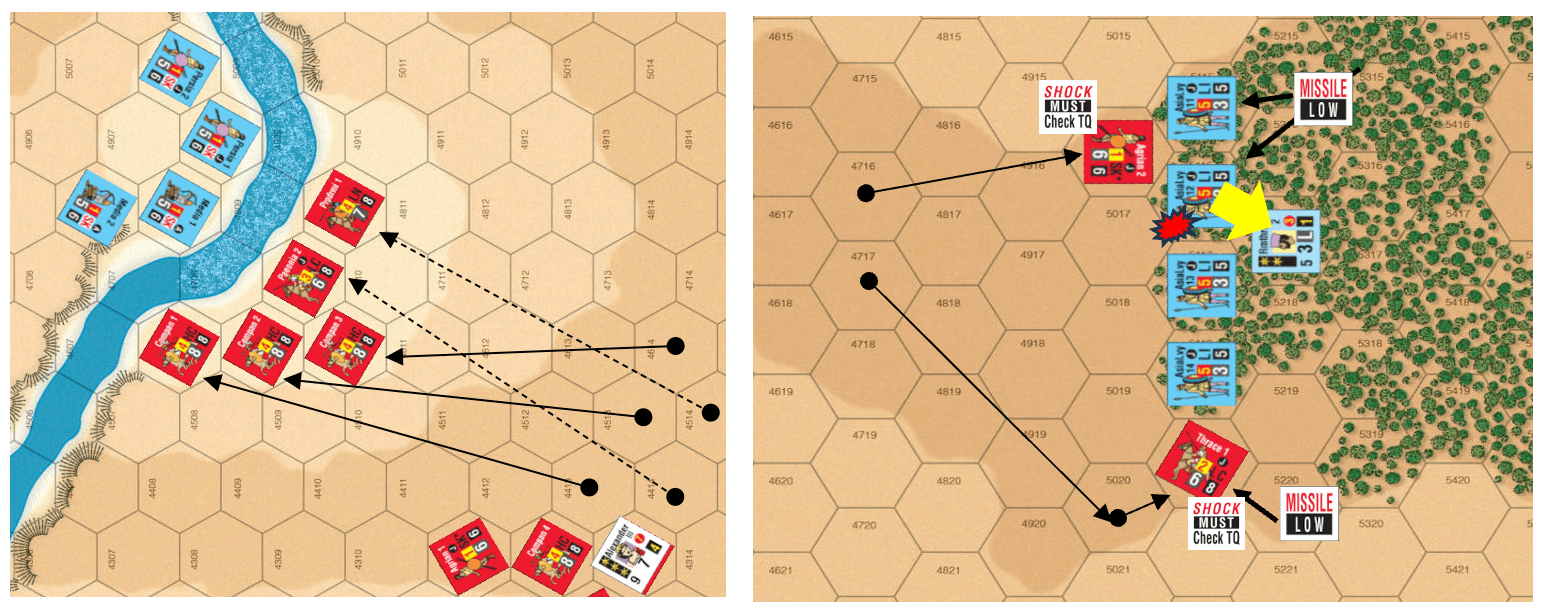
Persia 5 (2219) moves to hex 2223, facing the two Macedonian units. The Thracians reaction fires and hits. Technically, I should hold off on the shots until after everyone moves (Alexander, 8.21), but since this is the only reaction shot there is no point in complying. Persia 5 is not Shock capable, so sitting astride Thessaly 4’s flank is not worth the hit to react. However, facing in the other direction could possibly block infiltration around Thessaly 4, but in doing so present a flank in the direction of the enemy. Thessaly 4 rotates to the west to block the infiltration, passes its TQ check and incurs the mandatory 1 Hit penalty. The archers fire at the Thessalians scoring a hit. Thessaly 4 closed the path to the flanks of the Thracian Peltasts and the Amyntas Phalanx
Hycarnia 1 (1719) moves to hex 1925 (7 MP); Thessaly 2 changes facing, passes its check, and incurs the mandatory 1 Hit; The Hyrcanians fire and miss; Missile Low. Shock Must Check TQ placed
Hycarnia 3 (2020) moves to hex 2521, facing east (6 MP); fires at the Ptolemy Phalanx and misses, Missile Low . Shock Must Check TQ marker placed
Hyrcania 4 (1920) moves to 2522, facing Thessaly 5 (8 MP); fires and misses; Missile Low. Shock Must Check TQ marker placed
Hycarnia 2 (1820) moves to hex 2025, facing east (6 MP); fires at Thessaly 1 and misses ; Shock Must Check TQ marker placed
Media 1 (1918) moves to hex 2122 (5MP); fires at Thessaly 4 and hits ; Shock Must Check TQ marker placed
Nabarzanes has two horse archers and himself yet to move.
Media 5 (2019) moves to hex 2423 (7MP); fires at Thessaly 5 and misses. The hex chosen pins the Amyntas Phalanx.
Hyrcania 5 (2218) moves around the Thracian ZOC to hex 2419, facing the Thracians (7 MP). The archers are not Shock capable so making a facing change with a +3 DRM to the TQ check would be reckless. Hyrcania 5 fires and hits.
Nabarzanes (1919) has all units except for the two Media LC on the other side of the river in range, so remains where he is.
Shock Combat Segment
There are five Shock combats. Starting from the left side of the map, the Pre-Shock checks go as follows:
Hyrcania 1/Thessaly 2 – both pass
Hyrcania 2/Thessaly 1 – both pass
Media 1/Thessaly 4 – both pass
Hyrcania 3/ Ptolemy – both pass
Hyrcania 4/Thessaly 5 -Hyrcania 4 incurs 1 Hit
Rather uneventful, but not overly surprising when good quality units are involved. As my usual practice, I will resolve steps 9.14 through 9.16 together for each combat. There are no leaders involved, so that step can be ignored.
The Hyrcania 1 has a frontal attack on Thessaly 2. The combat is resolved on Shock CRT Column 5 (LC vs. HC, no SRD or terrain shift) with no adjustment for superiority. The result is 2(2). Hyrcania 1 (4 Hits), Thessaly 2 (3 Hits). The Hyrcania 2/Thessaly 1 combat is resolved on the same Column 5 with no adjustment for superiority, and with the same 2(2) result. Hyrcania 2 (3 Hits), Thessaly 1 (2 Hits).
The Media 1 has a flank attack on Thessaly 4. The combat is resolved on Shock CRT Column 6 (there are no shifts). Media 1 has Position Superiority due to the flank attack and thus is Attack Superior (AS). Note that when cavalry fight cavalry, flank/rear attacks don’t move the Shock CRT column much. The result is another 2(2), adjusted to 2(4) for the AS. Media 1 (3 hits), Thessaly 4 (10 Hits). Here we have a Breakthrough situation; Thessaly 4 incurs 2 more Hits which is irrelevant in this circumstance.
Hyrcania 3 has a flank attack on the Ptolemy Phalanx. The base Shock CRT Column is 5 which will shift to Column 2 due to the Size Ratio Difference (SRD) and the slope. Note since the Hyrcanians move to the attack, the ratio is rounded in their favor. The Hyrcanians have Position Superiority and so are AS, but the doubling of hits is halved when an LC attacks a Phalanx. The result is 3(2) with no adjustment (8 DR). Hyrcania 3 (3 Hits), Ptolemy (3 Hits)
Last combat. Hyrcania 4 has a frontal attack on Thessaly 5. We are back on Shock CRT Column 5 with no adjustments and another 2(2) outcome. Hyrcania 4 (3 Hits), Thessaly 5 (5 Hits).
For the Collapse step there is one rout. Thessaly 4 faces south and rout moves to hex 2125. None of the other combatants are within 1 Hit of a rout, so no TQ checks. Media 1 advances into 2123, where the Thracians take an entry reaction shot and hit – Media 1 (4 Hits).
Without hesitation, Nabarzanes will go for a Momentum Phase … and succeeds. A timely success. Nabarzanes is in position for another round of mostly survivable Shock combats. The intent here is to inflict another couple of Hits on each of the engaged Macedonians before the inevitable counterattack, which in most cases would be Attack Superior, enough to rout most of the Persian engaged cavalry even if they did not attack. The shock attacks require no orders, so those orders can be used instead to bring the Bactrians across the river and into a position to finish off the weakened Macedonians.
Trump decision time for the Macedonians. Parmenion cannot afford to lose a Player Turn so won’t make the attempt. Craterus has no better chance of succeeding and will be needed to help put out any fires on the left flank. Alexander has the best chance to succeed but at the possible cost of a delay on his wing and the loss of Momentum opportunities for both Craterus and Parmenion. Alexander will Trump …and succeeds (barely with a 7 DR). Nabarzanes is Finished.
Alexander
Movement and Missile Fire Segment
Alexander uses six of his seven orders to remove Hits from the six cavalry units across the Pinarus: Companion 1 (1 Hit), Companion 2 (2 Hits), Companion 3 (None), Companion 4 (1 Hit), the Agema (None), and the Prodromoi (2 Hits). Order seven is a Move order to Agriania 1 (4311) who has been loitering on the high ground since the start of the battle. The Agrianians face east and start to move toward Rheomithres who withdraws 3 MP to hex 4712. The Agrianians move into hex 4411 to keep Alexander company. No reason to risk another Personal Combat.
Momentum Orders Phase
Alexander succeeds in his Momentum attempt. Since he will have the first Orders Phase next Game Turn, there is no need to move the Companions now since some are already within striking distance of the Persians. Rather, Alexander uses four orders to remove the Hits from Companions 1, 2, 4 and the Prodromoi. At some point, Alexander will need to cross the Pinarus since the Steep/Sheer slopes are impassible to leaders and thus obstruct the tracing of command range (Alexander, 4.21). That can wait till his next Orders Phase. His remaining three orders will go to move his Hypaspists in the following order.
Agema (3912) moves to 3511, 1 Hit for the slope – 2 Hits total
Hypaspist 2 (3813) moves to 3412, 1 Hit for the slope – 1 Hit total
Hypaspist 3 (3713) moves to 3413, 1 Hit for the slope – 1 Hit total
The Hypaspist are positioned outside Slinger range and within Move distance for an assault on the Greek Hoplites. Alexander is Finished.
Parmenion
Movement and Missile Fire Segment
The Macedonian player has the choice of either Parmenion or Craterus for this Player Turn. Knowing how Parmenion fares will determine what Craterus will do, so Parmenion goes next. And Parmenion’s options are limited since has only three units in command range that could receive a useful order. There is no benefit in having the Amyntas Phalanx wheel and incur the Hit(s) (Alexander, 6.45) since its attack would remain frontal (Alexander, 9.15).
His first order is to move Thessaly 3 (2126) to 2124 (5 MP). Media 1 fires in reaction and hits. Shock Must Check TQ marker placed. With his second order, he has Thrace 6 fire at Persia 5 and hits. Persia 5 uses Return Fire (Alexander, 8.23) and misses. Order three is a Rally to Thrace 5. A 5 DR does the trick and breaks Parmenion’s Rally losing streak. A 9 DR on the Rally Tables leaves the Thracians with 3 Hits. The Thracians face north and receive a Missile No marker (Alexander, 10.27).
Order four sees Parmenion move to 2325 placing the routed Mercenary Peltasts (3022) in range. His last order is a Rally order to that same unit and again Parmenion gets the job done (3 DR). Mercenary 5 ends up with 3 Hits from the Rally Table, then faces west, and receives Missile No marker.
Shock Combat Segment
Now for some additional Shock combats. Shock No TQ markers go on Thessaly 2 and Thessaly 1 which attack Hyrcania 1 and Hyrcania 2 respectively. Shock No TQ markers are also placed on Thrace 6, Amyntas, and Thessaly 5 which attack Persia 5, Media 5, and Hyrcania 4.
Thessaly 4 must shock Media 1 which is the only Pre-Shock TQ check situation. The Thessalians pass, but the Medians incur 1 Hit (5 total).
The attack by Thessaly 2 is resolved on Shock CRT Column 9 (Sizes are the same, no terrain effects). HC are Attack Superior against LC. The result is 2(3) adjusted to 2(6) for the superiority. Thessaly 2 (5 Hits); Hyrcania 1 (10 Hits). The attack by Thessaly 1 is resolved the same way with the same 2(3) result adjusted to 2(6). Thessaly 1 (4 Hits); Hyrcania 2 (9 Hits). Thessaly 3’s attack breaks the pattern with a 2(2) result adjusted to 2(4). Thessaly 3 (3 Hits); Media 1 (9 Hits) – breakthrough is irrelevant.
Thrace 6’s attack is resolved on Shock CRT Column 8 with no shifts or adjustments and a 3(2) result. Both Thrace 6 and Persia 5 have 5 Hits. The Amyntas’ attack is resolved on Shock CRT Column 12 which includes the shift for the SRD but there is no superiority. The result is a 2(3). The Amyntas (4 Hits); Media 5 (4 Hits). For Thessaly 3’s attack it is back to Column 9, Attack Superior for a 2(2) result adjusted to 2(4). Thessaly 3 (7 Hits); Hyrcania 4 (7 Hits).
Now the Collapse step. Hyrcania 1, Hyrcania 2, and Media 1 face northeast and rout move to 1923, 2023, and 2121 respectively. Both Thrace 6 and Persia 5 are right at their break point. A Thrace 6 advance would not cause any terrain hits, so by the tie breaker rule (Alexander, 10.15) Persia 5 (the defender) routs, while Thrace 6’s Hits are reset to 4. Persia 5 daces northwest and rout moves to 2221. There is a similar situation with Thessaly 5 and Hyrcania 4, both are at or over their break points, but Hyrcania 4 is over, so it routs, and Thessaly 5 has its Hits reset to 6. Hyrcania 4 faces northwest and rout moves first to 2521, passing through Hyrcania 3 which incurs 1 Hit, and moving to 2421, avoiding Ptolemy’s ZOC.
Media 5 is within one Hit of its TQ and in an enemy ZOC so must make a TQ check (Alexander 9.18 #2). It passes and has its hits reduced to 3.
The victorious Macedonians advance: Thessaly 2 into 1925, Thessaly 1 into 2025, Thessaly 3 into 2123, and Thrace 6 into 2223 now Missile No. No facing changes. Thessaly 5 advances into 2522 where Hyrcania 3 reacts by changing facing, passes its TQ check incurring 1 Hit, fires (now Missile No) and hits, routing the Thessalians! Thessaly 5 changes its facing, and rout moves into 2624 avoiding Media 5’s ZOC.
Aside from Thessaly 5’s rout, a successful counterattack though not unexpected given the heavy cavalry’s superiority. Parmenion is Finished – the price the Macedonians paid for the Alexander’s successful Trump.
Craterus
Craterus is next with the final Orders Phase of the Game Turn. Should he support Parmenion or recover Hits on the Hypaspists and position himself to assault the Persian Hoplites next turn? He cannot rally the Thracians next to the river or the nearby Thessaly HC since they are in Persian missile range and LOS. He can reach (barely) Thessaly 4 for a rally attempt and be able to recover Hits on two other units but then would be too far to put all the Hypaspists in range next turn – he does not have a Momentum opportunity. Given the Persian disarray and the distance from the fresh Bactrians, Parmenion should have time to recover and reform his flank, so Craterus will take command of the Hypaspists.
Craterus’ first of five orders recovers the Hits on the Meleager Phalanx. With his second order, he moves himself to hex 3515 (3 MP) placing all the Hypaspists in range along with several Peltasts. His remaining three orders recover the hits on the three Hypaspists. Ineligible for Momentum, Craterus is Finished.
Rout and Reload Phase
On to the Rout and Reload Phase. The first step is to remove the Rallied markers from Thrace 5 and Mercenary 5. Next come the rout moves. Moving from left to right across the map, Persia 2 (1718) rout moves to 1708. Persia 4 (1814) follows suit and rout moves to (1806). Hyrcania 1 (1923) rout moves through Nabarzanes to hex 1915, followed by Hyrcania 2 (2023) which passes through Cardaces 1 into 2015. The latter passes its TQ check incurring the minimum 1 Hit. Media 1 (2121) and Thessaly 4 (2125) are in the same hex row. The Medians are furthest from the bottom edge so they will go first, not that it matters in this situation. Media 1 rout moves through Cardaces 1 and stops in Syria 2’s hex where it must move one more hex to 2112 (Alexander, Stacking Chart). Cardaces 1 fails its TQ by one, so it still incurs only 1 Hit. The Syrians fail their check by two so incur 2 Hits.
Thessaly 4 rout moves off the map and is eliminated. Persia 5 (2121) rout moves through Cardaces 2, stopping atop Syria 3 and moves one more hex to 2212. Cardaces 2 passes its TQ check and incurs 1 Hit while Syria 3 fails and incurs 3 Hits. Hyrcania 4 (2421) rout moves through Hyrcania 5, goes west to avoid Thrace 4’s ZOC and ends up in 2716. Keep in mind that routing units pay the MP costs for terrain. Hyrcania 5 pass its TQ check and incurs 1 Hit,
Thrace 2 (2517) is next, and rout moves around two different Persian ZOCs onto hex 2721. Ptolemy passes its TQ check and incurs 1 Hit. Thrace 1 rout moves through Ptolemy and skirting the Persia ZOC lands atop Thrace 2. Time to check the Stacking Chart. Thrace 1 moves one more hex to 2722. Ptolemy once again passes and incurs a hit. Thrace 2 is eliminated. Thessaly 5 (2623) rout moves through the recently rallied Thrace 5, exits the map, and is eliminated. Thrace 5 fails its TQ check by three causing it to rout and move its two hexes off the map where it is eliminated. If by chance it stayed on the map, it would then rout move its full MA. That the unit routed in this phase does not exempt it from the rout moving (Alexander, 10.22).
This segment was a bit messy, so here is a summary of the Hit count of those units impacted during this segment.
Macedonians: Ptolemy (5 Hits) … and two Peltasts eliminated.
Withdrawal Phase
The Macedonians lost the two Thessaly HC (14 RP) and two Thrace LP (10 RP) for 24 RP this turn. Added to the 12 RP from the last turn the Macedonians have lost 36 RP.
The Persians lost another Asia Levy (3 RP) and Persian LC (6 RP) for 9 RP. Added to the 17 RP from last turn the Persians have lost 26 RP.
All somewhat misleading since the Macedonians have only one routed unit on the map due the nearness of their retreat edge while the Persians have seven.
End of Game Turn Commentary
Although the Persian Light Cavalry onslaught on the right flank was repulsed (five routed units), the damage to the Macedonian wing was significant with four eliminated units, one routed, and the remainder with three or more Hits. Aleander’s Trump prevented a follow up set of favorable Persian shock combats, but more importantly it denied the Persians the opportunity to bring the fresh Bactrian cavalry across the river and in range for another assault.
On other fronts, the Persian skirmishers were able to drive off the peltasts that crossed the river, positioned more units to protect the Persian left flank, and the daring Rheomithres exploited a bit of Macedonian carelessness to engage Alexander in Personal Combat, coming out on the losing end.
For the Macedonians, Alexnader’s Trump blunted the Persian momentum on the Macedonian left allowing Parmenion the opportunity to counterattack and send most of the Persians lights toward their side of the field. The Trump prevented any follow-up. On the Macedonian right, Alexander moved all his Companions and the Prodromoi across the river in striking distance of the Persian line and importantly removed all the hits incurred in the river crossing and combats. With the Macedonian left temporarily stabilized, Craterus recovers the Hits on the Hypaspists, preparing them for cross river assault against the Greek Hoplites.
Both sides continued to pursue their overall battle plan. The Macedonian Trump was effective in minimizing the impact of the Persian assault without preventing the Macedonians from getting their right wing in order for offensive operations.
This guide is intended to give players helpful hints on playing the Great Battles of Alexander. The format is like my SPQR: A Guide to Playing the Game available on the GMT website. That guide provided a comprehensive review of the SPQR rules using the Battle of Heraclea as a case study. For this guide I am going to dispense with the comprehensive rules review that I did for SPQR since, aside from some specific rules related to the Romans, it would be a repeat of what was written in that guide. For those players looking for a comprehensive discussion on the rules for the Great Battles of Alexander, they should read Part 1 and Part 2 of SPQR: A Guide to Playing the Game.
I picked the Battle of Issus as a case study because, as ancient battles go, it was uncommon due to the lay of the battlefield which was dominated by difficult terrain. Most generals of the day would not fight a battle in such terrain unless they were desperate. Darius and his generals were able to maneuver their army astride Alexander’s line of communication back to Macedon and deployed their army in highly defensible terrain along the Pinarus river. Alexander had little choice but to fight (he fell into that desperate category) and that he won is testament to his generalship and the high quality of his veteran army (see the Historical Background section for the Issus scenario for more details). From a game play perspective, the terrain provides the Persian side, which has a large but “light” army, the necessary ingredient to provide a balanced contest.
For the game I will not use the following rules most of which are optional or not relevant to the scenario:
5.6 Macedonian Contingent Commanders
6.5 Drift to the Right
6.6 Column Movement
6.8 Pre-Arranged Withdrawal
9.4 Cavalry Pursuit
10.3 Engaged
11.1 War Elephants (there are none)
11.7 Double-Depth Phalanx
11.8 Artillery (there are none)
11.9 Cavalry Charge Formations
Pre-Battle Preparation
In addition to setting up the scenario, there are two things that you need to do to prepare for play. One is to understand the flow of activity within a given Game Turn (each battle is different in this regard) and the other is to have an overall battle plan considering the composition of the forces, their deployment, and the victory conditions. As with most GBoH battles, victory at Issus is determined by forcing your opponent to withdraw by eliminating units.
Sequence of Play
To a new player, the Sequence of Play (Alexander 3.0) is unusual compared to many other wargames. In a Game Turn, we have a Leader Activation, followed by an Orders Phase conducted by the activated leader, which may be repeated one or two times (Momentum). This procedure is repeated for each leader present at the battle, after which routed units head for their side of the map, missile units reload, and the players flip counters and remove markers. Lastly, the players see if one side or the other withdraws, and if so, the game ends. The concept of a Player Turn present in most games is there but not obvious from the Sequence of Play. The number of Player Turns within a Game Turn varies by scenario, based on the number of leaders present, while the order of those Player Turns is determined by the Initiative Ratings of those leaders. Depending on the distribution of those Initiative Ratings, the Player Turn order will often vary from Game Turn to Game Turn.
Leader Activation
Leaders are the engines that drive the game. Other than a few limited reactions and involuntary actions, non-leader units (i.e., combat units) can do nothing without direction from a leader. Alexander 4.0 details what leaders can do. For constructing a sequence of play (“course of play” is perhaps a better descriptor), from a player’s perspective, we need just the Initiative Rating which all leaders possess.
At Issus, the Persian player has five leaders; the Macedonian player has three leaders. Alexander is one of the leaders present, so the Macedonians will have an extra Player Turn due to his Elite Commander status (Alexander, 5.6). Thus, for Issus each Game Turn will consist of nine Player Turns.
Player Turn Order
The first Player Turn goes to the Macedonians due to the Elite Commander Initiative rule. This can be Alexander or either of the other Macedonian leaders if within Alexander’s Command Range. Given the initial setup, only Alexander is eligible despite his extensive 9 Command Range. The Player Turns are performed starting with the lowest Initiative-rated leader and moving, in sequence, to the highest Initiative-rated leader regardless of which side the leader is on. In case of ties, the non-Macedonian (Persian) player goes first, after which the players alternate Player Turns among the remaining similarly rated leaders. If a player has two or more leaders with the same Initiative Rating, he chooses which to use for that Player Turn.
After the initial Macedonian Player Turn, play will continue with three consecutive Persian Player Turns using the three Persian 3-rated leaders, then Persian player’s choice as to which goes when. The fifth Player Turn belongs to the 4-rated Thymondas while the sixth Player Turn belongs to the 5-rated Nabarzanes. Though tied with Parmenion and Craterus, the Persian leader goes first. Player Turns seven and eight go to the Macedonian leaders Parmenion and Craterus, who goes first is up to the Macedonian player. Player Turn nine is Alexander’s.
The leader activations at Issus are not as dynamic as, say, Heraclea from SPQR, discussed in SPQR: A Guide to Playing the Game Part I, where there are 13 leaders, five different Initiative Ratings, and two groups of similarly rated leaders of both sides where a die roll determines which leader goes first.
Trump
The Trump Option (Alexander, 5.4) gives the players an opportunity to alter the Player Turn order described above to a degree by allowing a player to use a higher rated leader to jump ahead of another of his leaders. This is usually done to jump ahead of an opposing leader to preempt whatever that leader might be planning to do. At Issus, there are no opposing leaders to jump over, so there is little reason to use Trump in this way, especially since a successful Trump will deny Momentum to his lower rated leaders and present a Trump opportunity to the other player.
The other Trump opportunity presents itself when an opposing leader succeeds in a Momentum attempt (Alexander 5.3). The only Persian leader able to Trump in this fashion is Nabarzanes, but since he goes before all the Macedonian leaders, he will only get the chance if Parmenion or Craterus succeed with a Momentum attempt after an Orders Phase gained through a Trump. All three Macedonian leaders, on the other hand, can Momentum Trump at will, but failure finishes the leader (in effect the leader loses its Player Turn), and success may deny Momentum to another Macedonian leader.
Issus Leader Activation Order
Leader Orders
Let’s now look at what happens within a Player Turn. The leader associated with the Player Turn is the driver of the action. The Initiative Rating is a key factor here as well, but three other ratings are in play: Command Range, LineCommand Rating, and Strategy Rating. All leaders have ratings for Command Range and have a Movement Allowance. Some Persian leaders have the Line Command ability while Persian Overall Commanders and Wing Commanders have a Strategy Rating. Macedonian leaders do not have either rating. At Issus, the only leader with the Line Command rating is Nabarzanes who is also a Wing Commander. The Wing Commander ability allows Nabarzanes to issue a Line Command without the use of Darius’ (the Persian OC) Strategy Rating, though Nabarzanes’ Strategy Rating is needed to issue a Line Command in a Orders Phase generated by Momentum. Furthermore, Darius and Alexander, as OCs, have several other “special abilities” that separate the OC from the other leaders (Alexander 4.4). Macedonian Wing Commanders are used to activate the optional Contingent Commanders rule (Alexander 5.6) which I chose not to use.
Orders Phases
The leader granted the Player Turn conducts one and possibly up two more Orders Phases (Alexander 3.0 Phase B), with the additional two Orders Phases via the Momentum rule (Alexander 5.3). The Orders Phase has two segments conducted sequentially. In the Movement/Missile Fire segment, the player uses his leader to order combat units (the OC can also order other leaders). There are two mutually exclusive methods to do so: Line Commands (LC) or Individual Orders (IO). With the LC method only Move and Fire orders are allowed, while an IO can be used for all orders, some of which are limited to the OC (Alexander 5.22). In the Shock Combat Segment, the player’s units with Shock markers perform Shock combat.
In the Issus scenario, Individual Orders rule the day. The only leader with a Line Command ability is Nabarzanes and there are only two eligible Lines: the Light Cavalry (LC – 15 units) and the Heavy Cavalry (HC – 8 units). The three Royal Guard HCs are positioned elsewhere on the field and are best left to protect Darius (Alexander 9.24), so there is no benefit using an LC here. The Persians are guaranteed in being able to move 18 units by IOs. If Nabarzanes can issue an LC to al 15 LC, that number climbs to 28. The Macedonian player is guaranteed in being able to move 24 units by IOs – Alexander receives an extra Player Turn due to the Elite Commander Initiative (Alexander, 5.6) rule.
I want to draw your attention to the important Army Size and Troop Quality chart which is present in every scenario. The Persian player, with 79 units in his army, is limited to moving roughly 1/3 of his army per Game Turn without successfully using Momentum. The Macedonian player, on the other hand, has 49 units and will be able to move 2/3 of his army per Game Turn without using Momentum. When to use Momentum (for the Persians) and when to Trump a successful Momentum (for the Macedonians) provide the players with some tough choices. Although it would seem desirable to always try for Momentum, a Macedonian Trump can not only negate a successful attempt but also remove the ability of his other leaders in the Initiative order from attempting Momentum at all. For the Macedonian player, a successful Trump is not guaranteed and using Alexander, the leader most likely to succeed, would deprive his other two leaders of the Momentum opportunity. And, of course, there is the Die Roll of Doom (Alexander 5.33) which has a slight chance (3%) of turning a Momentum attempt into a significant boon to the opposing player.
At this point in the discussion, it’s time to consider the second most important leader rating, Command Range, since it puts a constraint on the use of IOs and LCs (Alexander 4.21). The larger the Command Range the more real estate over which the leader can project his influence. The leaders at Issus have generous ranges compared to other scenarios in the series. Note that for LCs, the rating is halved (rounded up). This means the Persian player will need to keep those LC within a 3 hex range of Nabarzanes to use the LC to maximum effect. In the Shock Combat Segment, combat units within the leader’s Command Range may be given (must if when using the optional Engaged rule) Shock markers (the No TQ Check variety), enabling them to conduct Shock combat. The positioning of leaders, therefore, is critical.
Battle Plan
Now that we have an idea on how an Issus Game Turn will likely unfold, we need a plan to win the game. This means doing away with enough of your opponent’s units to force his army to withdraw. From a rout ratio perspective, the Macedonian army is in its prime and the Persian army is at its best. The number of Rout Points (RP) triggering withdrawal is the same for both sides at 135 RP. The Persian player loses if Darius is killed, the Darius the Target rule (Alexander 9.24) makes it easy to have Darius leave the map. As for Alexander, he is worth 70 RP dead, not an automatic withdrawal, to encourage players to be somewhat aggressive with him.
The historical setup has the Persian army deployed in a good defensive position behind the Pinarus River. Historically, the Persian plan was to defend with its infantry along the river and use its excellent cavalry on the right wing to drive across the river, dispense with the weak Macedonia left wing, and take the Macedonian center in the rear. For The Macedonians, the plan was for Alexander, at the head of his elite cavalry, to cross the river at a fordable point on the Persian left and then drive toward the Great king, while concurrently assaulting the Persian center with his phalangites.
Terrain
Let’s look at the Issus terrain.
From the Persian perspective, the terrain on the right wing, where the Persian assault will occur, is relatively easy going. The crossing of the Pinarus will cost a Hit but no additional MP. The area across the river is eight hexes wide with no slopes – perfect cavalry country. There is not much point to advance any of the Persian foot across the river. None are a match for the phalangites in open terrain and the cost to do so over the “mild slope” portion of the river (hexes 2516 to 3410) would spot them 2 or 3 Hits depending on the Type. The cost to cross over the steep slope section is 5 Hits (1 less for Skirmishers) which would rout most units.
The Macedonian right wing is another matter. Cavalry can only cross into four hexes: 4707, 4708, 4809, and 4909. Their journey from the starting gate is all downhill which will cost an extra MP for each slope but no Hits. The Rocky River will cost them 2 MP and 2 Hits to enter and another 2 MP plus a Hit to move upslope and exit the river on the far side. Once the opposing Skirmishers are cleared, units can avoid the Rocky River hexes by using hex 4707 reducing the MP and Hit cost for cavalry.
As noted above, the cost to cross the river in the steep slope section is prohibitive, so the Macedonian infantry assault will necessarily be along the “mild slope” section of the river. Even there the cost to enter the river is 2 MP and 2 Hits (1 Hit for the Peltasts) and another 2 MP and a Hit to leave the river up slope. Note that terrain Hits are incurred during an Advance after Combat (Alexander 9.31).
The Persians have an added advantage of some manmade terrain in the form of eight Abatis markers which may be placed on any unit deployed adjacent to the river. The benefit here is a +1 TQ increase for combat purposes and 1 Hit penalty to enter the hex although should a Macedonian unit do so, the marker is removed. The requirement that a two-hex unit have markers in both hexes seems to be a waste, so I decided to buff the Skirmishers in the five hexes from 2416 to 2814, and the Slingers in 3014, 3013, and 3112.
Matchups
The terrain is a significant challenge for the Macedonians. I will delve a bit into the combat characteristics to look for some offsetting advantages there. The Persians’ 20+ Skirmisher (SK) units are not capable of offensive shock combat. The Macedonians have a dozen or so light units, mostly shock capable Peltasts. A look at the Shock combat charts (Alexander 9.52, 9.53 and my condensed version at the end of this section) shows that an LP attack is resolved on the Shock CRT Column 10 against Skirmishers, shifted leftward a two or more columns depending on the terrain, with the all-important Attack Superiority. Should the SK stand their ground, they are looking at 4-8 Hits but are only able to inflict a maximum of 1 Hit in exchange. Moreover, units attacking Skirmishers do not make a Pre-Shock TQ check though the Skirmishers still do (Alexander, 9.13). Offsetting this to a degree is the Skirmishers’ missile fire capability, primarily Entry Reaction Fire (Alexander, 8.21) which, when coupled with the Hits due to the terrain, can be deadly. Most other types will produce comparable results except for the SK+ which do not gain Attack Superiority. Compared to the Peltasts, however, the Skirmishers are expendable at 1 RP versus 5 RP.
The bulk of the Persian non-Skirmisher infantry are on the lighter side: Cardaces LP/CA and low TQ Light Infantry. The Macedonia Phalanx (PH) and Hypaspists (HI) are Attack Superior with a similar Shock CRT column to that of the LP vs. SK match producing a similar 4-8 Hit result but with 2-3 Hits on the attacker. The only significant competition will come from the four Greek Mercenary Hoplites (HI/HO) where there is no Attack Superiority and resolution on Columns 7-8. The Macedonian units have a marginal advantage in Hit potential but there is a good chance the Hoplites will more than hold their ground given the Macedonian terrain disadvantage.
A look at the combat charts shows that cavalry has no business attacking the infantry heavy types unless they can achieve a positional advantage. You never want to be in a Defender Superiority situation. Given the HC’s attack Superiority, LC are best used in the attack with a “first strike” to their advantage.
The chart below summarizes the frontal attack Shock relationships for the most common matchups at Issus. Flank and rear attacks generally have a column or two rightward shifts, but the most important aspect is that those attacks are always Attack Superior, negating any Shock Superiority advantage. Although the higher the Shock CRT column the better, that advantage is subtle. The Selected Shock Column Probabilities chart shows the combat result probabilities for the center section of the Shock CRT where most attacks are resolved. The key takeaway here is that you will incur hits, and the hit difference between attacker and defender is but 1 Hit most of the time unless superiority or a special case (defending Skirmishers) is in play.
Enough setting the stage, it’s time to play the game.
The following is a “play by play” with commentary of my solitaire play through of the first Game Turn of the Battle of Issus. The game play was subsequently revisited to correct gross rules violations (Cardaces shooting missiles, the various Skirmisher penalties, etc.). There are a few cases of missed opportunities, along with some decisions that (in the light of hindsight) may not have been the best, which were left as is. There are frequent references to specific rules sections that should be helpful to players new tothe GBoH series games.
When I play solitaire, I tend not to flip units unless I must as a memory aid. You will not see leaders on their Finished side nor combat units on their moved side in the diagrams.
Elite Commander Initiative
Movement and Missile Fire Segment
The Macedonians start the festivities with an Elite Initial Orders Phase (Alexander, 5.5). The EIO Player Turn may be used by Alexander or any other Macedonian leader in his command range. Here there are none in range, so Alexander will conduct the Orders Phase. My view is that unless there is an incredible opportunity to do otherwise, Alexander should always get the nod. Following the battle plan, Alexander orders units toward the river.
Using three orders, he moves Companion HC 1-3 (in that order) into a line of hexes 4608, 4609, and 4610. There is no Hit cost to move down slope but there is a 1 MP cost to do so. The intent here is to cross the river via the “clear” river hex (4707). These three units are moved first to clear the way for the Paeonia and Prodromoi cavalry. There is no point in unnecessarily moving through your own units and incurring the Hit penalty (Alexander, Stacking Chart).
Alexanders’ fourth and fifth orders move the Prodromoi LN to hex 4810 and the Paeonian LC into hex 4709.
Alexander has two orders left. It seems best to use those orders to discomfort Rheomithres and those Asia Levy lights atop the hill. The first of those orders goes to the Thrace LC which has enough MP to move to 5119 and face the Persian LI for flank attack. The Persian player could try to change facing (Alexander, 7.16), but with the +3 DRM MA difference, there is a good chance the unit would outright rout. If not, the minimum 1 Hit for doing so and the 1 Hit for changing facing in the Woods, would guarantee a rout in the subsequent Shock combat. The low-odds shot taken by the Thrace LC misses with a 9 DR (adverse DRMs for movement and the Woods) so the unit is now Missile Low. The Thrace LC is tagged with a Shock Must Check TQ marker.
The Thrace LC’s flank attack is not optimal since the Asia Levy can react and force the cavalry into a DS situation and the only good reason for making the attack is the Asia Levy’s low TQ and the Woods penalty for the facing change.
Alexander’s final order goes to the Agriania SK* which moves to 5016. Why take on two units? Size doesn’t matter given that a Skirmisher type is involved, and both defenders will have to make a Pre-Shock TQ Check (Alexander, 9.13) and with a 3 TQ there is a good chance that the Asia Levy will run before needing to resolve the remainder of the Shock sequence. Furthermore, Rheomithres needs to decide whether to stay around for the fight or withdraw. Rheomithres wisely withdraws to 5217 (Alexander, 4.62) – slow going in the Woods. Having your leader in an enemy ZOC prevents that leader from issuing orders (Alexaner, 5.25) a situation that is best avoided in most circumstances. The two Asia Levy units use Entry Reaction Fire (Alexander, 8.21), both miss, and both end up Missile Low. The Agrianian’ s fire at the Asia Levy in 5116 and fares better scoring a Hit. Shock Must Check TQ marker placed. Alexander is out of orders, so play moves to the Shock Combat Segment.
Shock Combat Segment
I prefer to conduct Shock combats from left to right across the map. The Agrianian SK* is slightly leftward so I will start there. The first step is the Charge or Pre-shock TQ check (Alexander, 9.13). The 6 DR for the Agrianian has no effect. For the Persians, a 9 DR puts 6 Hits on the Asia Levy in 5515 causing a rout; the unit is faced toward the north edge of the map (the Persia Retreat edge) and rout moves two hexes into 5113. Implementing the rout is immediate in the Charge segment. Given the grain of the hex grid on the Issus map, a hexside (not a hex vertex) points in the direction of the retreat edge. Which side of that hexside the unit faces is immaterial since the “most direct path to the side’s Retreat Edge” will be through the hexside facing the Retreat Edge and along that hex row unless blocked (Alexander, 10.21). Since the Agrianians are in an enemy ZOC, the unit does not advance. A 2 DR doesn’t faze the other Asia Levy so it will face the Agrianians alone for the remainder of the Shock resolution sequence.
The Thrace LC charge did not go well for the Macedonians; the Thracians incurred 3 Hits, the Asia Levy none.
There are no leaders involved so there is nothing to do in the Leader Casualty step. I will resolve the next three steps (Alexander, 9.15-917) together for each combat. Combining these steps speeds play while still satisfying the intent of the rules (Alexander, 9.0 Procedure).
The Agrianian SK* combat is a frontal attack using Shock CRT Column 5 (Alexander, Clash of Spears Chart), shifted to 4 for the Woods (Size does not apply here) and no superiority (Alexander, Shock Superiority Chart). An 8 DR results in 2(2), both units incur 2 Hits. Note that the Agrianians are Shock capable, so the maximum 1 Hit Skirmisher effect does not apply to them. The Asia Levy now has 3 Hits, same as its TQ, but does not rout yet. There are no additional Hits for breakthrough. The Thrace LC combat is a flank attack using Shock CRT Column 6, shifted to a Column 4 (1 for Woods, 1 for Size rounded in favor of the moving LC). The LC is Attack Superior due to its Position which takes precedence over the DS from Shock Superiority Chart. A 0 DR results in a 4(2) adjusted to 4(4) due to the Attack Superiority. Both units suffer 4 Hits. There are no additional Hits for breakthrough.
Next, the Collapse step (Alexander, 9.18). The Asia Levy facing the Agrianians routs and moves to hex 5215, retreating around the Agrianians’ ZOC (Alexander, 10.21). In the Thracians’ combat, both units have exceeded their TQ Rating by the same amount (i.e. 1), so the tie breaker formula comes into play (Alexander 10.15). Since the Thracians would incur a 1 Hit for advancing into a Woods hex, it would exceed its TQ by 2 so it is the unit that routs, rout moving to 5121. The Asia Levy then has its Hits reset to 2 (TQ minus 1).
Back to the Agrianians – that unit advances into 5116 (as it must) where it changes facing one vertex (1 Hit for doing so in the Woods hex) to place the uninvolved Asia Levy in its ZOC. Rheomithres once again withdraws, this time into 5316.
Rheomithres
Movement and Missile Fire Segment
Play now proceeds in Initiative order starting with one of the Persian 3-rated leaders. At this point, there is no compelling reason to use one over another.
Rheomithres gets the nod. Recovery (Alexander, 10.16) and Rally (Alexander, 10.27) for the two units in Woods hexes are not possible due to the Rough terrain. However, there is another routed unit in Clear terrain and within Rheomithres’ command range, so Rheomithres issues a Rally order to that unit. Note that there is no line of sight requirement for issuing IOs. This may bother some players but keep in mind that there are a host of other leaders not represented by cardboard counters involved in making these armies function. Unlike most other GBoH games, a Rally attempt in Alexander uses the leader’s Initiative rating plus 1 for the die roll comparison. Rheomithres will need a 4 or less to succeed. An 8 DR doesn’t do it and since the DR is higher than the unit’s 3 TQ, it is eliminated.
Rheomithres next issues a Move order to the damaged Asia Levy unit in the Woods. Changing facing in the Woods costs a 1 Hit which would rout the unit, so it will move straight ahead to clear the Woods. A move into 5019 looks like a great opportunity for an attack on the routed Thrace LC, but, unfortunately, the Asia Levy unit does not have enough MP to place the routed LC in its ZOC. The down slope Hit penalty does not apply to LI, but the +1 MP is enough to prevent the second facing change. So, it moves into 5018 instead. Going after the Agrianians is possible since the unit is stuck – it cannot withdraw into a Woods hex (Alexander, 6.75) and hex 5016 is no further from the moving unit. However, the likelihood that the Asians would survive Entry Reaction Fire to take its low odds shot (+3 DRM; Woods, Skirmisher) is not worth the risk, and Shock is a guaranteed rout. The Asia Levy stays put and rotates one vertex in the direction of the Thrace LC.
Rheomithres last order is a Move order to the unscathed Asia Levy sitting in the Agrianians ZOC. It is not fast enough to leave the hex (Alexander, 7.23) but can and does change facing one vertex (Alexander, 7.25) for 1 MP and incurs 1 Hit. The Persian player would like to take a shot but can’t since the unit didn’t move closer to its target (Alexander, 8.11) – the unit was issued a Move (not Fire) order and expended MP. This is one of those nuanced rules that players often miss (or choose to ignore). Not a great shot anyway, and the Agrianians would get to fire back (Alexander, 8.23) with a better chance of success. The facing change allows the placement of a Shock No TQ Check marker (Alexander, 7.33) since the Asians did not move from an adjacent hex. With TQ 3 unit, not having to make a Pre-Shock TQ check is a good thing.
Shock Combat Segment
The Asia Levy combat will be resolved using Shock CRT Column 9 (10 + 1L Woods) with Attack Superiority. A 9 DR gives a 2(4) result modified to 2(8) – there is no Hit maximum for SK* types. The Asia Levy ends up with 3 Hits, the Agrianians now have 11 Hits. Breakthrough ups the Agrianians’ hit count to 13, not that it matters. The Agrianians are done for the day – eliminated. The Asia Levy advances and has its Hits set to 2. The unit does not change facing to avoid routing itself.
Now the Momentum decision. Nabarzanes is the Persian’s best leader and the one leading the army’s offensive so allowing him to have a chance at Momentum is critical. Rheomithres will not make the attempt, to avoid giving the Macedonians a Trump opportunity since, if successful, it would deny a Momentum chance to all the Persian leaders (Alexander, 5.44). A Momentum attempt here would not accomplish enough to risk Nabarzanes losing his chance at an attempt. Anyway, it is not likely that the Macedonians would harass Rheomithres before he activates again. So ends the Orders Phase and Rheomithres is Finished.
Aristomedes
Aristomedes will go next. At some point, three or more of the Cardaces deployed along the river from 4405 through 3807 will need to be pulled to a form a line to protect this flank from the inevitable Macedonian cavalry assault. But that can wait until it is clear where the Hypaspists will cross the river. The two Median Archers are within range, so Aristomedes issues a Fire order to the closest Median archer which misses the Companions in hex 4608 earning a Missile Low for the attempt. A second Fire order goes to the other Median archer who misses the Paeonian cavalry. One of the Persian Javelinists is in range, but the intervening terrain and the target type preclude an H&D shot (Alexander, 8.31-2). Aristomedes’ third order is a Move order to the Cardaces 10 at the end of the line which performs reverse face (3 MP) and a pivot (1 MP) incurring a Hit in the process (Alexander, 6.43). With no Shock combats and no inclination to risk a Momentum Trump, Aristomedes is Finished.
Darius
Darius, the last of the 3-rated leaders, is next. He issues Move orders to the three Sittaceni archers in hexes 3705, 3606, and 3605) which move into hexes 4002, 3902, and 3803 respectively (it costs Skirmishers only 1 MP to change facing in any direction) to cover the extreme left flank, keeping their distance from the Cardaces’ pivot hexes, and maintaining their current elevation. With no Shock combats and no inclination to risk a Momentum Trump, Darius is Finished.
Thymondas
Thymondas, the only 4-rated leader, is next in Initiative order. Satisfied with the positions of the combat units within his 5 hex Command Range (not as generous as that of the two previous leaders), Thymondas orders himself to move two hexes (2 MP) toward the left flank into 3211 and then issues Move orders to the two Sittaceni archers in hexes 3307 and 3407 that are now in Command Range. The latter moves to 3405 and the former to 3206, using their ability to change facing in any direction for 1 MP to return to their original facing. The last order goes to Thymondas who moves 4 MP (now 6 of his allowed 9 MP) toward the right flank into hex 2813. Once again, there is no Momentum attempt; Thymondas is Finished.
Here we have a bit of fine tuning of the defensive position. The archers are moved back to give room for the Cardaces in 3309-3409 to maneuver or to accommodate an initial rout move. Thymondas’ move to the right flank places the two archers in 2416 and 2515 in range and position himself at the center point of the anticipated Macedonian attack.
Nabarzanes
Movement and Missile Fire Segment
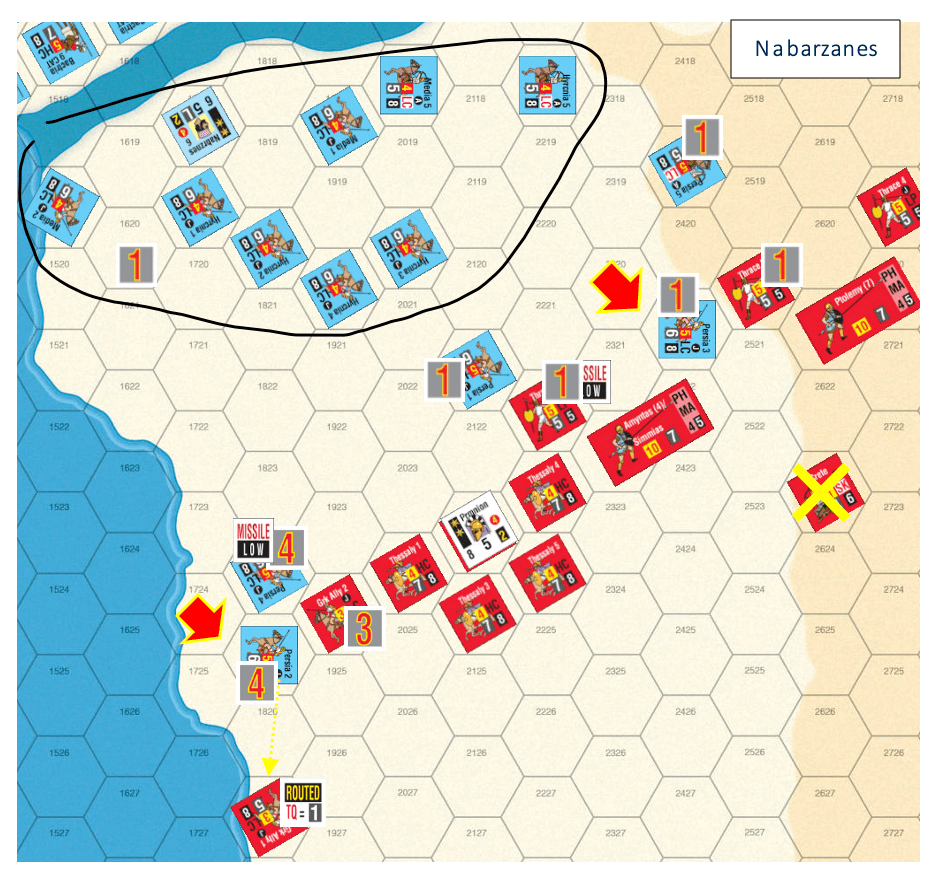
Nabarzanes is one of three 5-reated leaders, the other two Macedonian. The tie breaker for this scenario is that a non-Macedonian leader goes first rather than a determination by die roll (Alexander, 5.12). The Persian plan is to use their numerical superiority to overwhelm the Macedonian left flank and then work to get behind the line of phalanxes and attack them from the rear. Nabarzanes, the only leader with the Line Command ability in this scenario, can issue a Line Command to one of two groups: Light Cavalry or his Bactrian Heavy Cavalry. He has enough orders for the Bactrians, so a Line Command would be unnecessary. Nabarzanes will open by sending his mass of Light cavalry forward to overwhelm the Macedonian cavalry while keeping his Bactrians in reserve for use against the Macedonian phalangites. Nabarzanes has 13 LC within his 3 hex Line Command range (it is half his normal command range – Alexander, 4.33) so issues a Line Command to those LC.
Here are the moves and fires (in order). The river does not slow movement but all units that enter it incur 1 Hit.
Persia 2 to hex 1724; both units fire and miss; Shock Must Check TQ placed
Persia 1 to hex 2121; Thrace 6 misses with a Missile Low; Persia 1 Hits
Note that a moving LC is not required to Shock. LP are tough defenders against cavalry – DS on the Shock Superiority Chart. Against LC, they lose that DS if out or missiles. Given that the Peltast is Missile Low, the unit is unlikely to fire, so moving a Persian LC adjacent would effectively give that unit a free shot. But there are other opportunities …
Persia 3 to hex 2320; Cretans Hit as do the Persians; Shock Must Check TQ placed
Persia 5 to hex 2419, fires at Thrace 5 and Hits
With no Shock capability, the horse archers pulled up short, out of javelin range. Ending in 2319 and avoiding the up slope Hit would have been better but at the time I thought that the LOS was blocked by the higher elevation in 2420. Firing at the Cretans (+2 for SK) gives the target a better chance to hit with Return fire (Alexander, 8.23) than to receive from the firing unit. Besides, the Shock is certain to finish the Cretans so no point wasting the shot.
With regards to the elevation blocking the shot mentioned above, that is a mistake. The LOS rules in GBoH regarding elevations are simple: only an elevation higher than both firer and target blocks the LOS and if both firer and target are on higher elevations than any blocking obstacle (units, Woods) their LOS is clear.
Hycarnia 5 to hex 2218, facing east
Hycarnia 4 to hex 1920
Hycarnia 3 to hex 2020
Hycarnia 1 to hex 1719
Hycarnia 2 to hex 1820
Due to the way units head for the Retreat Edge, the Hyrcanians are careful to position themselves in different hex rows to minimize the number of units run over by their routed compatriots.
Media 2 to hex 1519, facing southwest
Media 5 to hex 2018, facing east
Media 1 to hex 1918.
Nabarzanes moves to 1718 to keep all the cavalry within command range.
Shock Combat Segment
Now to resolve the three shock combats. There is no choice in who is attacking who (Alexander, 9.12). Moving from left to right across the map, the Charge (Pre-Shock check) DRs are undertaken. Bad luck for the Macedonians. Greek Ally 1 takes 4 Hits while Persia 2 escapes unscathed. Persia 4 and Greek Aky 2 each incur 1 Hit. Bad luck for the Cretans – they fold (9 DR) and are immediately eliminated. Persian 3 advances into the vacated hex and rotates to face Thrace 5’s flank (there is no Pre-Shock TQ check when attacking Skirmishers).
Back to the first combat. The combat will be resolved on Shock CRT Column 8, right one column from the base due to the Size Ratio Difference (SRD, Alexander, 9.16 Step 2). Persia 2 gets the benefit of the rounding since it moved into the attack. A 0 DR produces a 3(2) result. Greek Ally LC now has 6 Hits and the Persia LC 4 Hits.
Persia 4’s combat uses the same Shock CRT Column. This time the result is reversed, a 2(3). Both LC now have 4 Hits. A quick look at the two results shows there are no Breakthroughs. So on to the Collapse step. There is one rout, so the Greek Ally rout moves to 1827. The second Greek Ally has Hits one less than its TQ so must make a TQ Check and passes (barely) and has its Hits reduced by one to 3. The victorious Persia LC advances into 1825 where it changes facing one vertex (Alexander, 9.13) toward the Greek Ally LC.
Momentum Orders Phase
Now, for the Momentum attempt. Since Nabarzanes is the last of the leaders on his side in the Initiative order, there is little reason not to make the attempt. The only downside is the Die Roll of Doom (Alexander, 5.33) and of those results only the Crisis of Faith would cause the Persians a problem here. Nabarzanes succeeds with a 3 DR. Decision time for the Macedonian player. Given a 40% probability of failure for Parmenion (if considering Alexander, keep in mind the Bypassed leader rule), the downside is not worth the benefit. Parmenion would be lost for this turn and Nabarzanes would get another go next turn before Parmenion could act. The Macedonian player does what Parmenion would have done and declines the Trump opportunity.
Movement and Missile Fire Segment
There is not much room to bring any additional units over the river and moving any of the units on the Macedonian side would incur a Hit for moving a second time. Persia 2 and Persia 3 had advanced out of range (should have anticipated that), so one order will go to Nabarzanes to move to 1919 to place those two and their potential advance hexes in range. Nabarzanes then follows with four orders to remove the Hits from Persia 5 and Hyrcania 2, 3, and 4.
While having a unit move again and incurring a Hit is not optimal, there are times when it’s worth the Hit cost. Moving at least one LC into 2023 would tangle up two of the Thessalian HC where they are. And if followed by a Shock attack, which the LC would most likely survive, the LC would inflict some Hits and force the Thessalians to Shock to untangle themselves, suffering more Hits in doing so. Passing on the Shock attack reduces the number Hits the HC will inflict and, given the HC’s Attack Superiority, the LC will earn enough Hits to rout anyway. More aggressive still, would be to move three LC into hexes 1923, 2023, and 2122 and Shock the three Thessalians separately. None of the LC will survive the counterattack, but the Thessalian HC will each have a minimum of 4 Hits making them vulnerable to a second attack should Nabarzanes gain another Momentum Orders Phase or another wave of LC attacks on the following Game Turn.
Shock Combat Segment
The first order of business in the Shock segment is the placement of Shock No TQ Check markers on Persia 2 and Persia 3. Optional here but mandatory when using the optional Engaged rule (Alexander, 10.3).
On to the resolution. There are no Pre-Shock checks. Both attacks are from the flank, so the Persians have Attack Superiority. For the LC vs. LC combat it’s Shock CRT Column 7 – there is no SRD advantage (non-moving attacks round down). The result is a 2(4), adjusted to 2(8) for the Attack Superiority. Since this combat has no effect on the other I am going to complete the combat. The Greek Ally has 11 Hits while the Persia LC has 6 Hits. The Greek Ally exceeds its TQ by more than his opponent, so routs to 2026 moving around the ZOC of Persia 2. The victorious Persian LC has its Hits set to 5 and advances into 1924 keeping its current facing.
The LC vs. LP combat will also be on Shock CRT Column 7. The result is a 2(2) adjusted to 2(4). Note that Position Superiority supersedes Weapons System Superiority. Persia now has 3 Hits while Thrace 5 has 5 Hits, enough to rout it. Due to Persia 3’s ZOC, the rout move will take it from 2621 to 2622 passing through the Ptolemy Phalanx which incurs 1 Hit (it passed its TQ check, but there is a minimum of 1 Hit). Persia 3 advances into 2521 keeping its current facing.
Now for Nabarzanes’ last Momentum attempt. A success here will be a great opportunity to damage the Ptolemy phalanx and eliminate the Peltasts. A Shock attack against the Thessaly HC would be risky but could worth it … and more Hits removed. No luck. Nabarzanes is Finished.
Parmenion
Movement and Missile Fire Segment
The Macedonian player has the choice of either Parmenion or Craterus for this Player Turn. Knowing the status of the left flank before launching the attack in the center is preferable, so Parmenion gets the nod. With no guaranteed Momentum Phase and the looming Retreat Edge, Parmenion will try to reserve two of his five orders to Rally the Greek Ally units (the Thracians aren’t eligible). The weakened flanking Persian cavalry must be dealt with first.
The lethargic Thessaly 1 missed its chance to change facing when the Persia 2 advanced, so will need an order to rectify the situation. Instead, Parmenion will use that order to move Thessaly 2 to 1923, facing the flank hexes of both Persian units (4 MP). If the Persians units react, Persia 2 will outright rout so stays put – staying around for the Shock will at least put a couple of Hits on the Thessalians. Persia 4 does react, however, passing its check but incurring 1 Hit. Its shot misses so is out of missiles. Shock Must Check TQ marker placed on Thessaly 2.
Parmenion’s second order goes to Thessaly 5, which moves to 2522 (4 MP) against the flank of Persia 3. The ensuing shock will rout it regardless of its orientation (Alexander, Shock Superiority Chart), so Persia 3 reacts by changing its facing toward the Thessalians so that it can take a shot. It passes its TQ check, incurs the mandatory Hit, shoots and Hits. Shock Must Check TQ marker placed.
With the immediate threats addressed, Parmenion will do his rallies. Note that Thessaly 2’s attack on Persia 4 stopped the potential H&D fire from interfering with the rallies. Greek Ally 2 first. Unfortunately, the 9 DR eliminates that unit. Parmenion fares no better with Greek Ally 1 where an 8 DR eliminates it as well. With his last order, Parmenion sends Thessaly 4 to 2122 (2 MP) where Persia 1 fires and Hits. Shock Must Check TQ marker placed.
Shock Combat Segment
Who will attack who in each of the three combats is straightforward. The decision for Parmenion is whether to include the Thracians in the attack on Persia 1. The gain is a column shift for the SRD and the ability to distribute the Hits all without a Pre-Shock TQ check for the Thracians. The downside is the loss of the unit’s DS against cavalry since javelin armed units are Missile No if involved in Shock. The shift to Column 10 doesn’t help enough so the Thracians will sit this one out.
Starting from the left side of the map, the Pre-Shock TQ checks DRs for Persia 2 and Persia 4 are high enough to rout both units, while the Thessalians are unaffected. Persia 4 rout moves to 1822. Persia 2 rout moves to 1724, moving around the Thessalian’s ZOC. Thessaly 2 advances into 1924 (either of the two vacated hexes are eligible) changing facing due west. The opportunity to cut off Persia 2’s rout path is enticing, but exposing Thessaly 2’s flank is not attractive.
Moving to Thessaly 4’s combat, Pre-Shock bad luck continues for the Persians … Persia 1 incurs the maximum 3 Hits, while the Thessaly 4 is unaffected. With the final pair the roles are reversed (no pun intended); Thessaly 5 receives 2 Hits, while Persia 3 is unaffected.
For the remaining two combats, the parameters are the same: Shock CRT Column 9 with Attack Superiority. For Thessaly 4 the result is 2(3) adjusted to 2(6); Thessaly 5’s is the same … 2(3) adjusted to 2(6). Thessaly 4 has a breakthrough, but the extra Hits are meaningless. Persia 1 rout moves to 2119 then Persia 3 rout moves to 2420 avoiding Ptolemy’s ZOC. Thessaly 4 advances to 2121 and keeps the same facing. Thessaly 5 advances to 2521 and rotates one vertex to face the Persians.
Momentum
So far a good start for Parmenion. The Momentum DR is important here since success will allow a rally attempt on the Thracians, the recovery of some Hits, and a chance have the Thessalians that haven’t moved enter the fray.
This is not to be … the 9 DR means it’s time for the Die Roll of Doom … and another 9! Parmenion and all units within half of Parmenion’s command range must withdraw 2 hexes toward the Macedonian Retreat Edge using the Orderly Withdrawal procedures (Alexander, 6.72).
Given the grain of the hex grid, all withdrawals will be directly down the hex row. Thessaly 1-5 withdraw to 2026, 1926, 2126, 2123 and 2523 respectively, all surprisingly passing their TQ checks. The Amyntas Phalanx withdraws to 2324-2424, incurs the automatic 1 Hit for infantry, and fails its TQ check for another 1 Hit. Thrace 5 withdraws to 2224, incurs 1 Hit, and passes is TQ check. Lastly, Parmenion withdraws to 2125 and is Finished. Although the Hit damage was light, the “Crisis” pushed the left flank uncomfortably close to the retreat edge. Perhaps the more troublesome aspect was the loss of the Orders Phase.
Craterus
Movement and Missile Fire Segment
The Macedonian plan for this section of the battlefield is to use his Peltasts to clear the skirmishers along the river before moving his phalangites forward. However, Parmenion’s crisis has caused some concern over the integrity of his left flank.
Craterus’ first order goes to Thrace 4 (2719) which moves to 2619, where Persia 5 withdraws to 2318, passing its TQ check, to await further developments. Thrace 4 moves to 2518 and Persia 5 withdraws to 2219, expends 1 MP to change facing due east (Alexander 6.72), and then it fails its TQ check incurring 1 Hit. Thrace 4 moves to 2418. The two Persian Archers hold their ground rather than put themselves directly in the path of routing Persia 1. Thrace 4 changes facing due west and ends its move.
Now for the assault. Craterus’ second and third orders go to Thrace 3 and 2. Thrace 3 (2819) moves into 2617, stopping to see if the three Susa Skirmishers withdraw – they don’t – and continues into 2516, incurring a Hit for the river but not for the down slope move. Both Susa archers score Hits as does the Peltast (on Susa 2); Shock Must Check TQ marker placed. Thrace 2 moves to 2716, the Skirmishers stay put, and continues to 2616 (1 Hit, river). Susa 3 misses and is Missile Low; Susa 4 also misses – a break for the Macedonians. Thrace 2 misses and is Missile Low; Shock Must Check TQ marker placed.
With two IOs left, Craterus could move and attempt to rally Thrace 5, but its rout move will keep it on the map so the rally will be postponed for now. Order four goes to Thrace 1 which moves to 2715 (1 Hit) – no Persian withdrawal again. Susa 4 hits but Arabia 1 misses as does Thrace 1 earning a Missile Low. Shock Must Check TQ marker placed. The last order goes to Mercenary 5 which moves to 3015 (1 Hit) – no Persian withdrawal. The Slingers hit as do the Mercenaries. Shock Must Check TQ marker placed.
So why not withdraw the Skirmishers? The reaction fire can be deadly and coupled with the terrain hits and TQ benefit of the abatis gives the Skirmishers a good chance at surviving the Shock. If they don’t survive, their loss is but 1 RP. A withdrawal may save the units, but it is unclear if they would be of any future value in the battle. Furthermore, the Slinger’s withdrawal would earn both it and one of the Greek Hoplites a hit due to the stacking “Stopping In” penalty (Alexander, Stacking Chart).
Shock Combat Segment
Now for the Shock combats. Thrace 3 will attack Susa2, Thrace 2 Susa 3, Thrace 1 will deal with Susa 4 and Arabia 1, and the Mercenaries will handle the Rhodians.
First the Pre-shock checks. All the defenders are Skirmishers so none of the attacking LP make this check (Alexander, 9.13). No hits for Susa 2, 3 Hits for Susa 3, and 4 Hits on Susa 4, and no hits on the Slingers. A good start for the Macedonians.
All combats will be resolved on Shock CRT Column 7 (10 Shifted 1 River and 2 slope) with Attack Superiority. Size does not matter, and the Skirmishers will inflict a maximum 1 Hit. The Thrace 3/Susa 2 result is a 2(2) .. revised to 1(4) for the Attack Superiority and SK penalty. The Thrace 2/Susa 3 revised result is the same at 1(4). The Thrace 1/Susa 4 plus Arabia 1 is revised to 1(6) as is the Mercenary 5/Rhodes 2 result. The Thrace 2 combat is a breakthrough though the extra hits are superfluous.
Susa 2 with 5 Hits does not rout due to the presence of the abatis. Susa 3 routs and is eliminated as does Susa 4 and Rhodes 2. Thrace 3 and Susa 2 face a TQ check (Alexander, 9.18 #2) which both pass with Hits reduced to 3 and 4 respectively.
Thrace 2 advances into 2515, incurring 2 Hits (Slope, abatis) and removing the abatis. Thrace 1 advances into 2615, incurring the same two Hits placing it at its break point, but since this is due to the advance after combat, its Hits are reset to 4 instead. Abatis removed. The Arabians may fire – a SK ZOC extends into their flank hex – does so but misses.
Mercenary 5 advances into 3014, same Hit cost and same resetting of it Hits as done for Thrace 1. The abatis there is removed. Arabia 3 and Rhodes 2 have shots. Arabia 3 fires first and Hits, routing the Mercenaries to 3016. All the LP are set to Missile No (well, for the routed Mercenaries this is unnecessary since they will be Missile No if they rally).
Momentum
Time for the all-important Momentum attempt. Craterus has all sorts of options here. One common practice is to rally and recover. Moving towards Parmenion, he could rally the Thracians and remove Hits from three other units, while keeping Thrace 1 in range for Shock combat. Alternatively, he could simply continue his attack by moving the Peltasts on his right forward with the Phalanxes following. But not to get the cart before the horse, Craterus must succeed in the attempt … and fails! Craterus is Finished.
Alexander
Movement and Missile Fire Segment
Alexander is the last leader to go. Progress needs to be made clearing the Skirmishers defending the river crossing, so Alexander orders his light units forward, accepting the Hit for moving a second time. Paeonia 2 moves to 4708 (1 Hit for moving again, 2 Hits Rocky River). The Median Archers miss and earn a Missile Low marker. The Paeonians also miss. Shock Must Check TQ marker placed. The Prodromoi move to 4909 (same 3 Hits), where the Persia Javelinists fire and Hit. Shock Must Check TQ marker placed.
Alexander wants to position his Hypaspist for an assault across the river against the Hoplites and Cardaces where it’s easier to cross the river. He uses two of his five remaining orders to first move Mercenary 5 and the Macedonian archers to clear the way. The Macedonian archers move to 3710 and fire at the Cardaces 4 – scoring a Hit (2 DR or less was needed since the archer moved). Mercenary 5 then moves to 3611 (5 MP). Alexander’s last three orders are used to move the Hypaspists: Hypaspist 1 to 3713 with a change of one vertex to the west along the way; Hypaspist 2 to 3813 in the same manner as Hypaspist 1; and the Agema to 3912 in the same manner as Hypaspist 2 but incurring 1 Hit for moving down slope. Unlike cavalry and the light infantry types, the heavy infantry earns 1 Hit when going down slope.
Shock Combat Segment
Shock time. Who is attacking who is clear. For the Pre-Shock step, only the defending Skirmishers check. Media 1 takes 4 (another nasty nine), the Persian Javelinists none. The Paeonia LC’s attack will be resolved on Shock CRT Column 6 (9 with 1L river; 2L slope) with Attack Superiority. The result is a 2(2) adjusted to a 1(4). For the Prodromoi, the Shock CRT Column is 7 with the same shifts and with Attack Superiority. The result is the same 2(2) adjusted to 1(4). During the Collapse step, Media 1 is eliminated. The Javelinists pass their TQ check so their Hits are reduced to 3.The Paeonians advance into 4808 where they incur a Hit for the slope. Media 2 fires and Hits, routing the Paeonians to hex 4810. Media 2 is now Missile No as are Persian Javelinists.
Alexander Momentum
Movement and Missile Fire Segment
Alexander is limited to one Momentum try and this time the Macedonians succeed. Time to exploit the gap at the river crossing – Skirmishers that do not have missiles lose their ZOC. First order goes to Companion 1 who changes facing one vertex due east then moves to 4907 (3 Hits – move again, river, up slope). Persia 2 fires and Hits. Shock Must Check TQ marker placed. Alexander’s second order goes to Companion 2 which uses 7 MP to move to 4808 facing Media 2 (3 Hits – move again, river, up slope). Shock Must Check TQ marker placed.
Order three rallies the Paeonians. The Paeonians are given 2 Hits from the Rally Table die roll and then are refaced towards the river. Alexander uses his fourth order to move himself to 4416 (3 MP) to place the routed Thracian LC in range while also keeping the Prodromoi in range. Order five rallies the Thracians (3 Hits from the Rally Table roll) and then are refaced towards the Persians. Orders six and seven are used for Move orders to the two Companion HC that have yet to move. Companion 4 moves to hex 4608 and Companion Agema moves to hex 4609.
Shock Combat Segment
The Prodromoi receives a Shock No TQ Check marker. Who is attacking who is clear. The Pre-Shock TQ checks inflict 2 Hits on Media 2, none on the Persia 2 Javelinists. Companion 2’s combat will be resolved using Shock CRT Column 9 (2L for the slope while Companion 1’s combat will use Column 11 (no shifts). The Prodromoi combat will be resolved using Column 7 (as before). All three combats have Attack Superiority.
The adjusted results for Companion 2 and Companion 1 are both 1(6); for the Prodromroi 1(4). Media 2, Persia 2 and Persia 1 are eliminated. Companion 2 advances to 4807, incurring a Hit for the slope and then faces north. Companion 1 advances to 5008 and faces northeast. The Prodromoi advance to 4908, incurring a Hit for the slope.
Alexander is Finished.
Rout and Reload Phase
The Orders Phase is complete, now on to the Rout and Reload Phase. The first step is to remove the Rallied markers from Thrace 1 and Paeonian 2. Next come the rout moves, of which there are several. The rules don’t specify which player goes when and in most cases it doesn’t matter. As with Shock combat, I will move from left to right across the map. In this segment, routed units use their entire MA to move toward the retreat edge expending MP for terrain and facing changes but ignoring any terrain Hits (Alexander, 10.22). Given the grain of the hex grid, the units will travel along a hex row unless blocked (Alexander, 10.21).
First to go is Persia 2 (1724) which routs along the hex row to 1716, passing through Hyrcania 1, which passes its TQ check incurring the minimum 1 Hit. Persia 4 (1822) is next, which rout moves along the hex row to 1814, passing through Hyrcania 2 which passes its TQ check incurring 1 Hit. On to Persia 1 (2119) which rout moves along the hex row to 2111 passing through Cardaces 1 and Syria 2. The Cardaces fails its check but still only incurs 1 Hit. The Syrians pass, incurring 1 Hit.
Persia 3 (2420) rout moves along a circuitous path behind Thrace 4. Blocked by Thrace 3, Persia 2 changes facing toward the west (4 MP so far) and moves into the river then into 2416 atop Susa 2, exhausting its 8 MP. Per the stacking chart, it moves one more hex atop Cardaces 3 and is eliminated. Susa 2 fails its TQ check by 2 giving it enough Hits to rout, despite the abatis benefit, and is eliminated. Cardaces 3 fails its check by one so incurs only the 1 Hit minimum.
Keep in mind that rout movement in this segment works the same way as the initial two hex rout move in that an enemy ZOC does not block or stop the move if occupied by a friendly unit (historically, the depth of the units was extremely shallow relative to the unit’s frontage so there was ample room for routing units passing behind the action).
Continuing, Thrace 5 (2622) rout moves along the hex row to 2627. Mercenary 5 (3016) rout moves along the hex row to 3021 atop the Greek Allies 1, where it moves one more hex to 3022. The Meleager Phalanx fails its TQ check and incurs 2 Hits, while Greek Allies Hoplite 1 passes theirs, incurring the 1 Hit minimum. And lastly, the Asia Levy (5215) rout moves to 5210.
The units with Missile Low/No can have those markers removed in some circumstances. Thrace 2 and Thrace 3 qualify since they are out of enemy missile range and not in a ZOC (Alexander, 8.18). In the final segment, leaders are flipped from their Finished side as are units on their Moved side and any Moved markers removed. For this play through, I didn’t do any flipping to speed things up.
Withdrawal Phase
The Macedonians lost the two Greek Ally LC (10 RP) and two Skirmishers (2 RP) for a total of 12 RP.
The Persians lost 1 Persian LC (6 RP), an Asia Levy (3 RP), and eight Skirmishes (8 RP) for a total of 17 RP.
Ready for the next Game Turn …
End of Game Turn Commentary
The Persians made decent progress on their right wing with a little help from Parmenion’s Crisis of Faith. Nabarzanes’ was a bit timid in his Momentum phase and should have anticipated a vigorous counterattack by Parmenion. A more spirited use would have been to send three of his LC to hit the Thessalians first and accept the hit for moving a second time.
On the Persian left, the Median archers being Missile Low should have held their fire (I had forgotten that Skirmishers lose their ZOC when out of missiles) to prevent those sneaky Companions from infiltrating the Persian position to attack the Persian Javelinists. The Skirmisher river defense did its job, which was somewhat undone by the flight of the Persia 3 light cavalry.
The Macedonians cleared the river crossing on their right wing but at a heavy Hit cost to three units. The three other Companions are set to cross during the upcoming EIO phase.
Craterus’ Peltasts were mostly successful in clearing the opposing riverbank, but a failed Momentum prevented further gains. Parmenion conducted a spirited and successful counterattack only to be spurned in his attempt to rally the Greek Ally cavalry and then lose his nerve with a failed Momentum and a Crisis of Faith retreat.