برچسب: Item

  • Roblox The Hatch rewards – every free UGC item and how to claim them

    Roblox The Hatch rewards – every free UGC item and how to claim them


    What are the Roblox the Hatch rewards? If you’re up for cracking eggs all summer long, this is the officially sanctioned block-based event for you. Split across multiple biomes, hundreds of games, and with numerous mechanics, the goal is simple: collect all ten eggs of a single element to earn a prize. Get the lot and you’ll spruce up your UGC catalog with glimmering goodies.

    Roblox the Hatch has spread into some of the best Roblox games on the platform. If you’re not sure which ones to search for sacred eggs, let our guides, well… guide you. Double up with Fisch codes, Dig codes, and Arm Wrestle Simulator codes to claim in-game loot while you hunt for eggs to hatch.

    Roblox the hatch rewards.

    All Roblox the Hatch rewards

    Reward Requirement
    Funktastic Fritatta Boombox Collect all 10 Connection eggs
    Bizarro Benedict Hat Collect all 10 Light eggs
    Electro Eggalodon Tail Collect all 10 Darkness eggs
    Scorching Deviled Egg Horns Collect all 10 Fire eggs
    Egglectrified Adventurer’s Belt Collect all 10 Earth eggs
    Midnight Eggquarium Backpack Collect all 10 Water eggs
    Yolktaic Energy Wings Collect all 10 Energy eggs
    Timespun Halo Collect all 10 Time eggs
    Staff of the Geomancer Collect all 10 Ice eggs
    Dark Side of the Egg Aura Collect all 10 Air eggs
    Wearable egg head accessory 1 Quest – Collect all 100 eggs
    Wearable egg head accessory 1 Quest – Complete the Finale

    Throughout The Hatch, you have the ability to unlock 12 different ‘Solstice’ UGC items by collecting every egg from its respective element. You can also buy the lot for 1200-1600 Robux if you truly believe time is money.

    Manage to score the whole set and they’ll be upgraded into fancier forms.

    Collecting an egg in the hatch.

    How to claim Roblox Hatch rewards

    Once you collect the final egg in an elemental set, you need to head to the hatch point of the matching biome. This triggers an event where the final 11th egg of that series appears before you.

    Agree to let it float around and all that’s left is to take it to that biome’s nest to hatch it, revealing the Roblox Hatch reward of that element.

    Are there more Roblox Hatch rewards?

    Some quests, found on the left side of the hub screen, award Hatch UGC, too. From inviting friends to collecting over 100 eggs, you can earn things like gelato you can equip, and unique head accessories.

    We expect a couple more Hatch rewards to surface before the event ends on July 12. Take a look in the telescope behind the Connection portal and you’ll spot a meteor hurtling through the sky.

    Expect the Hatch meteor to unlock the head accessory from the Finale quest. It could also have something to do with the ‘Something is Coming’ quests set to kick off on July 4, 2025.

    A concert in roblox.

    How to get Eggs in Roblox The Hatch

    Each biome within the Roblox the Hatch event hub houses eggs of a specific element.

    It’s possible to find all ten eggs of an element in its respective zone if you’re lucky. Once you exhaust the spawns, you’ll have to resort to merging, trading, or searching for a single egg in each of that biome’s mountain of player-made games by walking into its portal.

    You can also unlock eggs by clearing quests like discovering the biome’s portal, interacting with its decor, or completing obbies. It sounds easy, but with eggs of various rarities, getting lucky enough to find the lot can take some time. Cooperation is key.

    The Hatch hub has daily events, too. These can make hunting for eggs a little easier. For example, the Merge Mania event on July 3 reduced how many duplicates were needed to merge eggs and increased egg spawns across the hub, making it possible to AFK farm eggs in each biome.

    If you’re struggling to find a specific egg, it’s worth loading up the Hatch hub the next day to see if a fresh event might work in your favor.

    And that’s it for Roblox The Hatch rewards for now. Remember: you have until July 12 to grab the lot. Done and dusted? Find your next obsession with the help of our list of the best free PC games. Like the random egg mechanic? You might enjoy the best gacha games on PC, too.
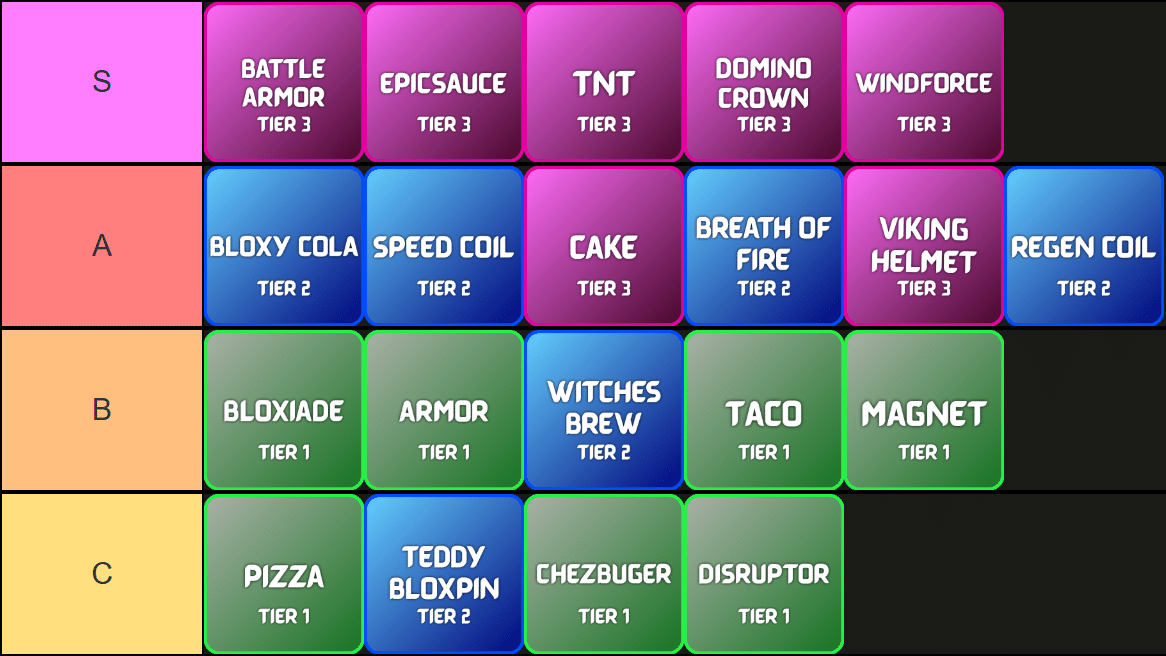


    Source link

  • [⚔️] Complete Noobs Must Die Item Tier List and Guide [Alpha]

    [⚔️] Complete Noobs Must Die Item Tier List and Guide [Alpha]


    Items are the most important aspect of power in Noobs Must Die. As waves of Noobs grow stronger and more relentless, players must rely on a different Items to hold their ground. Each Item offers unique strengths and, when combined thoughtfully, can create powerful synergies that turn the tide of battle. Understanding how these Items work together is key to surviving longer, so follow along with my Noobs Must Die Item Tier List and Guide to find the most effective way to destroy all the Noobs.

    Noobs Must Die Item Tier List

    None of the Items in Noobs Must Die are bad, but some are better than others. Each item has a synergy with another item, so even the Tier 1 Items have a use. Battle Armor is the best, as it allows you to become unkillable for a few seconds, letting you jump into groups of enemies and killing all of them without a risk of losing your run.

    Noobs Must Die Item List

    Below is a complete and detailed list of all Items in Noobs Must Die, listed by how good they are and accompanied by their best synergies with other Items:

    Noobs Must Die item Synergy

    Items in Noobs Must Die offer a creative and strategic system that rewards smart combinations and timing. Standout Items like Battle Armor and Windforce offer powerful defensive and offensive benefits, with the former granting invincibility and the latter summoning an orbiting sword for continuous damage. Pairing Windforce with Speed Coil or Bloxiade creates a fast, aggressive playstyle, while mixing Battle Armor with Regen Coil or Chezburger boosts survivability. Items like Domino Crown and Taco enhance critical and luck-based builds, and TNT can add unexpected explosive power when supported by Witches Brew or Breath of Fire.

    How to get Items in Noobs Must Die

    To get new Items in Noobs Must Die, you simply need to head to the Items Items on the right side of the screen and purchase new Items. Once you purchase them for the specified number of TIX, the Item will be available in the Item Pool for your next attempt.

    That is all for my Noobs Must Die Item Tier List and Guide. Check out our other Roblox Articles for more fun games and codes that can help you get freebies.


    The Escapist is supported by our audience. When you purchase through links on our site, we may earn a small affiliate commission. Learn more about our Affiliate Policy


    Source link

  • Roblox School Time Walkthrough Guide – Kit Tier List, Item Guide & More

    Roblox School Time Walkthrough Guide – Kit Tier List, Item Guide & More


    To beat Roblox School Time Chapter 1 you’ll need to know all the mechanics for each level as well as the best items and kits to use. I’m also going to walk you through each level and the best strategies for all of them. Here’s my complete School Time walkthrough guide, item guide, and kit tier list.

    School Time Beginner’s Guide

    To beat Roblox School Time you’ll have to go through a series of levels collecting different items in each one and bringing them to the art room to progress. The teacher Mrs. Klock and the principal Mr. Jenkins (starting level 2) will chase you and instantly knock you down on contact. Other players can revive you and then you have to heal with consumable items you find. Let’s start with some basic tips and tricks:

    • Disable Mrs. Klock and Mr. Jenkins: You can find and buy items to disable the teacher and principle like the bear trap snare that will stun them on contact or the paper ball you can throw to stun them by clicking on them with it equipped. Check out the full list of items below.
    • Coins & Gems: You’ll find coins each level that you can spend at the end of the level to buy items for the next day. Also, there are Gems to pick up which are used in the Lobby to unlock kits which are item presets that refresh each run and they also give you permanent movement speed and health boosts. Check out the best kits below.
    • Progression Items: In the first level you’ll need to pick up a certain number of planks and bring them to the art room to go to Day 2. This repeats for different items each day with Blueprints on Day 2 and so on. These items are randomly placed around the school and they even spawn during the level so keep looking. They’re hidden in various rooms on the floor and on the tables in classrooms but not in lockers which you need a key to open.
    • Red Arrows: Whenever you need to reach the art room go into any hallway and find the red arrows and then follow them. They’ll lead you to the art room which is helpful until you learn the level layout yourself.
    • Spread Out and Watch the Floor and Tables: The best strategy is to spread out into the cafeteria, gym field, and temple as well as the class rooms. Each day the level is the same so learn the layout and pay attention to the tables since the items can be on tables as well as the floor.
    • Certain Item Effects Persist: You can dig holes with Shovels to teleport around the level or place snares and these items persist throughout all levels so feel free to place them in earlier days so you can use them later as well. I recommend digging a Shovel hole near the art room so you can quickly come back to it.
    • Reviving Players: You can see a player who is downed through the walls so quickly rush to revive them before they run out of HP or else they’ll be eliminated and kicked from the game. You can drop healing items like Bandages and Medkits with Backspace to allow them to heal.
    • Max 10 Items: You can only carry 10 items at a time so use Bandages and drop Traps to free up space for better items.

    All Items Guide in School Time

    school time shop guide and all items
    Image by The Escapist

    You can find all of these items on the ground during each day in School Time or you can buy them at the end of a day. Below you’ll find a list of them all and a brief guide for each one on how best to use it or should you buy it.

    All Days Walkthrough in School Time

    all progression items in school time all days guide walkthrough
    Image by the Escapist

    When it comes to Roblox horror games School Time is pretty simple since there are no puzzles. You just collect all items each day, bring them to the art room, and avoid getting downed by the teacher and principal. That said, there’s a special mechanic each day so let me give you some tips for all of them:

    • Day 1 Tips: This day is really easy once you get a Trap, Soda, or Ball to escape when the teacher starts chasing you. Look for planks and bring them back to the art room, the red arrows will guide you. The most important part of Day 1 and any day for that matter is to always go to downed players to revive them. The more players pass the easier the later days will be. At the end of Day 1 and all days after you’ll get a shopping phase where you can buy the items we mentioned above. Make sure to stock up.
    • Day 2 Tips: This where Principal Jenkins shows up so you’re basically twice as likely to get chased. Just make good use of retreating, hiding, and using the escape/stun items and you’ll be fine. Always have at least one escape/stun item on you. If you don’t, don’t risk going into open spaces without cover.
    • Day 3 Tips: This is where both the teacher and principal can drink Soda for a speed boost. It’s more crucial than before to keep to the at least one escape/stun item strategy since they’ll catch you fast if you don’t have an escape plan.
    • Day 4 Tips: This is where certain lockers will have tentacles coming out of them that will damage and stun you on contact. You can still pass them by just make sure to walk on the furthest opposite side of the tentacle locker in a hallway. Otherwise, strategy from days before apply. Make sure to buy the Lantern at the end of Day 4 for Day 5.
    school time day 4 tentacle locker
    Image by The Escapist
    • Day 5 Tips: This is the last day where lights go out. Make sure you have a Lantern from one of the shopping phases before. Otherwise, strategies from Day 4 and before apply and nothing else changes.
    school time day 5 lights out
    Image by The Escapist

    Once you beat Day 5 you’ve beaten School Time Chapter 1. Congratulations! Now we wait for Chapter 2.

    School Time Kits Tier List

    school time kits tier list best kits
    Image by The Escapist

    You can buy all items from all kits eventually during the game so the best kits in School Time are the ones are that give you permanent bonuses or lots of coins. The permanent bonuses are useful for all days whereas the one-time items are a short term boost. Movement speed is much better than health as a stat boost so you’ll notice kits with it are ranked higher. Health isn’t that valuable since the teacher and principle one shot you anyway. Also, kits with coins are also powerful since you can establish a Shovel hole system earlier or be flexible in what you buy depending on how the game is going. You can check what all kits do in the lobby.

    That’s it for my complete School Time walkthrough guide with an item guide and kit tier list. Check out our Roblox guides page for more walkthroughs like our PETAPETA and 7 Days to Live guides.


    The Escapist is supported by our audience. When you purchase through links on our site, we may earn a small affiliate commission. Learn more about our Affiliate Policy


    Source link