
Stone |
Value – 1
Health – 3
Depths – 0 to 500
Rarity – 98
Aura – N/A |

Chest |
Value – Contains Class Keys
Health – 10
Depths – 1 to 10,000,000
Rarity – 1 in 3,000
Aura – N/A |

Garnet |
Value – 30,000
Health – 3
Depths – 0 to 1
Rarity – 1 in 10k
Aura – N/A |

Copper |
Value – 3
Health – 5
Depths – 5 to 500
Rarity – 1 in 200
Aura – N/A |

Coal |
Value – 3
Health – 10
Depths – 5 to 500
Rarity – 1 in 200
Aura – N/A |

Diamond |
Value – 3
Health – 30
Depths – 5 to 500
Rarity – 1 in 400
Aura – N/A |

Abyssal Stone |
Value – 150
Health – 50
Depths – 5 to 500
Rarity – 1 in 1,000
Aura – N/A |

Ambrosia |
Value – 500
Health – 50
Depths – 5 to 500
Rarity – 1 in 1,000
Aura – N/A |

Ammolite |
Value – 2500
Health – 50
Depths – 5 to 500
Rarity – 1 in 1,000
Aura – N/A |

Datolite |
Value – 1500
Health – 50
Depths – 5 to 500
Rarity – 1 in 2,000
Aura – N/A |

Lithium |
Value – 250
Health – 50
Depths – 5 to 500
Rarity – 1 in 10,000
Aura – N/A |

Darkstone |
Value – 3
Health – 10,000,000,000
Depths – 500 to 10,000,000
Rarity – 99
Aura – N/A |

Iron |
Value – 100
Health – 10,000,000,000
Depths – 500 to 10,000,000,000
Rarity – 1 in 200
Aura – N/A |

Ruby |
Value – 100
Health – 10,000,000,000
Depths – 500 to 10,000,000
Rarity – 1 in 200
Aura – N/A |

Platinum |
Value – 250
Health – 10,000,000,000
Depths – 500 to 10,000,000
Rarity – 1 in 1,000
Aura – N/A |

Dragonglass |
Value – 1,000
Health – 10,000,000,000
Depths – 500 to 10,000,000
Rarity – 1 in 1,000
Aura – N/A |

Plutonium |
Value – 1,000
Health – 10,000,000,000
Depths – 500 to 10,000,000
Rarity – 1 in 1,000
Aura – N/A |

Firecrystal |
Value – 5,000
Health – 10,000,000,000
Depths – 500 to 10,000,000
Rarity – 1 in 2,000
Aura – N/A |

Darkmatter |
Value – 5,000
Health – 10,000,000,000
Depths – 500 to 10,000,000
Rarity – 1 in 2,000
Aura – N/A |

Rainbonite |
Value – 25,000
Health – 10,000,000,000
Depths – 500 to 10,000,000
Rarity – 1 in 10,000
Aura – N/A |

Stellarite |
Value – 25,000
Health – 10,000,000,000
Depths – 500 to 10,000,000
Rarity – 1 in 10,000
Aura – N/A |

Constellatium |
Value – 100,000
Health – 100,000,000,000
Depths – 500 to 10,000,000
Rarity – 1 in 20,000
Aura – N/A |

Unobtanium |
Value – 1,000,000
Health – 100,000,000,000
Depths – 500 to 10,000,000
Rarity – 1 in 100,000
Aura – N/A |
| Crimsonstone |
Value – 50
Health – 500,000,000,000,000,000,000
Depths – 1,000 to 10,000,000
Rarity – 1 in 1.01
Aura – N/A |
| Warped Coal |
Value – 500
Health – 5,000,000,000,000,000,000,000
Depths – 1,000 to 10,000,000
Rarity – 1 in 200
Aura – N/A |
| Malachite |
Value – 500
Health – 5,000,000,000,000,000,000,000
Depths – 1,000 to 10,000,000
Rarity – 1 in 200
Aura – N/A |
| Taaffeite |
Value – 1,250
Health – 10,000,000,000,000,000,000,000
Depths – 1,000 to 10,000,000
Rarity – 1 in 1,000
Aura – N/A |
| Realgar |
Value – 1,250
Health – 10,000,000,000,000,000,000,000
Depths – 1,000 to 10,000,000
Rarity – 1 in 1,000
Aura – N/A |
| Jasper |
Value – 15,000
Health – 10,000,000,000,000,000,000,000
Depths – 1,000 to 10,000,000
Rarity – 1 in 2,000
Aura – N/A |
| Morganite |
Value – 15,000
Health – 10,000,000,000,000,000,000,000
Depths – 1,000 to 10,000,000
Rarity – 1 in 2,000
Aura – N/A |
| Lightning Crystal |
Value – 100,000
Health – 10,000,000,000,000,000,000,000
Depths – 1,000 to 10,000,000
Rarity – 1 in 10,000
Aura – N/A |
| Redlinite |
Value – 100,000
Health – 10,000,000,000,000,000,000,000
Depths – 1,000 to 10,000,000
Rarity – 1 in 10,000
Aura – N/A |
| Devilline |
Value – 1,000,000
Health – 10,000,000,000,000,000,000,000
Depths – 1,000 to 10,000,000
Rarity – 1 in 10,000
Aura – N/A |
| Void Crystals |
Value – 5,000,000
Health – 10,000,000,000,000,000,000,000
Depths – 1,000 to 10,000,000
Rarity – 1 in 100,000
Aura – N/A |
| Masslock |
Value – 5,000,000
Health – 10,000,000,000,000,000,000,000
Depths – 1,000 to 10,000,000
Rarity – 1 in 100,000
Aura – N/A |
Ekanite
(Kind of a Troll ore, not worth mining) |
Value – 1,250
Health – 10,000,000,000,000,000,000,000
Depths – 500 to 1,000
Rarity – 1 in 100,000
Aura – N/A |
| Marble |
Value – 500
Health – 1 octillion
Depths – 2000 to 10,000,000
Rarity – 1 in 1
Aura – N/A |
| Mineralite |
Value – 5,000
Health – 1 octillion
Depths – 2000 to 10,000,000
Rarity – 1 in 200
Aura – N/A |
| Crookesite |
Value – 5,000
Health – 1 octillion
Depths – 2000 to 10,000,000
Rarity – 1 in 200
Aura – N/A |
| Niedermayrite |
Value – 15,000
Health – 1 octillion
Depths – 2000 to 10,000,000
Rarity – 1 in 1,000
Aura – N/A |
| Rozenite |
Value – 15,000
Health – 1 octillion
Depths – 2000 to 10,000,000
Rarity – 1 in 1,000
Aura – N/A |
| Miroite |
Value – 50,000
Health – 1 octillion
Depths – 2000 to 10,000,000
Rarity – 1 in 2,000
Aura – N/A |
| Rainbonium |
Value – 50,000
Health – 1 octillion
Depths – 2000 to 10,000,000
Rarity – 1 in 2,000
Aura – N/A |
| Alagamite |
Value – 500,000
Health – 1 octillion
Depths – 2000 to 10,000,000
Rarity – 1 in 10,000
Aura – N/A |
| Lavendulan |
Value – 500,000
Health – 1 octillion
Depths – 2000 to 10,000,000
Rarity – 1 in 10,000
Aura – N/A |
| Wadsleyite |
Value – 2,500,000
Health – 1 octillion
Depths – 2000 to 10,000,000
Rarity – 1 in 20,000
Aura – N/A |
| Celsian |
Value – 2,500,000
Health – 1 octillion
Depths – 2000 to 10,000,000
Rarity – 1 in 20,000
Aura – N/A |
| Augelite |
Value – 2,500,000
Health – 1 octillion
Depths – 2000 to 10,000,000
Rarity – 1 in 20,000
Aura – N/A |
| Cordierite |
Value – 2,500,000
Health – 1 octillion
Depths – 2000 to 10,000,000
Rarity – 1 in 20,000
Aura – N/A |
| Decayium |
Value – 50,000,000
Health – 1 octillion
Depths – 2000 to 10,000,000
Rarity – 1 in 100,000
Aura – N/A |
| Redrum |
Value – 50,000,000
Health – 1 octillion
Depths – 2000 to 10,000,000
Rarity – 1 in 200,000
Aura – N/A |
| Fracturium |
Value – 50,000,000
Health – 1 octillion
Depths – 2000 to 10,000,000
Rarity – 1 in 200,000
Aura – N/A |


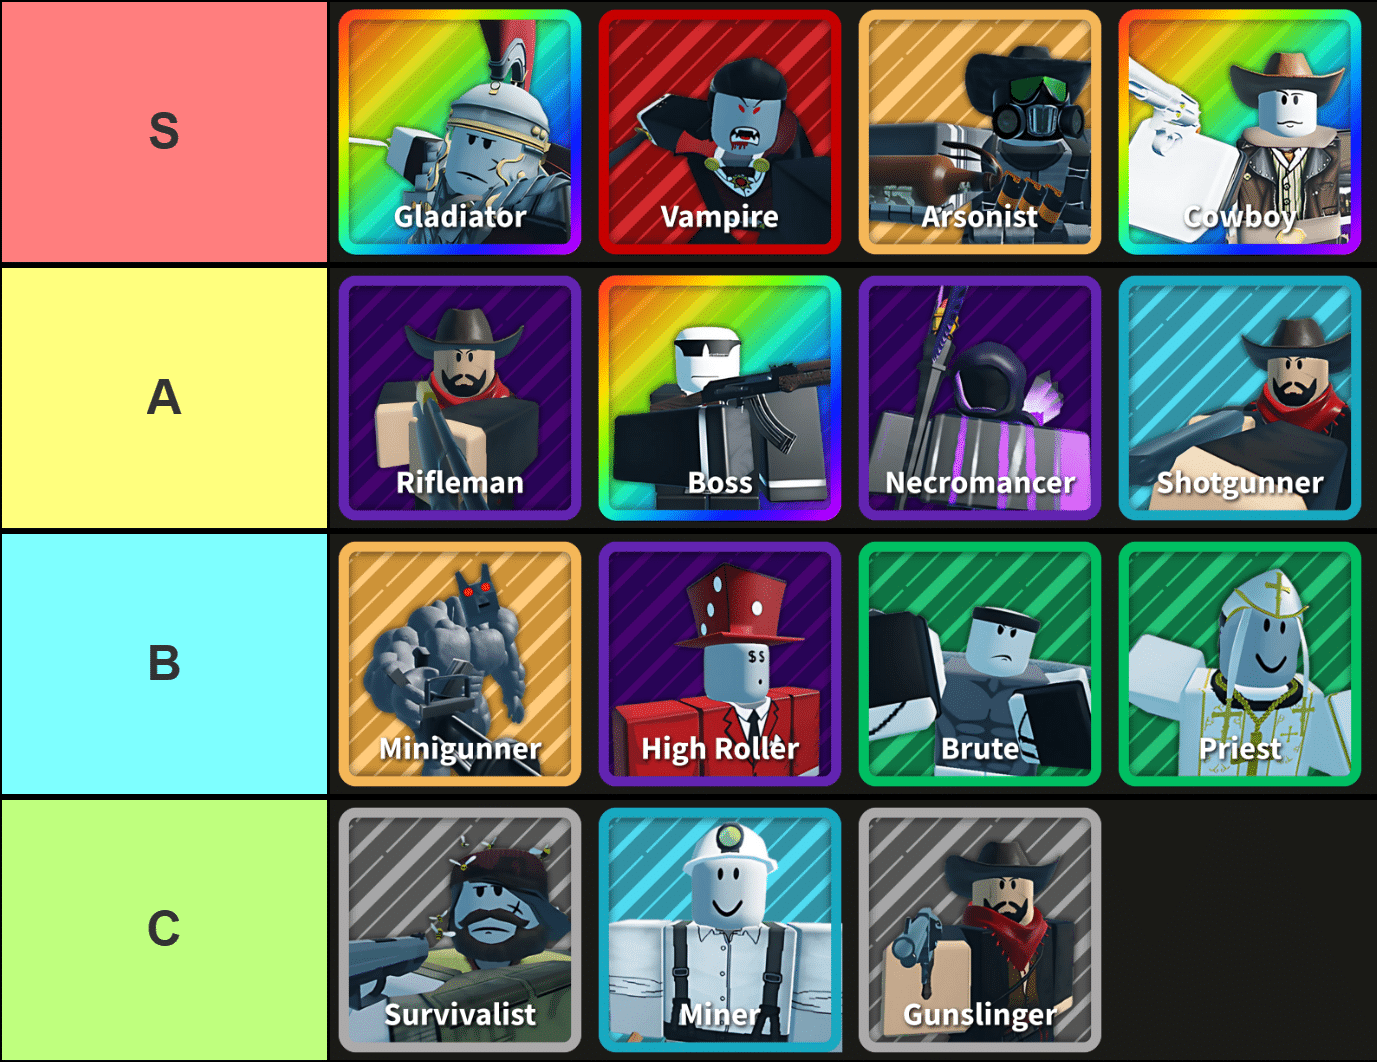
![Dead Defense Tier List [UPD 2.1] – Best Towers for Nightmare, Trade Values, and More](https://histream.ir/wp-content/uploads/2025/05/dead-defense-tier-list.webp.jpeg)


Published: Jul 3, 2025 06:31 am