Okay, so you may already know I am slightly obsessed with Survivor-type games. Vampire Survivors, especially on Steam Deck, is still a go-to of mine, especially when traveling, but initially, I turned my nose up at it when it first came out and completely ignored it.
It was only by getting into the genre by accident, by stumbling across Deep Rock Galactic: Survivor, that I revisited Vampire Survivors, and the rest is history.
Now I find myself trying to keep abreast of the genre and having a dabble at any such game that comes along, and boy oh boy, there are a lot of them.
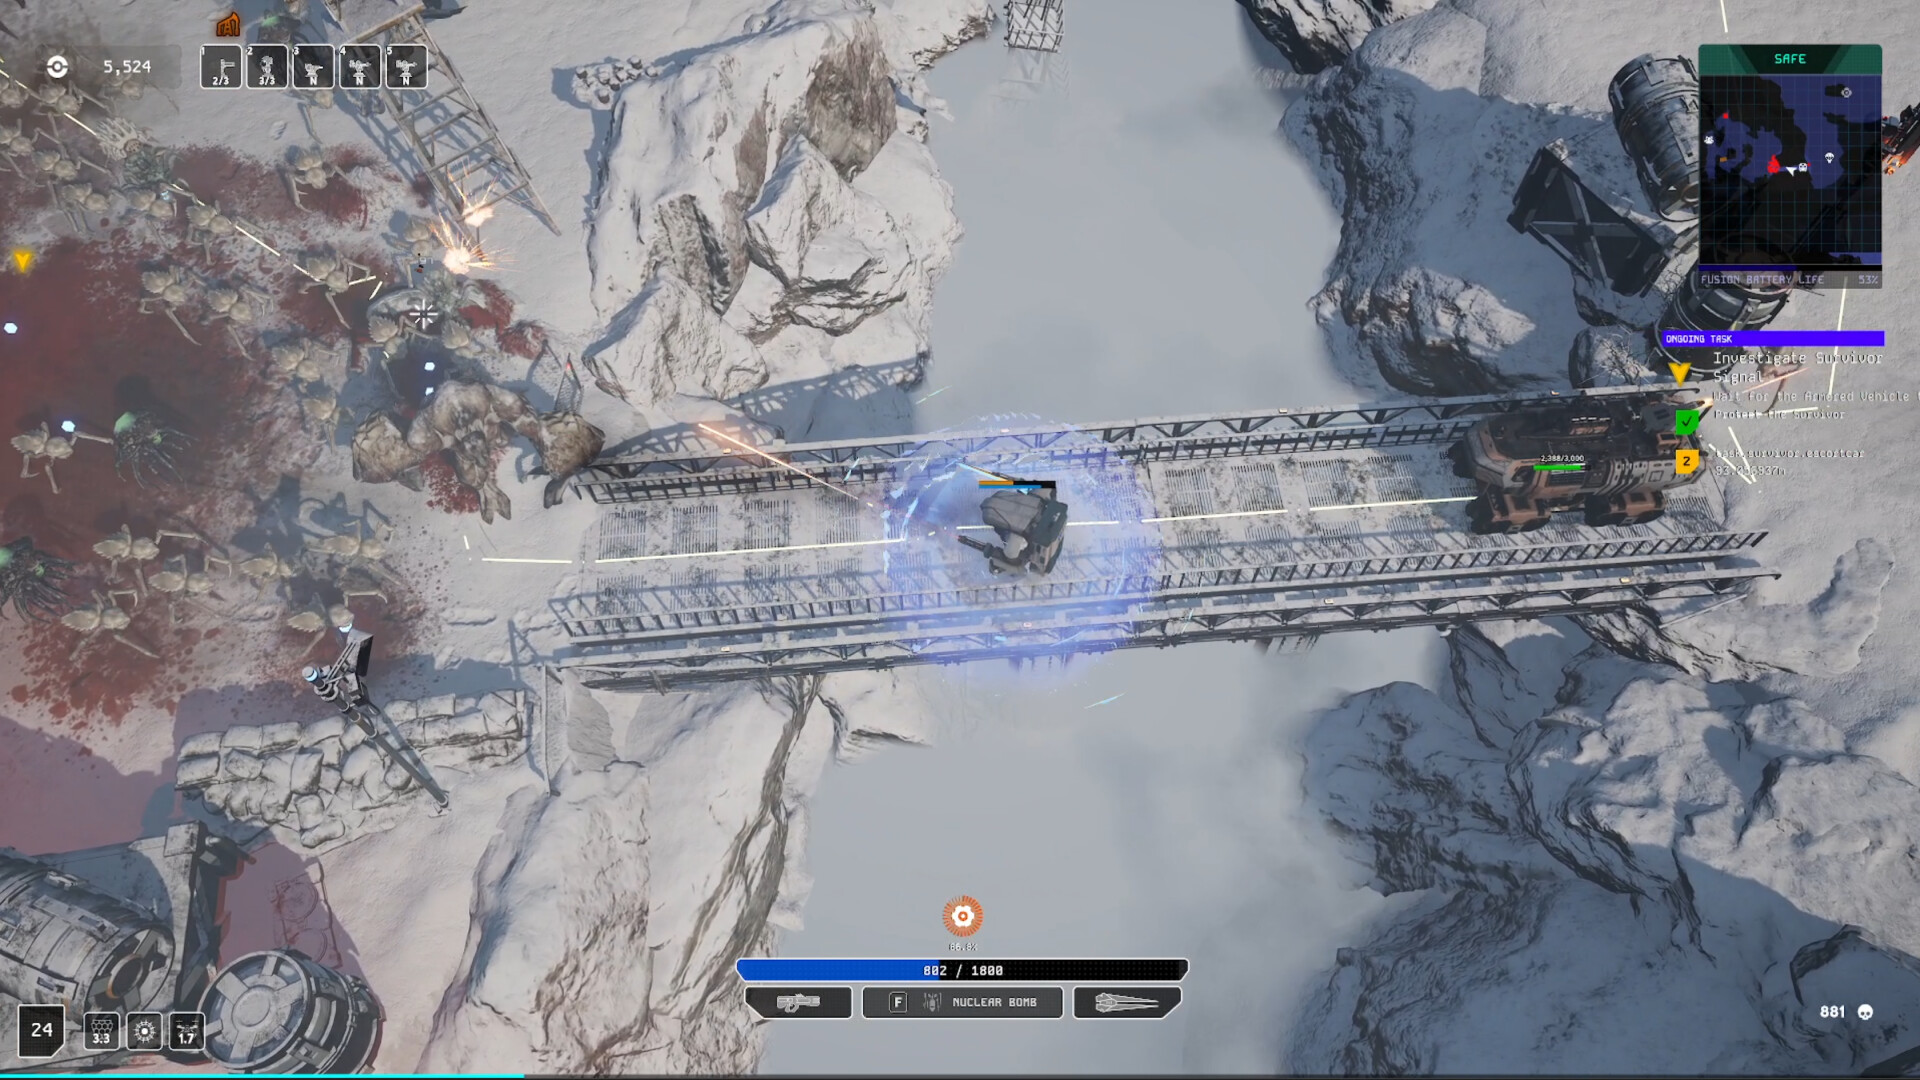
This weekend, I discovered Iron Core: Mech Warrior, which was released a day or so ago on Steam and seems to tick a lot of boxes that dorks like me might be interested in. Survivor mechanics. Check. Mechs. Check – did you say mechs? I certainly did. Iron Core is Vampire Survivors with big, hulking mechs. Baby. I’m all in.
Iron Core: Mech Warrior is more graphically intense than Vampires and more akin to the flashiness of Deep Rock Galactic: Survivor, and it’s probably fair to say it borrows from a few of that games’ more esoteric mechanics, too.
There are some differences, certainly at the start. This is a twin-stick shooter from the off, where the left trigger fires and the right stick spins you round. My terrible coordination doesn’t help here, but once you start levelling up your mech and get add-ons such as drones and the like, things start getting more familiar.
Nice new territory as well comes in the way of a game mechanic stolen from Battle Royales such as Fortnite, where the gameplay area continues to close in “the Storm” style. You can keep this at bay, but it offers something else to think about.
You can also change the perspective from the usual Survivor games, making things more third-person. It’s a real box of tricks this one.
Some people on Steam seem to be complaining about crashes and performance, but I had no such issues, even playing on a mid-rig. I haven’t tried on Steam Deck yet, but there’s enough here to make me think I will enjoy it if I do.
Don’t think of this as a review because it is not, but it is definitely a recommendation of something to pass the rest of the weekend and beyond with.
I am looking forward to seeing where this ends up as the updates roll in. The genre probably needed to see some fresh ideas, so Iron Core is a welcome addition, and one I wasn’t expecting.
The Escapist is supported by our audience. When you purchase through links on our site, we may earn a small affiliate commission. Learn more about our Affiliate Policy
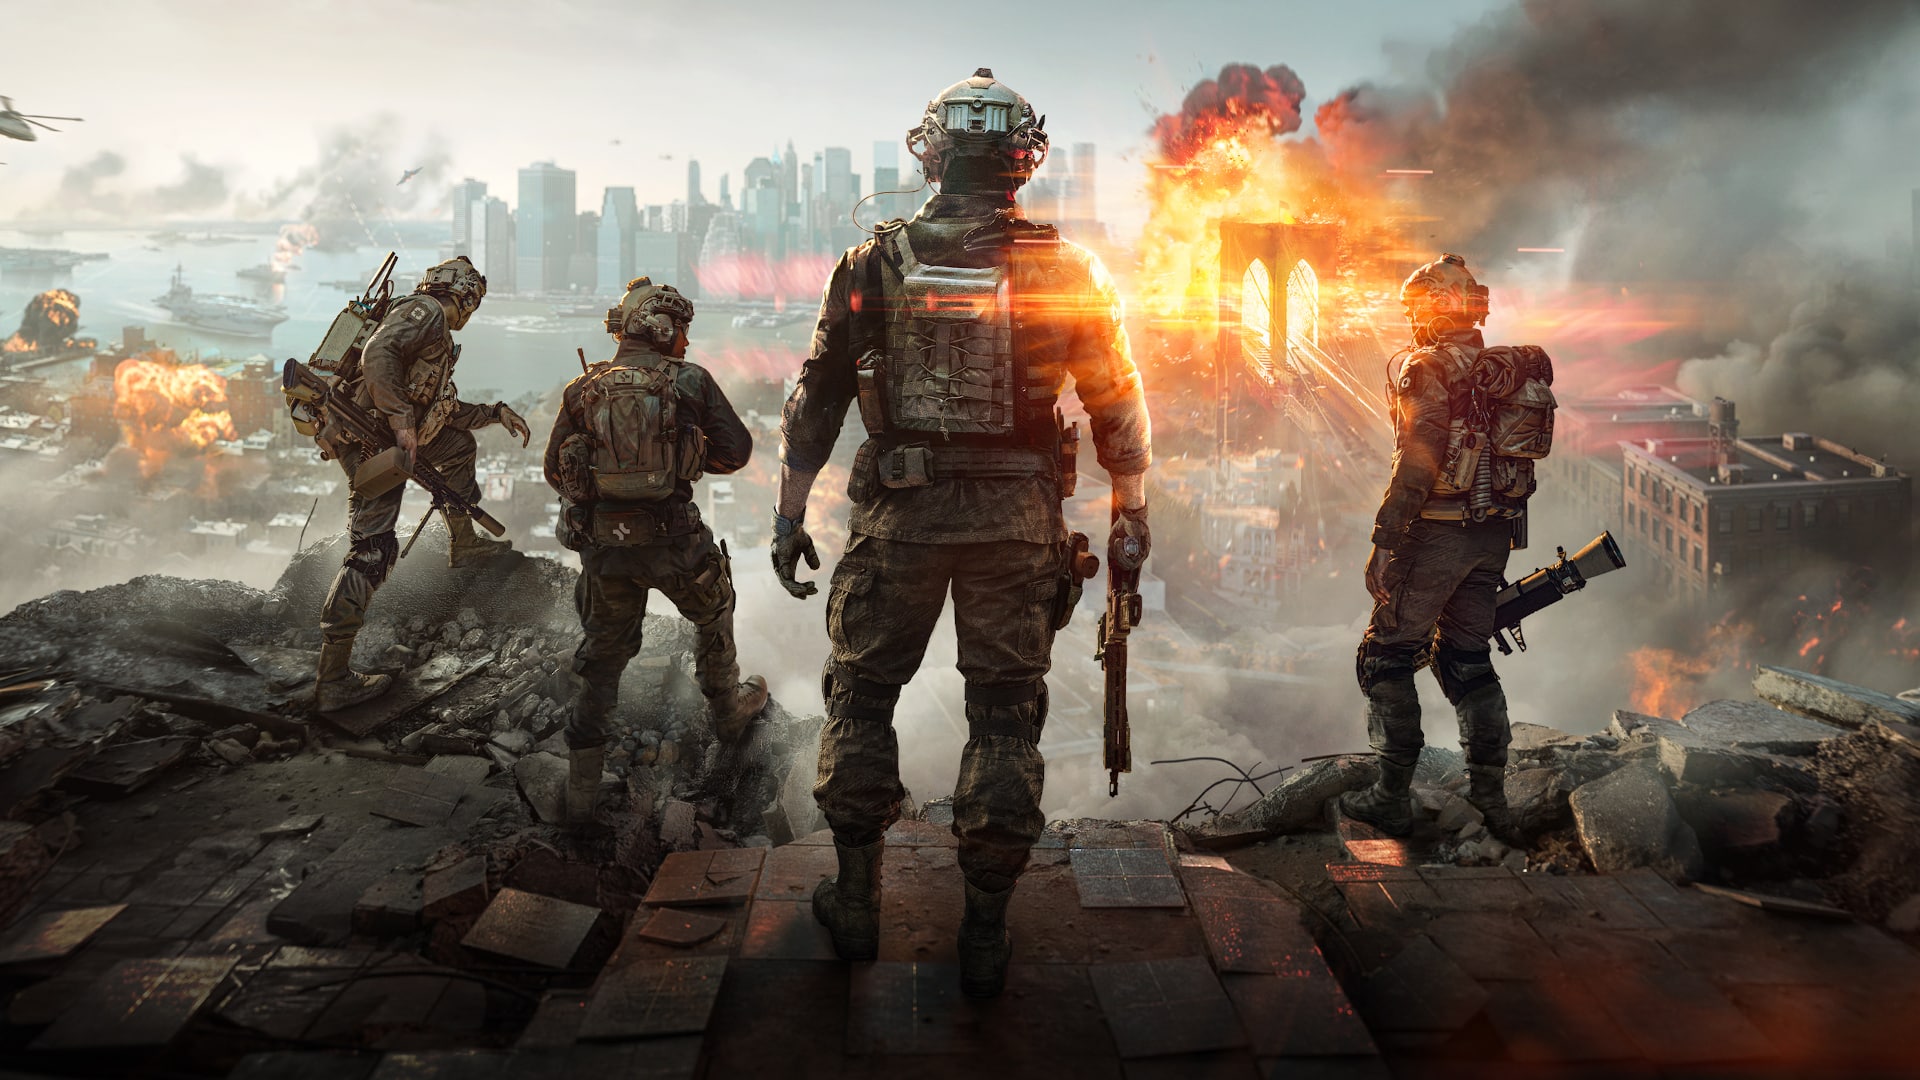
Battlefield 6 is generating some serious buzz in the FPS circles. A seeming spiritual successor to Battlefield 3 and 4, core Battlefield players are hoping it will be a return to form for what Battlefield once was — a class based arcade spectacle sandbox shooter with the potential to produce moments that really no other game can.
However, one thing could destroy that return to form, if streamers get their way: Ranked.
Multiple streamers, including the fast-talking Gamba-obsessed Felix “xQc” Lengyel, have demanded Battlefield add ranked modes (among other things not worth mentioning). For core Battlefield fans, this reads as a foolish demand from someone who doesn’t really get what the core Battlefield experience is about.
The magic of Battlefield is in the scale of it all. And that scale is a big reason why a competitive mode just wouldn’t make the game better.
No, Ranked Won’t Work in Battlefield 6
With 64 and 128-person servers, Battlefield matches are big — huge even. The game is a sandbox where players have a lot of creative freedom to enjoy large-scale combat across a variety of terrains and using a variety of weapons and vehicles. Players log on to be a part of these massive struggles, where you can’t really control the outcome.
Sure, the real sweats are going to make a difference more than the average player, but when the match is 64 v 64, individual contribution is minimal.
Given that fact, competitive modes that promote and demote folks based on if they win or not would struggle to accurately reward players. You could probably reward people based on individual performance, but then you are likely to run into the same problems that other games do with skill-based matchmaking, a system that has long frustrated many players in the Call of Duty community for one.
Among these problems is the risk of min/maxing the fun out of the game with essential meta builds, since the goal is to win a ranked game not to explore the game and have fun.
On top of that, introducing a competitive mode would split the player base between the casual and competitive playlists. Then it would further split the players into their ranks, and with huge servers to fill, the probability is that the higher you climb the harder it will be to find games in a timely manner — or the game will compromise the skill-based match-making, in which case why have it?
And then there is the issue of balancing. When ranked modes are added to games, there is a tendency for devs to balance those games around the ranked experience. This is fine in games designed to be highly competitive, tight-knit shooter experiences — Like Counter-Strike, VALORANT, and more.
But Battlefield (at least the best Battlefield titles) has always been about the general player experience. In fact, Battlefield at its best has historically been based on server browser with no real matchmaking at all.
I’m not suggesting balance changes shouldn’t be made, of course they should be. But the balancing should be done to keep the general player experience good, not privilege the highest ranked players who are sequestered in their own ranked games away from the general population.
In short, Battlefield is meant to be a celebration of arcade shooters, a game that is about teamwork and having fun blowing stuff up. For some people, ranked progress is the only thing that keeps them coming back to a game, and that’s okay. But if you need a ranked mode to motivate you to come back daily, don’t play Battlefield — and don’t come into our game and demand we make it for you.
The incentive to play Battlefield is, and always should be, that it’s damn fun. Battlefield has never been an overly competitive shooter, in fact it has proudly stood as an alternative to that side of the FPS genre. If pushed to become a competitive ranked game it could very well lose the core of its own identity — a sandbox spectacle that makes you feel like the hero in your own story.
The Escapist is supported by our audience. When you purchase through links on our site, we may earn a small affiliate commission. Learn more about our Affiliate Policy
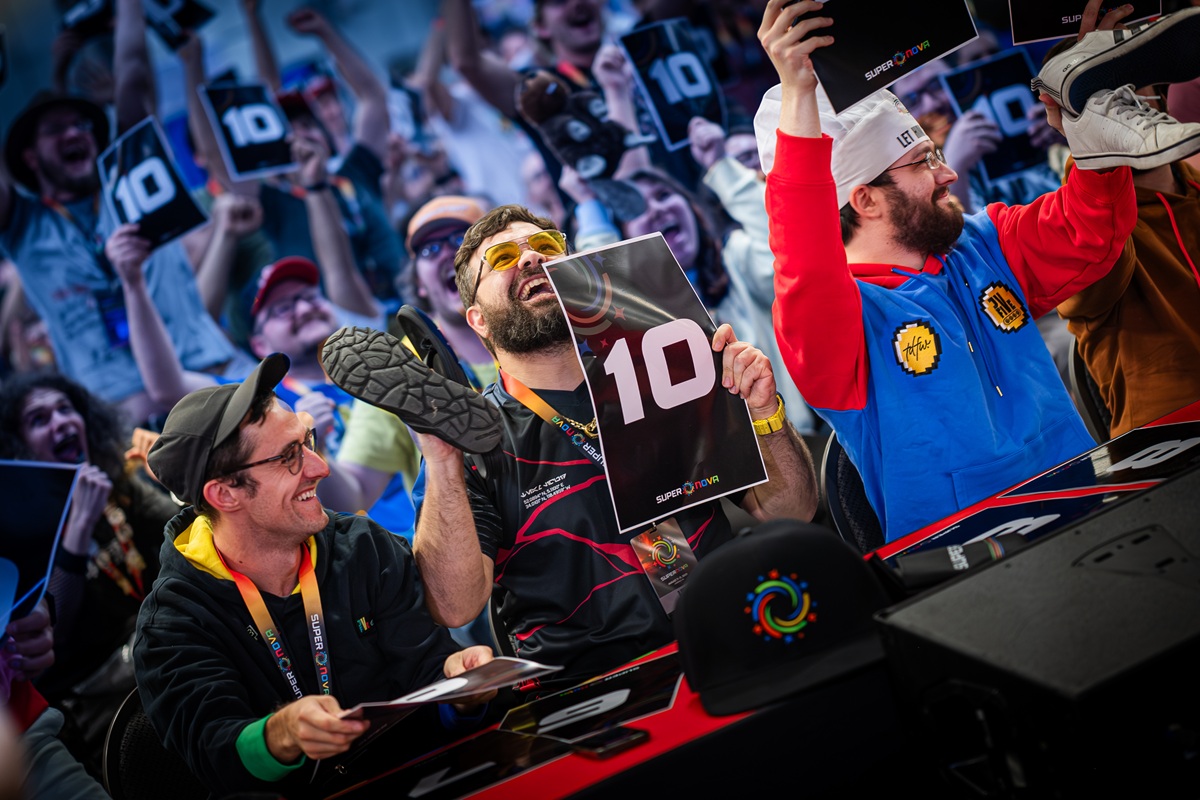
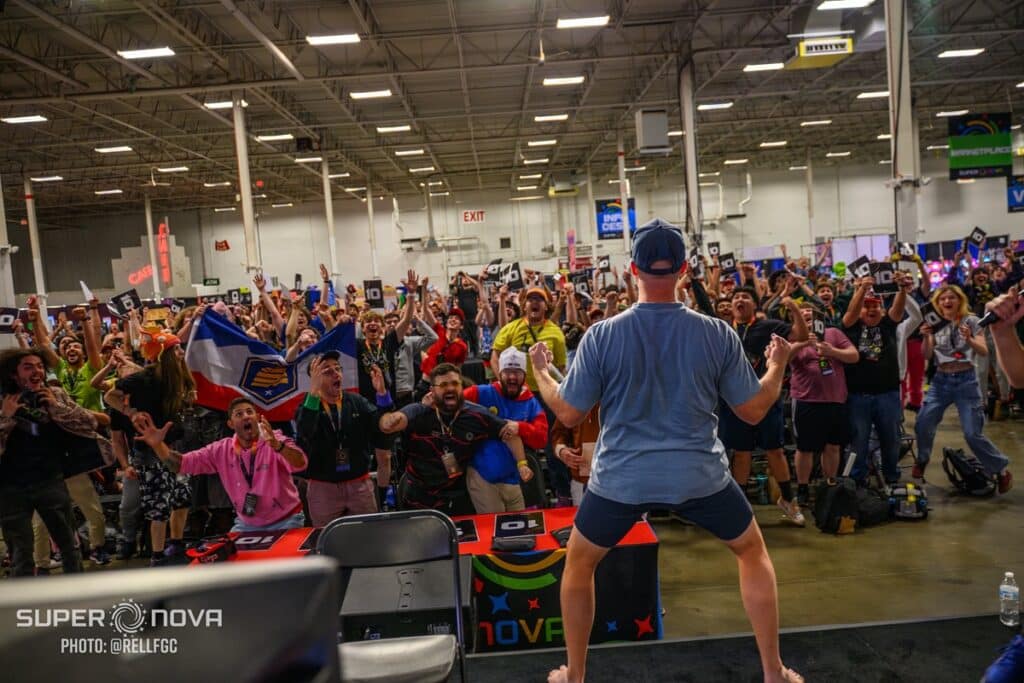
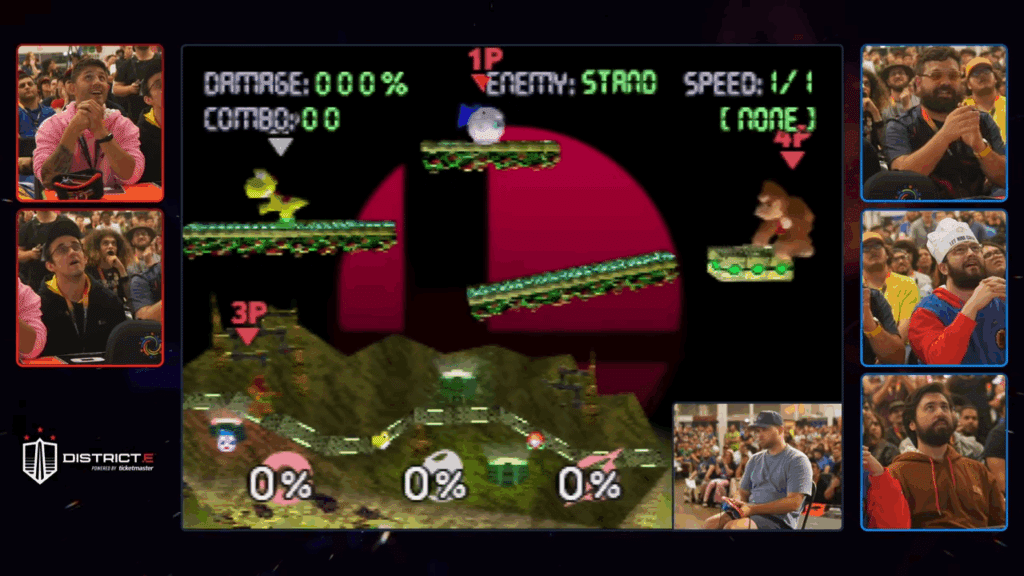
Supernova 2025 is one of the largest Super Smash Bros. events of the year and pros from all over the world are flying to Virginia to compete in stacked Melee and Ultimate tournaments. But if that’s what you came to watch, you’re missing the point.
The best thing to watch all weekend at Supernova is the Combo Contest.
What is the Combo Contest?
The Combo Contest is a Smash 64 event in which players compete to create the longest and most complex combos. It’s not a 1v1. Instead, players use Smash’s practice mode to set up various items and character placements in attempt to pull off some wild combos.
If they don’t hit the opponent or the opponent doesn’t land exactly right, the combo could be dropped. This means the combos require insane accuracy, timing, strategy, and planning. Players are given a few times to try and make the combo work but it’s obviously more impressive if the combo works on the first or second try.
There are a panel of judges, consisting of other Smash players, that will rate the combo a 1 through 10. Players are eliminated from a round if they score the lowest, leaving the top competitors to show off multiple combos to keep progressing.
The first-ever Combo Contest was held at Super Smash Con (the former name of Supernova) in 2016. Since then, many big names have emerged in this niche scene, including Prince, Taco, and Huntsman. They’ve become known for their over-the-top creative and high-tech strategies but also their dedication.
The Combo Contest is barely watched compared to games like Melee and Ultimate. It’s on a Thursday when some fans haven’t even arrived yet. The prize money isn’t anything to brag about and there’s only one tourney a year anyway. This is all about the love of the game, grinding all year to come up with these crazy combos that only a few people will see. But that’s what makes the Combo Contest so great — it’s solely for love of a game that came out in 1999.
Huntsman Uses High IQ Strats and Feet to Secure the Win
Image Credit: Supernova / @RELLFGC
When I went to Supernova in 2023, I was disappointed that Prince hadn’t returned. Often considered the best-of-the-best at combos, the Japanese N64 player had once signed my shirt at a past Supernova event, which, if anything, made the shirt even less valuable. But to me — priceless.
But I forgot all about Prince when Huntsman took out his grippers on stage and started using his toes to control a second character for a crazy combo the stream unfortunately didn’t catch. The past few years, players have been trying to make the combos more complex with gimmicks, but this was just next-world entertainment.
This year, Huntsman walked onto the stage and immediately took off his socks. But what made this even wilder? Huntsman was controlling three characters — one controller in his left hand, one in his right, and one on the ground with his toes. Would he pull it off?
Image Credit: VGBootcamp
The combo was so complex that the commentators couldn’t comprehend what Huntsman was even trying to accomplish. Why was Donkey Kong made invincible with a star? What was Samus going to do? In the end he almost accomplished what would have been one of the craziest combos ever attempted, but it didn’t quite land. (If you want to see it completed, check this video out.)
Luckily, Huntsman had one more chance to show off yet another combo and this one is now considered one of the best combos ever to be done. Once again, Huntsman took out the toes to have a 3v1. He used Yoshi, Samus, and Falco — and some well-placed items — to land a complex 13-hit combo on Link. It’s wild to think he was able to use one hand to throw two well-timed and well-aimed eggs along with everything else he pulled off perfectly.
Huntsman’s final combo was just as clean and complex, landing things that even the commentators couldn’t understand. The reaction times and extremely high IQ strats were just mind blowing to common folk like me. Otherworldly execution. It was a no-brainer that Huntsman took the title once again.
Honestly, it gives me chills to think of these guys grinding to perfect these insane combos throughout the year, perfecting a craft that almost nobody knows is even happening. This is what the FGC lives for. If you didn’t watch this year, you really should. These are the unsung heroes of the Smash community, keeping a game from the 90s alive and doing it just for the love of Smash.
This is the culture of Smash — and you’re not watching. But you should be.
The Escapist is supported by our audience. When you purchase through links on our site, we may earn a small affiliate commission. Learn more about our Affiliate Policy
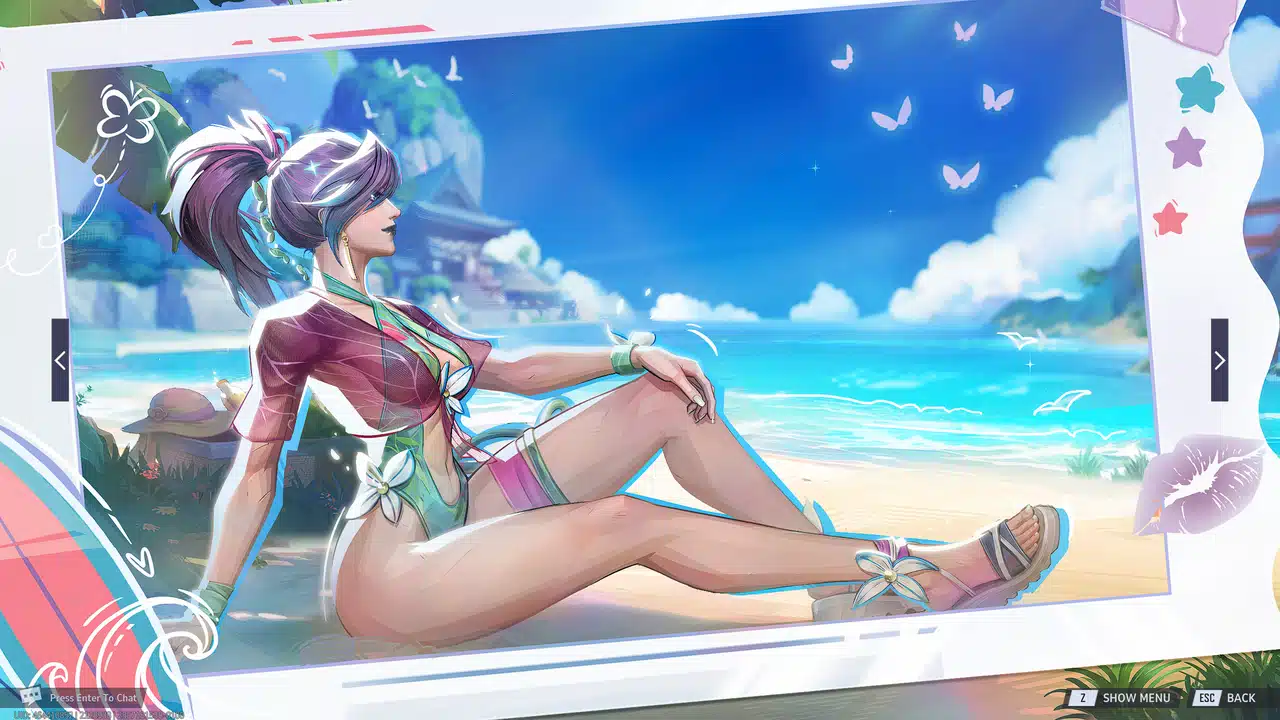
I’m sometimes embarrassed to admit it, but I scroll TikTok when I’m bored. TikTok is definitely full of cringe challenges, scripted couple content, annoying culture-stealing dances… But I can often tolerate most of it — most of it. There is one thing I can’t stand: Marvel Rivals’ gooner ads.
Every so often I’ll be mindlessly scrolling past performative men telling women to stop dating, people “surprising” waiters by speaking a different language… All the horrors of quasi-influencers. But then I’ll get a random animated ad featuring a Marvel superhero in a revealing swimsuit, her butt right in my face, and I’ll see it’s from the official Marvel Rivals account.
Welp, it’s time to stop scrolling.
Marvel Rivals Has Turned Into a Gooner Game
I think Marvel Rivals is getting desperate.
When Marvel Rivals came out last year, everyone immediately retracted their Overwatch 2 comparisons and decided it was the only hero shooter they were gonna play. For a while, it’s all my friends talked about and I even tried the game out myself so I could try to relive the glory days of the original Overwatch.
But I quickly got bored. The game felt sorta stale and repetitive, with many of the heroes not feeling very impactful and many overlapping abilities. It’s still a pretty good shooter game, don’t get me wrong, but there’s a reason that the player base has started to decline (though not by much).
Perhaps trying to get ahead of that inevitable drop in players, NetEase Games released revealing skins (for both sexes at least). At first, it was just a few. Just some cheeky one pieces. But as NetEase saw the response from its most thirsty players, it decided to lean into its characters’ assets and raise the skill ceiling for its gooner skins.
At this point, it’s gone from showing some buns beneath a cape if you stare at a certain angle to full-on bathing suit skins. The Psylocke bathing suit that basically gives her a wedgie in the front and back and the Loki banana hammock that shows all eight of his abs and his bulge… Diabolical.
But what really makes this worse is NetEase’s treatment of the skins. The ads with Psylocke’s butt right in my face are just crazy work. But it’s not only TikTok that gets this treatment from developers. On Reddit, there’s an image of Invisible Woman’s booty in the Malice skin with the caption: “When your teamwork is so tight, even Invisible Woman shows up.” Really NetEase?
I’m not offended that the characters are being sexualized really, although that’s clearly never really that great from a predominantly male community. We have Loki so Marvel Rivals really said, “Let’s just equally sexualize all Marvel heroes.” Rocket Raccoon next? But no, the real issue is how desperate NetEase is pushing it.
It’s just sad to see a game market itself more for its revealing skins rather than its gameplay. If you want to say “the world kept spinning” and “there are bigger problems” I’m not gonna argue. But some of us can care about multiple things just because they’re cringe and show a game’s desperation to be relevant.
I’m rooting for you, Marvel Rivals, but maybe focus more on your repetitive gameplay issue instead of getting sex-deprived teens to pay money to see animated butt cheeks.
The Escapist is supported by our audience. When you purchase through links on our site, we may earn a small affiliate commission. Learn more about our Affiliate Policy
Well, who would have thought it? Huge server queue problems as Battlefield 6 launches its Early Access Open Beta, and the numbers are only going to get bigger by the time the rest of the world gets to join in in a couple of days.
Hopefully, by then, EA and Battlefield Studios will have added a bit more capacity, and the clamor to be first on board may have waned a little, but right now, for many, Battlefield 6’s first trial run is unplayable.
Images are scattered around X of players having 150,000 plus players ahead of them in line, and even when you get into the game, matchmaking is falling apart due to the volume of players.
Just under an hour ago, the official Battlefield account posted:
“A quick note about queues and Early Access / Open Beta.
Since this is Battlefield’s biggest Open Beta ever, we’re putting in the work to ensure that players have the best possible experience and servers remain stable.
To support this, we will use queues to protect the player experience but expect this impact to be minimal.
You may encounter this during high peak moments, such as the start of servers going live. The team is working constantly to reduce any queue that takes place.
Thank you for your continued excitement and patience. We’ll see you on the Battlefield!!
That last line may be a little hopeful for many, and it will be minutes away before the self-righteous start demanding that the beta time be extended, but this is a good first sign for the revamped Battlefield.
Better this in many ways than being able to jump right in and squad up with a load of bots.
How to beat the Battlefield 6 queues
For now, all you can do is wait it out. EA will doubtless be pushing extra resources in the direction of the game, and, much like trying to buy tickets for any big gig these days, people will soon get bored of waiting and drop out of the queue, causing it to drop more quickly.
We are confident that when you do eventually get in, it will be worth the wait.
The Escapist is supported by our audience. When you purchase through links on our site, we may earn a small affiliate commission. Learn more about our Affiliate Policy
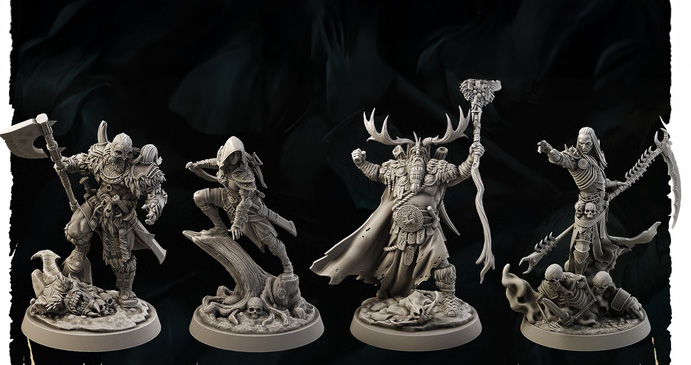
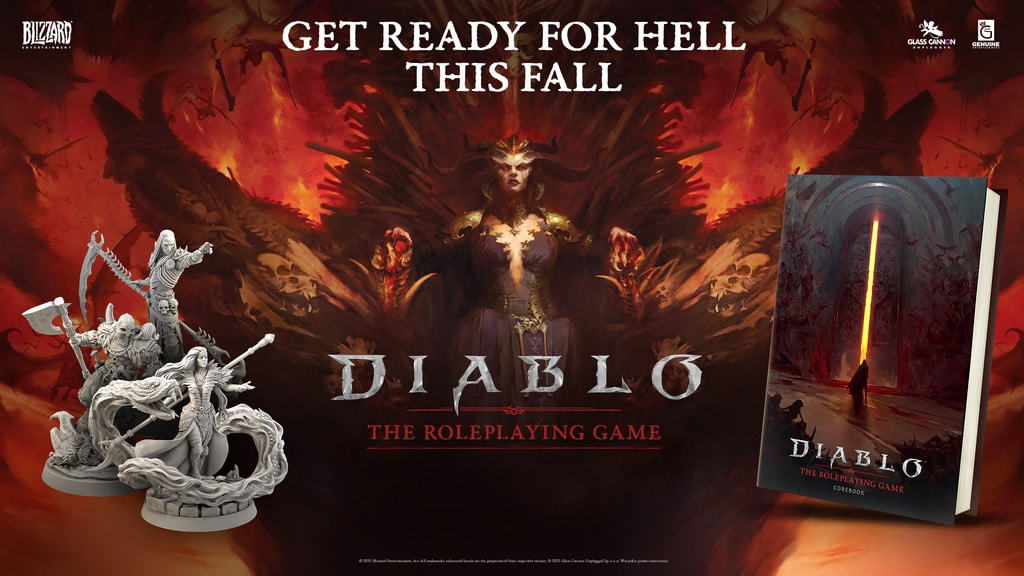
With the world of Diablo being around so long, it’s amazing we haven’t had more attempts to bring the game to the tabletop. But as TTRPGs continue to flourish, a new Kickstarter has popped up for Diablo: The Roleplaying Game, a new officially licensed RPG from Glass Cannon Unplugged.
With the campaign not having launched yet, it has already garnered some 3,000 followers, eagerly awaiting it to go live. So what do we know at this stage?
Well, there will be a tasty 300-page book of rules and art, we know that much, along with an anthology of one-shot adventures written by some big names in the business.
The game will run on a custom D6 system, similar to the Blade Runner RPG (which is excellent), and that is no major surprise as Joe LeFavi from that game is also involved here.
But standard RPG stuff aside, the minis, oh, the minis are so good, but at this pre-launch stage, we don’t exactly know what we are going to need to do or pay to get our hands on them. Hopefully, everything will become much clearer in the very near future.
The Kickstarter launch page does say we can expect the game in Q4, which is just around the corner, so it does look like we will be digging out he old Army Painter gear in the following weeks.
Diablo: The Roleplaying Game Classes
We don’t know what era Diablo the RPG is set in. Still, we do know some of the classes that will be available are Barbarians, Druids, Necros, Rgies, and Sorcerers, and that Diablo staples such as Legendary gear will be available. With no mention of the Paladin class, which is also missing in Diablo IV, we are assuming that this visit to tabletop Sanctuary could also be themed around D4.
The Escapist is supported by our audience. When you purchase through links on our site, we may earn a small affiliate commission. Learn more about our Affiliate Policy
Figuring out which decks to play in Pokémon TCG Pocket is a lot harder than it used to be. When the game originally dropped and had just one expansion set, you had roughly five viable decks to choose from – but nowadays, there’s a mountain of meta decks on offer.
Wisdom added plenty of powerful cards into the Pocket scene, giving competitive players even more tools to use during their matches. Here’s a rundown of the best Wisdom of Sea and Sky Pocket decks right now, not listed in any particular order.
The Escapist recaps
Pokémon TCG Pocket Wisdom of Sea and Sky introduced 241 new cards into the game, shaking up the competitive meta and adding new decks into the mix
While it’s not been as disruptive as previous sets, this release did present a variety of new decks to experiment with and a handful of crucial tools for competitive players
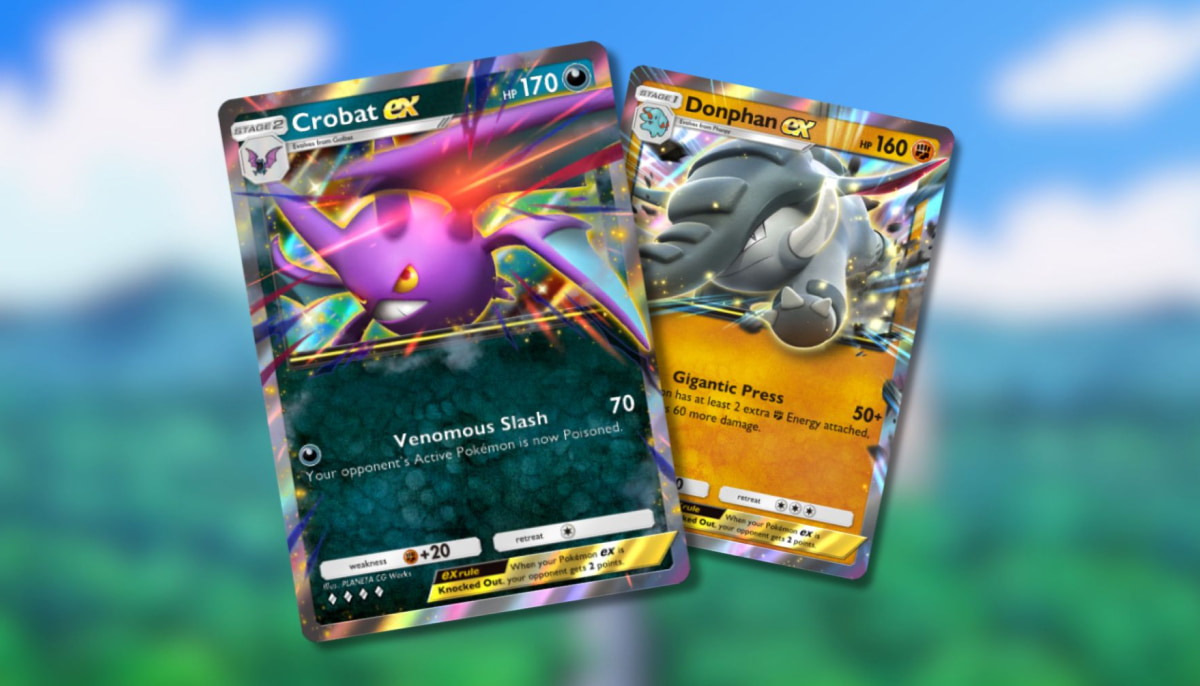
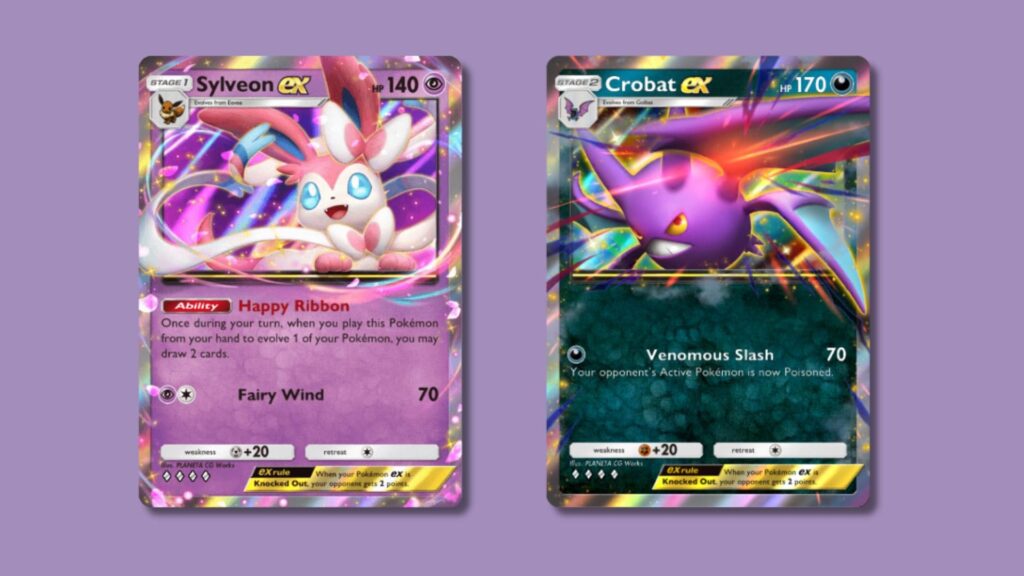
Crobat ex stands out as one of the best decks in the game right now with the addition of Sylveon ex. The Intertwining Pokémon also pairs perfectly with the new Espeon ex as well
Other viable decks to consider include Silvally-Pichu, Ho-Oh ex and Lugia ex, and Donphan ex, along with older decks like Dragonite ex, with new cards added in
Crobat-Sylveon
Crobat ex has had people talking since the expansion launched. Image credit: The Pokémon Company
If you saw my rundown of the strongest ex cards in Wisdom of Sea and Sky, you’ll know that Crobat ex has been one of the most hyped cards of the expansion.
It’s not pulling in the tournament numbers that I would’ve expected initially at the time of writing – although I believe in the bat, I think it’ll come out on top over the coming weeks. It’s still a powerhouse, though, especially when paired with Sylveon ex.
Crobat ex provides simple, consistent damage for just one Energy, adding Poison into the mix for chip damage. Sylveon ex also provides a decent chunk of damage, but is mainly played here for the draw power.
When building this list, make sure to use the Wisdom of Sea and Sky Eevee for additional draw power, alongside Supporters like Silver and Lyra to stay ahead of the competition. Choosing the Zubat and Golbat with Poison attacks is also worthwhile.
Some players run a variant of this with Darkrai ex included, capitalizing on the Nightmare Aura ability and stacking up extra damage over time.
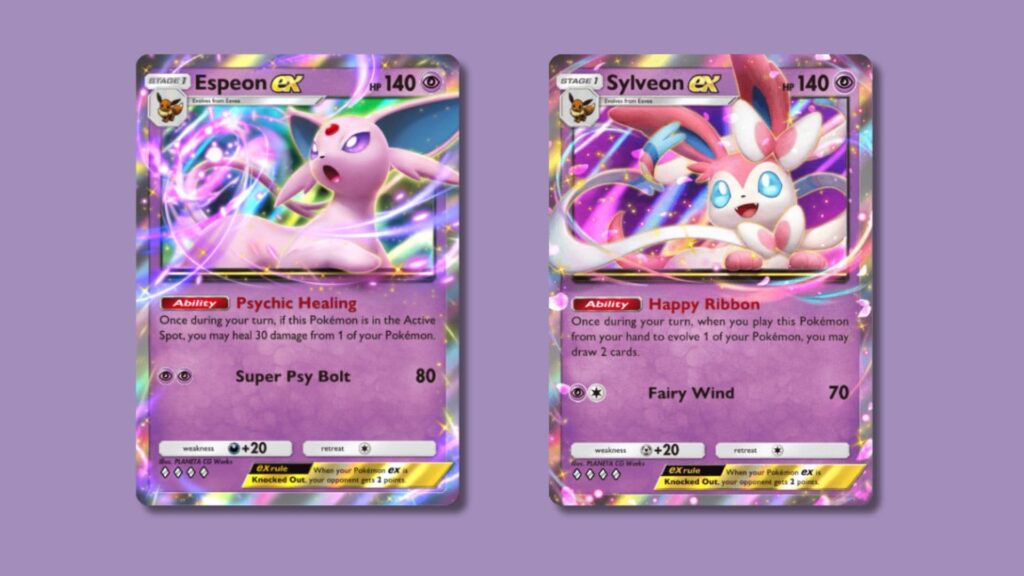
Sylveon-Espeon
These two adorable Eeveelutions pack a punch. Image credit: The Pokémon Company
If you like fast-paced decks in Pocket, this is what you need to be playing during this season. It’s quick to get going, with a tasty self-heal and plenty of draw power.
Sylveon ex allows you to set up quickly and get your Espeon ex into position via the Happy Ribbon ability, dealing a decent 70 damage as needed. Espeon ex acts as the main hitter, healing up whenever needed with Psychic Healing and whittling away with Super Psy Bolt.
To ensure that Espeon ex is as hard to kill as possible, I’d suggest running at least one copy of Giant Cape to get an extra sliver of HP on there.
Other crucial cards to have at your disposal here include Sabrina and Cyrus for control, the A4 Eevee for additional draw power, and Eevee ex for speedy evolutions. I could also see Mew ex helping to fill in the damage output gaps with Genome Hacking.
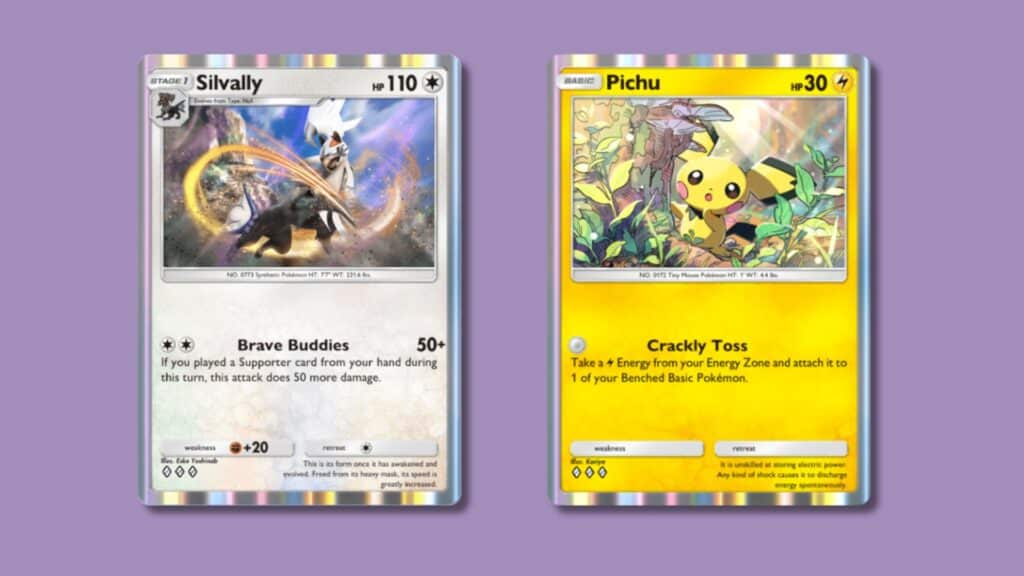
Silvally-Pichu
This surprising duo is a lot of fun to play. Image credit: The Pokémon Company
Acting as a riff on Silvally-Oricorio, this deck features plenty of Supporter cards and two copies of the Lightning-type Oricorio to help mitigate any ex threats in battle.
Silvally is the main source of damage thanks to the Brave Buddies attack, putting out 100 damage for just 2 Energy when a Supporter is used. Pichu acts as a crucial source of Energy movement, using Crackly Toss to spread Lightning Energy Tokens around.
Gladion and Silver are vital Supporters to include here, alongside Cyrus and Sabrina for control, Giovanni for a simple damage buff, and Lyra for easy movement.
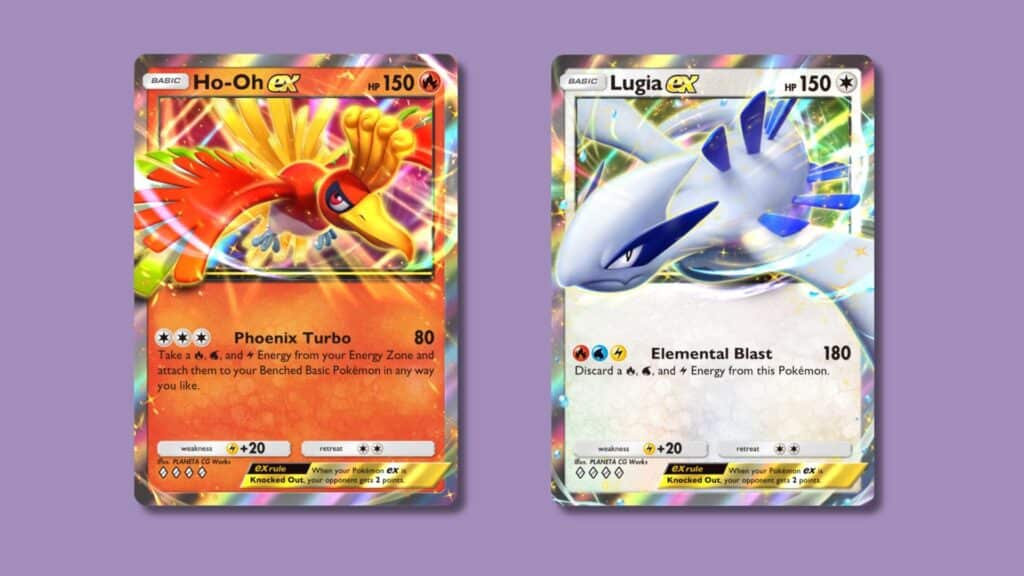
Ho-Oh ex and Lugia ex
The pack Legendaries are a mighty combination. Image credit: The Pokémon Company
The two-pack Legendaries are decent on their own, but when they’re paired together, they can put out brutal levels of damage.
Ho-Oh ex provides the exact Energy Tokens that Lugia ex needs to use the obscenely powerful Elemental Blast, which deals 180 damage in return for a total Energy discard. Cards like Elemental Switch and Dawn can help to keep the Energy moving quickly.
It’s worth having at least one copy of Pichu if you’re running this deck, along with a couple of Zeraora cards to keep Lugia ex ready.
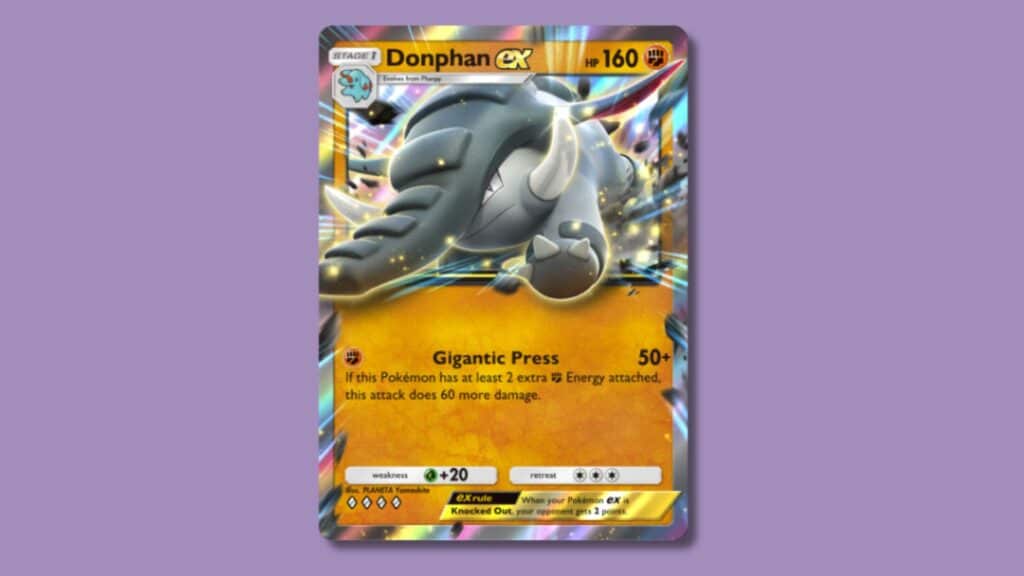
Donphan ex
With the right list, Donphan ex is a beast. Image credit: The Pokémon Company
I wasn’t overly impressed with Donphan ex when I saw it for the first time, but the tournament results that are rolling out post-expansion launch have changed my mind. With the right list, this Fighting-type can do some serious damage.
On its own, Donphan ex can deal 50 damage for one Energy Token, spiking to 110 damage if there are at least two extra Energy Tokens attached. Adding two copies of Lucario into the mix helps this attack hit even harder.
Alongside Donphan ex and Lucario, it’s important to have Marshadow for re-balancing, Lyra for easy movement, and Red for extra damage boosts against ex-foes.
Some players run Donphan ex with the Rampardos line instead of Lucario and Marshadow, so it’s worth experimenting with this setup as well.
Honorable mentions
I’d strongly encourage you to build the five decks listed above as they’ve got the highest potential out of the newer lists from Wisdom of Sea and Sky.
If you’re looking to enhance an older deck, though, these are the lists you should look into improving with fresh cards:
Dragonite ex. This deck can be taken to a new level by adding in Pichu and Elemental Switch, allowing for easy Energy movement to power up Dragonite ex
Eevee ex. Since Eevee Grove, there have been heaps of iterations on Eevee ex decks. Using Flareon ex, Leafeon ex, Sylveon ex, and the new Eevee alongside Eevee ex might seem unbalanced, but it works a treat
Darkrai-Giratina. This deck was powerful before Wisdom of Sea and Sky dropped, but with the addition of Silver and potentially Lyra, it’s now an absolute demon. It also works nicely to counteract Sylveon-Espeon players
Out of these, I’d urge you to try out Darkrai-Giratina, as this deck is putting on an incredible performance in the tournament scene right now. With Wisdom Supporters in the list, it’s a punchy deck to play.
Pokémon TCG Pocket Wisdom of Sea and Sky has plenty of powerful decks to pick from, with Crobat-Sylveon, Espeon-Sylveon, Donphan, Silvally-Pichu, and the pack’s Legendary duo standing out as the best options. Older decks like Dragonite ex can also be enhanced with cards from the new set.
Ask The Escapist
When did Pokémon TCG Pocket Wisdom of Sea and Sky come out?
Wisdom of Sea and Sky was released on July 30, 2025, making it the fourth main expansion set for Pokémon TCG Pocket.
Which are the strongest ex cards in Wisdom of Sea and Sky?
On their own, Crobat ex and Umbreon ex stand out as the strongest ex cards in Wisdom of Sea and Sky. Make sure you’re opening Ho-Oh packs to get these two gems.
What are the best Supporters in Wisdom of Sea and Sky?
Silver, Lyra, and Will stand out as the most competitively viable Supporter cards in Wisdom of Sea and Sky, and they all feature in prominent decks that are currently swarming the tournament scene.
The Escapist is supported by our audience. When you purchase through links on our site, we may earn a small affiliate commission. Learn more about our Affiliate Policy
Pokémon TCG Black Bolt and White Flare both dropped on July 18, 2025, introducing a plethora of beautiful new cards for collectors to sink their teeth into. Featuring a brand new rarity and artwork by legendary Pokémon artists, it’s a dual set worth watching.
To help you plan which chase cards to go after, I’ve hunted down the most expensive cards in Pokémon TCG Black Bolt and White Flare, using data from a multitude of sites to pick out the most valuable pieces at the time of writing.
The Escapist recaps
Pokémon TCG Black Bolt and White Flare released as a dual special set on July 18, 2025, with 172 and 173 cards apiece.
A new rarity was introduced with this release, called a BWR, or Black White Rare.
Due to the popularity of the Unova Pokémon and the beautiful artwork, the prices for this set have been high since launch day, although some are settling down.
The most expensive cards in Black Bolt and White Flare include all three of the Black White Rares, as well as the Special Illustration Rares for the box Legendaries.
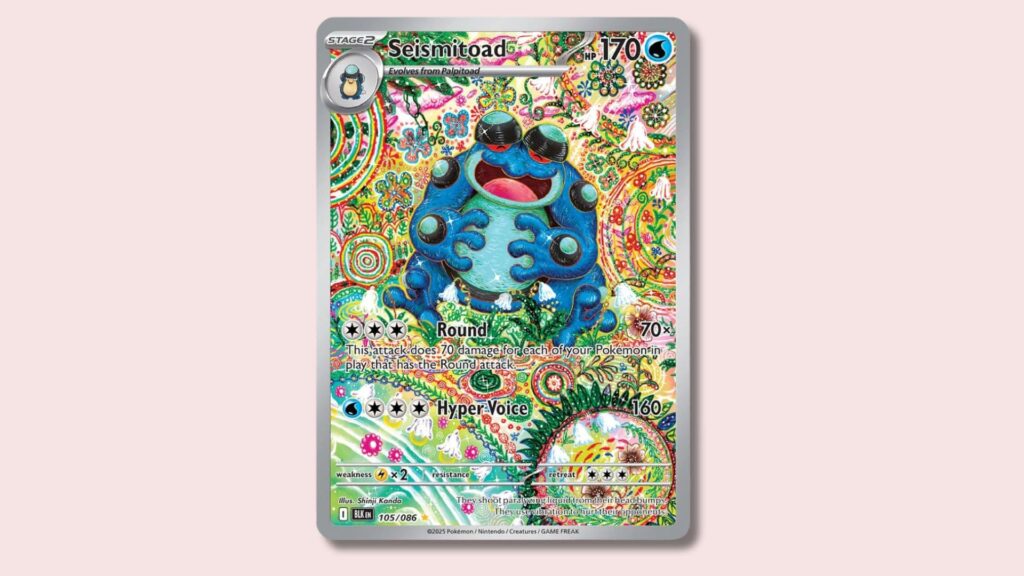
Seismitoad (BLK 105)
Shinji Kanda has an utterly iconic art style. Image credit: The Pokémon Company
Card
Seismitoad
Card Number
105/086
Set
Black Bolt
Card Type
Illustration Rare
Selling For
$70-$200
Is anyone surprised to see this card on the list? I honestly thought it’d be higher up – Shinji Kanda is an absolute icon in the Pokémon TCG community, with a following of dedicated fans that adore his mind-melting art style.
Seismitoad isn’t a hugely popular Pokémon by any means, but it looks powerful and otherworldly thanks to the psychedelic artwork on this card.
I spotted auction prices ranging from $70 all the way to $200 while digging around for data on this card, so if you’re keen on getting it, I’d suggest watching the prices and seeing if they settle down in the coming weeks.
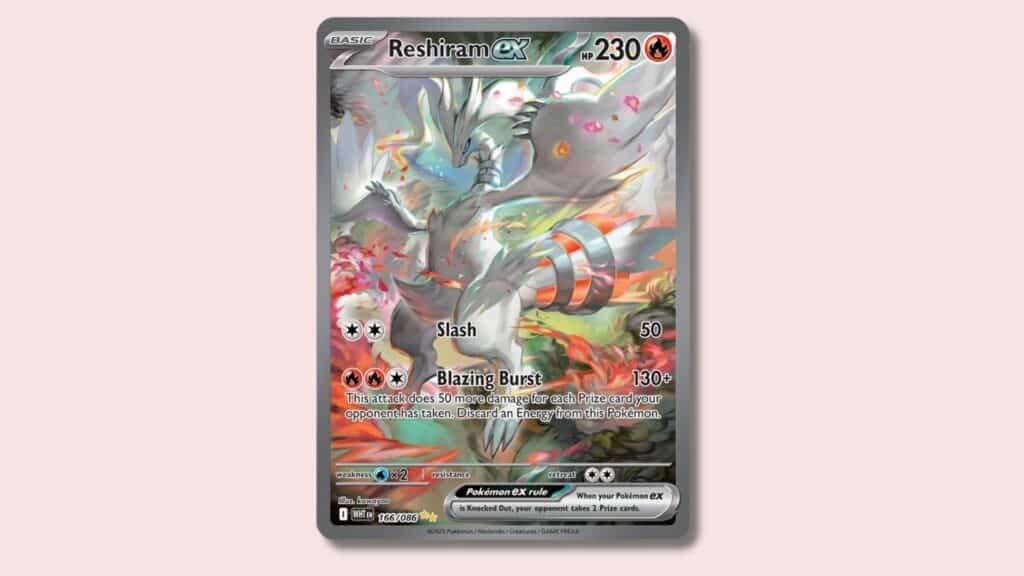
Reshiram ex (WHT 166)
This piece accurately captures the strength of Reshiram in the lore. Image credit: The Pokémon Company
Card
Reshiram ex
Card Number
166/086
Set
White Flare
Card Type
Special Illustration Rare
Selling For
$120-$215
This card manages to make Reshiram look poised and powerful, which pairs with the Pokémon perfectly. It’s an elegant yet destructive Special Illustration Rare, with spectacular artwork by kawayoo.
It’s one of the most expensive Special Illustration Rare cards in the White Flare list, giving fan-favorites Keldeo and Hydreigon a run for their money.
While researching, I found that the majority of the auction prices for this card sat in the range of $120 to $190, with a few higher prices based on quality. Graded copies, particularly PSA 10 slabs, went for even larger sums.
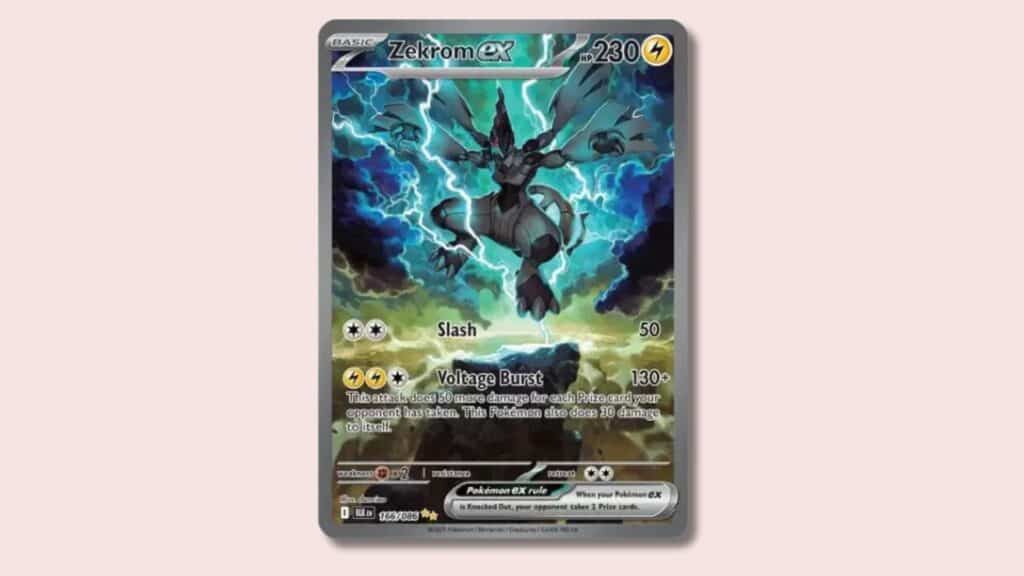
Zekrom ex (BLK 166)
This card has an electrifying aesthetic. Image credit: The Pokémon Company
Card
Zekrom ex
Card Number
166/086
Set
Black Bolt
Card Type
Special Illustration Rare
Selling For
$100-$220
While it’s not selling for quite as much as its Black White Rare counterpart, this iteration of Zekrom ex is still a worthy chase card to pick up for your collection.
With artwork by danciao, Zekrom feels as if it’s ripping out of the card, shredding the sky apart with lightning bolts. It’s a visually stunning piece, so I wasn’t surprised to see prices ranging from $100 to $220, with even higher prices popping up for graded copies.
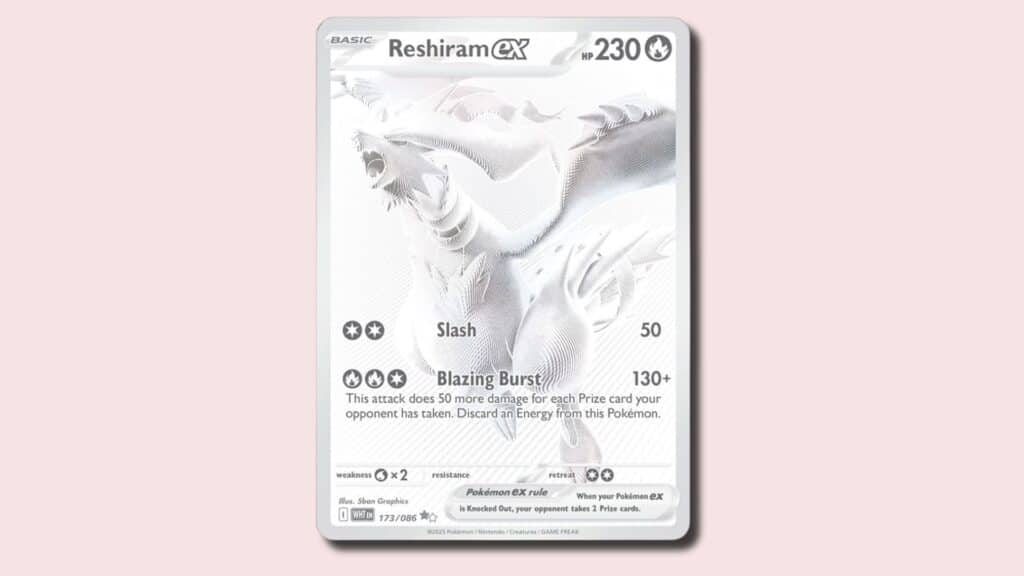
Reshiram ex (WHT 173)
Much like the next card in the list, Reshiram ex is strong. Image credit: The Pokémon Company
Card
Reshiram ex
Card Number
173/086
Set
White Flare
Card Type
Black White Rare
Selling For
$310-$440
Reshiram ex is a magnificent card, topping the charts as one of the most expensive pieces in White Flare. It’s the most affordable Black White Rare currently on the market, but that’s not saying too much as the prices are still decently hefty.
Most auctions that I found for the BWR copy of Reshiram ex placed it between $300 and $380, with a few exceptional prices at either end of that spectrum. There were a few copies up for auction on eBay in the realm of $180, but I can’t see that lasting too long as it’s an immensely popular card right now.
As with any high-value Pokémon card, it’s crucial to make sure that you buy from verified sellers and always do a price check before making a purchase. Despite the set dropping a few weeks ago at the time of writing, prices are still likely to change somewhat.
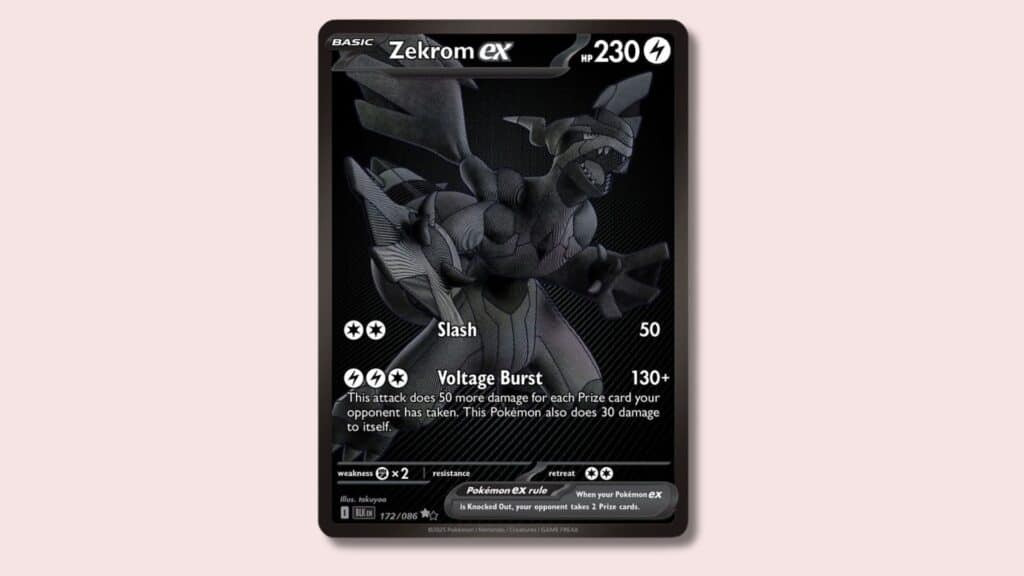
Zekrom ex (BLK 172)
This card has some competitive potential. Image credit: The Pokémon Company
Card
Zekrom ex
Card Number
172/086
Set
Black Bolt
Card Type
Black White Rare
Selling For
$300-$450
There isn’t much of a difference between the BWR cards for Zekrom ex and Reshiram ex, but the Black Bolt card comes out ever-so-slightly on top.
In my opinion, it’s the best looking card out of the bunch – it’s dynamic and polished, with the lighting on Zekrom still managing to make the creature pop despite the overall aesthetic theme being incredibly dark.
The majority of the prices I found while digging into this card ranged from $300 to $400, with a few higher-quality pieces taking the auction price well over the $400 mark.
Graded copies are selling for higher prices, so if you pull this and don’t want to keep it, it could be worth getting it graded before choosing a platform to sell it on.
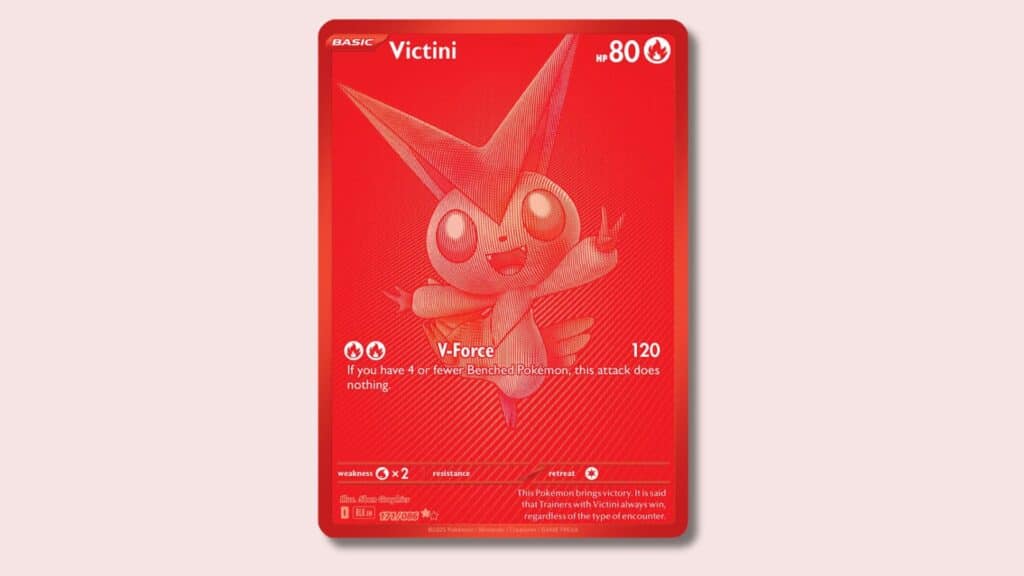
Victini (BLK 171/WHT 172)
It’s not a powerful card, but it’s exceptionally valuable. Image credit: The Pokémon Company
Card
Victini
Card Number
BLK 171/086 or WHT 172/086
Set
Black Bolt/White Flare
Card Type
Black White Rare
Selling For
$300-$600
At the time of writing, Victini is one of the most expensive cards you can pick up from both Black Bolt and White Flare. Unlike most of the cards in this list, it pops up in both sets, featuring slightly different card numbers.
While searching for live auction data, I found prices in the range of $300 to $600 for good quality copies of the card, but also spotted some PSA 10 copies that were starting to creep into the thousands. It’s a card that’s got the community talking and the current prices reflect this.
Victini is one of the first Black White Rare cards in existence and it has a striking aesthetic, with a vivid red color theme and dynamic design.
I’m predicting that the hype for some cards from Black Bolt and White Flare will start to die down, but I think Victini will continue to be a hugely popular card in the collector’s scene, at least for the next few months.
Pokémon TCG Black Bolt and White Flare both have an impressive roster of cards up for grabs, and they’re worth picking up if you’re a collector looking to stock up on valuable pieces. The prices in this list are sure to fluctuate after publication, so always double check prices on other sites before making a purchase, especially for higher value cards.
Ask The Escapist
Does Black Bolt or White Flare have the most valuable Pokémon cards?
While they both offer plenty of artistic and monetary value, Black Bolt stands out as a slightly better option for avid Pokémon TCG collectors who are looking to invest in top-tier cards.
Where do you find out how valuable a Pokémon card is?
I’d recommend shopping around and using a range of sources – for example, I referenced Cardmarket, Price Charting, TCGPlayer, Collectr, and eBay for this article. If you’re investing in an expensive card, research is crucial.
What’s the difference between Pokémon Black Bolt and White Flare?
Despite being part of the same release, it’s best to think of Pokémon TCGBlack Bolt and White Flare as separate special sets. They have individual card lists and rare hits, with a variety of art styles contained in each pack.
The Escapist is supported by our audience. When you purchase through links on our site, we may earn a small affiliate commission. Learn more about our Affiliate Policy
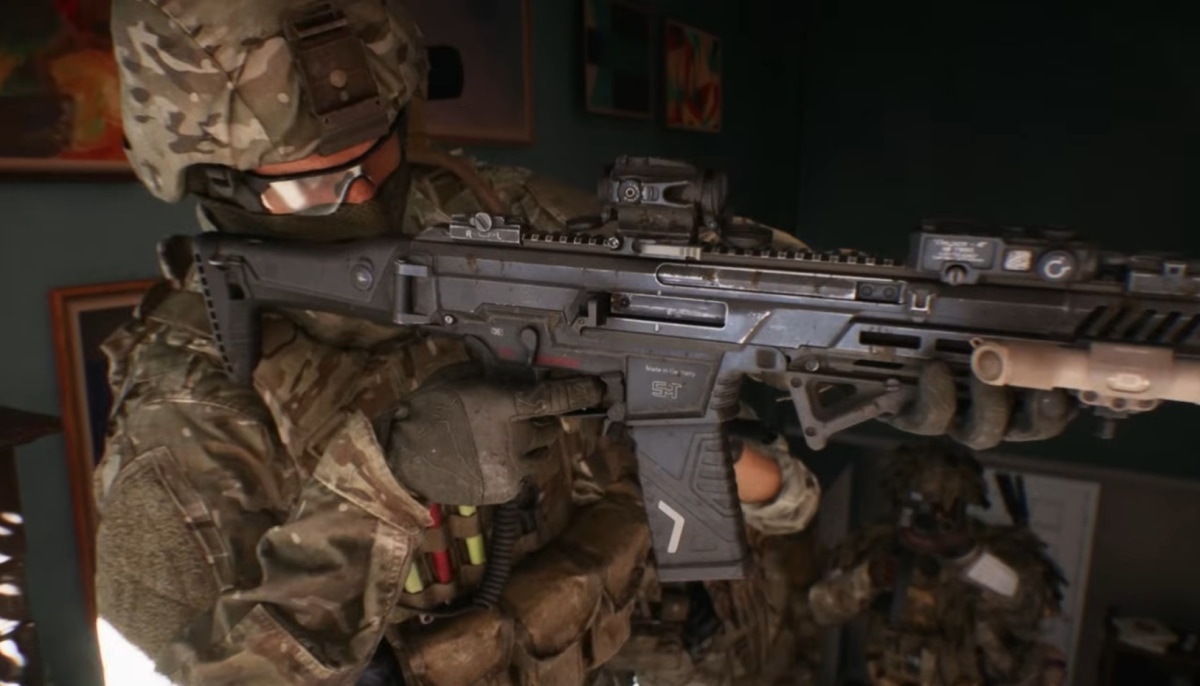
It’s been a long road to this point, or maybe it just feels that way. It’s a remarkable thing, you know: we only heard that EA’s next Battlefield would arrive before the ‘end of March 2026’ in May. May…It feels like an age has passed, and in that time, there were all kinds of leaks and rumors; however, the official Battlefield 6 release date is now known to be October 10, 2025.
I get it, Triple-A games are big business, big news, and we’re living through the Internet Age after all. Yet there are several reasons this Battlefield-liker is wary, or perhaps weary, of absorbing a relentless assault of tidbits and whispers. Because let’s not forget, folks, we’re looking ahead to a launch that’s only months away, so brace yourselves.
The Escapist recaps
Battlefield 6 arrives on October 10, 2025, a few days later than rumored.
The BF6 Official Reveal Trailer has had more than 8.5 million views.
A full campaign and extensive multiplayer are included in Battlefield 6.
Battlefield 6 will cost the industry-standard $70, instead of the rumored $80.
Traditional Battlefield classes are confirmed for the game.
Less information is more
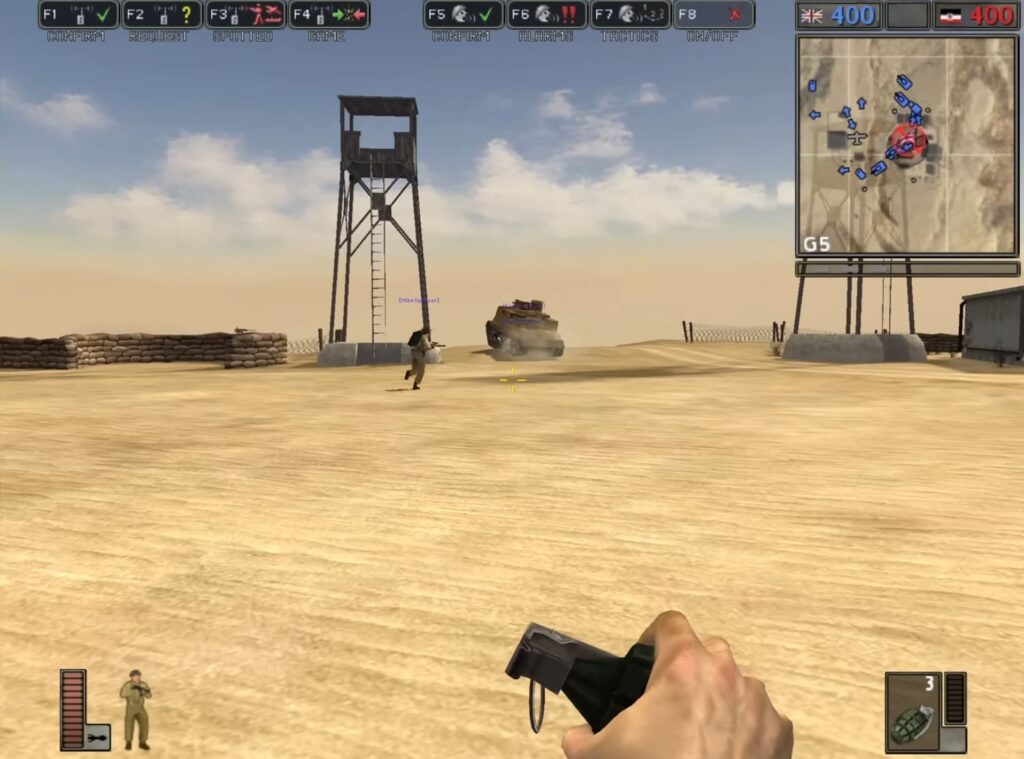
The first time I came across Battlefield was in the early 2000s. I was killing time playing an assortment of games, including Football Manager, Pro Evolution Soccer, and a WWII-themed Counter-Strike mode called Day of Defeat. Some of the folks I was playing DoD with also played Desert Combat, a Battlefield 1942 mod released in 2004.
Before that introduction, I knew nothing of the game. That meant finding it felt like uncovering a rare gem, but I couldn’t give it enough hours. I already had my treasure, being committed to taking an English League 2 soccer team to the Champions League, and playing PES Master League with buddies.
Then, in 2010, I found Bad Company 2, again through someone already playing. Knowing nothing about it, I jumped in and had an absolute blast, before spending thousands of hours in both Battlefield 3 and Battlefield 4. Each time, I knew very little about the upcoming title…although my exposure to BF4 news ahead of release was the highest here, I was already playing and engaging on forums with interested parties.
Battlefield 1942, released in 2002. Image credit: JackFrags/YouTube
The price of entry
It’s not that ‘things were better’ then, let’s drop that trite and useless saying. But I can’t help but think the Battlefield 6 run-up is less a clear, insightful path to launch, more a debris-strewn assault of half-truths, controversy, and a drum-up of talking points to divide while the facts are absent.
Aside from the rising cost of Triple-A games – and you can believe I have thoughts on that – some folks have been quick to jump on a rumor that BF6 could cost $80. Thankfully, we now know that the Battlefield 6 price is the industry-standard $70 for the regular edition, and there’s also a $100 Phantom Edition for those so inclined. Not great, but better than paying over the odds, right?
It feels like we’re paying another tax anyway, with our energy and focus. Sure, if you asked me a month ago whether class-locked weapons were core to the next Battlefield, I would have suggested that I thought so. They, infamously, were not a part of the Battlefield 2042 experience; however, we have confirmation that Battlefield 6 classes are back to what we know and love: Assault, Engineer, Recon, Support – as it should be.
So, is worrying about whether I want to invest in a game based on such unconfirmed information (if I can afford it) sensible? I doubt it. That’s not to say I’m not interested in knowing about it, but I’m keen on facts or educated information. What I don’t want to do is pay for Battlefield 6 twice: once for unsubstantiated rumors, with the energy I need to keep up with work, laundry, cooking, and, you know, existing, and then again with my wallet.
One eye open
The official Battlefield 6 multiplayer reveal did not disappoint. Image credit: EA
EA perhaps could have done a better job of getting ducks in a row and releasing steady, and abundantly clear information to help quash false information. To its credit, it did put a copyright claim on the post of a recreated image of the ‘Battlefield Royale’ map, although the horse had already bolted.
Less to EA’s credit, a two-minute Official Reveal Trailer posted on July 24 included absolutely no gameplay footage. It did include a seeming preoccupation with game-engine helicopters crashing or being included in destruction (seven scenes, I believe). What that trailer also did was reach, at the time of writing, over 8.5 million views.
That’s an impressive amount, and it will have got more people thinking about…well, very few specifics. What did we see? Battles? Check. Destruction? Check. Vehicles? Check. Not a lot to go on? Also check.
Even before this, and surely EA knows its BF6 path to release will be picked apart, the official Battlefield account posted on X, casually mentioning an Open Beta. That’s an open beta, which, until then, wasn’t confirmed.
The Battlefield X account also did this as a sub-topic to a post that adds more fuel to the class and weapons debate:
“Open Weapons vs Closed Weapons
Why not both?
Starting at Open Beta players can choose official playlists with Signature Weapons locked to class, or not.”
That was an odd way to announce something, and also to chime in on one of the hot topics that Battlefield fans past (and maybe even future) are keen to know credible information about. At this point, it’s hard to tell if it’s me with only one eye open through fatigue from rumors.
Or if EA has just one eye on its release cake, and the other is oblivious to the all-you-can-eat information buffets in neighbouring yards. Regardless, we’re finally out of the woods with all the Battlefield 6 rumors and speculation; I’ve seen the gameplay, and we’re only a handful of months away from a full release. I just hope the game lives up to expectations, because the wait has me feeling so tired.
Ask The Escapist
Can you pre-order Battlefield 6?
Yes, Battlefield 6 pre-orders are available on the Xbox, PlayStation, and PC platforms for the starting price of $70 for the standard edition and $100 for the Phantom Edition.
Is Battlefield 6 coming?
Yes, the Battlefield 6 release date is confirmed to be October 10, 2025.
Is Battlefield 6 free-to-play?
No, Battlefield 6 isn’t free-to-play; it costs the industry-standard price of $70.
The Escapist is supported by our audience. When you purchase through links on our site, we may earn a small affiliate commission. Learn more about our Affiliate Policy
Gacha, gacha everywhere. Everything seems to be gacha these days – including the new mech game Mecharishi that came out the other day and has managed to hold my attention for longer than much of this sort of thing does.
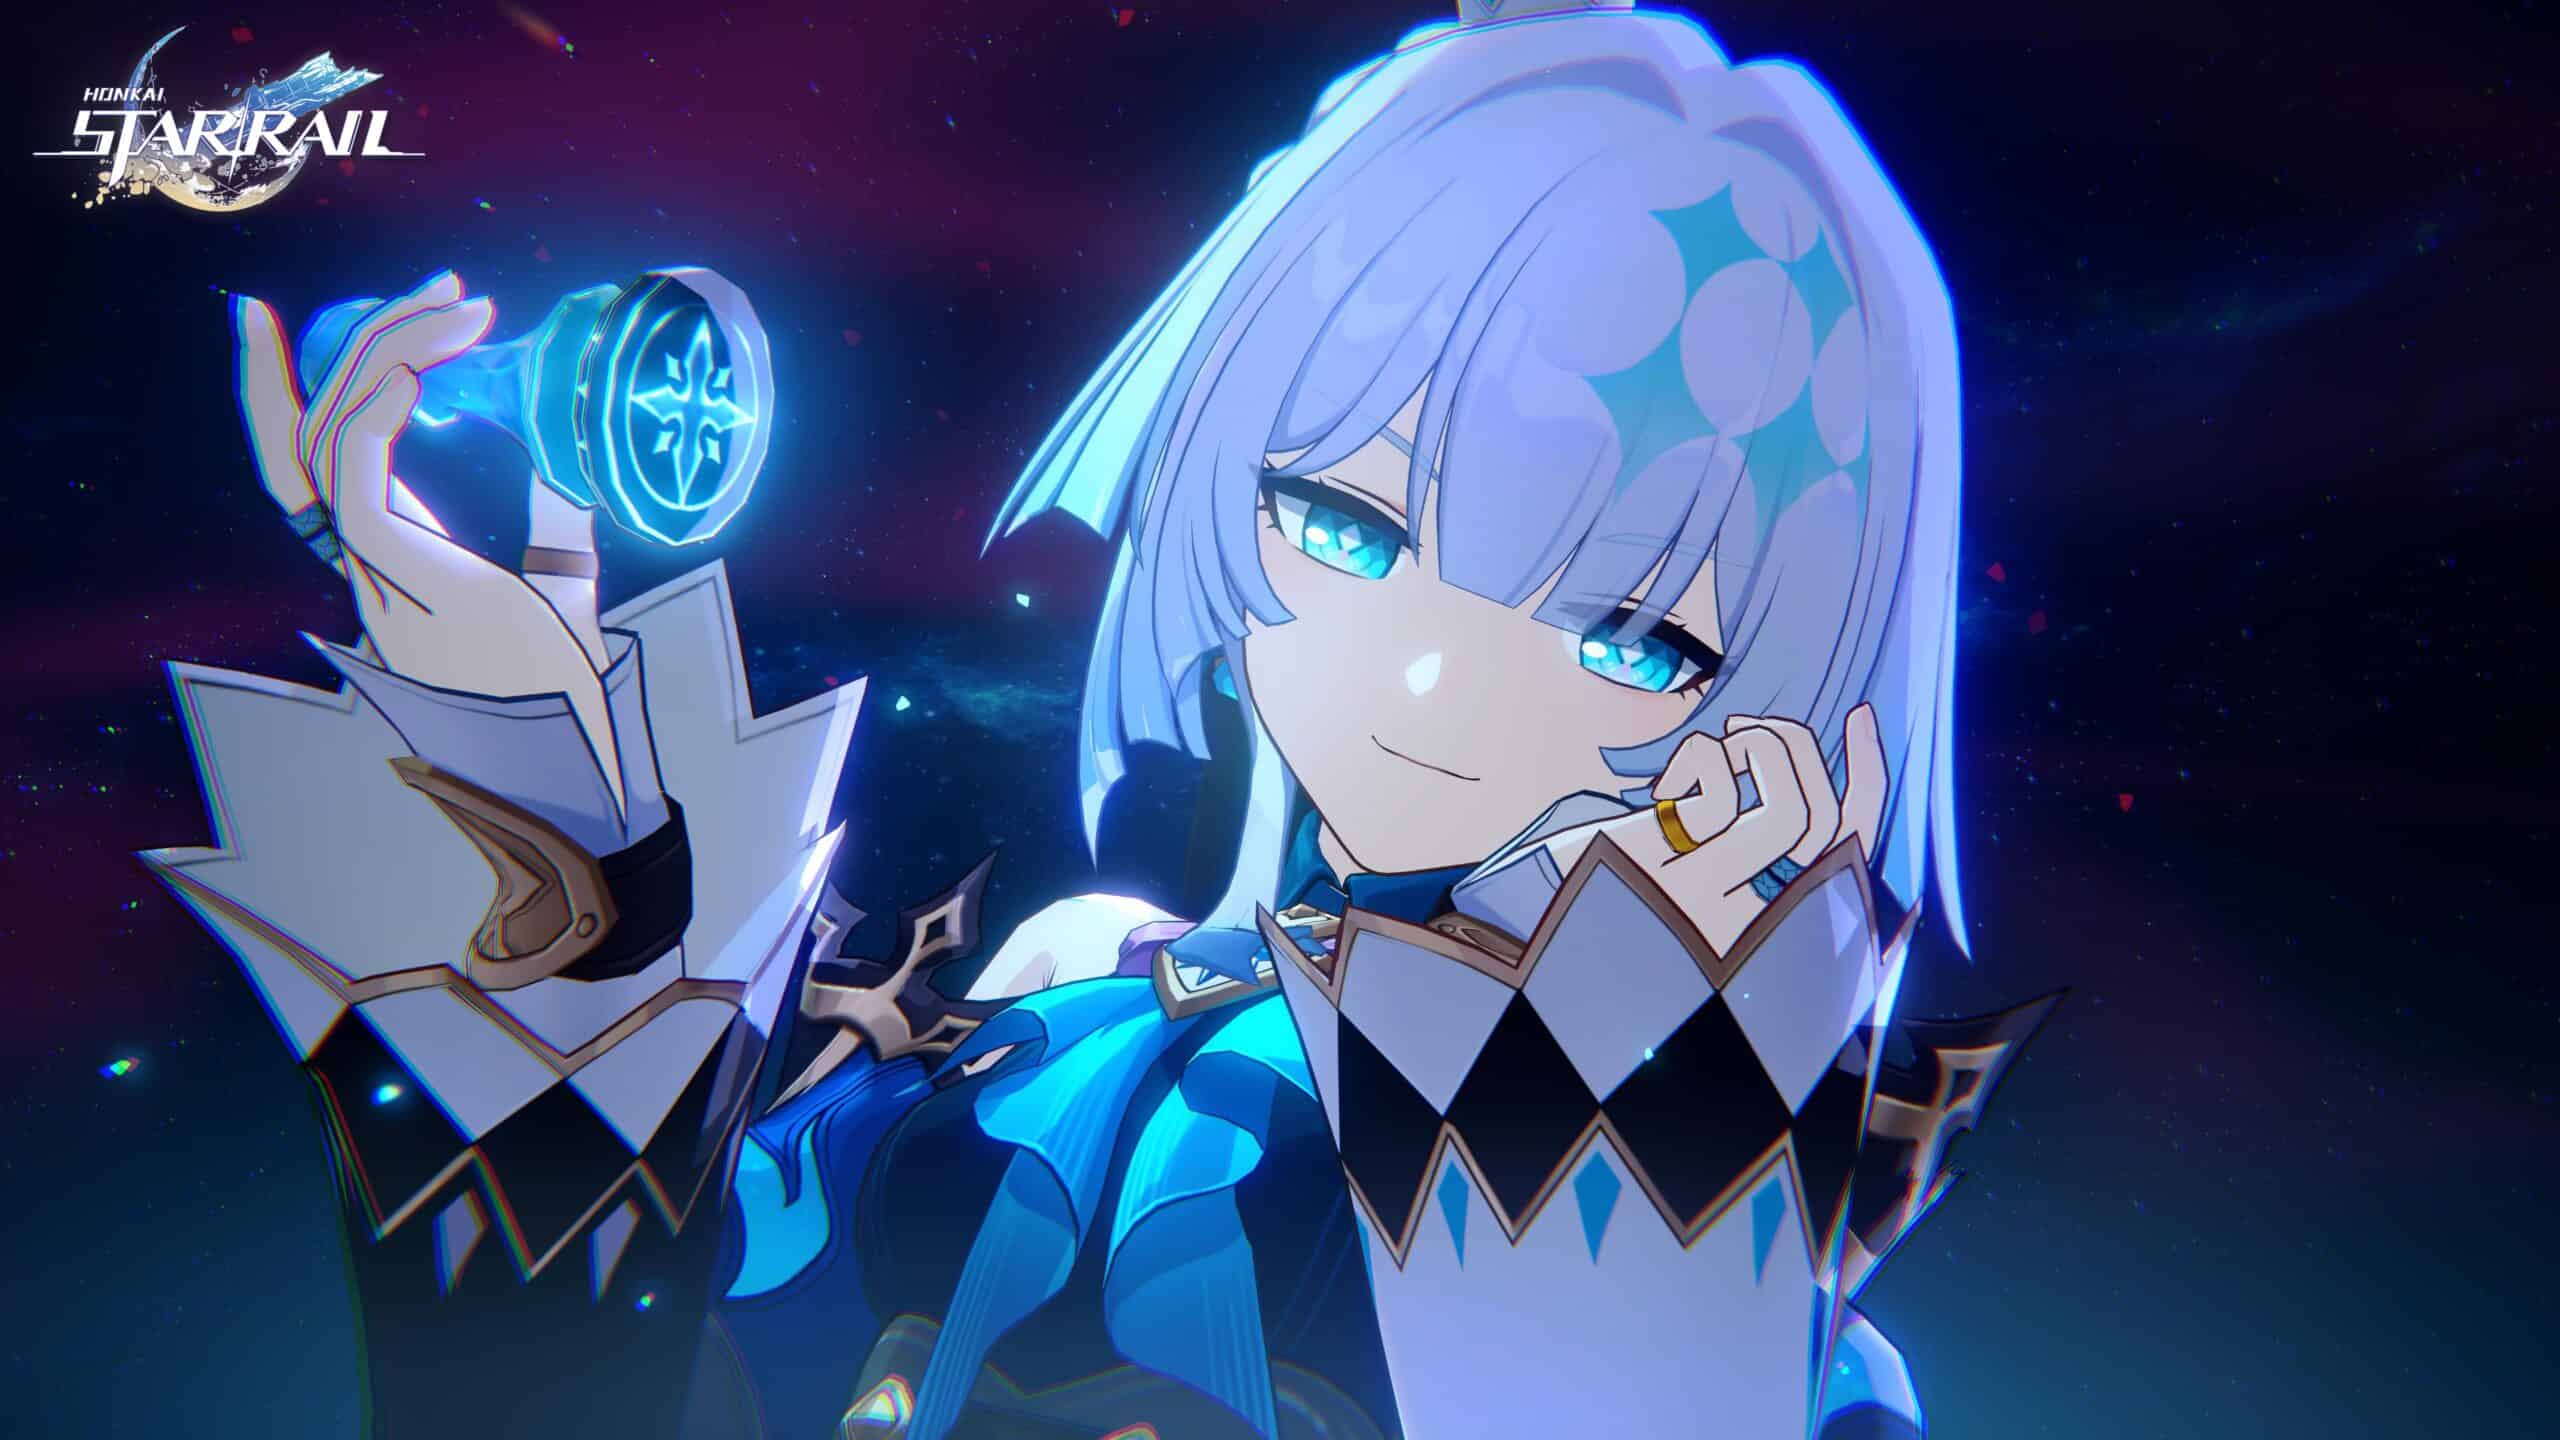
One of the longer-term and more successful examples out there at the moment is the popular Honkai Star Rail, which has just announced the arrival of its latest 3.5 update. But when is it, what will it bring, and what news has been released so far?
Honkai: Star Rail Version 3.5 “Before Their Deaths”
When is it out?
HoYoverse has announced that we can expect the version 3.5 update to arrive on August 13th, so less than two weeks away from the time of publication.
This update officially kicks off the second half of the Amphoreus story. Trailblazers will encounter new companions, confront fresh enemies and events, and witness old friends in entirely new forms. Hysilens and Cerydra will also make their long-awaited debut as playable characters, joining players in the next leg of the Amphorean trailblazing expedition.
Version 3.5 introduces two powerful new characters to the team of Trailblazers. The first is Hysilens, commander of the holy city’s knights and a 5-star Physical-Type character following the Path of Nihility. Hysilens excels when paired with characters who specialize in DoT.
The other 5-star Wind-Type character following the Path of Harmony, Imperator Cerydra, is the holder of the Law Coreflame and the initiator of the first Flame-Chase Journey
HSR V3.5 will see the limited 5-star characters Stellaron Hunter Kafka and Silver Wolf return in the first and second halves of the Version 3.5 warp event
Voice actor features
This is an interesting one. Version 3.5 brings a toggle to the in-game audio that allows you to toggle between the original in-game dub and the original licensed voice actors. This is being added to help increase immersion for players.
Honkai Star Rail has so far passed an astonishing 150 million downloads across PC, iOS, and Android. That is a lot of potential income for HoYoverse when you consider it sits beside its other gacha behemoth, Genshin Impact.
You can download the new Honkai Star Rail update on August 13th, and we will update this page with go-live times once they are released.
The Escapist is supported by our audience. When you purchase through links on our site, we may earn a small affiliate commission. Learn more about our Affiliate Policy


Published: Aug 10, 2025 11:12 am