برچسب: Guide

  • Definitive Volleyball Legends Abilities Guide and Tier List [UPDATE 20] – Best Abilities for Each Position

    Definitive Volleyball Legends Abilities Guide and Tier List [UPDATE 20] – Best Abilities for Each Position


    If you’ve seen others score some easy points using special moves that you haven’t seen before, then they are definitely using abilities. Compared to styles, abilities in Volleyball Legends aren’t necessarily stronger the rarer they are. Still, some stand out from the rest. So, here is a Volleyball Legends abilities tier list to help you choose the right one for you.

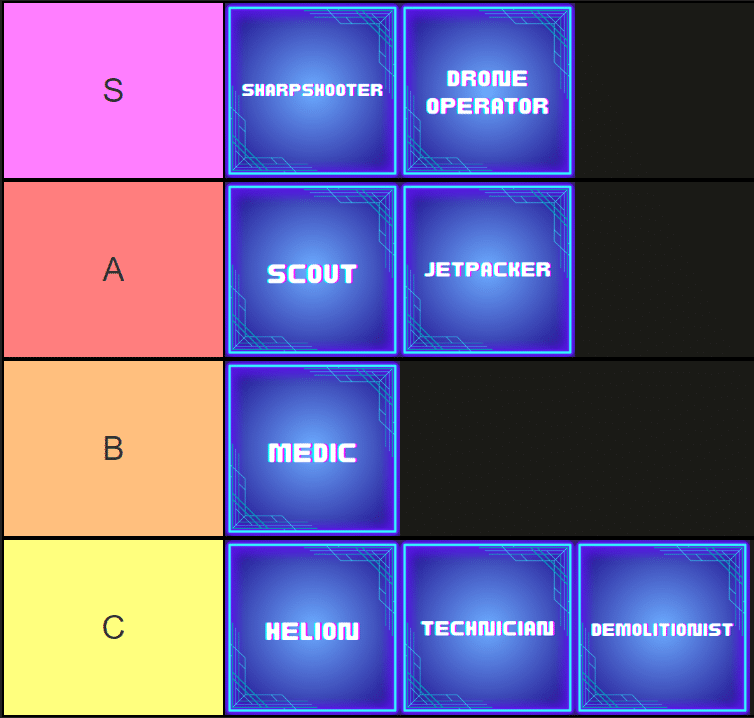
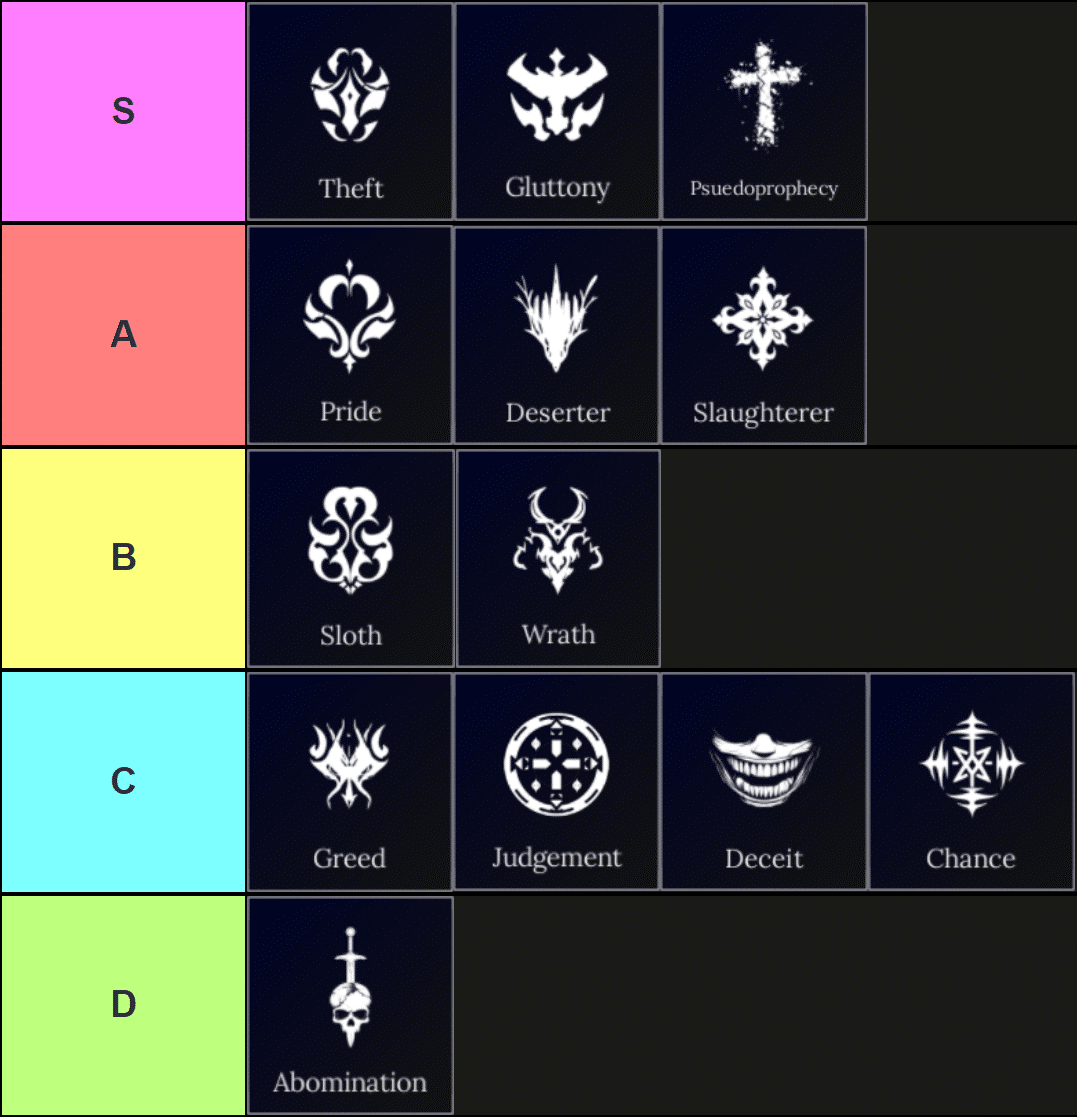
    Volleyball Legends Abilities Tier List

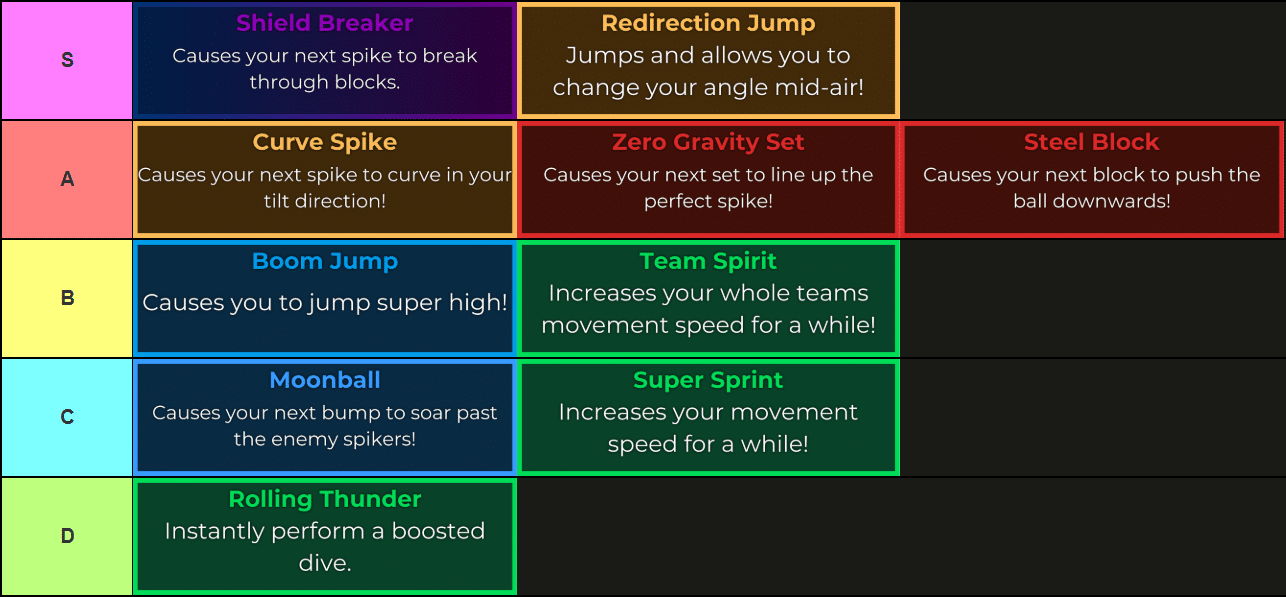
    We decided to rank abilities in the above tier list based on how useful they are in Volleyball Legends Pro servers. Playing on Pro servers assumes that your team will be more coordinated and ready to play off of each other. Volleyball Legends is all about team play, and most abilities are designed with that in mind. However, skills like Redirection Jump, Super Sprint, and Steel Block can be even more useful when playing with random players.

    Best Abilities for Spiking, Blocking, Setting, Serving, and Receiving

    In contrast to the tier list, some abilities in Volleyball Legends are way more useful, depending on your play style. With that in mind, below are a few abilities that pair up well with some styles from our Volleyball Legends styles tier list:

    List of Abilities in Volleyball Legends

    Abilities in Volleyball Legends last only for a few seconds. Generally, you will have to predict when to use them so that you don’t waste them. Here is a list of all abilities in Volleyball Legends sorted by their rarity tier, along with some tips for each of them:

    S-Tier Abilities

    Ability Details Rarity
    Shield Breaker ability from Volleyball Legends Roblox experience 
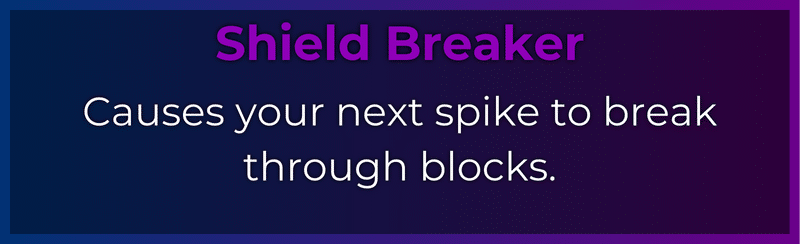
• The Shield Breaker makes your next spike go through blocks.
    • Shield Breaker is the best ability for spikers, allowing you to score easy points.
    Secret (0.01%)
    Redirection Jump ability from Volleyball Legends Roblox experience • Redirection Jump makes you immediately jump, scaled by the stat of your style.
    • While in the air, you can spike the ball in any direction you are aiming at.
    • Without this ability, you can only spike the ball in the direction your character is facing.
    Godly (0.5%)

    A-Tier Abilities

    Ability Details Rarity
    Curve Spike ability from Volleyball Legends Roblox experience • Curve Spike makes your next spike curve in the direction of your tilt (A/D on the keyboard while in the air).
    • How much the ball is curved depends on the power of your spike. With very powerful spikes, the ball barely curves a bit.
    Godly (0.5%)
    Zero Gravity Set ability from Volleyball Legends Roblox experience • Zero Gravity Set is the best ability for any setter out there. However, it only works while you are on the ground. Legendary (2%)
    Steel Block ability from Volleyball Legends Roblox experience • Steel Block speeds up and angles your next block.
    • It’s perfect for scoring easy points on the net.
    • Before you jump for a block, make sure to face and angle yourself to the side so that you bypass the players trying to block in front of you.
    Legendary (2%)

    B-Tier Abilities

    Ability Details Rarity
    Boom Jump ability from Volleyball Legends Roblox experience • Boom Jump enhances your jumps.
    • It is most useful when serving and when trying to catch super-high sets from your teammates.
    Rare (35%)
    Team Spirit ability from Volleyball Legends Roblox experience 
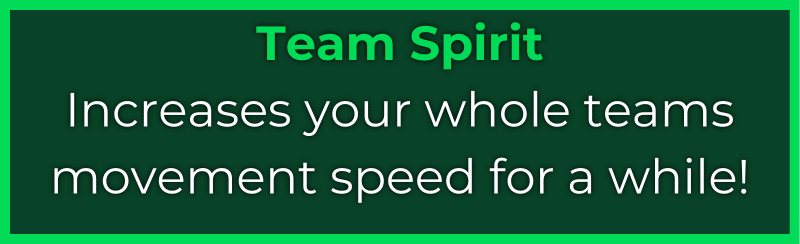
• Team Spirit lives up to its name as it increases the movement speed of all players on your team.
    • If you are a team player who likes to sit in the back and support your team, bring Team Spirit with you.
    Common (62.5%)

    C-Tier Abilities

    Ability Details Rarity
    Moonball ability from Volleyball Legends Roblox experience • Moonball shoots the ball way up in the air and makes it fall quickly back to the ground.
    • It’s only useful when all opponents try to play on the net.
    Rare (35%)
    Super Sprint ability from Volleyball Legends Roblox experience • Super Sprint greatly increases your movement speed.
    • It is a very versatile ability that is great for catching stray balls and repositioning before a block or a spike.
    Common (62.5%)

    D-Tier Abilities

    Ability Details Rarity
    Rolling Thunder ability from Volleyball Legends Roblox experience • Rolling Thunder allows you to make a super dive and bump difficult-to-catch balls.
    • Very situational ability overall.
    Common (62.5%)

    How to Reroll Abilities in Volleyball Legends

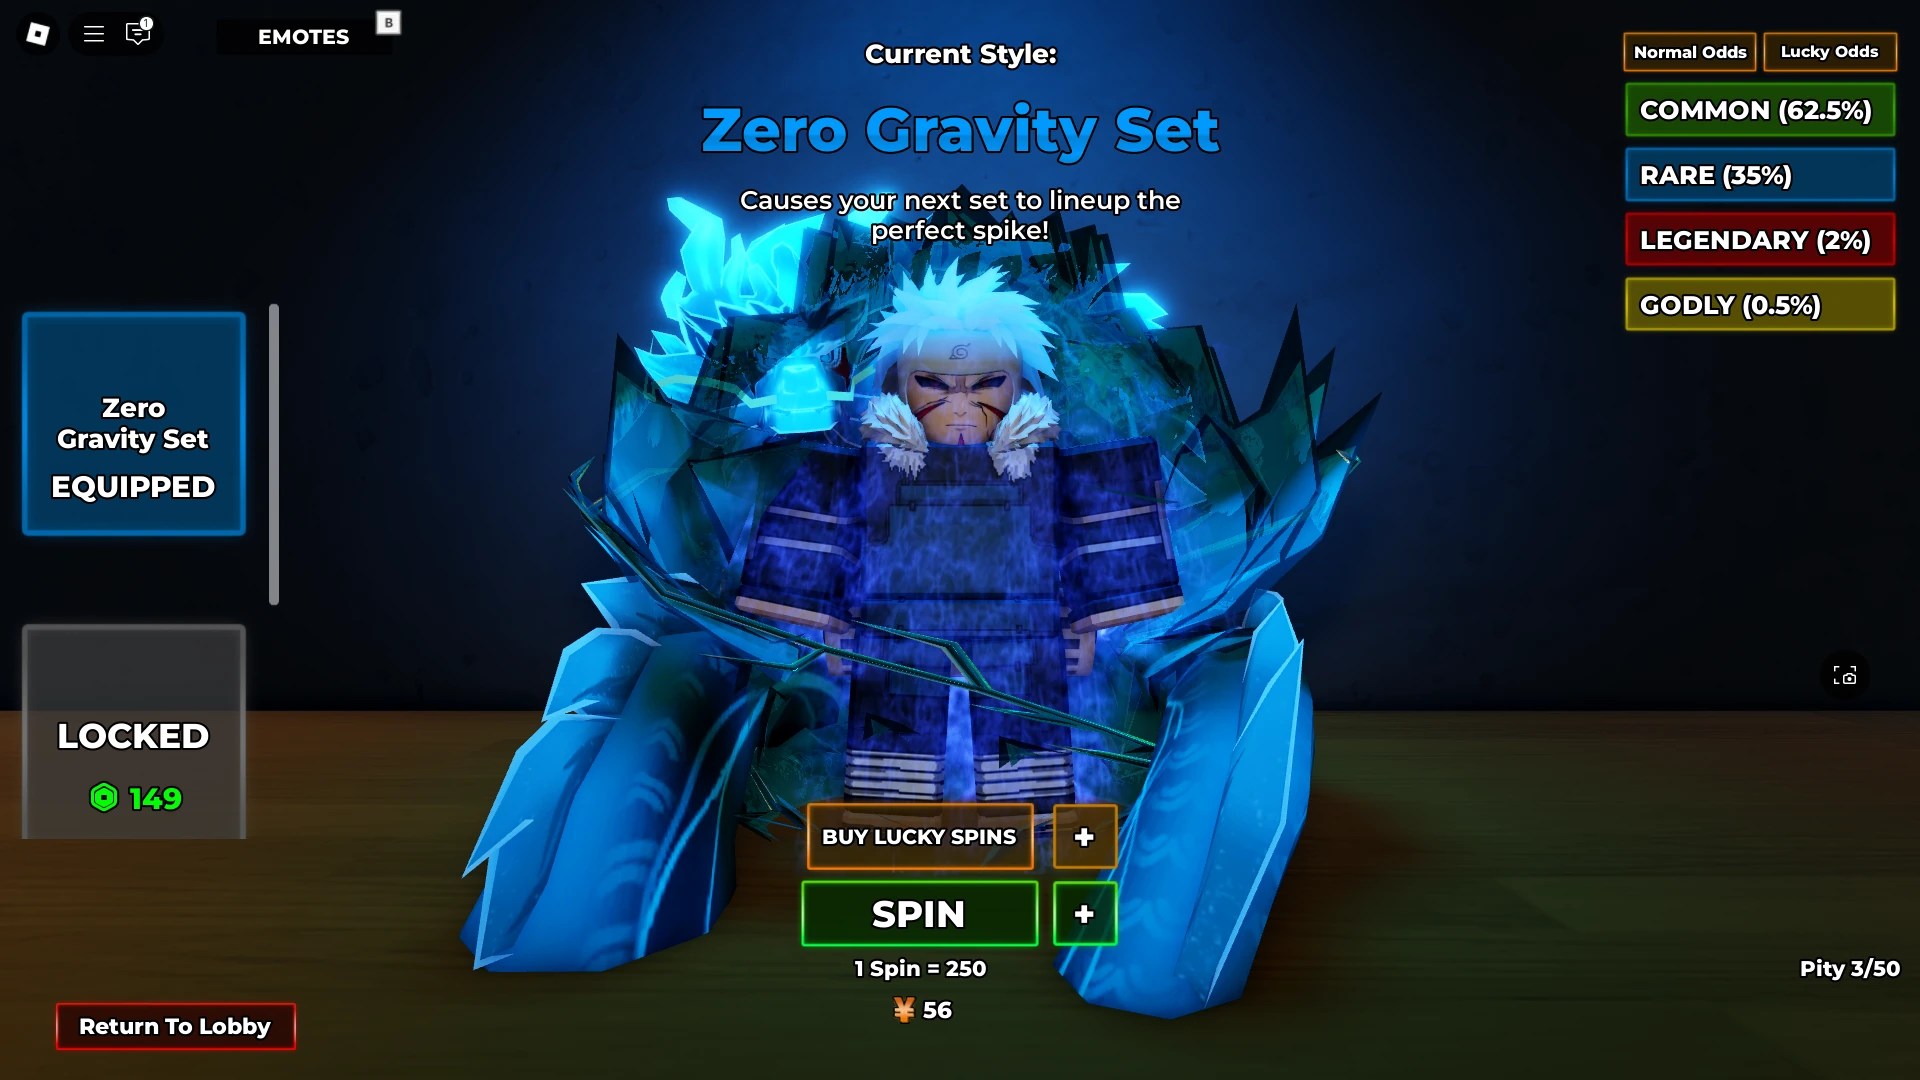
    You can use either regular Spins, Lucky Spins, or Yen to reroll your ability in Volleyball Legends. With Lucky Spins, you can only get Rare, Legendary, and Godly abilities. Also, you can purchase a storage slot for Robux if you want to keep a good ability as a backup.

    And that concludes our Volleyball Legends abilities tier list. If you want to get some free Lucky Spins and possibly get a Godly ability, then check out our Volleyball Legends codes.


    What are the best Volleyball Legends abilities?

    Currently, the best abilities are Shield Breaker, Redirection Jump, and Curve Spike.

    How do you get more Lucky Spins?

    You can get more Lucky Spins by redeeming codes and by buying them using Robux.

    Is the new Shield Breaker ability good?

    The new Shield Breaker ability is insanely good because it allows you to score easy points, even against tougher opponents.
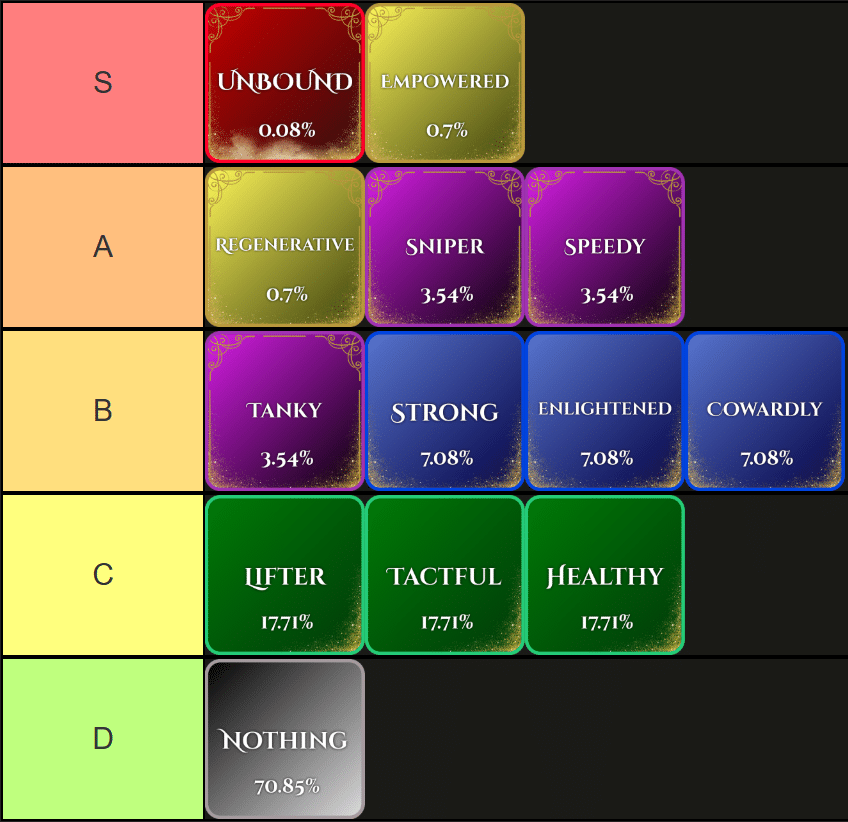

    The Escapist is supported by our audience. When you purchase through links on our site, we may earn a small affiliate commission. Learn more about our Affiliate Policy


    Source link

  • [⭐Traits] Dead Spells Trait Tier List and Guide

    [⭐Traits] Dead Spells Trait Tier List and Guide


    In Dead Spells, Traits play a key role in shaping your character’s performance. These modifiers provide small boosts to base stats like health, damage, and speed. While all Traits offer some advantages, certain ones stand out as they deliver stronger enhancements. Understanding which Traits are most effective can give players a valuable edge in combat, so follow along with our Dead Spells Trait Tier List and Guide to find out which ones are the best for you.

    Dead Spells Trait Tier List

    While Unbound is undoubtedly the strongest Trait in Dead Spells, it is also the hardest to get, making Empowered a clear choice when trying to roll. If you are just starting and you do not have many Burgers, you should look for a Rare Trait, such as Strong or Enlightened, as they can carry you early.

    Dead Spells Trait List

    Below is a complete and detailed list of all Traits in Dead Spells, ranked by usefulness:

    The best Trait to go for if you are a beginner in Dead Spells is one that gives you damage. Lifter, Enlightened, or Sniper would be the easiest and best choices for any beginner. If you are not sure if you are gonna be able to fight multiple enemies at once and want a safer playstyle, getting Healthy or Tank is also viable at the start. Later on, you can roll for Legendary and Mythic upgrades for those rare and epic Traits.

    How to Reroll Traits in Dead Spells

    Rerolling Traits in Dead Spells is as easy as walking over to the Traits Cauldron and rolling. You can find it by going forward after you spawn and then turning right. Once you reach the cauldron on the right side, hold the Interact [E] button to enter the Trait Reroll screen. There, you can directly buy the Trait you want or roll a random Trait for 10 Burgers.

    That is all for my Dead Spells Trait Tier List and Guide. Check out our Dead Spells Class Tier list and Guide to see which Class is the best for which Trait.


    The Escapist is supported by our audience. When you purchase through links on our site, we may earn a small affiliate commission. Learn more about our Affiliate Policy


    Source link

  • All Anime Saga Controls And Keybinds Guide (PC, PlayStation and Xbox)

    All Anime Saga Controls And Keybinds Guide (PC, PlayStation and Xbox)


    Anime Saga Roblox doesn’t go in-depth on all controls in the game so we’re here to help. Especially for console controllers since System Arts Studio introduced controller support. Speaking of which this guide will be useful even if you’re playing with a controller on PC. Here’s our Anime Saga controls and keybinds guide for all platforms.

    Anime Saga PC Controls

    The PC controls in Anime Saga are pretty straight forward and though you can’t customize them they’re quite easy to grasp and use. It’s all about the three ability buttons combined with the Dodge and switch character function. Here are all PC controls:

    Control Keybind
    Moving WASD
    Attack M1
    Dodge Q
    Switch Character E
    Jump Space
    Shiftlock Shift
    Character Ability 1 Z
    Character Ability 2 X
    Character Ability 3 C
    Zoom In and Out I and O or Mouse Wheel

    Related: Anime Saga Wiki

    Anime Saga PlayStation Controls

    anime saga playstation controls guide
    Image by The Escapist

    Anime Saga supports PlayStation controllers on PC so you can plug-n-play if you have one. In fact, I recommend using a controller since the game is very smooth with a controller with the camera locked. As you can see in the image above, PlayStation controls are pretty straight forward. You can’t customize them but there’s not a lot of keybinds to keep track off. Note that the third ability is on R1 and not the four face buttons on the right.

    Anime Saga Xbox Controls

    anime saga xbox controls guide
    Image by The Escapist

    Anime Saga also supports Xbox controllers. The Xbox controls for the game are similar to the PlayStation ones as you can see in the image. They follow the same pattern with the Ability 3 button being on RB instead of the face buttons.

    How to Change Keybinds in Anime Saga

    Unfortunately, you currently cannot change controls and keybinds in Anime Saga. This goes both for the PC keyboard controls as well as PlayStation and Xbox controllers you might use. There is a basic Settings menu in the game so System Arts Studio might allow you to customize keybinds in the future.

    That’s it for my Anime Saga controls and keybinds guide for PC, PlayStation and Xbox. Check out our Anime Saga Unit and Trait tier list for some expert game play tips.


    The Escapist is supported by our audience. When you purchase through links on our site, we may earn a small affiliate commission. Learn more about our Affiliate Policy


    Source link

  • Roblox School Time Walkthrough Guide – Kit Tier List, Item Guide & More

    Roblox School Time Walkthrough Guide – Kit Tier List, Item Guide & More


    To beat Roblox School Time Chapter 1 you’ll need to know all the mechanics for each level as well as the best items and kits to use. I’m also going to walk you through each level and the best strategies for all of them. Here’s my complete School Time walkthrough guide, item guide, and kit tier list.

    School Time Beginner’s Guide

    To beat Roblox School Time you’ll have to go through a series of levels collecting different items in each one and bringing them to the art room to progress. The teacher Mrs. Klock and the principal Mr. Jenkins (starting level 2) will chase you and instantly knock you down on contact. Other players can revive you and then you have to heal with consumable items you find. Let’s start with some basic tips and tricks:

    • Disable Mrs. Klock and Mr. Jenkins: You can find and buy items to disable the teacher and principle like the bear trap snare that will stun them on contact or the paper ball you can throw to stun them by clicking on them with it equipped. Check out the full list of items below.
    • Coins & Gems: You’ll find coins each level that you can spend at the end of the level to buy items for the next day. Also, there are Gems to pick up which are used in the Lobby to unlock kits which are item presets that refresh each run and they also give you permanent movement speed and health boosts. Check out the best kits below.
    • Progression Items: In the first level you’ll need to pick up a certain number of planks and bring them to the art room to go to Day 2. This repeats for different items each day with Blueprints on Day 2 and so on. These items are randomly placed around the school and they even spawn during the level so keep looking. They’re hidden in various rooms on the floor and on the tables in classrooms but not in lockers which you need a key to open.
    • Red Arrows: Whenever you need to reach the art room go into any hallway and find the red arrows and then follow them. They’ll lead you to the art room which is helpful until you learn the level layout yourself.
    • Spread Out and Watch the Floor and Tables: The best strategy is to spread out into the cafeteria, gym field, and temple as well as the class rooms. Each day the level is the same so learn the layout and pay attention to the tables since the items can be on tables as well as the floor.
    • Certain Item Effects Persist: You can dig holes with Shovels to teleport around the level or place snares and these items persist throughout all levels so feel free to place them in earlier days so you can use them later as well. I recommend digging a Shovel hole near the art room so you can quickly come back to it.
    • Reviving Players: You can see a player who is downed through the walls so quickly rush to revive them before they run out of HP or else they’ll be eliminated and kicked from the game. You can drop healing items like Bandages and Medkits with Backspace to allow them to heal.
    • Max 10 Items: You can only carry 10 items at a time so use Bandages and drop Traps to free up space for better items.

    All Items Guide in School Time

    school time shop guide and all items
    Image by The Escapist

    You can find all of these items on the ground during each day in School Time or you can buy them at the end of a day. Below you’ll find a list of them all and a brief guide for each one on how best to use it or should you buy it.

    All Days Walkthrough in School Time

    all progression items in school time all days guide walkthrough
    Image by the Escapist

    When it comes to Roblox horror games School Time is pretty simple since there are no puzzles. You just collect all items each day, bring them to the art room, and avoid getting downed by the teacher and principal. That said, there’s a special mechanic each day so let me give you some tips for all of them:

    • Day 1 Tips: This day is really easy once you get a Trap, Soda, or Ball to escape when the teacher starts chasing you. Look for planks and bring them back to the art room, the red arrows will guide you. The most important part of Day 1 and any day for that matter is to always go to downed players to revive them. The more players pass the easier the later days will be. At the end of Day 1 and all days after you’ll get a shopping phase where you can buy the items we mentioned above. Make sure to stock up.
    • Day 2 Tips: This where Principal Jenkins shows up so you’re basically twice as likely to get chased. Just make good use of retreating, hiding, and using the escape/stun items and you’ll be fine. Always have at least one escape/stun item on you. If you don’t, don’t risk going into open spaces without cover.
    • Day 3 Tips: This is where both the teacher and principal can drink Soda for a speed boost. It’s more crucial than before to keep to the at least one escape/stun item strategy since they’ll catch you fast if you don’t have an escape plan.
    • Day 4 Tips: This is where certain lockers will have tentacles coming out of them that will damage and stun you on contact. You can still pass them by just make sure to walk on the furthest opposite side of the tentacle locker in a hallway. Otherwise, strategy from days before apply. Make sure to buy the Lantern at the end of Day 4 for Day 5.
    school time day 4 tentacle locker
    Image by The Escapist
    • Day 5 Tips: This is the last day where lights go out. Make sure you have a Lantern from one of the shopping phases before. Otherwise, strategies from Day 4 and before apply and nothing else changes.
    school time day 5 lights out
    Image by The Escapist

    Once you beat Day 5 you’ve beaten School Time Chapter 1. Congratulations! Now we wait for Chapter 2.

    School Time Kits Tier List

    school time kits tier list best kits
    Image by The Escapist

    You can buy all items from all kits eventually during the game so the best kits in School Time are the ones are that give you permanent bonuses or lots of coins. The permanent bonuses are useful for all days whereas the one-time items are a short term boost. Movement speed is much better than health as a stat boost so you’ll notice kits with it are ranked higher. Health isn’t that valuable since the teacher and principle one shot you anyway. Also, kits with coins are also powerful since you can establish a Shovel hole system earlier or be flexible in what you buy depending on how the game is going. You can check what all kits do in the lobby.

    That’s it for my complete School Time walkthrough guide with an item guide and kit tier list. Check out our Roblox guides page for more walkthroughs like our PETAPETA and 7 Days to Live guides.


    The Escapist is supported by our audience. When you purchase through links on our site, we may earn a small affiliate commission. Learn more about our Affiliate Policy


    Source link

  • Complete Dead Planets Class Tier List and Guide

    Complete Dead Planets Class Tier List and Guide


    In Dead Planets, a Roblox game inspired by Dead Rails, players drive a truck through desolate space landscapes while fending off relentless zombie hordes. To survive the journey, players choose from a variety of unique Classes, each offering distinct abilities and roles. This Dead Planets Class tier list and guide breaks down every Class and how they contribute to keeping the truck moving and the team alive.

    Dead Planets Class Tier List

    Sharpshooter and Drone Operator are undoubtedly at the best Classes in Dead Planets, as they have the best utility and damage options in the game. You want to be able to get as much loot as possible while killing zombies at the same time. Sharpshooter gets a good weapon at the start, along with a nice damage boost, while Drone Operator gets a Drone that kills zombies for him, making his gameplay very easy.

    Dead Planets Class List

    Below is a complete and detailed list of all Classes in Dead Planets, ranked by usefulness and cost:

    If you are looking for a good Dead Planets Class, I recommend trying to go for Scout. It’s the best early Class and holds up even in the late game. It has a lot of speed and helps you avoid enemies easily with his Highlight ability. If you are looking for even more mobility or utility, go for Jetpacker, as it has a flying ability, but it is a bit pricier.

    How to Change Classes in Dead Planets

    Firstly, you will need to collect some Credits by playing. You can find packs all over the map that will give you a certain amount of Credits. Once you have enough Credits, head back to the Hub and jump into the Classes hole. Trust me, it is safe. From there, you will be able to see all the different Classes, along with their price and abilities. Once you decide which one you want and which one you have the Credits for, click Purchase below the price on the right side of the screen to make it yours and enjoy!

    That is all for my Dead Planets Class Tier List. Check out our other Dead Rails Potions Guide and Tier List for a similar game that i know you will like.


    The Escapist is supported by our audience. When you purchase through links on our site, we may earn a small affiliate commission. Learn more about our Affiliate Policy


    Source link

  • Ultimate Anime Saga Unit Evolutions Guide – How to Farm Materials, Evolve Units, and More

    Ultimate Anime Saga Unit Evolutions Guide – How to Farm Materials, Evolve Units, and More


    Mythic Units are basically mandatory to have if you want to tackle late-game content. However, if you don’t evolve them, you won’t see their true power. So, to help you farm evo materials and evolve all of your Units, we prepared the following Anime Saga Unit evolutions guide.

    Anime Saga Unit Evolutions Explained

    All Mythic Units in Anime Saga have evolutions that increase their overall damage and unlock one additional move. Newly unlocked moves can be extremely powerful. For example, Zid’s Atomic deals more damage than the rest of its kit combined. With that in mind, you should evolve your Units as soon as you can.

    How to Evolve Units in Anime Saga

    You can evolve Units in Anime Saga at the Evolve capsule in the main lobby. Now, each Unit has specific evolution requirements. For the most part, those requirements are Gold and craftable evolution items. Below, you can see which Units can be evolved, and what materials you need to collect to do that. If you are indecisive about which Unit to evolve first, Units with the highest priority have the best evolutions.

    How to Craft Evolution Items in Anime Saga

    You can craft evolution items at the Craft (Majin Buu) NPC in the main lobby. To craft an evolution item, you first need to collect some specific materials and a bit of Gold. You can farm most of these materials by doing Raids, while some are also available at the Gold Shop.

    Farming Materials in Raids

    You unlock Raids when you reach player level 25. From then on, you can easily farm materials needed for evolution items in them. Raids open up every hour at XX:00 (1:00, 2:00, etc.), and they stay open for 15 minutes before going on a 45-minute cooldown.

    When you enter a Raid, you have 15 minutes to deal as much damage as you can to the boss within it. With each damage threshold you reach, you get an additional set of rewards. Even though up to eight players can join the same Raid, the damage dealt to the boss isn’t shared between them. However, teaming up with others has its benefits, as your Unit’s damage increases with more players in the same Raid.

    Where to Spend Raid Tickets

    When you complete a Raid, you will get a certain number of Tickets as a reward. You can spend these Tickets at the Raid Shop NPCs to purchase Trait and Stat rerolls, as well as some very powerful limited Units, like Remu.

    Buying Materials and Food at the Gold Shop

    Suppose you are missing some materials to craft an evolution item for one of your Units. In that case, you can buy those occasionally at the Gold Shop. Keep in mind that the Gold Shop stock refreshes every 12 hours, and not all items are available from it at once. Instead, a random selection is in stock. All Rare and Epic materials are easily farmed in Raids. Thus, I suggest you purchase only Legendary and Mythic materials as they have very low drop rates.

    Material Shop cost Obtainable from Needed for
    Demon Blood food from the Anime Saga Roblox experience. 400 Gold Red Light District Story Fan (Doma)
    Screws material from the Anime Saga Roblox experience. 1,060 Gold Raids Pochita (Chainsaw)
    WeaponsZid (Zid)
    Milk material from the Anime Saga Roblox experience. 1,060 Gold Raids Pochita (Chainsaw)
    OkorunBall (Okorun)
    WeaponsFrierin (Frierin)
    Gear material from the Anime Saga Roblox experience. 1,060 Gold Raids Pochita (Chainsaw)
    Battery material from the Anime Saga Roblox experience. 2,500 Gold Raids Pochita (Chainsaw)
    Handheld material from the Anime Saga Roblox experience. 2,500 Gold Raids WeaponsZid (Zid)
    OkorunBall (Okorun)
    Chip material from the Anime Saga Roblox experience. 2,500 Gold Raids Fan (Doma)
    Bottle material from the Anime Saga Roblox experience. 2,500 Gold Raids Fan (Doma)
    WeaponsFrierin (Frierin)
    Dice material from the Anime Saga Roblox experience. 6,500 Gold Raids Fan (Doma)
    OkorunBall (Okorun)
    Yoyo material from the Anime Saga Roblox experience. 7,000 Gold Raids WeaponsZid (Zid)
    WeaponsFrierin (Frierin)
    Egg material from the Anime Saga Roblox experience. 9,000 Gold Raids OkorunBall (Okorun)
    WeaponsFrierin (Frierin)
    Soup material from the Anime Saga Roblox experience. 11,000 Gold Raids WeaponsZid (Zid)
    Fan (Doma)
    WeaponsFrierin (Frierin)
    Magnet material from the Anime Saga Roblox experience. 10,000 Gold Raids Pochita (Chainsaw)
    OkorunBall (Okorun)
    Key material from the Anime Saga Roblox experience. 12,000 Gold Raids WeaponsZid (Zid)
    Fan (Doma)

    That concludes our Anime Saga Unit evolutions guide. Now, you know how to take your best Units as powerful as they can be. If you want to claim some free Gems and start pulling for evolvable Units right away, then make sure to check out our Anime Saga codes.

    Anime Saga Unit Evolutions FAQs

    What Units can be evolved in Anime Saga?

    Currently, you can only evolve Mythic Units in Anime Saga.

    Can you sell materials you don’t need in Anime Saga?

    Unfortunately, you can’t sell the excess materials that will inevitably pile up in your inventory.

    How do you farm evolution materials in Anime Saga?

    You can farm evolution materials in Anime Saga by completing Raids (level 25+). Also, if you need a specific one to evolve a Unit right away, you might find it in the Gold Shop.


    The Escapist is supported by our audience. When you purchase through links on our site, we may earn a small affiliate commission. Learn more about our Affiliate Policy


    Source link

  • Definitive Absolvement Sin Tier List and Guide

    Definitive Absolvement Sin Tier List and Guide


    Choosing the right Sins when creating a new character in Absolvement is as crucial as choosing your race, because you won’t be able to change them. However, with each of them sounding worse than the other, making that choice can be difficult. To help you pick only the best Sins available, we prepared the following Absolvement Sin tier list.

    Absolvement Sin Tier List

    In the tier list above, we ranked all Sins in Absolvement based on how difficult it is to play with them. Picking up multiple high-ranked Sins will make the overall gameplay not that bad. However, picking even one from the bottom of the tier list is not recommended for new players.

    Good Sin Combos

    Now, you can always run with just one Sin, but your Soul Fragment generation will be low. So, we prepared some Sin combos that don’t make the game too difficult, while still giving you a decent Soul Fragment multiplier.

    List of Absolvement Sins

    Below is a list of all Sins in Absolvement, along with their effects and their overall difficulty.

    Sin Effects Difficulty Tier
    Theft sin from the Absolvement Roblox experience. • All prices are doubled. Very Easy S
    Gluttony sin from the Absolvement Roblox experience. • Every 5 minutes, you are forced to consume a random item that you may be holding on to.
    • If there is no item to eat, you will begin to aggressively gnaw and chew at your own hand, dealing 20 damage to yourself.
    Very Easy S
    Pseudoprophecy sin from the Absolvement Roblox experience. • You are permanently locked to one life only. Easy for veterans
    Hard for beginners
    S
    Pride sin from the Absolvement Roblox experience. • All forms of support spells and heals are now 25% less effective on you, as you see those as requiring a handicap or needing help from others. Very Easy A
    Deserter sin from the Absolvement Roblox experience. • While under 50% health, your walking speed will gradually decrease with your remaining health. Easy A
    Slaughterer sin from the Absolvement Roblox experience. • Total regeneration decreased by 25%.
    • Your regeneration is now slower out of combat, but faster while in combat.
    • Additionally, you now have a 10% reduced walk speed and deal 30% reduced damage for the first 3 seconds you enter combat, and the debuff will persist permanently outside of combat.
    Medium A
    Sloth sin from the Absolvement Roblox experience. • Your slug-like behaviors cost your prowess, causing you to attack 20% slower.
    • Additionally, your walking speed is reduced by 10%.
    Hard B
    Wrath sin from the Absolvement Roblox experience. • Threat gained from potentials increased by 100%.
    • All armor is only 65% as effective.
    Medium B
    Greed sin from the Absolvement Roblox experience. • You are now forced to select the highest rarity from potential selections to prevent your greed from turning dire.
    • Every time you refuse to do so, your greed inflicts a permanent stacking debuff, decreasing your total damage and total armor by 2% per stack.
    Medium C
    Judgement sin from the Absolvement Roblox experience. • Your potentials now have most of the important details obscured, use your best… “judgement” to make your call. Hard C
    Deceit sin from the Absolvement Roblox experience. • Not all potentials are truthful; some may be decoys.
    • Enemies may be a figment of your imagination, both in physical form and in detection basis.
    • Shopkeepers mislead you about their stock.
    Hard C
    Chance sin from the Absolvement Roblox experience. • Increases your chance to get Common and Uncommon potentials by 40%, making Rare, Unique, and Mythical ones much harder to come by. Easy C
    Abomination sin from the Absolvement Roblox experience. • You are now afflicted with all sins.
    • You are now always affected by burden debuffs.
    • You receive 40% extra soul fragments on wipe.
    Very Hard D

    Absolvement Sins Explained

    In Absolvement, you pick Sins while creating a character. With each Sin you select, the amount of Soul Fragments you get with that character will increase by 4%. However, each Sin applies a set of permanent debuffs to your character. So, unless you are an already experienced player, pick only a few easier-to-manage Sins. Keep in mind that before you can finish creating your character, you have to select at least one Sin.

    That concludes our Absolvement Sins tier list. Now, you don’t have to break your mind while finishing up your character every time. If you want to check out more of our Roblox content, then visit the Roblox hub here on The Escapist.

    Absolvement Sins Tier List FAQs

    What is the easiest Sin to pick when starting out in Absolvement?

    The easiest Sin to take in Absolvement is Theft. The double prices won’t impact you that much, and eventually, you will get used to them.

    Can you change Sins after you finish creating a character in Absolvement?

    No, the Sins you select while creating a character apply to your character until you wipe.

    What is an easy combo of Sins to pick in the mid to late game?

    A relatively easy-to-manage combo of Sins is: Theft, Pride, Gluttony, Sloth, Slaughterer, and Deserter. You can also pick up Pseudoprophecy if you are comfortable with having only one life.


    The Escapist is supported by our audience. When you purchase through links on our site, we may earn a small affiliate commission. Learn more about our Affiliate Policy


    Source link

  • a Treehouse guide — The Treehouse

    a Treehouse guide — The Treehouse


    Hello everybody, welcome back to the Treehouse blog!

    We hope you’re all keeping safe and well and finding ways to manage in this era in which being asked to believe six previously impossible things before breakfast is actually a little below average.

    As you’re probably aware, The Treehouse is currently closed for business until further notice due to the Coronavirus outbreak. It’s a funny old time to be a small business, but we’ve seen some absolutely incredible support over the last few days, and team Treehouse is currently doing OK.

    We are aware that the next few weeks are going to be tough for a lot of people, with isolation, anxiety and loneliness becoming central issues. But, for those of us lucky enough to be faced with the question ‘what the heck am I going to do with my time?’ they are also an unprecedented opportunity. Having fun, trying new things and building social connections will all be completely possible over the next few weeks with the right tools, and we believe that games of all kinds are some of the most powerful tools around. We are in the fortunate position of having some expertise in this area, and it’s our aim to put that to good use even while The Treehouse is closed as a venue.

    We’ve already been getting messages from people looking for suggestions on how to overcome the various barriers stopping people from playing together at the moment. Over the next few days and weeks we’re going to be considering some of these in more detail and sharing our thoughts and advice.

    Because we’re massive nerds, we thought we’d kick things off with a flow chart to give some high-level pointers and show where we think we can help. If you think there are topics you’d like to hear from us about that aren’t covered on here, please get in touch – we would love to hear from you!


    Source link

  • Complete Project Viltrumites Character Tier List and Guide – Roblox

    Complete Project Viltrumites Character Tier List and Guide – Roblox


    Ready to dominate the Planet? In Project Viltrumites, a fun new game inspired by Invincible, you can play as all the famous comic book Characters. Each one brings their own style that is reminiscent of their counterparts in the comic books and the cartoon, making the game feel different every time you turn it on. The Characters are easy to start, but hard to master, so follow along with our Project Viltrumites Character tier list and guide to start destroying your opponents.

    Project Viltrumites Character Tier List

    There are not too many Characters introduced in Project Viltrumites yet, but from the ones that were added, they are quite good. Each of them have a unique use and playstyle, and are fun in their unique way. I recommend starting off with Mark, as he is easy and does a lot of damage. The game will be fully released soon, so you should bookmark this page to stay up to date with the latest releases and Character rankings.

    Project Viltrumites Characters List

    Big Brain Character from the Project Viltrumites Roblox experience Electricity Guy Character from the Project Viltrumites Roblox experience Mark Character from the Project Viltrumites Roblox experience Starting Guy Character from the Project Viltrumites Roblox experience
    A Character that is drastically stronger than the rest, but comes at a price of having to buy the Early Access. Has powerful ranged and melee options, along with some very high damage. Not a strict upgrade on Mark, but still comes out on top because of the ranged abilities. Electricity Guy has very good damage, but most importantly, he has stun chains that can lock a player down until death. Mark is the definition of ‘Die, die, die.’ All his abilities are continual and brutal physical attacks that beat the opponent into the ground with increasing force. Best for new players. This is the default Character that everyone starts with. He has abilities similar to Mark, but he does not possess the same damage, and his attack chains are a lot shorter. I recommend switching to any of the other free characters immediately upon starting.
    + Damage
    + Range
    Stuns
    + Range
    + Stuns
    Damage
    + Damage
    + Stuns
    Range
    + Versatility
    Everything else

    If you are just starting Project Viltrumites, I would recommend going for Mark, as he is easy and does a lot of damage. When you are ready to take off your training shoes, try playing Electricity Guy. He is fun and can attack multiple people at once with his ranged abilities. Big Brain is a pay-to-win Character that is very strong. But he costs money for now, so I do not recommend that you buy him, as he will probably become free when the game releases.

    How to change Characters in Project Viltrumites

    To change your Character in Project Viltrumites, all you have to do is navigate to the top left side of your screen. You will find the Characters button right next to the Options and Chat buttons. It is pretty big, so once you know it’s there, you can’t miss it. Once you’re ready, select the Character you would like to play and enjoy!

    That is all for my Project Viltrumites Characters tier list. Check out our Ghoul://RE Kagune Tier List if you are a fan of this type of brawling-fighting game.


    The Escapist is supported by our audience. When you purchase through links on our site, we may earn a small affiliate commission. Learn more about our Affiliate Policy


    Source link

  • a beginner’s guide — The Treehouse

    a beginner’s guide — The Treehouse


    Attention roleplayers, experienced and aspiring! If you’re currently craving adventure but are unable to get together with a group, expert Treehouse Dungeon Master Henry is here to help, with some advice on how to get started with online roleplaying platform Roll20

    Are you currently at an exciting moment in a tabletop roleplaying game, but unable to meet up with your group anytime in the near future? Or maybe you’ve suddenly found yourself with a lot of spare time and have always been intrigued by the idea of doing some pen and paper roleplaying with friends? Well, luckily for you, a while back some nerds decided to go and invent the internet, which has been further built upon (presumably lots more nerds were involved) until we’re at the point where roleplaying is now something that you can do from the comfort of your own home, without the need to meet people IRL!

    In my roundabout way, I’m coming to the point that I’ve been exploring Roll20, an online resource for hosting or joining roleplaying sessions. If your newsfeed is anything like mine then recently you’ll been inundated with suggestions and lists of ways to take your roleplaying game online. There seem to be many options, and while I do advise doing some research to find which one best suits your needs, I am here to relate what Roll20 was like for a first-time user, and give some advice on things that may not seem obvious from the outset.


    Source link