Items are the most important aspect of power in Noobs Must Die. As waves of Noobs grow stronger and more relentless, players must rely on a different Items to hold their ground. Each Item offers unique strengths and, when combined thoughtfully, can create powerful synergies that turn the tide of battle. Understanding how these Items work together is key to surviving longer, so follow along with my Noobs Must Die Item Tier List and Guide to find the most effective way to destroy all the Noobs.
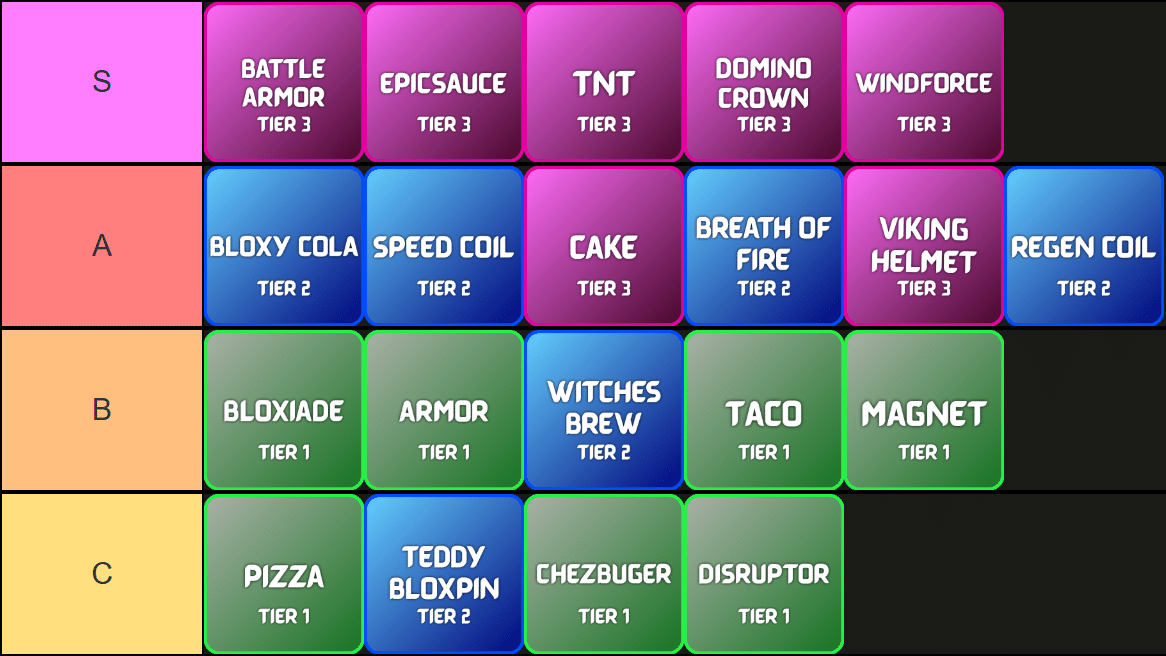
Noobs Must Die Item Tier List
Image via Tiermaker
None of the Items in Noobs Must Die are bad, but some are better than others. Each item has a synergy with another item, so even the Tier 1 Items have a use. Battle Armor is the best, as it allows you to become unkillable for a few seconds, letting you jump into groups of enemies and killing all of them without a risk of losing your run.
Noobs Must Die Item List
Below is a complete and detailed list of all Items in Noobs Must Die, listed by how good they are and accompanied by their best synergies with other Items:
Noobs Must Die item Synergy
Items in Noobs Must Die offer a creative and strategic system that rewards smart combinations and timing. Standout Items like Battle Armor and Windforce offer powerful defensive and offensive benefits, with the former granting invincibility and the latter summoning an orbiting sword for continuous damage. Pairing Windforce with Speed Coil or Bloxiade creates a fast, aggressive playstyle, while mixing Battle Armor with Regen Coil or Chezburger boosts survivability. Items like Domino Crown and Taco enhance critical and luck-based builds, and TNT can add unexpected explosive power when supported by Witches Brew or Breath of Fire.
How to get Items in Noobs Must Die
Go to the Shop, and then buy them for TIX.
To get new Items in Noobs Must Die, you simply need to head to the Items Items on the right side of the screen and purchase new Items. Once you purchase them for the specified number of TIX, the Item will be available in the Item Pool for your next attempt.
That is all for my Noobs Must Die Item Tier List and Guide. Check out our other Roblox Articles for more fun games and codes that can help you get freebies.
The Escapist is supported by our audience. When you purchase through links on our site, we may earn a small affiliate commission. Learn more about our Affiliate Policy
If you’ve seen others score some easy points using special moves that you haven’t seen before, then they are definitely using abilities. Compared to styles, abilities in Volleyball Legends aren’t necessarily stronger the rarer they are. Still, some stand out from the rest. So, here is a Volleyball Legends abilities tier list to help you choose the right one for you.
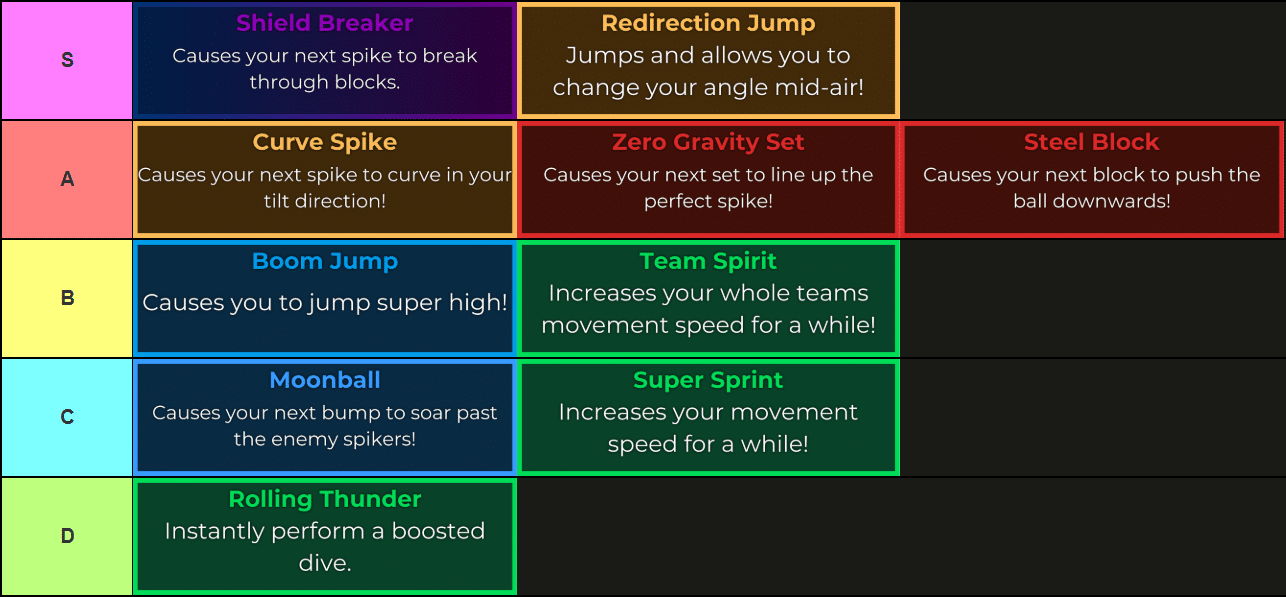
Volleyball Legends Abilities Tier List
All Volleyball Legends abilities ranked from best to worst — Image via TierMaker
We decided to rank abilities in the above tier list based on how useful they are in Volleyball Legends Pro servers. Playing on Pro servers assumes that your team will be more coordinated and ready to play off of each other. VolleyballLegends is all aboutteam play, and most abilities are designed with that in mind. However, skills like Redirection Jump, Super Sprint, and Steel Block can be even more useful when playing with random players.
Best Abilities for Spiking, Blocking, Setting, Serving, and Receiving
In contrast to the tier list, some abilities in Volleyball Legends are way more useful, depending onyour play style. With that in mind, below are a few abilities that pair up well with some styles from our Volleyball Legends styles tier list:
List of Abilities in Volleyball Legends
Abilities in Volleyball Legends last only for a few seconds. Generally, you will have to predict when to use them so that you don’t waste them. Here is a list of all abilities in Volleyball Legends sorted by their rarity tier, along with some tips for each of them:
S-Tier Abilities
Ability
Details
Rarity
• The Shield Breaker makes your next spike go through blocks. • Shield Breaker is the best ability for spikers, allowing you to score easy points.
Secret (0.01%)
• Redirection Jump makes you immediately jump, scaled by the stat of your style. • While in the air, you can spike the ball in any direction you are aiming at. • Without this ability, you can only spike the ball in the direction your character is facing.
Godly (0.5%)
A-Tier Abilities
Ability
Details
Rarity
• Curve Spike makes your next spike curve in the direction of your tilt (A/D on the keyboard while in the air). • How much the ball is curved depends on the power of your spike. With very powerful spikes, the ball barely curves a bit.
Godly (0.5%)
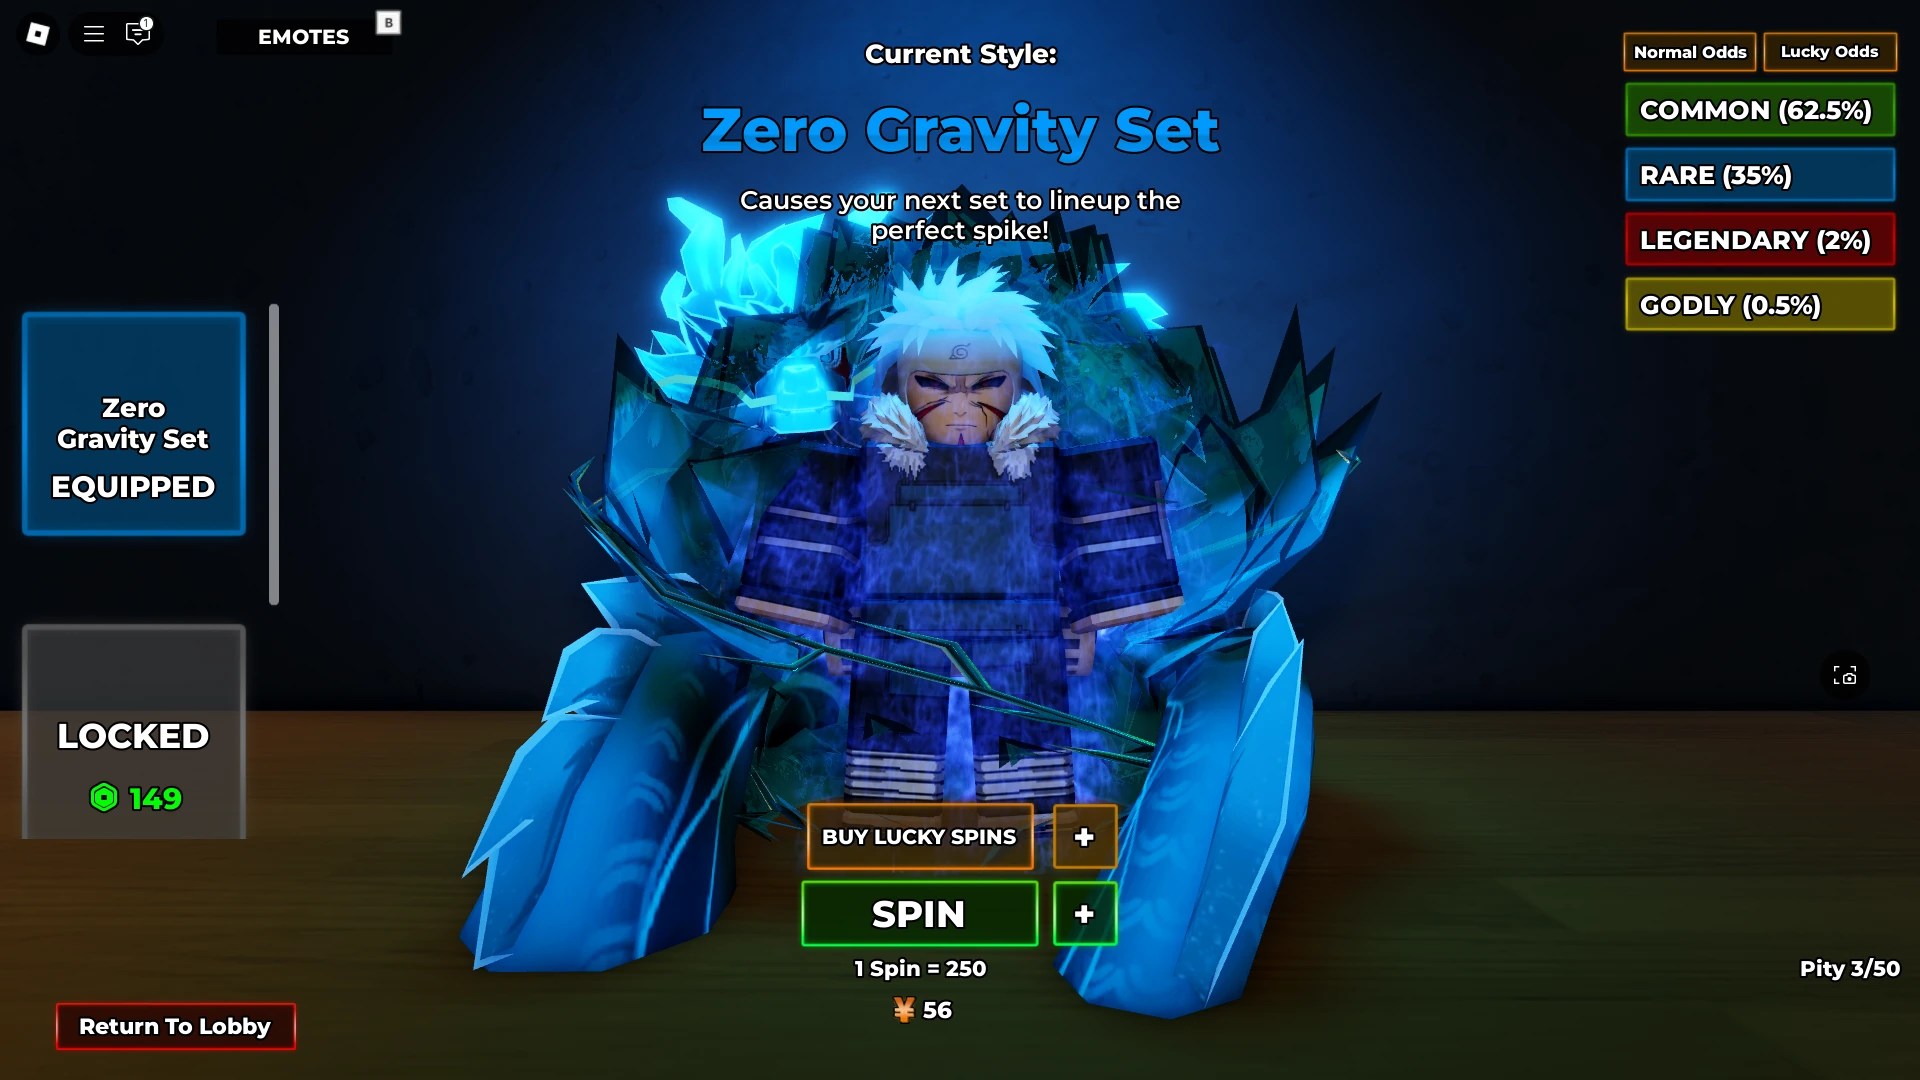
• Zero Gravity Set is the best ability for any setter out there. However, it only works while you are on the ground.
Legendary (2%)
• Steel Block speeds up and angles your next block. • It’s perfect for scoring easy points on the net. • Before you jump for a block, make sure to face and angle yourself to the side so that you bypass the players trying to block in front of you.
Legendary (2%)
B-Tier Abilities
Ability
Details
Rarity
• Boom Jump enhances your jumps. • It is most useful when serving and when trying to catch super-high sets from your teammates.
Rare (35%)
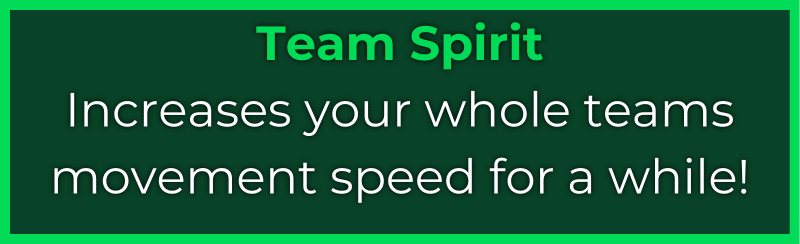
• Team Spirit lives up to its name as it increases the movement speed of all players on your team. • If you are a team player who likes to sit in the back and support your team, bring Team Spirit with you.
Common (62.5%)
C-Tier Abilities
Ability
Details
Rarity
• Moonball shoots the ball way up in the air and makes it fall quickly back to the ground. • It’s only useful when all opponents try to play on the net.
Rare (35%)
• Super Sprint greatly increases your movement speed. • It is a very versatile ability that is great for catching stray balls and repositioning before a block or a spike.
Common (62.5%)
D-Tier Abilities
Ability
Details
Rarity
• Rolling Thunder allows you to make a super dive and bump difficult-to-catch balls. • Very situational ability overall.
Common (62.5%)
How to Reroll Abilities in Volleyball Legends
Screenshot by Escapist
You can use either regular Spins, Lucky Spins, or Yen to reroll your ability in Volleyball Legends. With Lucky Spins, you can only get Rare, Legendary, and Godly abilities. Also, you can purchase a storage slot for Robux if you want to keep a good ability as a backup.
And that concludes our Volleyball Legends abilities tier list. If you want to get some free Lucky Spins and possibly get a Godly ability, then check out our Volleyball Legends codes.
What are the best Volleyball Legends abilities?
Currently, the best abilities are Shield Breaker, Redirection Jump, and Curve Spike.
How do you get more Lucky Spins?
You can get more Lucky Spins by redeeming codes and by buying them using Robux.
Is the new Shield Breaker ability good?
The new Shield Breaker ability is insanely good because it allows you to score easy points, even against tougher opponents.
The Escapist is supported by our audience. When you purchase through links on our site, we may earn a small affiliate commission. Learn more about our Affiliate Policy
In Dead Spells, Traits play a key role in shaping your character’s performance. These modifiers provide small boosts to base stats like health, damage, and speed. While all Traits offer some advantages, certain ones stand out as they deliver stronger enhancements. Understanding which Traits are most effective can give players a valuable edge in combat, so follow along with our Dead Spells Trait Tier List and Guide to find out which ones are the best for you.
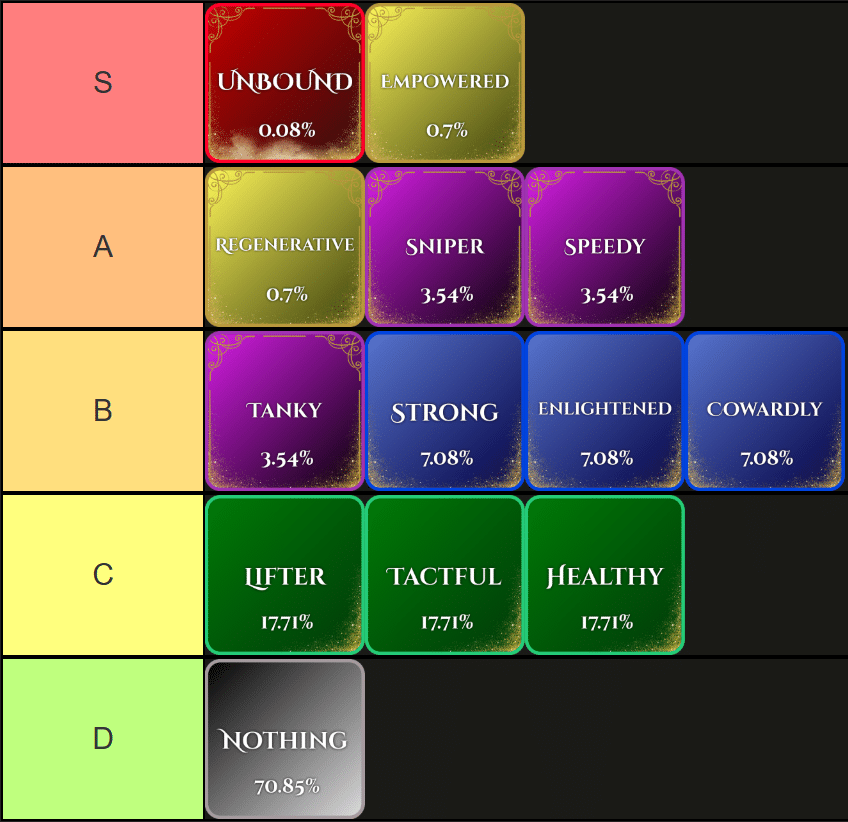
Dead Spells Trait Tier List
Image via Tiermaker
While Unbound is undoubtedly the strongest Trait in Dead Spells, it is also the hardest to get, making Empowered a clear choice when trying to roll. If you are just starting and you do not have many Burgers, you should look for a Rare Trait, such as Strong or Enlightened, as they can carry you early.
Dead Spells Trait List
Below is a complete and detailed list of all Traits in Dead Spells, ranked by usefulness:
The best Trait to go for if you are a beginner in Dead Spells is one that gives you damage. Lifter, Enlightened, or Sniper would be the easiest and best choices for any beginner. If you are not sure if you are gonna be able to fight multiple enemies at once and want a safer playstyle, getting Healthy or Tank is also viable at the start. Later on, you can roll for Legendary and Mythic upgrades for those rare and epic Traits.
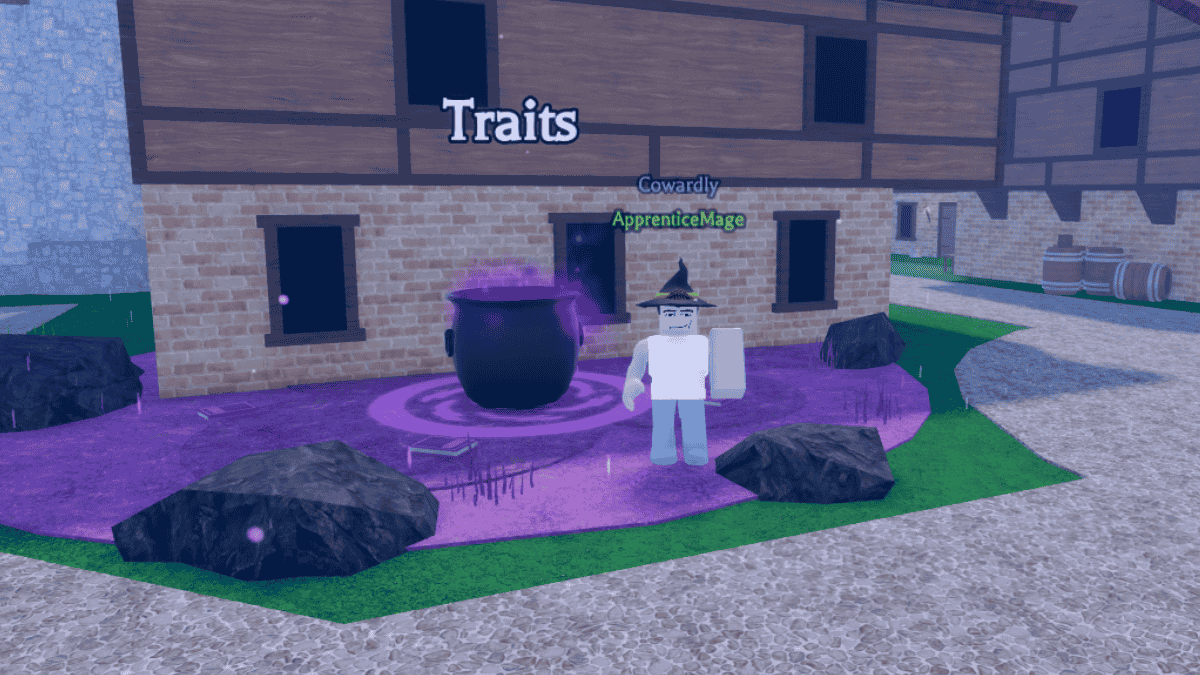
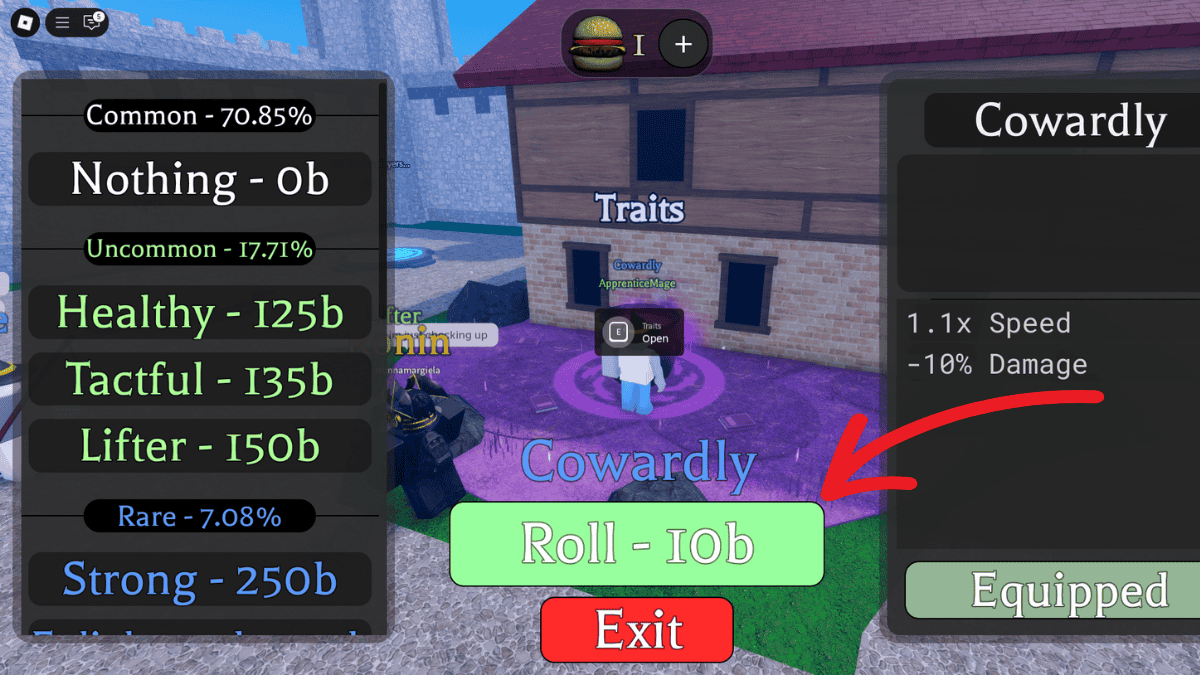
How to Reroll Traits in Dead Spells
You can’t miss it!As long as you have enough Burgers.
Rerolling Traits in Dead Spells is as easy as walking over to the Traits Cauldron and rolling. You can find it by going forward after you spawn and then turning right. Once you reach the cauldron on the right side, hold the Interact [E] button to enter the Trait Reroll screen. There, you can directly buy the Trait you want or roll a random Trait for 10 Burgers.
That is all for my Dead Spells Trait Tier List and Guide. Check out our Dead Spells Class Tier list and Guide to see which Class is the best for which Trait.
The Escapist is supported by our audience. When you purchase through links on our site, we may earn a small affiliate commission. Learn more about our Affiliate Policy
In the current update of Dead Rails, the developers introduced a liquid system that lets players mix different liquids to create Potions. You can then drink these Potions to gain various buffs and perks that will help you on your journey. In this guide, I’ll walk you through how to get all Potions in Dead Rails, where to find the ingredients, and what each potion does. Whether you’re looking for healing, fire damage, or full-on necromancy, this is your starting point.
All Potion Effects and Recipes in Dead Rails
Few, but very strong.
The table below lists all the potion recipes in Dead Rails, along with the ingredients you’ll need to make them. Crafting is simple: combine the right substances on the ground, then use an empty Glass Bottle to scoop up the mixture. Be quick, as they evaporate fast once exposed to the air.
Potion
Potion Recipes
Effect
Unicorn Blood + Blood
Angel Tears can heal all injuries almost immediately.
Unicorn Blood + Kerosene
Once ignited, it rapidly engulfs the entire area in flames. Best used by the Arsonist class.
Unicorn Blood + Water
It very quickly kills all enemies around you with green flames, while allied players remain unaffected.
Unicorn Blood + Milk
Corpses soaked in Primordial Soup will come back to life and fight on behalf of the player.
As we can see here, all Potions in Dead Rails require you to have Unicorn Blood. Once you have Unicorn Blood, you will have to combine it with different liquids to produce different Potions. We will explain in detail how to acquire all of these materials and liquids in the section below.
How to Make Potions in Dead Rails
There are four potions you can find in Dead Rails: Angel Tears, Devil Tears, Holy Water, and Primordial Soup. To make them, you’ll need to mix different ingredients and store the result in Glass Bottles, which you can collect while exploring.
Some key ingredients you’ll need are Water, Milk, Blood, Kerosene, Zombie Blood, and Unicorn Blood. Most of these can be found while scavenging, though Zombie Blood and Unicorn Blood must be collected from the bodies of the undead or unicorns. Here is a list of all ingredients:
Ingredient
How to Get
Water
Obtained in a bottle during Rainy Weather.
Milk
You can get it by searching houses in the Urban Town Areas or by choosing the Milkman Class at the start.
Blood
You can collect it by killing non-zombie NPCs and drawing their blood.
Kerosene
You can extract Kerosene by carefully draining it from a Molotov.
Zombie Blood
Obtained by killing any zombie and draining its blood.
Unicorn Blood
You can get it by either striking a liquid puddle with lightning or by collecting blood from a dead unicorn.
To collect liquids in Dead Rails during draining or other specific events, you’ll need a Glass Bottle. This new item lets you store liquids in the game. You can find Glass Bottles all over the map, either empty or already filled with something. Just pick them up and toss them in your sack, then use them whenever you need. Once you’ve got empty bottles, just head over to any liquid puddles like Unicorn Blood, Normal Blood, or Rain, and press the LMB to fill them up. When you want to pour the liquid out, simply press F to spill it onto the ground as puddles.
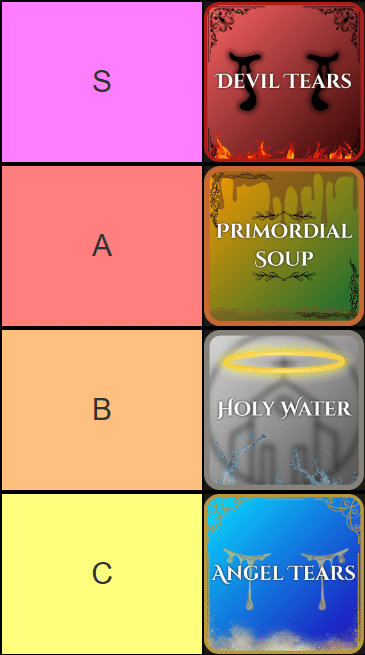
Dead Rails Potion Tier List
Below is a Tier List of all Potions in Dead Rails, ranked by usefulness and split into the best for solo runs and the best for group gameplay. It goes well with our DR class tier list.
Best with a Group
Best when Alone
Angel Tears are, sadly, just a big Heal. They do not offer much more than that, and you can already heal with bandages. Holy Water is good, but its effect is just a worse Devil Tears, so it is near the bottom. The Primordial Soup is amazing for dealing with hordes of mutated and non-regular zombies, alone or with a group. And lastly, the Devil Tears are amazing for destroying large groups of zombies fast, and the Potion itself is not hard to craft.
And that is all for my Dead Rails Potions Guide. Check out our Dead Rails Codes for goodies that can help you get potions faster.Lastly, check out our challenge guide for DR.
The Escapist is supported by our audience. When you purchase through links on our site, we may earn a small affiliate commission. Learn more about our Affiliate Policy
To beat Roblox School Time Chapter 1 you’ll need to know all the mechanics for each level as well as the best items and kits to use. I’m also going to walk you through each level and the best strategies for all of them. Here’s my complete School Time walkthrough guide, item guide, and kit tier list.
School Time Beginner’s Guide
To beat Roblox School Time you’ll have to go through a series of levels collecting different items in each one and bringing them to the art room to progress. The teacher Mrs. Klock and the principal Mr. Jenkins (starting level 2) will chase you and instantly knock you down on contact. Other players can revive you and then you have to heal with consumable items you find. Let’s start with some basic tips and tricks:
Disable Mrs. Klock and Mr. Jenkins: You can find and buy items to disable the teacher and principle like the bear trap snare that will stun them on contact or the paper ball you can throw to stun them by clicking on them with it equipped. Check out the full list of items below.
Coins & Gems: You’ll find coins each level that you can spend at the end of the level to buy items for the next day. Also, there are Gems to pick up which are used in the Lobby to unlock kits which are item presets that refresh each run and they also give you permanent movement speed and health boosts. Check out the best kits below.
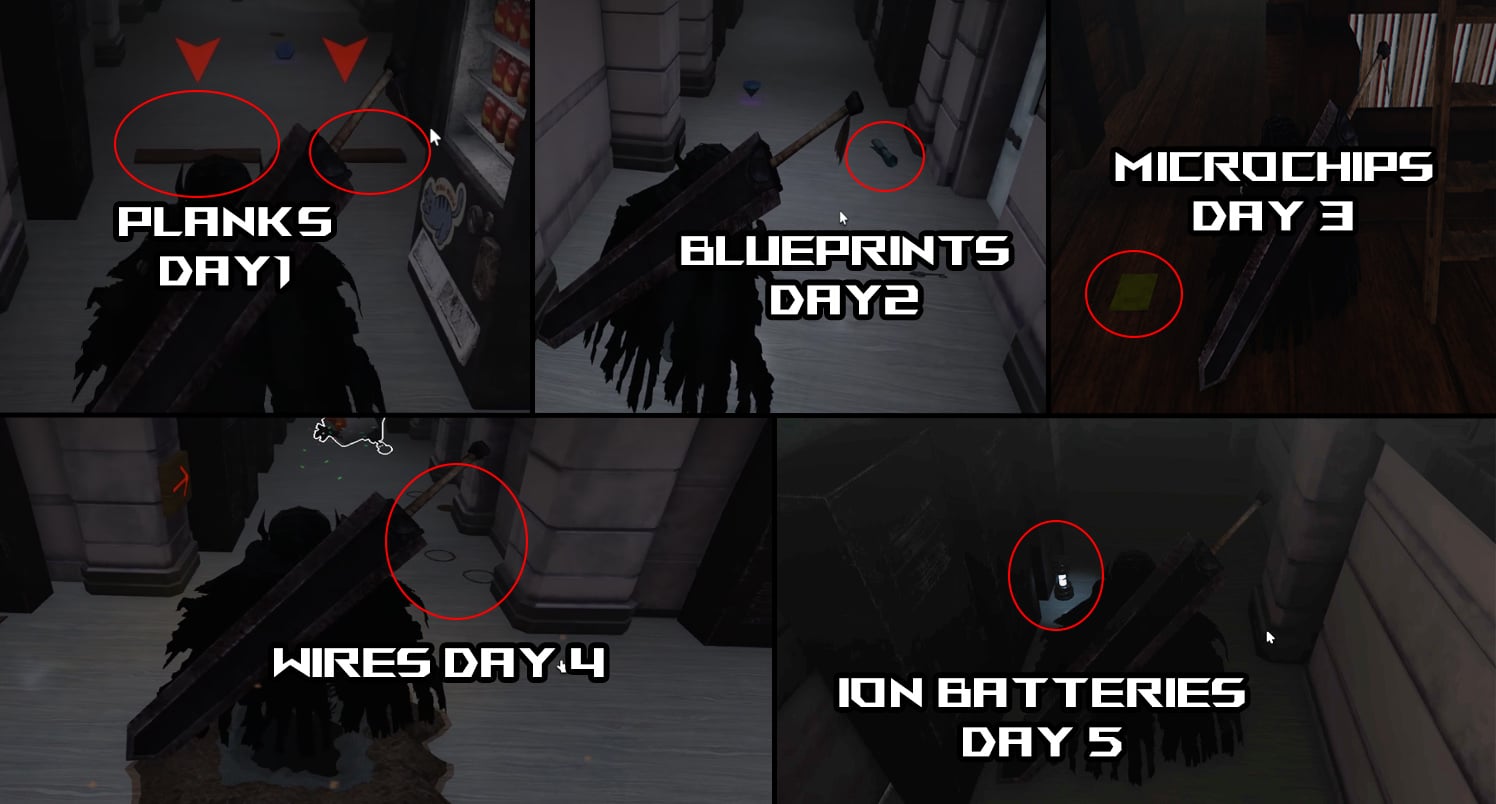
Progression Items: In the first level you’ll need to pick up a certain number of planks and bring them to the art room to go to Day 2. This repeats for different items each day with Blueprints on Day 2 and so on. These items are randomly placed around the school and they even spawn during the level so keep looking. They’re hidden in various rooms on the floor and on the tables in classrooms but not in lockers which you need a key to open.
Red Arrows: Whenever you need to reach the art room go into any hallway and find the red arrows and then follow them. They’ll lead you to the art room which is helpful until you learn the level layout yourself.
Spread Out and Watch the Floor and Tables: The best strategy is to spread out into the cafeteria, gym field, and temple as well as the class rooms. Each day the level is the same so learn the layout and pay attention to the tables since the items can be on tables as well as the floor.
Certain Item Effects Persist: You can dig holes with Shovels to teleport around the level or place snares and these items persist throughout all levels so feel free to place them in earlier days so you can use them later as well. I recommend digging a Shovel hole near the art room so you can quickly come back to it.
Reviving Players: You can see a player who is downed through the walls so quickly rush to revive them before they run out of HP or else they’ll be eliminated and kicked from the game. You can drop healing items like Bandages and Medkits with Backspace to allow them to heal.
Max 10 Items: You can only carry 10 items at a time so use Bandages and drop Traps to free up space for better items.
All Items Guide in School Time
Image by The Escapist
You can find all of these items on the ground during each day in School Time or you can buy them at the end of a day. Below you’ll find a list of them all and a brief guide for each one on how best to use it or should you buy it.
All Days Walkthrough in School Time
Image by the Escapist
When it comes to Roblox horror games School Time is pretty simple since there are no puzzles. You just collect all items each day, bring them to the art room, and avoid getting downed by the teacher and principal. That said, there’s a special mechanic each day so let me give you some tips for all of them:
Day 1 Tips: This day is really easy once you get a Trap, Soda, or Ball to escape when the teacher starts chasing you. Look for planks and bring them back to the art room, the red arrows will guide you. The most important part of Day 1 and any day for that matter is to always go to downed players to revive them. The more players pass the easier the later days will be. At the end of Day 1 and all days after you’ll get a shopping phase where you can buy the items we mentioned above. Make sure to stock up.
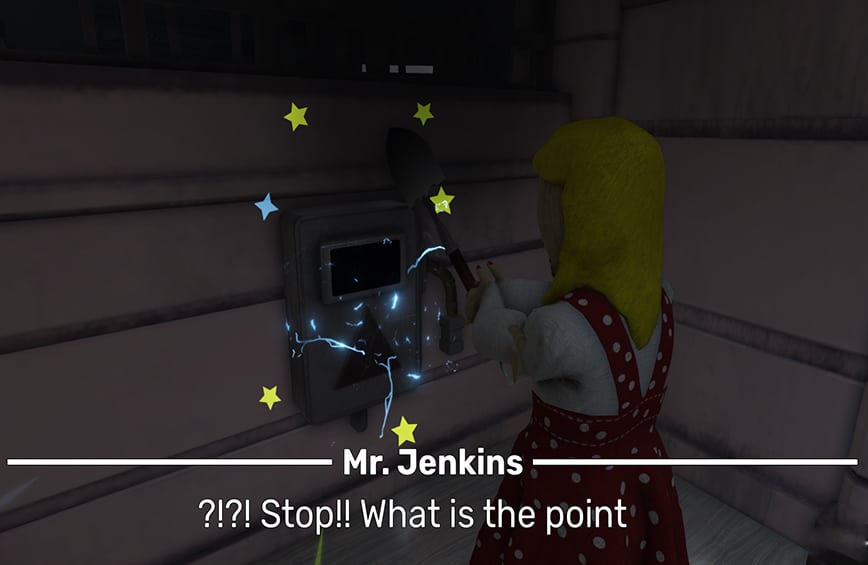
Day 2 Tips: This where Principal Jenkins shows up so you’re basically twice as likely to get chased. Just make good use of retreating, hiding, and using the escape/stun items and you’ll be fine. Always have at least one escape/stun item on you. If you don’t, don’t risk going into open spaces without cover.
Day 3 Tips: This is where both the teacher and principal can drink Soda for a speed boost. It’s more crucial than before to keep to the at least one escape/stun item strategy since they’ll catch you fast if you don’t have an escape plan.
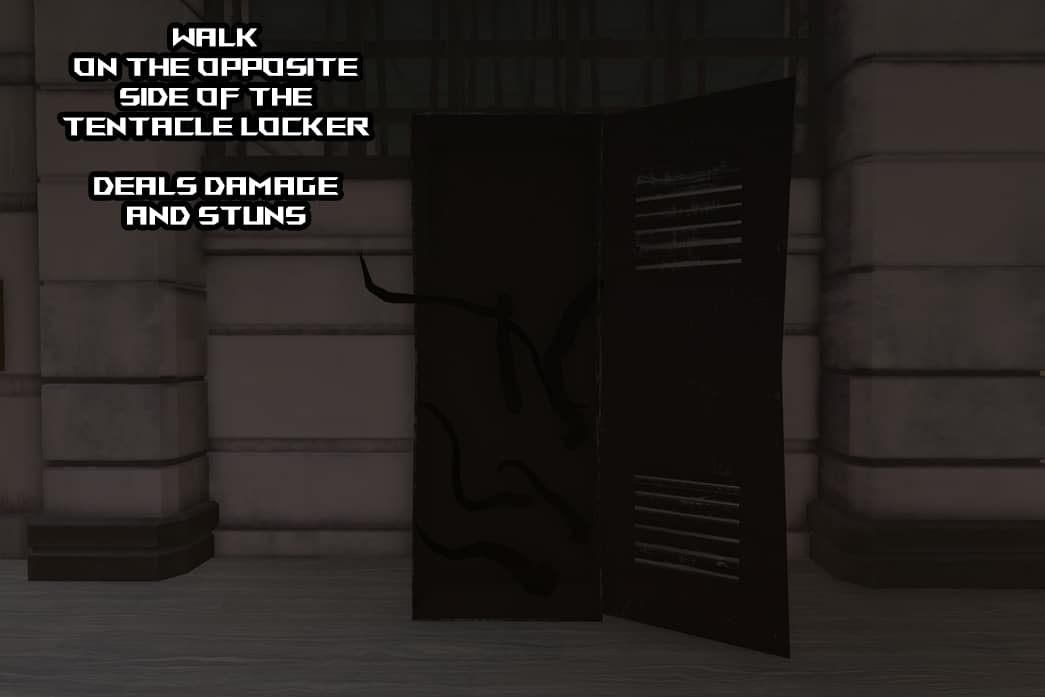
Day 4 Tips: This is where certain lockers will have tentacles coming out of them that will damage and stun you on contact. You can still pass them by just make sure to walk on the furthest opposite side of the tentacle locker in a hallway. Otherwise, strategy from days before apply. Make sure to buy the Lantern at the end of Day 4 for Day 5.
Image by The Escapist
Day 5 Tips: This is the last day where lights go out. Make sure you have a Lantern from one of the shopping phases before. Otherwise, strategies from Day 4 and before apply and nothing else changes.
Image by The Escapist
Once you beat Day 5 you’ve beaten School Time Chapter 1. Congratulations! Now we wait for Chapter 2.
School Time Kits Tier List
Image by The Escapist
You can buy all items from all kits eventually during the game so the best kits in School Time are the ones are that give you permanent bonuses or lots of coins. The permanent bonuses are useful for all days whereas the one-time items are a short term boost. Movement speed is much better than health as a stat boost so you’ll notice kits with it are ranked higher. Health isn’t that valuable since the teacher and principle one shot you anyway. Also, kits with coins are also powerful since you can establish a Shovel hole system earlier or be flexible in what you buy depending on how the game is going. You can check what all kits do in the lobby.
That’s it for my complete School Time walkthrough guide with an item guide and kit tier list. Check out our Roblox guides page for more walkthroughs like our PETAPETA and 7 Days to Live guides.
The Escapist is supported by our audience. When you purchase through links on our site, we may earn a small affiliate commission. Learn more about our Affiliate Policy
Updated: We last updated the Dead Spells tier list on May 21, 2025.
Classes in Dead Spells offer unique bonuses that can completely shift your playstyle once you get them. However, with so many classes available, it can be hard to figure out which ones are worth buying and rolling for. To help you spend your Burgers wisely, we prepared the following Dead Spells tier list.
Dead Spells Tier List
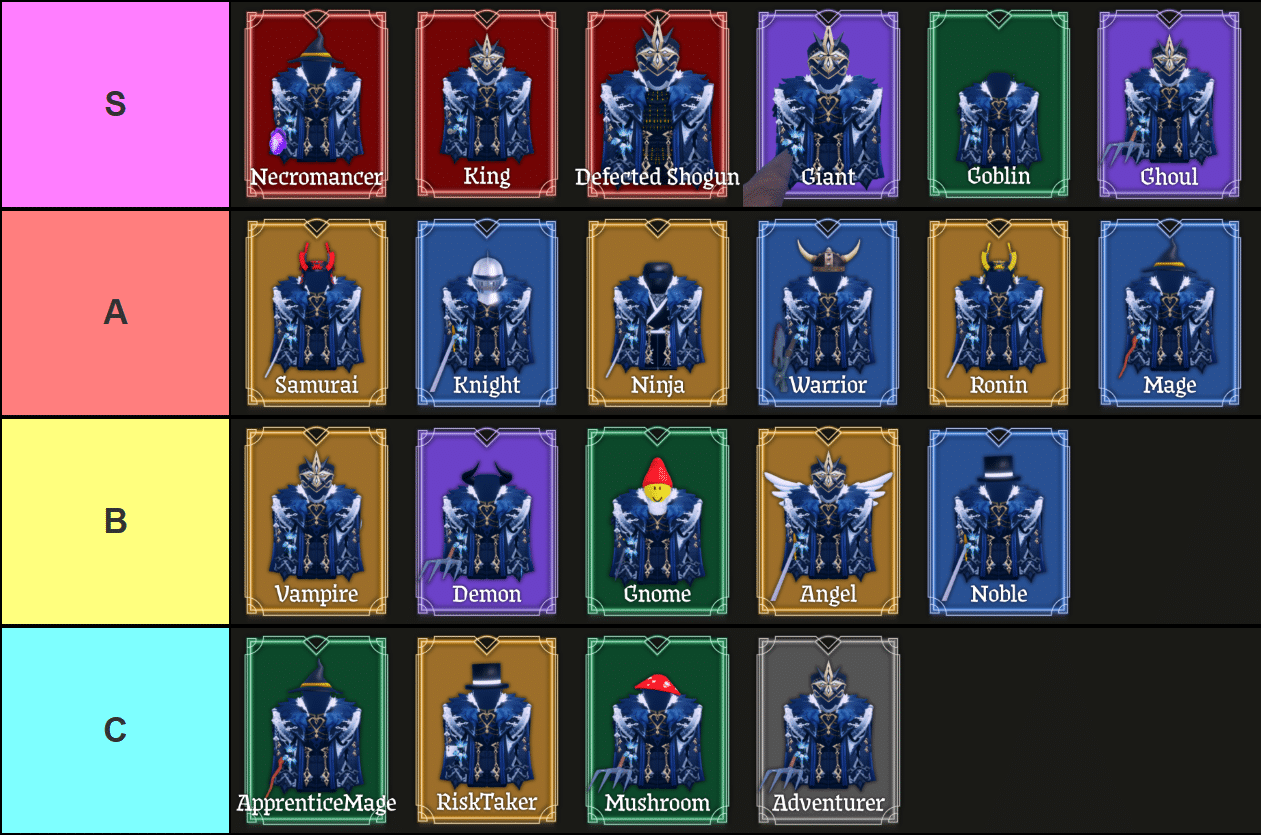
All classes in Dead Spells ranked from best to worst — Image via TierMaker.
In our Dead Spells tier list, we ranked all classes based on how good they are both for beginners and more experienced players. The rarest classes, Necromancer, King, and Defected Shogun, are without a doubt the best classes currently available. However, when you look at all other classes, there are hidden gems in every rarity tier. For example, Goblin is a fantastic class, even though it is one of the cheapest classes you can get in Dead Spells.
When ranking each class, we considered the following factors:
Passive abilities
HP, Damage, Regen, and Speed bonuses
Starting items
Viability in later parts of Raids
Survivability
Dead Spells Class List
Below, you can find a list of all classes in Dead Spells, sorted according to their positions on our tier list. We included some pros and cons of each class to give you more context behind their ranking.
S-Tier Classes
A-Tier Classes
B-Tier Classes
C-Tier Classes
Class
Passives
Starting Items
Pros & Cons
Price
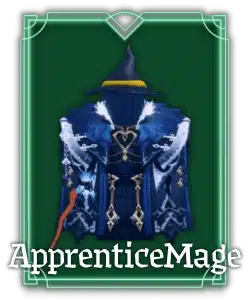
ApprenticeMage
• Increased mana regeneration
CrudeWand ManaPotion x2 WizardHat
+ Very good starting gear − Not that good overall
100🍔
RiskTaker
• None
Dice PitchFork TopHat
+ Can get random items from the Dice + Decent starting gear − No passive abilities − Loot from the Dice is very random
2,000🍔
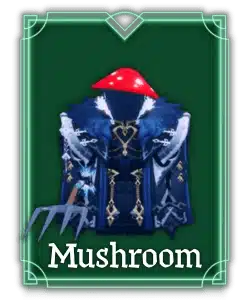
Mushroom
+300% Regen +50% HP –65% Damage
PitchFork
+ Insane regen and HP buffs + Amazing survivability − Equally insane damage debuff − Negative DPS 💀
150🍔
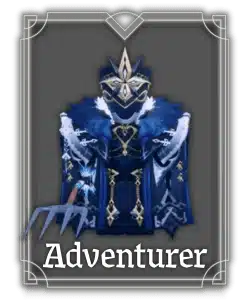
Adventurer
• None
PitchFork
− You will never use it
0🍔
How to Reroll and Unlock Classes in Dead Spells
You can instantly unlock a specific class without relying on luck by buying it using Burgers.
There are two ways to change your class in Dead Spells: rerolling and buying classes. Rerolling your class costs 10 Burgers, and every 10 rolls, you are guaranteed to get an Uncommon or better class. Every time you reroll your class, you will have to confirm whether you want to keep your old class or the one you just rolled.
Now, you can also just buy a class you want by using the “Buy” button on the right after you select a specific class. This option is convenient because you don’t have to rely on luck to get the class you want. For example, the chance of getting a specific Mythical class is 1 in 1,250 rolls. So, you need ~12,500 Burgers to get it when rerolling, while buying it outright costs you 7,500 Burgers.
That is it for our Dead Spells tier list. Feel free to share your opinion on the best class in Dead Spells in the comments below. If you want to get some free Burgers and buy yourself a top-tier class right away, then make sure to check out our Dead Spells codes.
Dead Spells Tier List FAQs
What are the best classes in Dead Spells?
Currently, the best classes in Dead Spells are Necromancer, King, Defected Shogun, Giant, Goblin, and Ghoul.
What classes have the best starting gear?
Classes with the best starting gear are Defected Shogun, Necromancer, Samurai, Warrior, and Noble.
How do you farm more Burgers in Dead Spells?
You can farm Burgers in Dead Spells by completing raids and redeeming codes.
The Escapist is supported by our audience. When you purchase through links on our site, we may earn a small affiliate commission. Learn more about our Affiliate Policy
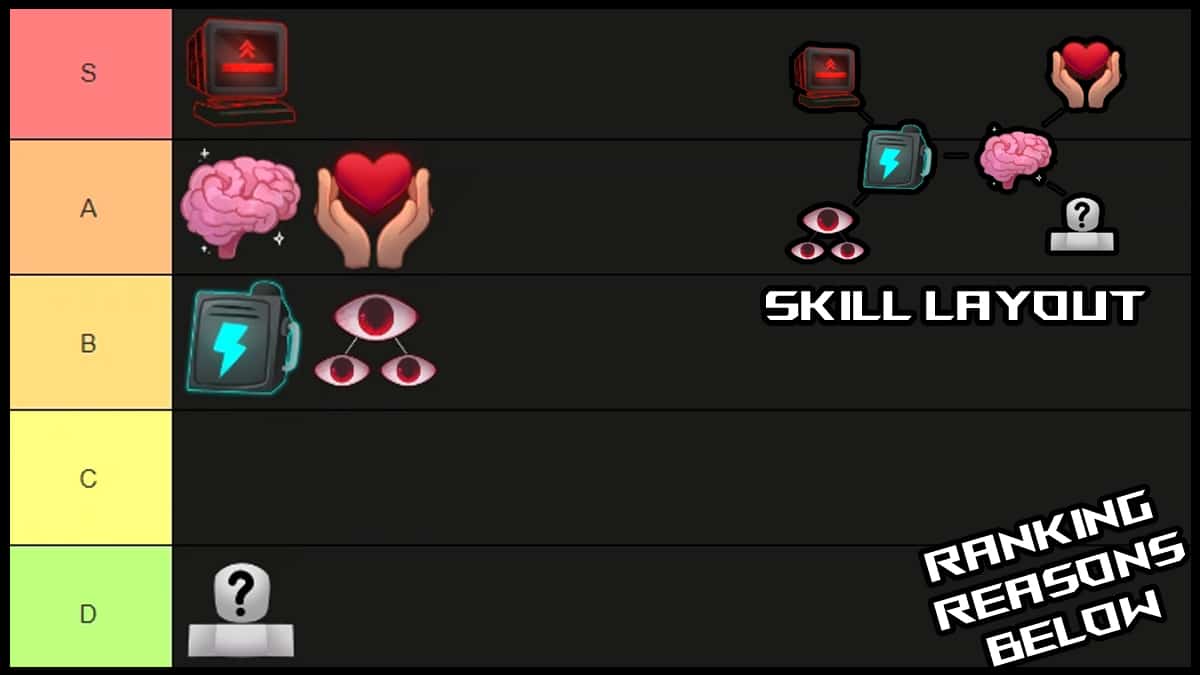
There are two main customization features to rank and these are Roblox Five Nights Hunted skills and abilities. Skills are for survivors and enchants/abilities are for killers so I’m going to take you through them all and arrange them from best to worst. Here’s our Five Nights Hunted skill and ability/enchant tier list.
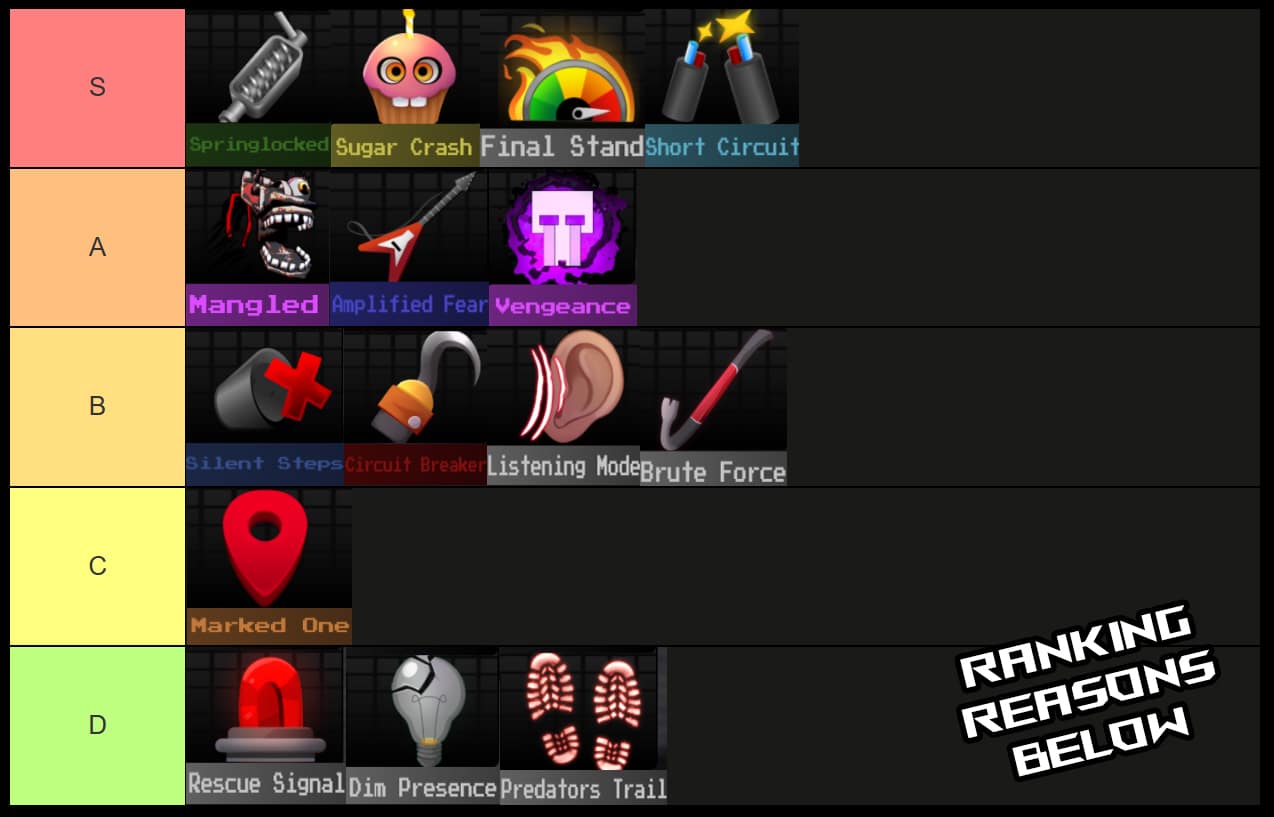
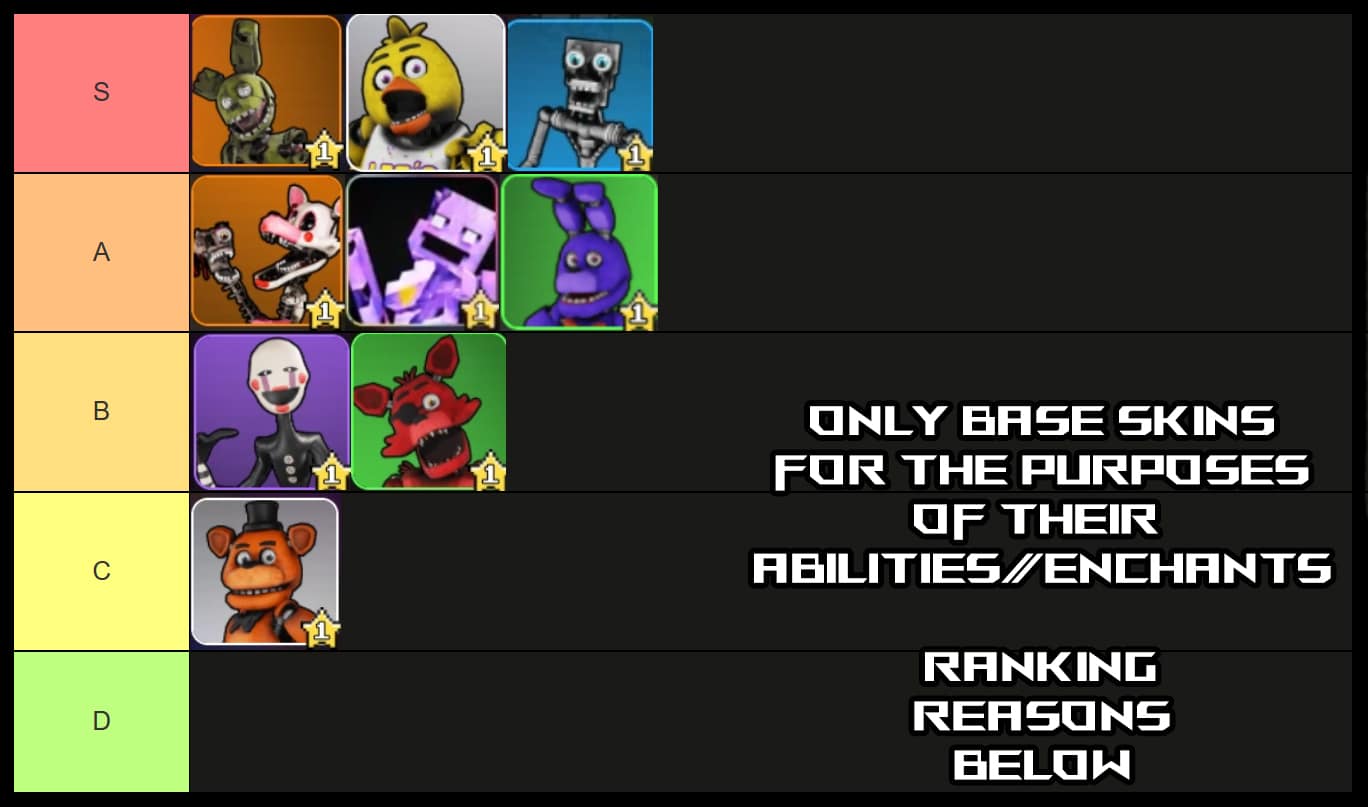
Five Nights Hunted Ability/Enchant Tier List
Image by The Escapist
The best abilities or enchants in Five Nights Hunted are in S-Tier. That said, since the enchant/ability system is tied to a specific killer, I would look at A and B-Tiers as well depending on the killer you like to play. I wouldn’t use C and D options because they’re simply underpowered. Below you’ll find ranking reasons for each ability/enchant in detail and who they belong to.
S-Tier Abilities/Enchants
Ability/Enchant
Ranking Reason
Effect
Springlocked (0.49%) Lvl 50+ Springtraps Only
This is the best ability in Five Nights Hunted but you have to have the Springtrap skin and be Level 50 with him. It essentially saves you having to two-hit on a survivor and it’s on an incredibly low cooldown.
Your attack instantly knocks down a survivor. 20 second cooldown.
Sugar Crash(0.49%) Lvl 50+ Chicas Only
This is tied for the best ability in the game with Springlocked because it’s a ranged AOE ability that can hit multiple survivors. Incredibly strong due to the slowing effect and saving you an additional hit every once in a while depending on survivor HP. Best of all it’s homing.
Throw a homing projectile at a nearby survivor to damage and slow them and nearby survivors as well.
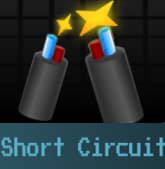
Short Circuit(0.49%) Lvl 50+ Endo 01 and 02 Only
While it’s a drastically longer cooldown than Springlocked this shuts down survivor progression instantly. It’s incredibly strong to slow the game down for survivors and the best part is that it has great range. Much better than Circuit Breaker.
Reset the progress of the nearest terminal. 90 second cooldown.
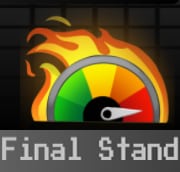
Final Stand(0.98%)
This ability is only S-Tier with the Tier 3 version. This is the best common ability in the game and overall it’s amazing for clutching a round as a killer. You need to learn a map’s Escape doors for this to work and once you do you can sprint incredibly fast and catch any remaining survivors.
When all terminals are done gain a: • Tier 1: 10% sprint speed boost. • Tier 2: 20% sprint speed boost. • Tier 3: 30% sprint speed boost.
A-Tier Abilities/Enchants
Ability/Enchant
Ranking Reason
Effect
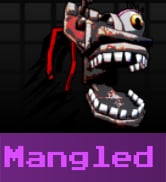
Mangled(0.49%) Lvl 50+ Mangles Only
This would be the best ability in Five Nights Hunted if players weren’t able to dodge it. Skilled players will know how to dodge but you can still farm a lot of levels on early to mid-skill players by instantly grabbing them and capturing them.
Grab the nearest survivor within 50 studs. 30 second cooldown.
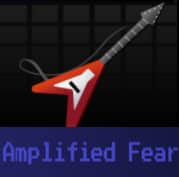
Amplified Fear (0.49%) Lvl 50+ Bonnies Only
This is a weaker version of Sugar Crash because it’s a melee skill around you but it’s still incredible. You just have to approach the survivors and then you can catch them without sprinting.
Fire a shockwave around you that slows nearby survivors.
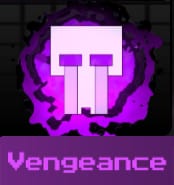
Vengeance(0.49%) Lvl 50+ Purple Guys Only
This is an amazing ability to down multiple survivors at the same time if they don’t heal right away or don’t escape. Just be careful if you’re going for multiple downed survivors that your first one doesn’t get up an leave.
Passive that deals AOE damage around a survivor you down within 35 studs.
B-Tier Abilities/Enchants
Ability/Enchant
Ranking Reason
Effect
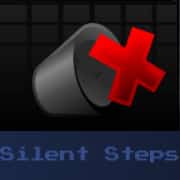
Silent Steps(0.49%) Lvl 50+ Marionettes Only
A decent option if you want to play Marionette that allows you to be more stealthy. Works best when combined with an unlocked camera to peak around corners.
Silence your footsteps and remove survivor camera shake when you’re nearby for: • Tier 1: 5 seconds. • Tier 2: 9 seconds. • Tier 3: 13 seconds. 30 second cooldown.
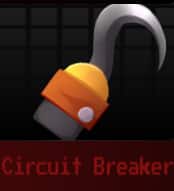
Circuit Breaker(0.49%) Lvl 50+ Foxies Only
The worse version of Short Circuit above but still an okay option if you like playing with the Foxy skin.
You can strike terminals and temporarily disable them.
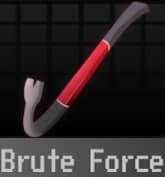
Brute Force (4%)
Not a flashy ability/enchant but still a decent one if you don’t have anything better. Works the best against more experienced players who play around doors a lot.
Quite useful for beginner killers to find survivors more quickly. You just have to stand still to activate this. Note that both you and the survivor are notified when revealed so they’ll know you’re coming.
Stand still to activate a pulse that reveals and highlights nearby survivors doing terminals: • Tier 1: Highlight lasts 1 second. • Tier 2: Highlight lasts 2 second. • Tier 3: Highlight lasts 3 second.
C-Tier Abilities/Enchants
Ability/Enchant
Ranking Reason
Effect
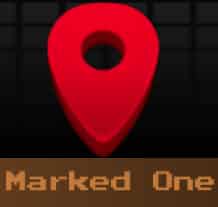
Marked One(0.49%) Lvl 50+ Freddies Only
Very situational since experienced survivors will usually spread out.
When you strike a survivor, nearby survivors are also highlighted and revealed for a short duration.
D-Tier Abilities/Enchants
Ability/Enchant
Ranking Reason
Effect
Rescue Signal (10%)
This is one of the worst/useless abilities/enchants in Five Nights Hunted because you can just check the survivor list and it’ll say if a survivor is captured/released. In time you’ll get good at tracking capture point locations so you’ll know where rescued survivors are.
Reveals ball pit location when a survivor is rescued. • Tier 1: Highlight lasts 1 second. • Tier 2: Highlight lasts 2 second. • Tier 3: Highlight lasts 3 second.
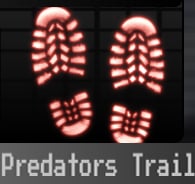
Predators Trail(30%)
Not the best enchant/ability since you’ll most likely see where the survivor is going anyway. Only useful in tight corridors and the maze level if you’re attacking multiple survivors but even then it’s lackluster.
Striking a survivor highlights and reveals their footsteps: • Tier 1: Highlight lasts 1 second. • Tier 2: Highlight lasts 2 second. • Tier 3: Highlight lasts 3 second.
Dim Presence(50%)
The idea behind this enchant/ability is great but the glow reduction is so minor even at Tier 3 that it isn’t really useful at all.
Reduces your glow making it harder for survivors to spot you: • Tier 1: 10% glow reduction. • Tier 2: 20% glow reduction. • Tier 3: 30% glow reduction..
Five Nights Hunted Skill Tier List
Image by The Escapist
Second up, here are the best skills in Five Nights Hunted for survivors. Only one skill is useless and that one is in D-Tier but the rest are all useful with some being more powerful the better you are at the game. That said, you’re stuck at starting with Guiding Light and Adrenaline on start so you’ll need to grind a bit for the others. I highly recommend going left for Guiding Light and then Lone Survivor. That said, let’s analyze each skill separately and talk about its ranking reason. Note that Tiers from the same skill don’t stack, you just get the highest one.
S-Tier FNH Skills
Skill
Ranking Reason
Cost & Effects
Lone Survivor (Top Left)
This is the best survivor skill in Five Nights Hunted because it all comes down to finishing terminals and escaping on time. In public games you’ll always have teammates who get captured early and get eliminated or leave. Sometimes you can’t even rescue them in the later stages of the game and they get eliminated. This also works when players leave providing you with a massive boost to decoding speed. I would rush to this in the top left after Guiding Light.
• Tier 1 (10 Skill Points): Terminal decoding speed increases by 20% with each eliminated survivor. • Tier 2 (15 Skill Points): Terminal decoding speed increases by 50% with each eliminated survivor. • Tier 3 (20 Skill Points): Terminal decoding speed increases by 80% with each eliminated survivor.
A-Tier FNH Skills
Skill
Ranking Reason
Cost & Effects
Adrenaline Boost (Middle Right)
This is always a powerful skill for survivors to pull of clutch rescues and get away. Especially if the killer has the Rescue Signal enchant. You can drop in, rescue, and retreat to fix a terminal or save another teammate. The killer will hate you.
• Tier 1 (5 Skill Points): Gain a 3-second speed boost after a successful rescue. • Tier 2 (15 Skill Points): Gain a 5-second speed boost after a successful rescue. • Tier 3 (20 Skill Points): Gain a 7-second speed boost after a successful rescue.
Healing Hands (Top Right)
This is an amazing skill that will slow down the rate at which survivors drop. You just need to retreat somewhere safe to heal your teammate but the speed will be drastically increased at Tier 3 so rush to Tier 3 if you’re using this.
This is an A or S-Tier skill for beginners who don’t know where terminals are on each map. Max it to Tier 2 and leave it there as a beginner since Tier 3 isn’t cost-effective so you should just save your skill points and go to Lone Survivor once you learn terminal locations on each map. Once you know the locations, this becomes a useless Skill.
• Tier 1 (5 Skill Points): The last 2 terminals are highlighted in blue across the map. • Tier 2 (15 Skill Points): The last 3 terminals are highlighted in blue across the map. • Tier 3 (20 Skill Points): Each time a terminal is finished, all other available terminals are temporarily highlighted.
Third Eye (Bottom Left)
This is an incredibly powerful skill but only in the late-game and for escaping. It’s not as widely useful for the entire game which is why it’s in B-Tier. Still, being able to see the killer through walls at the end is incredibly useful but I would probably still go for Lone Survivor because it’s more flexible.
• Tier 1 (10 Skill Points): When all terminals are finished, reveals killer for 5 seconds. • Tier 2 (15 Skill Points): When all terminals are finished, reveals killer for 10 seconds. • Tier 3 (20 Skill Points): When all terminals are finished, reveals killer for 15 seconds.
D-Tier FNH Skills
Skill
Ranking Reason
Cost & Effects
Hidden Charge (Bottom Right)
This is an ultra beginner skill that I would never go for because you’ll get good at skill checks after like 1 game and this will become useless.
• Tier 1 (10 Skill Points): Failing a skill check doesn’t alert the killer once. 1 Use. • Tier 2 (15 Skill Points): Failing a skill check doesn’t alert the killer. 2 Uses. • Tier 3 (20 Skill Points): Failing a skill check doesn’t alert the killer. 3 Uses.
Five Nights Hunted Killer Tier List
Image by The Escapist
Lastly, let’s rank the best Killers/Skins in Five Nights Hunted taking into account the skin group for the purpose of the ability/enchant they get. This means that I’m just considering what ability each skin group gets, not the visual/aesthetic quality of each skin. For example, for the purposes of this tier list Freddies are Bling Freddy, Soul Freddy, etc., Endoes are Endo 01 and Endo 02, Chicas is Toy Chica, Soul Chica, etc. Here are all base killers ranked according to their ability/enchant which you can read more about above to see why they’re ranked the way they are here.
Tiers
Killers & Abilities/Enchants (Check out each ability/enchant above)
That’s it for my complete Five Nights Hunted tier list and guide for skills, abilities, and killers. For free goodies in the game check out our Five Nights Hunted codes.
The Escapist is supported by our audience. When you purchase through links on our site, we may earn a small affiliate commission. Learn more about our Affiliate Policy
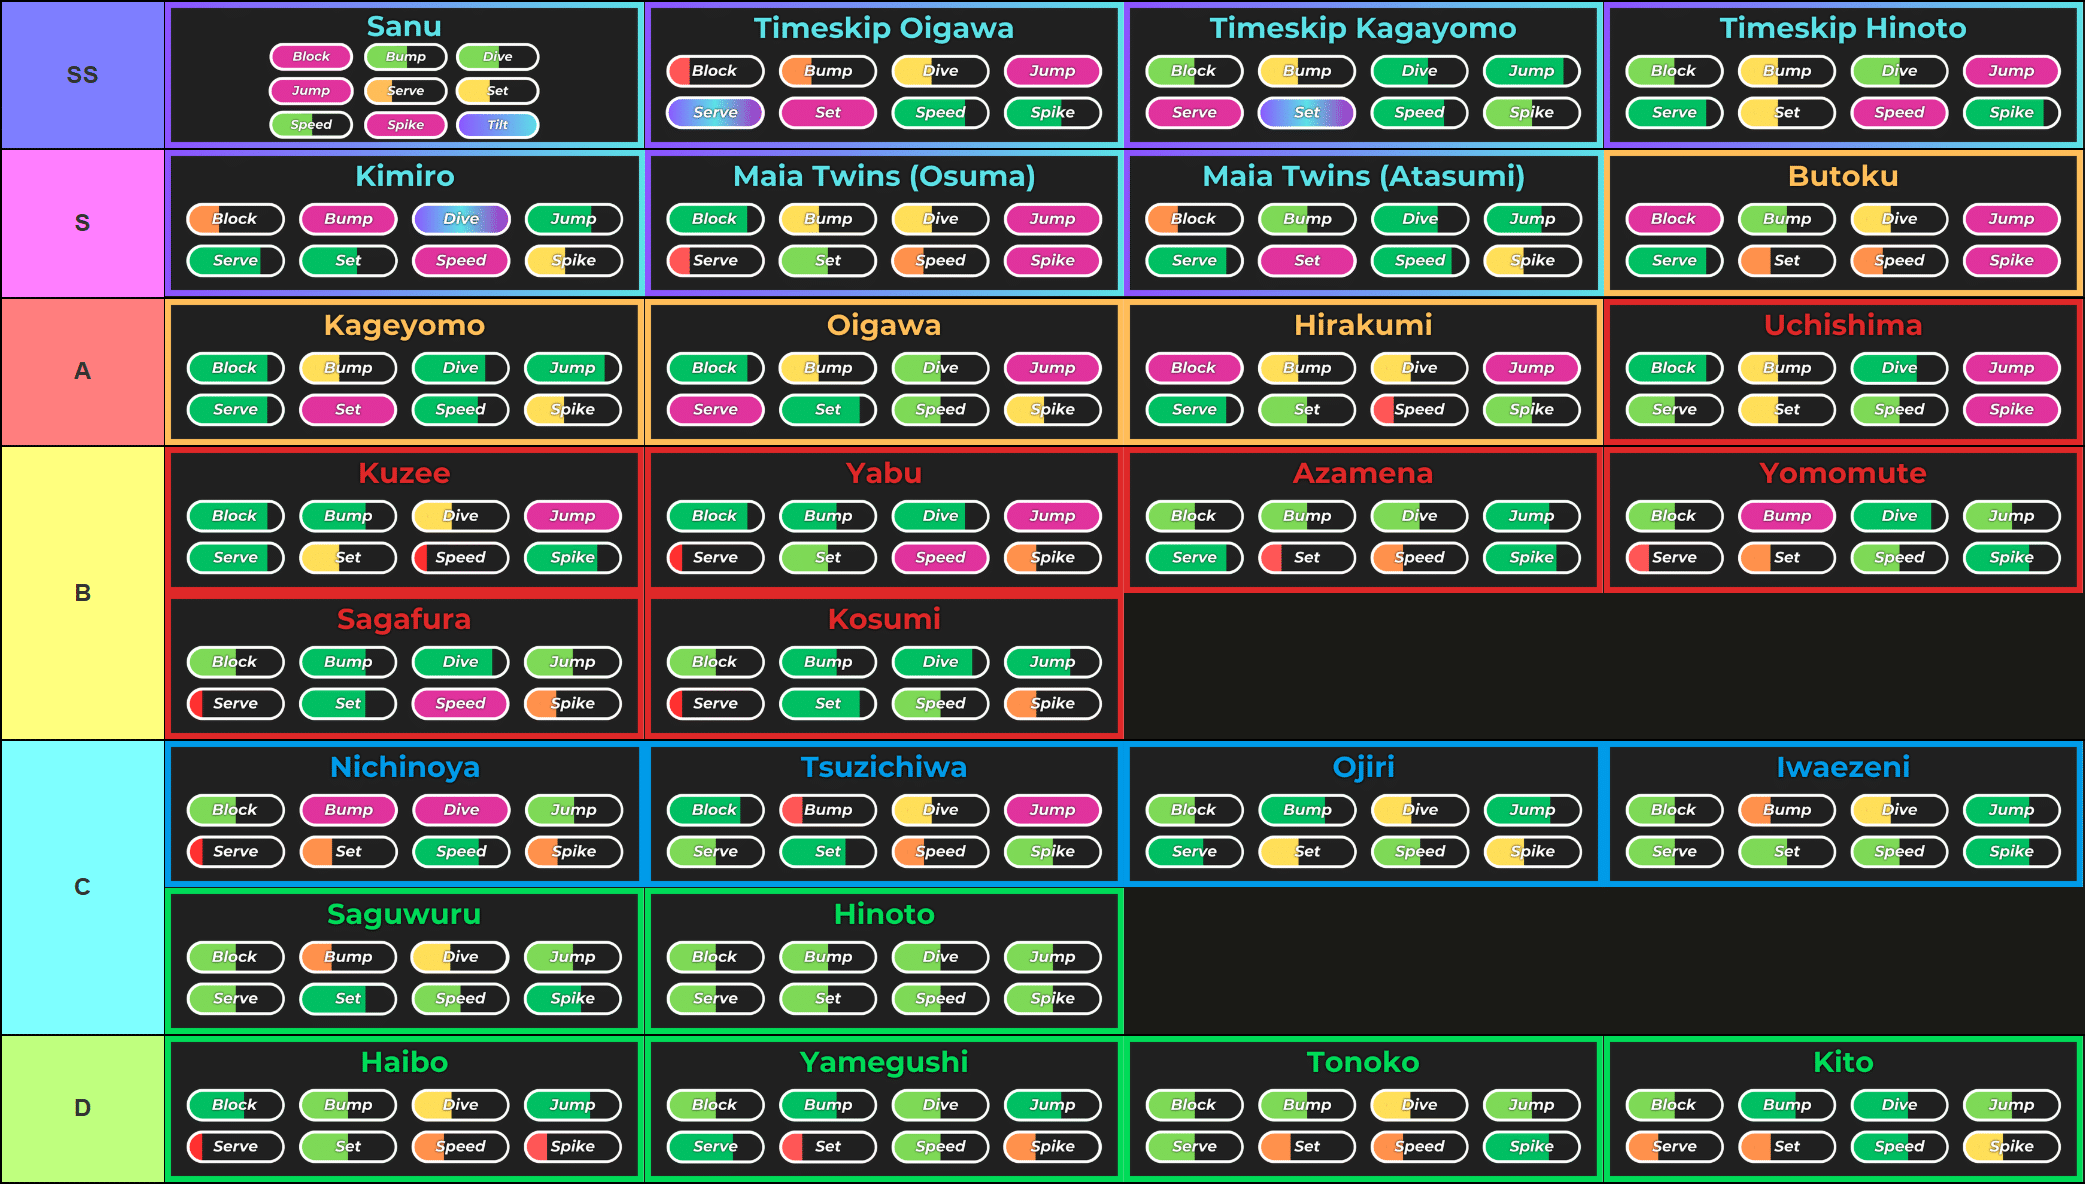
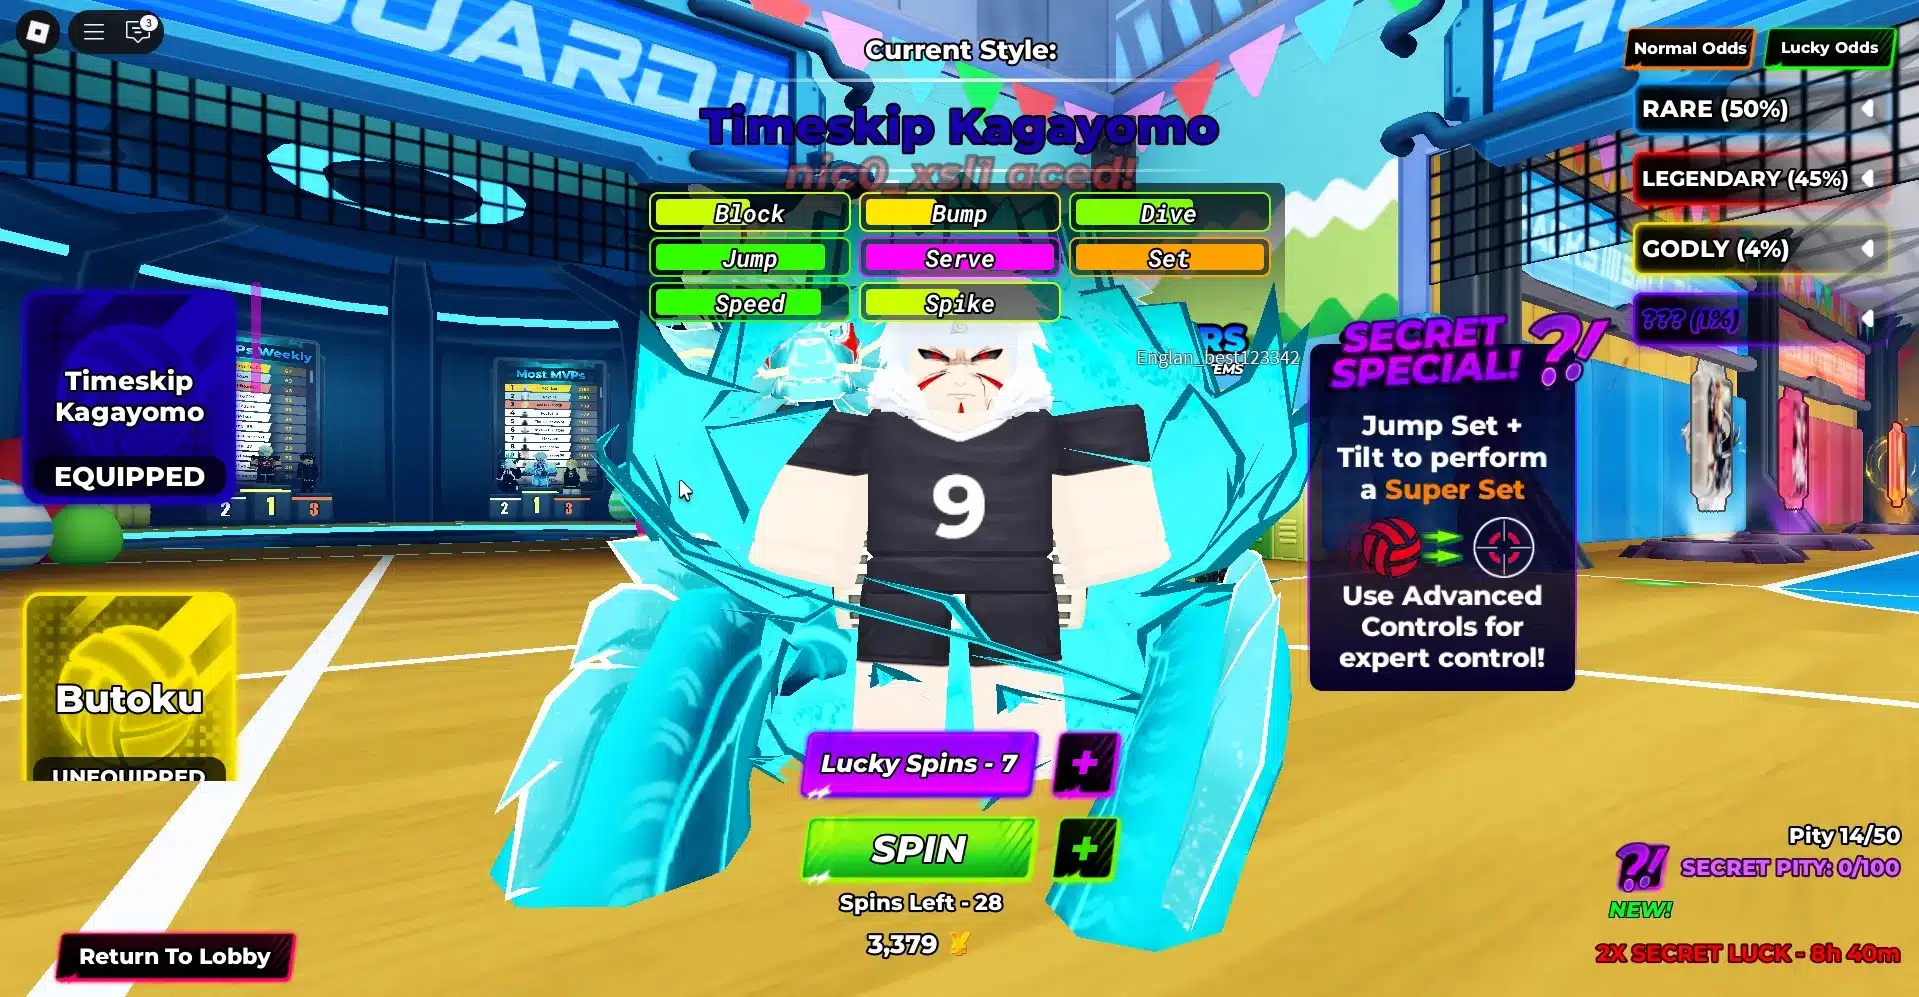
The styles in Volleyball Legends match very closely to the play styles of characters from Haikyu. And just like in the fictional world, teamwork makes the dream work. However, with some styles in Volleyball Legends, you can consistently claim the MVP title. Find out which styles are the best to carry your team to victory with our VolleyballLegends style tier list below.
Volleyball Legends Style Tier List
All styles in Volleyball Legends (Timeskip Oigawa update) ranked from best to worst — Image via TierMaker.
The above tier list ranks all Volleyball Legends styles from best to worst, depending on their overall strength. However, we did give more priority to styles that are good at spiking and blocking. As most styles in VolleyballLegends are suited only for a specific playstyle, check out the best styles for each position right below.
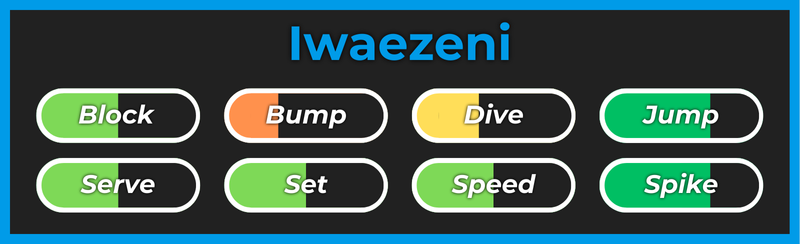
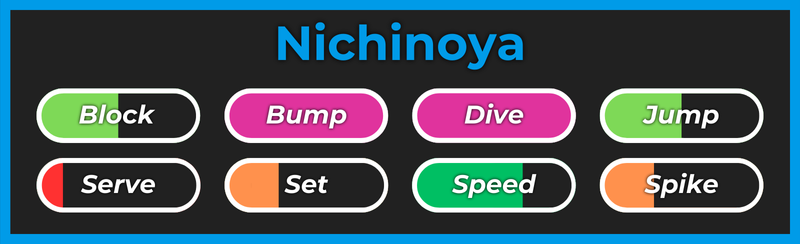
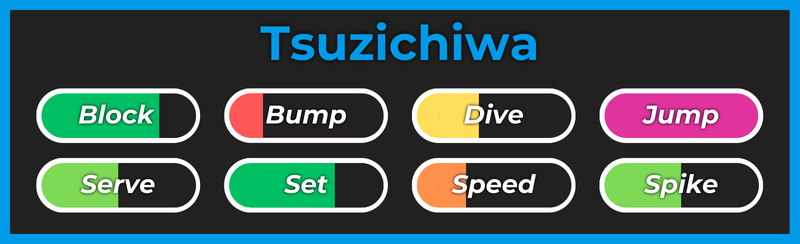
Best Styles for Blocking, Serving, Setting, Receiving, and Spiking
Playing scrims and teaming up with your friends in Volleyball Legends is a lot more fun if you have a style that synergizes with the rest of your team. So, here is a smaller tier list of the best styles for each of the most popular positions in Volleyball Legends:
Volleyball Legends Style List
Below is a list of all Volleyball Legends styles and their stats based on their rarity tier. Also, we decided to convert their stats into numerical values and bold their strengths so as to highlight them. For a detailed list of abilities that match up well with some of the styles listed below, check out our Volleyball Legends abilities tier list.
Secret Styles – 0.1% Drop Rate
Secret styles in Volleyball Legends have special abilities unique to them. Because of that,Sanu and Timeskip Hinoto are definitely the best styles at the moment. Sanu has the additional tilt stat, which makes his spikes and blocks way trickier to counter. After charging up the Secret Special meter with Timeskip Hinoto, you can do super spikes that are extremely hard to block.
Godly Styles – 0.49% Drop Rate
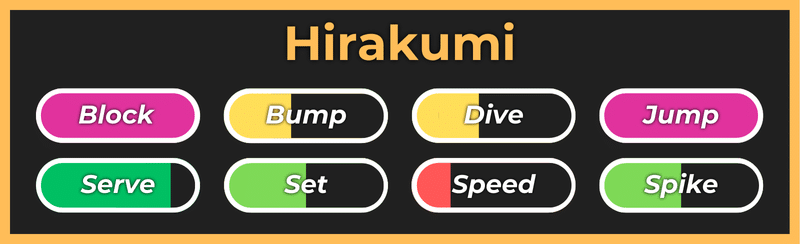
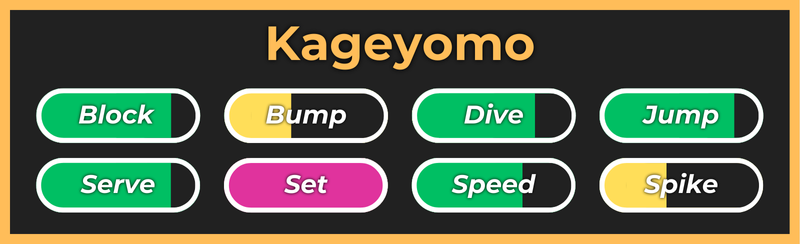
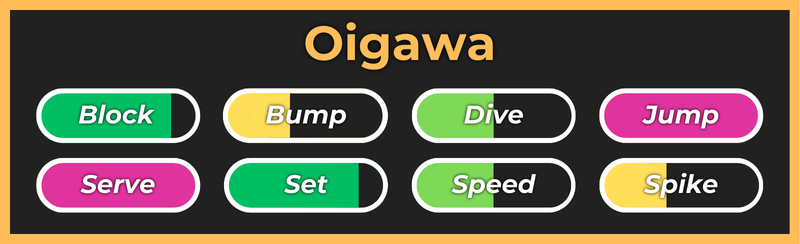
Godly styles, even though not as powerful as the Secret ones, give you enough stats to dominate the opponents if you know what you are doing. Every Legendary style has a role for which they are suited the most. Butoku is excellent for spiking and blocking, Kageyomo is the ideal setter, and Oigawa is great at everything except for spiking.
Legendary styles are relatively easy to get with a few lucky spins. However, only a few of them can compare to the Godly styles, and those are Uchishima and Kuzee. Both are great at playing on the net, but they also have enough stats to excel in other roles. Other Legendary styles are just decent in comparison.
Rare Styles – 35% Drop Rate
You will reroll a lot of Rare styles when you spin in Volleyball Legends. Most of them are only viable in casual lobbies. However, there is one exception: the Nichinoya style, which is the best style for liberos, the defensive anchors of every team.
You will use a Common style in Volleyball Legends only if you’ve been rerolling and you ran out of Yen. All of the Common styles are practically useless, especially in ranked lobbies, so if you are about to run out of spins, stop on a Rare style and don’t risk it.
How to Reroll Styles in Volleyball Legends
Timeskip Kagayomo is a secret, limited style
To change your style in Volleyball Legends, open up the Styles menu and then use either Normal or Lucky Spins. Keep in mind that when you use a spin, you will reroll your current style, so don’t reroll over Legendary or better styles. There are two additional storage slots you can buy. They cost Robux, but I recommend getting at least one so that you can safely spin for new Styles.
And that concludes our VolleyballLegends Style Tier List. If you want to claim some free Lucky Spins and get yourself one of the best styles right away, then check out our VolleyballLegends codes. Also, get on the road to becoming an ace by reading our guide on how to spike in Volleyball Legends as well.
FAQs
What are the overall best Styles in Volleyball Legends?
Currently, the best Styles are Sanu, Timeskip Kageyomo, Timeskip Hinoto, and Butoku.
How do you get more Lucky Spins in Volleyball Legends?
You can get more Lucky Spins by redeeming codes or by purchasing them using Robux.
Is the new Timeskip Kageyomo style good?
Timeskip Kageyomo is one of the best styles overall and the best style for setters by far.
The Escapist is supported by our audience. When you purchase through links on our site, we may earn a small affiliate commission. Learn more about our Affiliate Policy
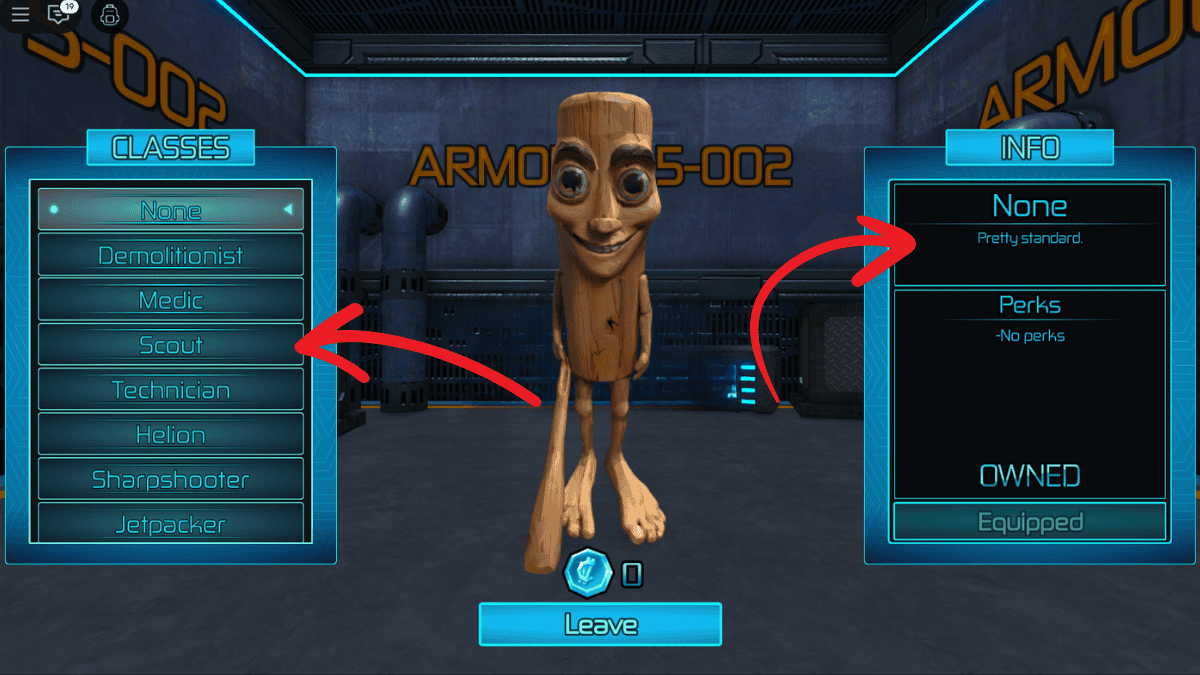
In Dead Planets, a Roblox game inspired by Dead Rails, players drive a truck through desolate space landscapes while fending off relentless zombie hordes. To survive the journey, players choose from a variety of unique Classes, each offering distinct abilities and roles. This Dead Planets Class tier list and guide breaks down every Class and how they contribute to keeping the truck moving and the team alive.
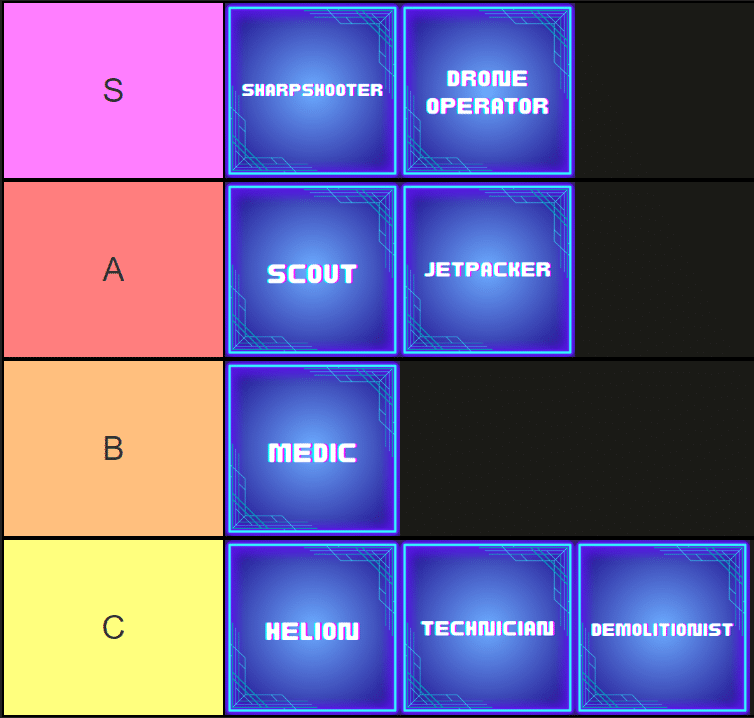
Dead Planets Class Tier List
Image via Tiermaker.
Sharpshooter and Drone Operator are undoubtedly at the best Classes in Dead Planets, as they have the best utility and damage options in the game. You want to be able to get as much loot as possible while killing zombies at the same time. Sharpshooter gets a good weapon at the start, along with a nice damage boost, while Drone Operator gets a Drone that kills zombies for him, making his gameplay very easy.
Dead Planets Class List
Below is a complete and detailed list of all Classes in Dead Planets, ranked by usefulness and cost:
If you are looking for a good Dead Planets Class, I recommend trying to go for Scout. It’s the best early Class and holds up even in the late game. It has a lot of speed and helps you avoid enemies easily with his Highlight ability. If you are looking for even more mobility or utility, go for Jetpacker, as it has a flying ability, but it is a bit pricier.
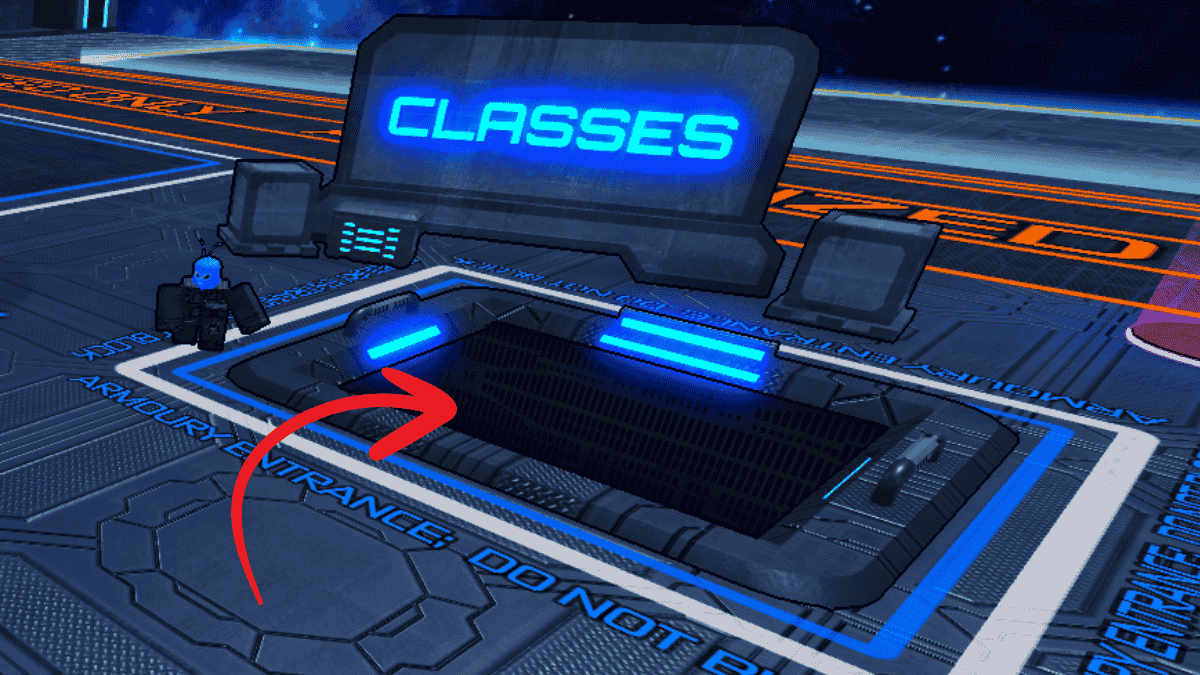
How to Change Classes in Dead Planets
Jump in there, trust me.Did anyone else see a gnome run past?
Firstly, you will need to collect some Credits by playing. You can find packs all over the map that will give you a certain amount of Credits. Once you have enough Credits, head back to the Hub and jump into the Classes hole. Trust me, it is safe. From there, you will be able to see all the different Classes, along with their price and abilities. Once you decide which one you want and which one you have the Credits for, click Purchase below the price on the right side of the screen to make it yours and enjoy!
That is all for my Dead Planets Class Tier List. Check out our other Dead Rails Potions Guide and Tier List for a similar game that i know you will like.
The Escapist is supported by our audience. When you purchase through links on our site, we may earn a small affiliate commission. Learn more about our Affiliate Policy
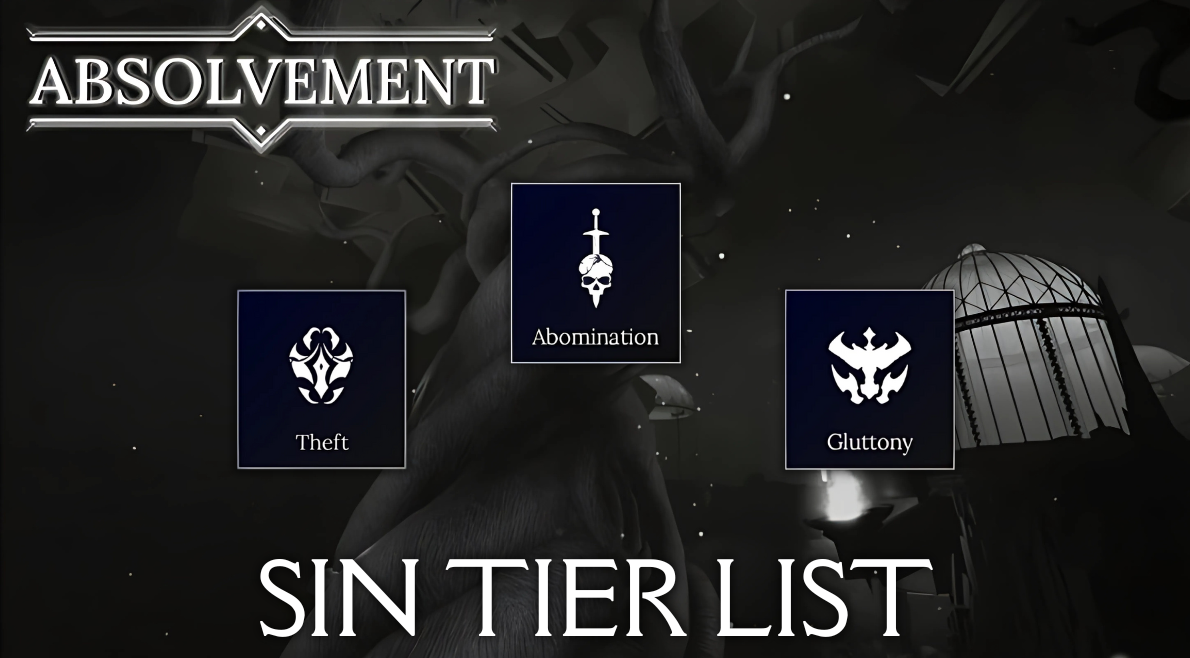
Choosing the right Sins when creating a new character in Absolvement is as crucial as choosing your race, because you won’t be able to change them. However, with each of them sounding worse than the other, making that choice can be difficult. To help you pick only the best Sins available, we prepared the following Absolvement Sin tier list.
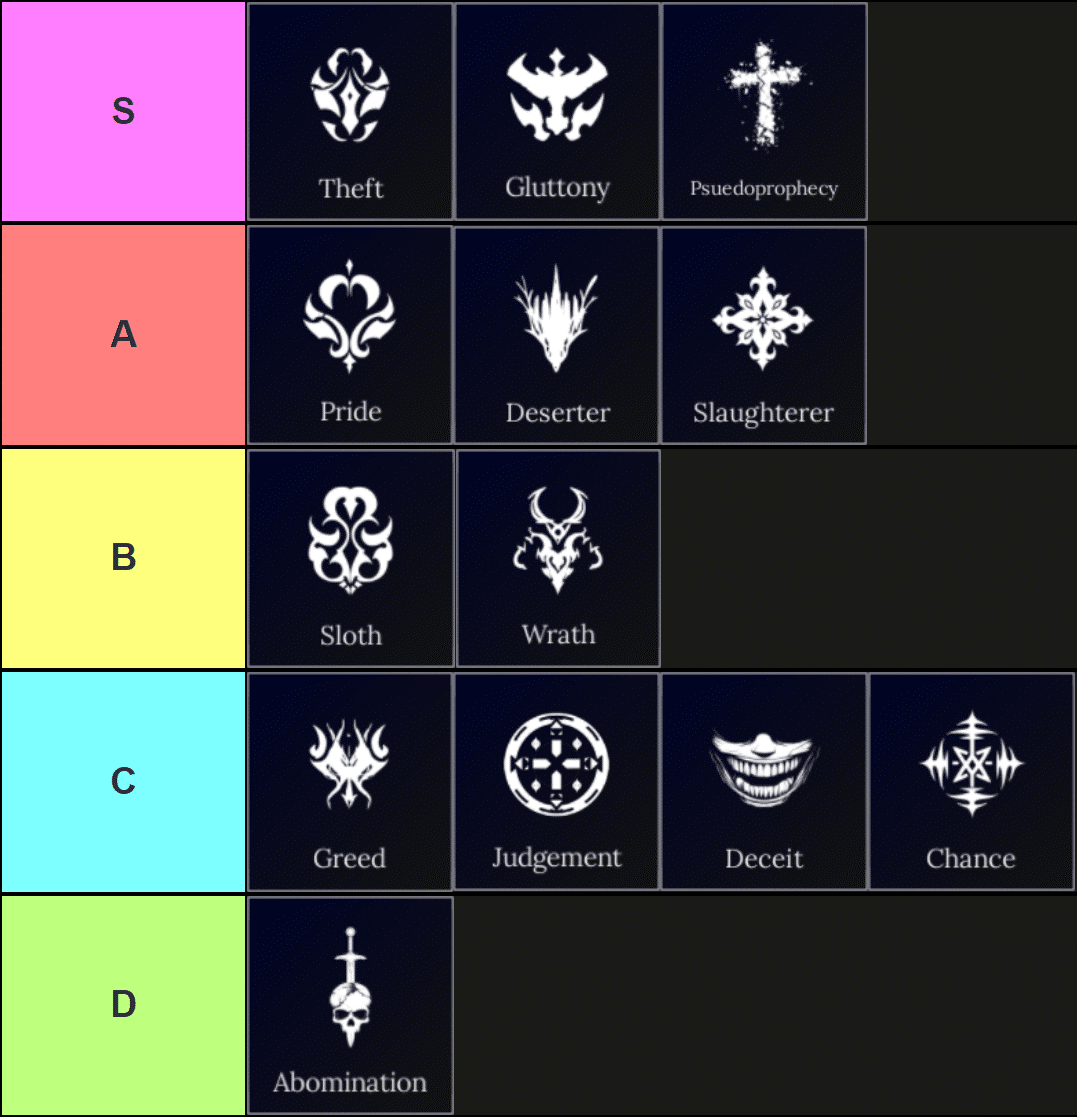
Absolvement Sin Tier List
All Sins in Absolvement ranked from easiest to hardest – Image via TierMaker.
In the tier list above, we ranked all Sins in Absolvementbased on how difficult it is to play with them. Picking up multiple high-ranked Sins will make the overall gameplay not that bad. However, picking even one from the bottom of the tier list is not recommended for new players.
Good Sin Combos
Now, you can always run with just one Sin, but your Soul Fragment generation will be low. So, we prepared some Sin combos that don’t make the game too difficult, while still giving you a decent Soul Fragment multiplier.
List of Absolvement Sins
Below is a list of all Sins in Absolvement, along with their effects and their overall difficulty.
Sin
Effects
Difficulty
Tier
• All prices are doubled.
Very Easy
S
• Every 5 minutes, you are forced to consume a random item that you may be holding on to. • If there is no item to eat, you will begin to aggressively gnaw and chew at your own hand, dealing 20 damage to yourself.
Very Easy
S
• You are permanently locked to one life only.
Easy for veterans Hard for beginners
S
• All forms of support spells and heals are now 25% less effective on you, as you see those as requiring a handicap or needing help from others.
Very Easy
A
• While under 50% health, your walking speed will gradually decrease with your remaining health.
Easy
A
• Total regeneration decreased by 25%. • Your regeneration is now slower out of combat, but faster while in combat. • Additionally, you now have a 10% reduced walk speed and deal 30% reduced damage for the first 3 seconds you enter combat, and the debuff will persist permanently outside of combat.
Medium
A
• Your slug-like behaviors cost your prowess, causing you to attack 20% slower. • Additionally, your walking speed is reduced by 10%.
Hard
B
• Threat gained from potentials increased by 100%. • All armor is only 65% as effective.
Medium
B
• You are now forced to select the highest rarity from potential selections to prevent your greed from turning dire. • Every time you refuse to do so, your greed inflicts a permanent stacking debuff, decreasing your total damage and total armor by 2% per stack.
Medium
C
• Your potentials now have most of the important details obscured, use your best… “judgement” to make your call.
Hard
C
• Not all potentials are truthful; some may be decoys. • Enemies may be a figment of your imagination, both in physical form and in detection basis. • Shopkeepers mislead you about their stock.
Hard
C
• Increases your chance to get Common and Uncommon potentials by 40%, making Rare, Unique, and Mythical ones much harder to come by.
Easy
C
• You are now afflicted with all sins. • You are now always affected by burden debuffs. • You receive 40% extra soul fragments on wipe.
Very Hard
D
Absolvement Sins Explained
In Absolvement, you pick Sins while creating a character. With each Sin you select, the amount of Soul Fragments you get with that character will increase by 4%. However, each Sin applies a set of permanent debuffs to your character. So, unless you are an already experienced player, pick only a few easier-to-manage Sins. Keep in mind that before you can finish creating your character, you have to select at least one Sin.
That concludes our Absolvement Sins tier list. Now, you don’t have to break your mind while finishing up your character every time. If you want to check out more of our Roblox content, then visit the Roblox hub here on The Escapist.
Absolvement Sins Tier List FAQs
What is the easiest Sin to pick when starting out in Absolvement?
The easiest Sin to take in Absolvement is Theft. The double prices won’t impact you that much, and eventually, you will get used to them.
Can you change Sins after you finish creating a character in Absolvement?
No, the Sins you select while creating a character apply to your character until you wipe.
What is an easy combo of Sins to pick in the mid to late game?
A relatively easy-to-manage combo of Sins is: Theft, Pride, Gluttony, Sloth, Slaughterer, and Deserter. You can also pick up Pseudoprophecy if you are comfortable with having only one life.
The Escapist is supported by our audience. When you purchase through links on our site, we may earn a small affiliate commission. Learn more about our Affiliate Policy
![[⚔️] Complete Noobs Must Die Item Tier List and Guide [Alpha]](https://histream.ir/wp-content/uploads/2025/05/noobs-must-die-item-tier-list-and-guide.png)

![Definitive Volleyball Legends Abilities Guide and Tier List [UPDATE 20] – Best Abilities for Each Position](https://histream.ir/wp-content/uploads/2025/05/volleyball-legends-abilities-tier-list.png)


![[⭐Traits] Dead Spells Trait Tier List and Guide](https://histream.ir/wp-content/uploads/2025/05/dead-spells-traits-tier-list-and-guide.png)


![Definitive Dead Spells Tier List [Vampire Mansion]](https://histream.ir/wp-content/uploads/2025/05/dead-spells-tier-list.webp.jpeg)


![Volleyball Legends Style Tier List [TIMESKIP OIGAWA]](https://histream.ir/wp-content/uploads/2025/05/volleyball-legends-style-tier-list-and-guide.webp.webp)