Team Ninja’s devilishly difficult samurai souls-like is back, and it’s bigger and bloodier than ever. Revealed during PlayStation’s June 2025 State of Play, the Nioh 3 announcement confirmed what many hoped was coming: a brutal, faster, and more ambitious sequel. PS5 players even got hands-on time via a limited-time demo.
While that has now passed, the Nioh 3 news cycle is just getting started. Nioh 3 introduces open-field zones, dual-style combat stances, and new yokai-related hijinks. Whether you’re here for the masochist punishment or the Japanese folklore setting, the next in the franchise promises a defining step forward in Team Ninja’s samurai saga.
The Escapist recaps
Nioh 3 release window is set for early 2026.
PS5 demo ran June 4–18, 2025, but it is now now offline.
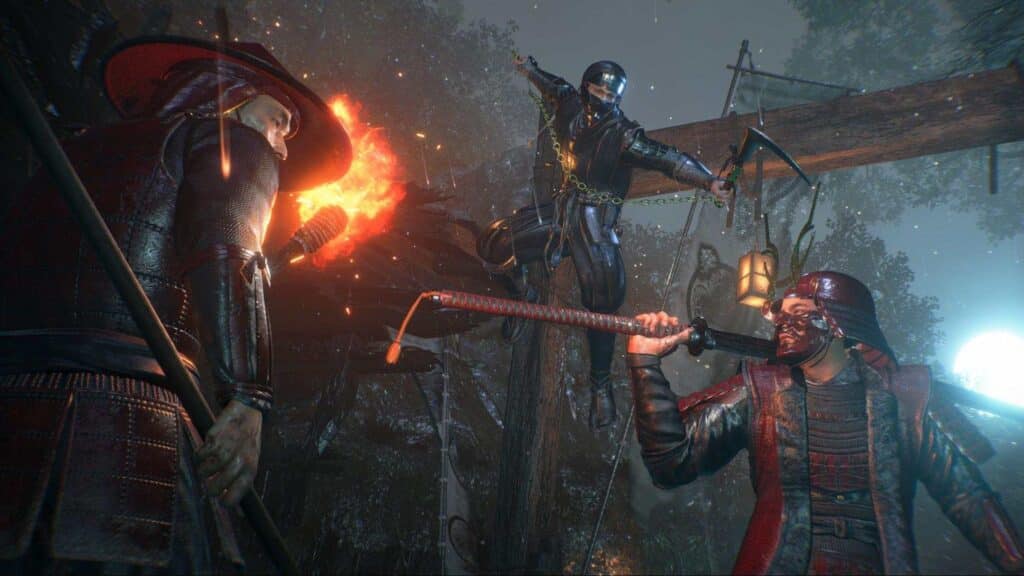
Dual-style combat: Samurai & Ninja stances.
Open-field exploration replaces linear maps.
The game will launch day one on PS5 and PC (Steam).
When could Nioh 3 be released?
The Nioh 3 release window is officially confirmed as early 2026, according to the PlayStation Blog and the June 2025 State of Play event.
That places the Nioh 3 release date somewhere between January and March, barring any major delays. From what was observed by the state of the demo, it’s not hard to speculate that a Q1 launch seems highly likely.
While it’s not clear when Nioh 3 will get a more specific release date, Gamescom and Tokyo Game Show are likely candidates. Given Team Ninja’s tight marketing windows in the past, expect a steady rollout of more content and previews over the coming months.
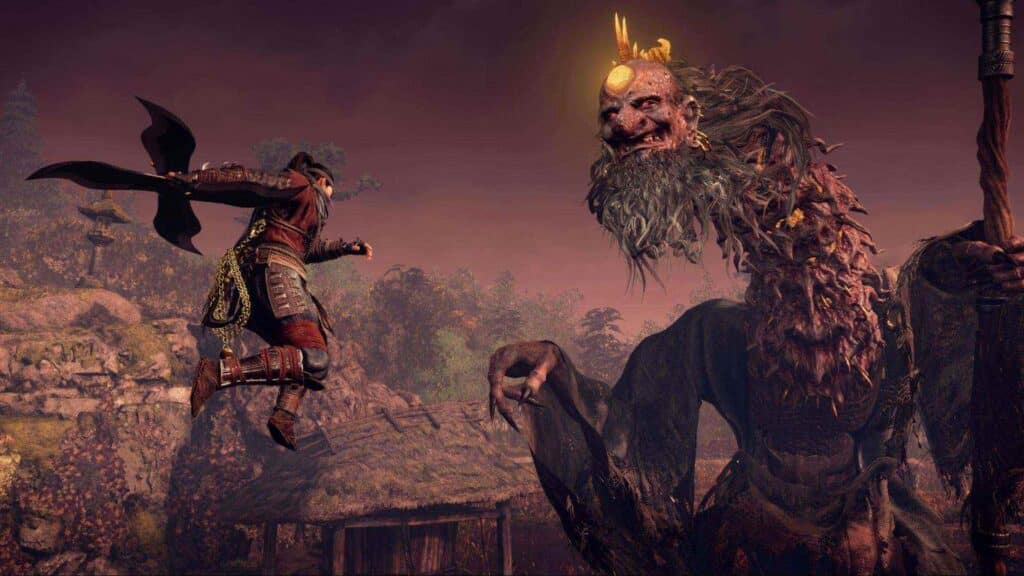
Nioh is full of surprising enemies, meaning you never know what you’ll see when you round a corner. Image credit: Team Ninja
Expected Nioh 3 Price & pre-orders
Nioh 3 pre-orders aren’t live yet, but they will likely appear when the game receives its full release date..
Completing the demo (now expired) rewarded players with a special Crimson Kabuto Helmet, which will be available in the full game. Whether there will be more demos or chances to get the cosmetics in the future is not currently known.
Expect various editions, with collector’s bundles and digital bonuses, especially if Koei Tecmo repeats its strategy from Nioh 2’s launch. With that in mind, we expect this to be a full-priced $69.99 release.
Nioh 3 Platforms
Confirmed Nioh 3 platforms on day one are PlayStation 5 and PC via Steam. This is a first for the series—Nioh 1 and 2 both launched on PlayStation first before trickling over to PC months later. There’s no PS4 version planned, and Team Ninja hasn’t announced any plans for an Xbox release either.
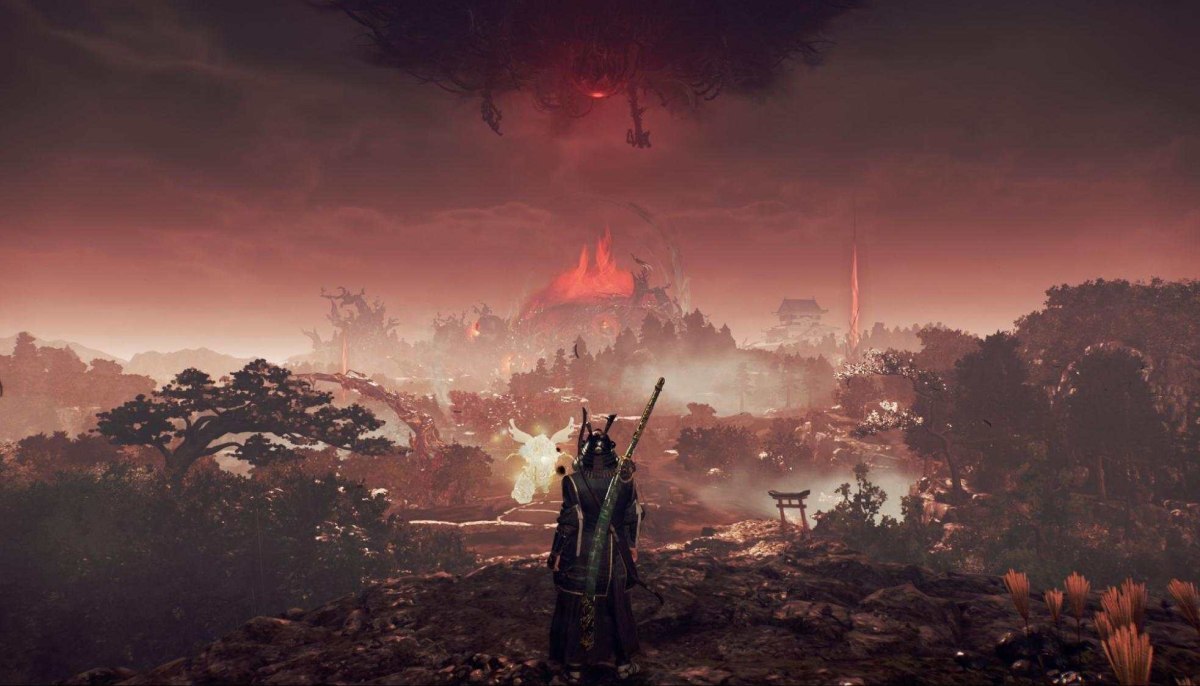
The official Nioh 3 trailer set the tone perfectly: fast, vicious, and stylish. Combat has evolved with a new dual-style system, letting you switch in real-time between a heavy, defensive Samurai stance and a fast, evasive Ninja stance. This gives players more tools than ever to control the pace and flow of each battle.
The transition to open-field zones is another big shift. Gone are the segmented, mission-based maps. Instead, Nioh 3 offers larger, interconnected areas filled with side paths, minibosses, yokai ambushes, and hidden gear
The demo also gave players a taste of the character creator, with promises of full customization at launch. All of these points suggest a faster, more flexible, and even deadlier evolution of the classic Nioh formula, especially with the inclusion of a double-jump, giving Nioh 3 some serious Sekiro: Shadows Die Twice vibes.
What is the Nioh series about?
Nioh is an action RPG series developed by Team Ninja and set in a dark, mythologized version of Japan’s war-torn Sengoku era. The games blend the historical with the supernatural, pitting players against legendary samurai and grotesque yokai.
The gameplay is known for being brutally difficult. You’ll need to master parries, Ki (stamina) management, and weapon stances to survive. Nioh has always rewarded patience, precision, and planning. With each entry, Team Ninja has expanded on that core, adding more weapons, systems, and now—in Nioh 3—more space to explore and fight.
Nioh (2017) had you play as real-life Englishman turned samurai, William Adams. You were in pursuit of an evil sorcerer, all while fighting off hordes of yokai in a fictional retelling of Adams’ involvement in the unification of Japan before the Edo period.
Nioh 2 (2020) was set earlier in Japan in the late 1500s, acting as a prequel to some of the events of Nioh, where you play a Hidechiyo, a half-human half yokai, who can be customized by the player, trying to uncover the secrets of their past.
You’ll be able to embody a Ninja – or a Samurai – in Nioh 3. Image credit: Team Ninja
Ask The Escapist
Is Team Ninja making Nioh 3?
Yes. Team Ninja—the original studio behind Nioh and Nioh 2—is developing Nioh 3, once again led by director Fumihiko Yasuda. It’s a proper sequel with all the original DNA intact, not a reboot or spin-off.
Is Nioh 3 open world?
Not quite. While it’s not a seamless open world like Elden Ring or Ghost of Tsushima, Nioh 3 uses an “open-field” structure. Think larger, interconnected areas with multiple objectives and plenty of reasons to explore. It’s a step up in scale and freedom compared to the mission-based zones of previous entries.
Will Nioh 3 have multiplayer?
Yes. Multiplayer is returning in Nioh 3, including co-op features like Visitor Summons and Expedition Missions. Team Ninja hasn’t detailed PvP yet, but given past games, it’s very likely. Whether helping friends or summoning assistance, multiplayer remains central to the Nioh formula.
Is there a Nioh 3 demo?
There was, for a limited time. The Nioh 3 demo was available exclusively on PS5 from June 4 to June 18, 2025. It offered early access to new mechanics, an open-field zone, and a character creator. Completing the demo unlocked a reward for the full game. No second demo has been announced, but a wider beta before release isn’t out of the question.
The Escapist is supported by our audience. When you purchase through links on our site, we may earn a small affiliate commission. Learn more about our Affiliate Policy
Hubris – Twilight of the Hellenistic World takes one to three players twenty-two centuries back in time to the Ancient Eastern Mediterranean. This period is often little known, obscured by the great epopees of Alexander the Great (that preceded it), Hannibal (that took place simultaneously) or Julius Caesar (that followed it). It was nonetheless pivotal to world history. Let’s explore it a little bit…
The situation in 220 BCE
In 220 BCE, the Greek and Macedonian world forged by Alexander and his Successors is still essentially the predominant region of the Western World, and is dominated by three great dynasties descended from the most successful of the Successors: in Macedon the Antigonids, heirs to Antigonos Monophtalmos (‘the One-Eyed’) and his no less famous son Demetrios Poliorketes (‘the Besieger’); in Egypt the Lagids or Ptolemies, heirs to Ptolemaios (I) Sôter (‘the Saviour’); and in Syria and Babylonia the Seleucids, heirs to Seleukos (I) Nikator (‘the Victorious’). The fortunes of these dynasties have been very contrasted however in recent years.
Macedon, still barely recovered from the exertions and manpower drain consecutive to the great conquests and establishing of the new Macedonian kingdoms in the East, has been beset by the growing assertiveness of new leagues of Greek cities in Aitolia and Achaia, and the relentless pressure of barbarians on its northern borders. However, under the masterful leadership of Antigonos III Dôsôn (‘the Caretaker’), the kingdom has been able to secure its borders and, leveraging the threat of a resurgent Sparta under king Kleomenes III, build an alliance with the Achaian League in the Peloponnese and reestablish Macedonian hegemony in Greece. Dôsôn however died abruptly shortly after his great victory at Sellasia against Kleomenes, leaving the throne to an untested youth, his nephew Philippos (V).
In contrast, the power of the Lagids has grown continuously over the past half-century, leveraging the prodigious wealth of Egypt into a far-reaching sea empire, controlling the seas all the way to the straits between Europe and Asia through a network of bases and the largest navy of its day. On land, the approaches to the Delta are secured by a strong glacis in Koile Syria (modern Israel, Palestine, Lebanon and southern Syria) and the great fortress of Pelousion on the easternmost mouth of the Nile. Through its diplomats and mercenaries, Egyptian gold is everywhere, more powerful than armies. The third king Ptolemaios (Evergetes – ‘the Benefactor’) has recently died though after a long and successful reign, leaving the throne to his young son Ptolemaios IV Philopator (‘who loves his father’), who is reputed to care more about his pleasures and luxuries than military glory…
Finally, the Seleucids rule theoretically over the largest of the successor kingdoms, from Asia Minor (Western Turkey) to modern Iran, but brutal family rivalries and centrifugal tendencies among subject peoples have been dogging them for decades. Only three years earlier, their young king Seleukos III Keraunos (‘Thunderbolt’) has been assassinated while campaigning in Asia Minor against the upstart king Attalos II of Pergamon, precipitating yet another crisis. The army tried to proclaim his cousin Achaios, who was with him, king, but he preferred to support the younger brother of Seleukos, Antiochos, who was acting as viceroy in Babylonia. Not all major officers agreed with him though, with the governor of the Upper Satrapies (Iran), Molon, proclaiming himself king upon hearing the news. The early years of Antiochos III’s reign were thus dominated by the simultaneous struggles against the usurper Molon, the encroachments of Attalos and, to top things off, a war launched unwisely against Lagid Koile Syria under the dangerous influence of his Chief Minister Hermeias. Three years later, Molon has been eliminated, Asia Minor secured by Achaios, and Hermeias disposed of. However, Antiochos and Achaios have now fallen out, with the latter eventually claiming the royal diadem in Asia Minor. And the war with Egypt is still dragging on with not much to show for it…
Hubris Map, Year 220 BCE
The Fourth Syrian War and the battle of Raphia
In 219, Antiochos manages to pull off a brilliant stunt, subverting several high-ranking Lagid officers, including the disgruntled governor of Koile Syria, Theodotos, who had thwarted his 221 invasion. With several major cities opening their gates to his army, Antiochos quickly ousts the new Ptolemaic commander, Nikolaos, and proceeds to subdue all Ptolemaic territories east of the Sinai, precipitating a major crisis for Ptolemaios IV, who was relying on the strong defenses of the satrapy and is not ready to meet Antiochos’s army in the field.
However, his canny Chief Minister, Sosibios, achieves marvels. On the one hand, he initiates peace proceedings with Antiochos to gain his king time. On the other, he brings all the mercenary generals and troops that he can find to Egypt and undertakes an unprecedented measure by training a native Egyptian phalanx to supplement the small royal army.
Thus reinforced, Sosibios abruptly ends the diplomatic talks the next year and Ptolemaios marches across the Sinai with his new army to face Antiochos at Raphia in 217 in what remained the largest battle of the age: 75,000 Ptolemaic troops (with 73 African war elephants) facing 68,000 Seleucid troops (with 102 Indian war elephants). Antiochos’s impetuous cavalry charge on his right wing quickly crushes Ptolemaios’s left wing while the latter’s African elephants prove no match for the larger Indian elephants. However, Antiochos fails to maintain control of the pursuit and Ptolemaios can rally his center and, victorious on his right wing, rout the Seleucid army. Antiochos must concede defeat and give back all his gains in Koile Syria. He will be back…
Philippos and the Aitolians
At the same time that Antiochos is trying for Koile Syria, Philippos V finds his rule challenged by these eternal enemies of Macedon, the Aitolian League and Sparta, under their new king Lykourgos. The young king proves equal to the task, demonstrating an untiring activity from Thessaly where Aitolian bands are raiding, down to the Southern Peloponnese, where he crushes Sparta as his uncle had done a few years before. Most of the action however is concentrated in western Greece and the central Peloponnese, where Philippos has to bolster his Achaian and Acarnanian allies against repeated Aitolian inroads.
Philippos spends most of his time in the Peloponnese, strengthening his relationship with the old Achaian strategos Aratos, long a resolute adversary of Macedon, and his son. This angers a number of senior Macedonian officials, led by his Chief Minister Apelles. Eventually, the tension boils over into open confrontation, when the Macedonian army comes to the edge of mutiny over spoils of war, and is only resolved with Philippos eliminating Apelles and his clique in 218.
The following year, after a campaign on the northern border of Macedon where Dardanian tribes were threatening, Philippos captures Phtiotic Thebes, the key Aitolian strongpoint in southern Thessaly, empties it and installs a Macedonian colony. He then takes ship again to relieve Aitolian pressure on Achaia, threatening another key Aitolian place in Naupaktos, where a peace conference encouraged by Ptolemaios IV finally succeeds in bringing the war to an end.
Shortly thereafter, Philippos finds himself at odds with his erstwhile ally the Illyrian warlord Scerdilaidas and builds a fleet to operate in the Adriatic. However this brings him into contact with a newcoming power: the Republic of Rome.
Rome enters the Scene
In 229-228, an upsurge of piracy under Queen Teuta led Rome, fresh off its victory over Carthage in the First Punic War, to intervene in Illyria, installing a protectorate around the city of Apollonia. Ten years later, Demetrios of Pharos, an Illyrian Greek whom Rome had placed to control the area, proves too ambitious and Roman forces cross the Adriatic again to oust him. He quickly finds refuge at the court of Philippos, becoming one of his main advisors. For the time being however, Philippos dares not add another enemy to an already long list and stays his hand in Illyria.
The situation changes dramatically however during the following years when Hannibal Barca, leading a Carthaginian army from Spain, invades Italy from Gaul, igniting the Second Punic War. He then proceeds to win a stunning string of victories against Rome on Italian soil. After his great victory at Cannae, he appears poised to defeat the upstart Latin republic. In 215, Philippos concludes an alliance with Hannibal where both parties agree to work together against Rome. However, before he can strike in Illyria, Philippos is compelled to hasten to the Peloponnese again where the Messenians are challenging Macedonian hegemony.
In 214, Philippos sails to the Adriatic and moves against Apollonia. The Roman answer, despite the ongoing war with Hannibal, is swift and decisive, defeating Philippos’s army who must burn his ships and withdraw over the mountains into Makedonia. Over the next few years, as Rome is unable to field a significant army across the sea, Philippos establishes his domination over the Illyrian interior but is unable to capture Apollonia.
The situation changes again though in 211 when Rome makes agreements with the Aitolians, Pergamon, Spartan and Skerdilaidas. Soon, with the support of the Roman navy and limited legionary forces, Philippos and his allies find themselves hard pressed everywhere. He manages still to beat the Aitolians and Attalos of Pergamon so badly that they refuse to face him in the field for the rest of the war, and slowly strengthens his positions before carrying the war to the Aitolian heartland, sacking their federal sanctuary at Thermon, while the new Achaian strategos Philopoemen crushes the Spartans at the battle of Mantinea.
When Attalos, threatened at home by king Prusias of Bithynia, withdraws from Greece, the Aitolians beg Rome for a more significant involvement but the republic is unable to comply. The Aitolians then elect to make what peace they can with Philippos. The next year, Rome sends Sempronius in Illyria, but this is too little, too late, and as Philippos closes on Apollonia, Rome makes peace in turn, abandoning most of Illyria to Macedon with definite ill grace…
A new Alexander
Meanwhile, with his back secured by the peace sworn with Ptolemaios IV, Antiochos III wastes no time ending the uneasy truce which had been prevailing with his rebel cousin Achaios. After an arduous but systematic campaign, he has him penned in the great fortress of Sardeis in Lydia by 214. A lengthy siege begins, from which the ever resourceful Sosibios tries to extract Achaios through the agency of a pair of Cretan agents. However, as the Ancient Greeks were wont to say, one should never trust a Cretan, let alone two, and a double cross results in a hopeful Achaios falling in the hands of his cousin, who has him promptly executed.
Next, Antiochos, more intent than ever to restore the full extent of the kingdom created by his ancestor Seleukos, campaigns decisively in Armenia, imposing a more compliant satrap, before embarking on extensive preparations for a great expedition in the Upper Satrapies. In 210, he expertly forces the passes of the Elburz mountains into Hyrkania and Parthyene, and quickly forces the submission of the Parthian king Arsakes.
The following year, he triumphs on the Arios river of the heavy cavalry of king Euthydemos of Bactria, and soon has him besieged in another great fortress, that of Baktra. However, forcing Euthydemos’s surrender proves more difficult than expected, and after more than two years, Antiochos and Euthydemos come to an agreement, recognizing Antiochos’s at least nominal suzerainty, and providing him with cash, elephants and Kataphraktoi (armored cavalry).
Antiochos then, consciously emulating Alexander’s exploits during his Anabasis (‘Voyage in the high interior’), returns to the West by way of Karmania and the Persian Gulf, claiming for himself the glorious epithet ‘Megas’ (‘the Great’) hitherto only bestowed on Alexander…
The Lagid Collapse
Antiochos’s return to the Mediterranean shores may have been prompted by information that Ptolemaios IV’s health was failing, meaning that the peace sworn between the two kings after Raphia was about to expire. Ptolemaios dies in 204, his death kept a secret for several months as his successor is only 6 years old. A ferocious struggle at the Alexandrian court results, with Sosibios and his ally Agathokles eliminating the queen-mother Arsinoe and sending many potential rivals away. Sosibios himself dies shortly therafter, leaving Agathokles sole regent, a responsibility he would soon prove woefully inadequate at…
While Ptolemaic officials try frantically to forestall war by attempting to seal a marriage alliance with Philippos of Macedon, he and Antiochos ready for war. In desperation, the Ptolemaic court tries an appeal to Rome, denouncing a conspiracy of Macedon and Syria to dismantle the Lagid empire, but Rome is not yet sufficiently interested in the affairs of the East, and too busy anyway with the final stages of the struggle against Hannibal to care.
In 202, Philippos launches a campaign with a large army and fleet in the region of the Straits between Europe and Asia, capturing many Ptolemaic-held cities, while Antiochos marches along the desert road and captures Damaskos. Soon, the toxic nature of the Lagid court is demonstrated again as another governor of Koile Syria, Ptolemaios son of Thraseas (no known relationship to the ruling dynasty) defects to Antiochos. In 200, after more frantic recruiting of mercenaries and the recalling of overseas garrisons, a Ptolemaic army under the Aitolian condottiere Skopas counterattacks in Koile Syria, but is utterly defeated at the battle of Panion by Antiochos, ably seconded by his grown-up sons.
In the Aegean, Philippos’s successes alarm Rhodes and Pergamon, who oppose him at sea. In 201, after an indecisive naval battle near Chios, Philippos finds himself stranded in Karia, where his army is supplied by Zeuxis, the Seleucid viceroy in Sardeis. The following year, he threatens Pergamon itself and pursues his seizing of Ptolemaic strongholds on both sides of the Straits.
The Second Macedonian War and the battle of Kynoskephalai
However, with Hannibal’s defeat at Zama in 202, and the ensuing surrender of Carthage, Rome’s energies are freed to, at long last, turn East and settle accounts with the king of Macedon. Seizing the pretext of a dispute between Athens and Philippos, Rome declares war in 200, promptly landing a full consular army in Illyria. While the legions probe Macedonian defenses in the interior, the fleet joins with Rhodes’s and Pergamon’s and lays to waste the major Macedonian base of Chalkis on the island of Euboia, one of the so-called ‘Fetters of Greece’. Arriving too late on the scene, Philippos vents his anger on Athens, but is soon compelled to withdraw to Makedonia to prepare it for war, leaving Roman envoys ply the Greek cities and leagues for support.
The following year, the Roman general Galba tries a decisive thrust from Apollonia up the Aous valley into Upper Makedonia, but is frustrated by Philippos’s skilled defense of the passes. In 198, a new Roman consul, T. Quinctius Flamininus arrives in Greece with veterans and tries another route, this time from Epeiros, with similar results. Flamininus hence shifts his focus to Thessalia through the lands of the Aitolians, whose alliance he renews, making a show of “freeing” Greek cities from Macedonian garrisons.
In 197, Philippos, feeling the pressure of northern barbarians, and seeing his support among the Greeks become more fragile by the day, tries to force a decision and seeks a decisive battle. He finds it in an unexpected manner at Kynoskephalai in Thessalia, where a meeting skirmish escalates into a full-blown battle. While initially successful, the Macedonian army is ultimately undone by Roman tactical flexibility on the rough terrain of the Kynoskephalai ridge and routs.
At the ensuing peace negotiations, Rome refuses to destroy Macedon, as urged by the Aitolians, but forces it to relinquish all its garrisons in Greece as well as control of Thessalia, which had been Macedonian for 150 years, since Philippos II’s reign. Philippos must also pay a heavy war indemnity and deliver his second son, Demetrios, as hostage. Flamininus refuses to install Roman garrisons in place of the Macedonian, and within a year all Roman troops are gone from Greece.
The Syrian War and the battle of Magnesia
While Philippos was learning to his expense the extent of the new threat coming from the West, Antiochos was leading follow-up campaigns by land and by sea to round up the remaining Ptolemaic possessions along the coast of Asia Minor, up to Ionia. When Philippos, hard pressed by the Romans, withdrew from the Straits, Antiochos moved in and was soon campaigning across the straits in Thrake. Once more, he appeared bent on restoring the full extent of the dominion of his glorious ancestor Seleukos Nikator. Maybe he should have been mindful of Seleukos’s fate once he crossed into Europe…
As Antiochos is busy campaigning against the wild Thracian tribes and restoring the ruined Greek cities on the European shore, a Roman delegation meets him and delivers an ultimatum, asking him to withdraw from Europe and to free the Greek cities of Asia. Unsurprisingly, the Great King is not ready to listen to such pretentions from Italian barbarians, though he is careful to avoid an immediate clash. Roughly at the same time, envoys of the Aitolians, still resentful of what they see as Roman ingratitude, bring him enticing promises of a warm welcome should he cross to Greece, which the envoys describe as wary of foreign hegemony…
Eventually, the temptation proves too great and Antiochos, known for his daring ways, rolls the dice in 192, taking ship with a picked contingent to cross the Aegean and land in Central Greece. He soon finds that the Aitolians are not quite able to fulfill all their promises, but he is nonetheless able to establish himself in Euboia, Boiotia and Thessalia before the winter. He even tweaks Philippos’s noise by making a show of giving proper burial to the Macedonian dead at Kynoskephalai which had apparently been laying in the open since the battle. This results in Philippos throwing his lot with the Romans…
Hubris Map, Year 192 BCE
The following year, Consul Acilius Glabrio arrives in Thessalia with an army, and is joined by Philippos, who uses this opportunity to retrieve many places in Thessalia. Antiochos, still without his main body of troops delayed by storms in their crossing from Asia, withdraws to the famous pass of the Thermopylai. There, the Aitolians prove unable to protect the flanking routes in the mountain, dooming the Seleucid force to a fate not dissimilar to Leonidas’s three centuries ago. Antiochos is however able to escape and join his main army in Asia.
While the Romans proceed to punish the Aitolians for what they perceive as treachery, the Roman fleet, reinforced by Rhodian and Pergamene squadrons, faces off against the Seleucid navy to try to gain control of the Straits crossings. The Seleucid admiral Polyxenidas, himself a Rhodian, manages to hold off the coalition’s navies for a number of months, but eventually succumbs to superior numbers. A bizarre episode occurs during that period when the famous Hannibal, who had, after being compelled to flee Carthage, found refuge at Antiochos’s court, is tasked by Antiochos to arm and lead a reinforcing fleet from Phenicia, only to be intercepted and beaten back by the Rhodians, proving less of a genius at sea than on land.
With the crossings to Asia secured, a reinforced Roman army led nominally by Consul Lucius Cornelius Scipio, brother to Hannibal’s nemesis Publius Cornelius Scipio Africanus, who accompanies his brother as ‘advisor’, crosses in 190 from Thrake and relieves their ally king Eumenes II of Pergamon who was besieged in his high citadel. The allied army then moves South to Lydia where Antiochos awaits them on a field of his own choosing at Magnesia-near-the-Sipylon with an army drawn from his entire empire, totaling 72,000 men as well as elephants and even scythed chariots to oppose the Scipios’ 25,000 Romans and Pergamenes. Antiochos’s elite phalanx and heavy Kataphraktoi cavalry are initially successful, putting an entire legion to flight, but his unorthodox deployment of his elephants, mixed with the phalanx, eventually backfires, and Eumenes is able to force a decision on his wing, precipitating the rout of the vast Seleucid host. Recognizing his defeat, Antiochos agrees in 188 at the Peace of Apameia to evacuate all Asia Minor West of the Taurus mountains, which is promptly divided by Rome between his Pergamene and Rhodian allies.
Troubled successions
The following year, Antiochos is killed in a military adventure in Elymais in western Iran where he was trying to seize the treasures of a local sanctuary, probably to face the crushing war indemnities imposed by Rome. His eldest son, also named Antiochos, having disappeared under foggy circumstances some years before, he is succeeded by his second son Seleukos IV Philopator, while his third son Mithradates, renamed Antiochos after the death of his eldest brother, is hostage in Rome.
In Macedon, Philippos’s second son Demetrios has been released as a reward to his father’s good behavior during the war with Antiochos, but retains upon his return to the court at Pella strong ties to his new Roman friends. Soon, the Macedonian court splits between followers of Philippos’s eldest son Perseus, who favors confrontation with Rome, and those of the youngest son Demetrios, who preaches amity. The old king is torn but a conspiracy by Demetrios is uncovered and Philippos has his son killed. However, the whole affair is soon revealed to be a plot by Perseus. Heartbroken, Philippos considers disowning Perseus in favour of his cousin Antigonos, a relative of Dôsôn, but he dies before he can make it a reality. Perseus then moves swiftly to secure his hold on the throne, and soon engages into a major diplomatic effort to restore Macedonian standing in Greece.
In Egypt, the reign of young king Ptolemaios V has been marred by repeated coups to secure the regency and an enduring native rebellion in Upper Egypt, with native pharaohs ruling in Thebes, the old capital, for many years. It is only in 186 that Ankhwennefer, the last of these native pharaohs is captured by Komanos, a Galatian general in Lagid employ, completing the reconquest of Upper Egypt, though sporadic rebellions will keep popping up in the Delta for years.
In 180, Ptolemaios V is assassinated by courtiers who apparently feared that he was planning to confiscate their properties to finance a new Syrian War to recover Koile Syria. His widow Kleopatra (I) Syra, daughter of Antiochos III, becomes regent for their 6-years old son Ptolemaios VI Philometor (‘who loves his mother’), but dies in 176, prompting a new period of instability at the top of the Lagid kingdom.
That same year, Antiochos is replaced as hostage in Rome by Demetrios, the oldest son of Seleukos IV. With the support of Eumenes II of Pergamon, Antiochos soon seeks to destabilize the rule of his brother, who is assassinated the following year by his minister Heliodoros. A confused and bloody sequence of events in Antioch sees Antiochos prevailing as Antiochos IV Epiphanes (‘God manifest’).
Hubris Map, Year 176 BCE
The Third Macedonian War and the battle of Pydna
In Greece, the resurgence of Macedon under Perseus raises some disquiet in Rome, fed by the activism of king Eumenes II of Pergamon, who is worried that the young Macedonian king might seek in Asia Minor the aggrandizement denied to him in Greece by Roman guarantee of the Greek cities. Tensions ramp up after Eumenes escapes a possibly criminal rockslide while traveling through Delphi on his way back from Rome. Perseus’s envoys in Rome are unable to get heard, and when Roman troops are freed from an ongoing conflict in Spain, Rome proceeds to isolate Macedon diplomatically before declaring war on a flimsy pretext in 171.
However, decades of relative peace appear to have blunted the sharp edge of the Roman military machine, and the initial campaign by consul Publius Licinius Crassus in Thessalia meets near disaster at the hands of Perseus’s renewed army at the battle of Kallinikos. Perseus does not press his advantage, hoping for a peaceful settlement, but Rome will have nothing short of complete surrender. In 170, with the southern routes into Makedonia secured by Perseus, the new consul, A. Hostilius Mancinus, tries to force his way up the Aous valley, but is repulsed twice with heavy losses.
Impatience mounts in Rome, and the consul for 169, Marcus Philippus, takes care to reinforce and train his army before trying the Thessalian passes again, without more success. The following year, Lucius Aemilius Paullus, son of the consul killed at Cannae in 216, takes command and finally, through a freakish turn of events, manages to turn Perseus’s positions, leading to a decisive battle at Pydna. Again, initial success of the phalanx proves unsustainable, and Perseus must surrender.
This time, Rome proves unforgiving and dissolves the centuries-old Macedonian kingdom, breaking it up into four impotent republics. Perseus and his family are brought in chains to Rome to be exhibited at Aemilius’s triumph, and the last Antigonids then disappear from history…
The Sixth Syrian War and the Day of Eleusis
Meanwhile, the chronic instability of the Lagid court has reached new heights, with Ptolemaios VI’s younger brother, later known as Ptolemaios (VIII) Physkon (‘the Fat-bellied’) pushing for a share of power, splitting the court into two rival factions. The Ptolemaic court looks to a new war in Syria to restore a sense of unity, but in late 170, Antiochos IV, himself eager for glory to cement his rule, steals a march on the Ptolemaic army and crushes it in the Sinai. He then seizes Pelousion, the key to Egypt by ruse (or treason?), and immediately moves on the Delta.
A new coup puts Komanos, the victor of Ankhwennefer, and another general, Kineas, in power in Alexandria, while both rival Ptolemies enter negotiations with Antiochos, trying to make their case. Eventually, Ptolemaios VI recognizes Antiochos as his overlord, who grants him control of the territory under his control in Egypt. At the news, the populace in Alexandria rises in anger, proclaiming the younger Ptolemaios as sole king. While Antiochos blockades the city, Ptolemaios sends envoys to Rome pleading for help. Unable to capture the city before the winter, Antiochos returns to Syria to winter, leaving Ptolemaios VI in charge in the old capital of Memphis. However, Philometor promptly negotiates a reconciliation with his brother.
In the spring of 168, Antiochos sends a naval expedition to attack the Ptolemaic island of Kypros, destroying the Ptolemaic fleet and seizing the island, betrayed – once more – by its Ptolemaic governor. Meanwhile, Antiochos reenters Egypt with fire and sword and soon establishes a tight siege of Alexandria. After the Antigonids, the end of another Successor dynasty appears certain, when a Roman delegation headed by Caius Popilius Laenas, a friend of Antiochos’s from his time as a hostage in Rome, lands to meet the king on the beach of Eleusis, a suburb of Alexandria. As Antiochos walks to greet him, Popilius, reminding him of the recent fate of Perseus’s kingdom, demands he immediately evacuate all of Egypt. Taken aback, Antiochos tries to play for time, but Popilius draws with his stick a circle in the sand around the feet of the king, demanding an answer before he leaves this circle. Aghast, Antiochos submits and agrees to withdraw, putting an end to the war, and, beyond it, to the last hope of a Hellenistic kingdom standing up to Rome…
The agony of the Seleucid kingdom, fallen prey to unending dynastic struggles and progressively deprived of its rich Iranian and Mesopotamian provinces by the increasingly assertive power of the Parthians under king Mithradates I, would be prolongated until 63 when Pompey the Great deposed the last Seleucid pretenders, now reduced to squabble over Syria itself, as part of his campaign in the East. The kingdom of the Ptolemies would last 33 more years until its last queen, the famous Kleopatra VII Philopator, committed suicide after the failure of her bid to restore the grandeur of her kingdom through her alliance with Marcus Aurelius, but apart for this last flareup, it had become effectively a Roman vassal since this fateful day at Eleusis in 168…
Now that you have read through this overview of the history of the twilight decades of the Hellenistic kingdoms, you have surely realized that the actions of individual kings, generals and diplomats are driving the narrative of the period. Accordingly, Hubris’s game engine is built around these leaders, as I am going to present in the next installment of these Histories…
A new AMD Ryzen CPU benchmark leak has just appeared, and it shows the potentially awesome power of the company’s new Threadripper CPUs for multi-threading work. This new leak appears to show the raw power of the 96-core AMD Ryzen Threadripper Pro 9995WX, which is massively more powerful than your average gaming CPU, even if it isn’t a chip aimed at the gaming market.
We’ve not seen new Threadripper CPUs from AMD in a few years, and their release is highly anticipated. Packed with a ridiculous number of cores, at least by usual desktop standards, Threadripper Pro 9000 prices are already set to be ridiculous, with the 9995WX costing as much as $11,699 at launch. Expensive as they may be, raw power alone isn’t enough to make them great for gaming, either, with the options in our best gaming CPU guide still likely to top a Threadripper as the choice for a gamer-focused PC build.
This new leak, released on the Chinese industry forum Chiphell by admin user nApoleon, and caught by tech leaker 9950pro, shows a screenshot from benchmarking tool Cinebench R23. The leak shows a CPU multi-core test score of 173,452 for a CPU that 9950pro identifies in a post on X (formerly Twitter) as the new flagship AMD Ryzen Threadripper Pro 9995WX.
To put that into perspective, the eight-core 9800X3D scored an average of 23,265 when we tested it for our AMD Ryzen 7 9800X3D review. Meanwhile, the 24-core Intel Core i9 14900K, Intel’s last-gen flagship, scores 36,072 in our own benchmarks.
That’s a somewhat unfair comparison, however. Gaming CPUs rarely have excessive amounts of cores, and a 96-core CPU is clearly going to outperform an eight-core 9800X3D in a multi-core CPU test. Recent Threadripper CPUs in the past, including the 96-core 7995WX that this chip is replacing, have scored well over 100,000 in the same Cinebench tests, according to user test scores posted online, including in this recent Chiphell forum post that put the 7995WX through benchmark testing.
As AMD itself has stated, this is a processor aimed at the professional market, with AI and video rendering tasks in mind. High CPU counts work well in those situations, but not for gaming. That makes these CPUs a far less likely option for most gamers, especially with the 9995WX’s $11,699 price tag.
You might want to skip the Threadripper for your next gaming PC, but that doesn’t mean you can’t still go big when you’re picking your parts. Our best gaming motherboard guide is a good place to get started to pick the right centerpiece for your build. Once you’ve picked your CPU to go with it, you should head over to our best CPU cooler guide, which has several stylish options to help keep those CPU temps down.
You can also follow us on Google News for daily PC games news, reviews, and guides. We also have a vibrant community Discord server, where you can chat about this story with members of the team and fellow readers.
Welcome to Ludology, an analytical discussion of the hows and whys of the world of board games. Rather than news and reviews, Ludology explores a variety of topics about games from a wider lens, as well as discuss game history, game design and game players.
We post a new Ludology episode every other week. In these episodes, hosts Erica Bouyouris and Sen-Foong Lim deep-dive into a single topic within game design, often with a well-regarded guest from the game industry. We generally focus on tabletop game design (mainly board games and RPGs), but we often pull in experts from all forms of games, from video games to escape rooms to slot machines.
On weeks where there is no flagship Ludology episode, we will alternate between two smaller mini-sodes. Erica and Sen are happy to announce that Sarah Shipp of Shippboard Games and Stephanie Campbell of TTRPGKids will be joining us for the next year, providing additional content between our longer episodes.
Sarah’s segment, Thinking Beyond Mechanisms, is a monthly feature that dives deeper into the other aspects of games beyond the dice and cards we’re all familiar with.
Stephanie’s segment, TTRPGKids, explores how parents and teachers can use role playing games with children in the home and in the classroom.
We hope you enjoy the additional content!
Our History
We aim for most Ludology episodes to be timeless, so you are welcome to explore our entire catalog. Most of it should age quite well. The podcast was started in 2011 by Geoff Engelstein and Ryan Sturm, with Mike Fitzgerald taking over for Ryan in 2015. Gil and Scott joined the show in 2017 when Mike stepped aside, and Emma joined in 2019 when Geoff ended his tenure as host. Emma left in 2021, and Erica and Sen joined us. Since then, Scott stepped down in 2022 and Gil will be hanging up his mic in 2023, leaving Erica and Sen to carry on this amazing legacy.
Erica and Sen are working to bring new voices to Ludology and have some great things to announce as gaming expands to include even more people!
Contact Us
Have your own thoughts about our topics? We encourage you to visit us at our guild on Boardgamegeek to get involved in a continuing discussion.
If you have questions that you’d like answered on Ludology, let us know by filling out this Google Form; you can also leave an audio question that we can use on the show, if you wish!
You can also make a one-time or monthly donation here. The link will take you to Erica’s account. People who donate in this way will not have access to the Patreon page – sorry!
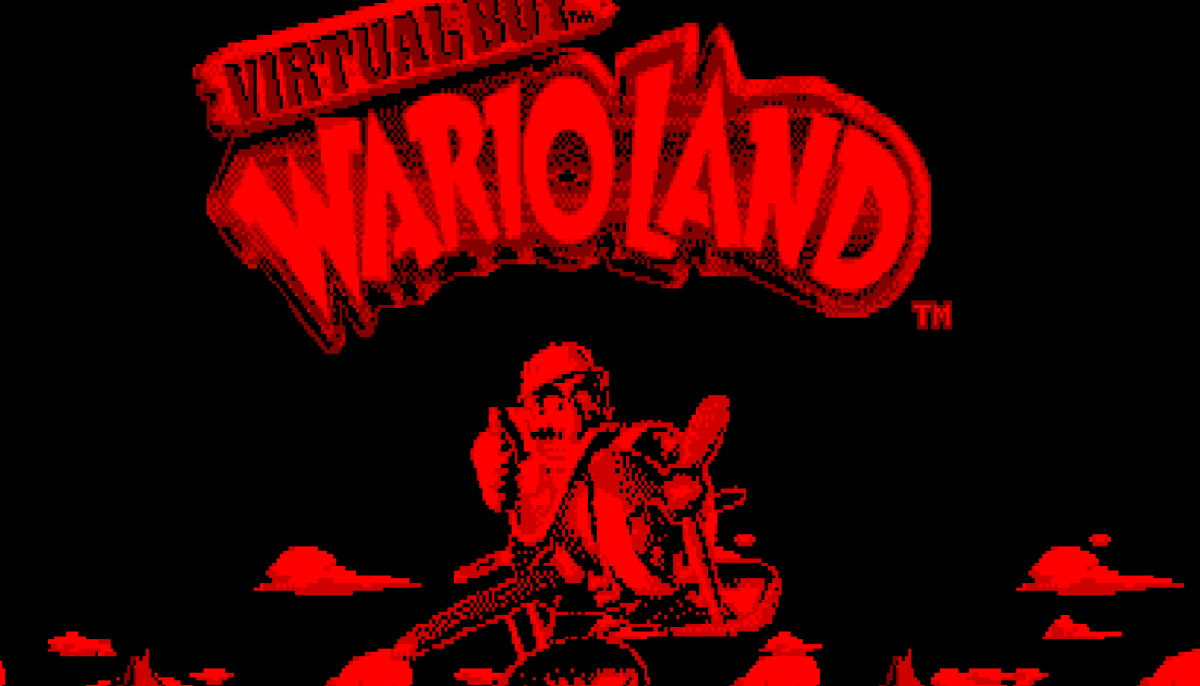
For every success, like the Nintendo Switch 2, there’s a dud, like the Virtual Boy. Released in Japan and America in 1995, it was developed by Game Boy creator Gunpei Yokoi as the next evolutionary step in gaming. However, this bulky red headset was arguably Dead on Arrival. Owners would complain about feeling nauseous after using the Virtual Boy for several minutes, and the games available were subpar at best.
The device was an example of Nintendo trying to be forward-thinking as to where the industry was going. However, despite Virtual Boy being a flop, there was one game that shone through: Wario Land. Although it was slightly similar to the first Wario Land that debuted on the Game Boy handheld in 1994, it differed in many ways, being regarded as an underrated classic, nearly 30 years on.
The Escapist recaps
The Virtual Boy was released 30 years ago in July 1995.
The system only supported games made for it, which could only have a black and red color scheme.
The system was a notable failure for Nintendo, perhaps remaining one of the biggest in the company’s past.
Wario Land is the best game of the 22 games made for the system.
The game made use of the system’s headache-inducing, but impressive at the time, 3D.
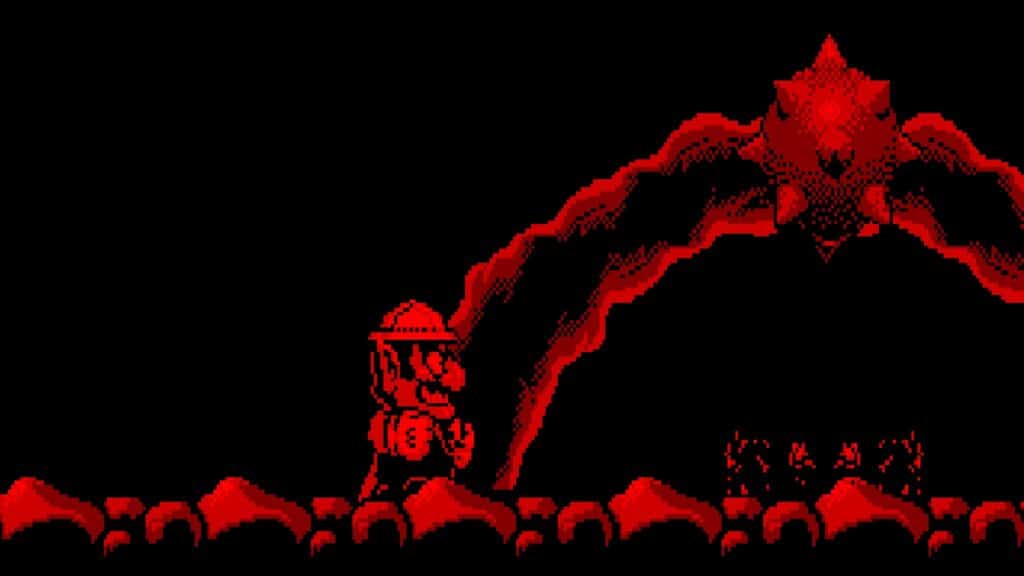
Art Style
It’s hard to fathom that Virtual Boy Wario Land came out just 18 months after the original Wario Land on the Game Boy, but it did. The extra power the headset offered meant that a crisper art style could be used.
Despite the red and black color scheme that tried to simulate 3D effects in the game, the way hazards like lava and enemies move brings the world alive. When you discover certain treasures in unique rooms, you feel as though it’s a special moment.
Background and Foreground
Although arguably part of the art style too, the effect of Wario being able to jump into the background and foreground is worth its own mention. As you run through the many levels, you’ll come across an arrow on the ground.
Jumping on this will have Wario leap to the background in a quasi-3D effect, adding to the parallax depth that the Virtual Boy tried to achieve. It may have seemed like a gimmick in other games like Golf and Mario Tennis, but Wario Land arguably did it right by making it a part of the levels so that treasures and more could be uncovered, as well as using the effect for enemies and bosses.
A New Hat
The art style of Wario Land translated surprisingly well to the black and red display. Image credit: Nintendo
Granting Wario new abilities via hats is a lost art in recent titles, but early on, collecting hats that looked like jets and dragons was a fun moment. These would enable Wario to fly through the levels, charge through them like a bull, or breathe fire in order to break blocks and destroy multiple enemies at once.
Despite Virtual Boy Wario Land having the same hats as its Game Boy predecessor, it did have a new one. Called the ‘King Dragon’ hat, this would combine two of these abilities at once, meaning Wario can fly and breathe fire at once, making certain moments ones to remember, but also makes us pine for a return of these abilities in a new Wario game someday.
Bosses
The bosses in the entire Wario Land series are arguably one of its best attributes. From the Genie in the first title to the mutated bat in the fourth game, they can be unpredictable, challenging, but very fun to play repeatedly. The same applies for this Virtual Boy entry, with each of the five bosses using the quasi-3D effects to appear between the background and foreground to try and hit Wario in various ways.
You’ll find robots, goblins, and more trying to hurt you with projectiles being fired from the background, but it’s the detail of these that makes a big impression when playing the game. They’re all incredibly fun to replay, even with the red and black color scheme.
Endings
Another lost art of the Wario Land series is the multiple endings players can get, depending on how much treasure gets collected throughout. The very first entry on Game Boy had a bunch of them, which could vary from Wario earning a birdhouse after collecting barely any treasure, to a whole planet after collecting a boatload.
The same applies to Virtual Boy Wario Land, with a few endings dependent on how much treasure you collect throughout the 14 levels. As you defeat the final boss, you’ll go into another room where it will show the treasure you’ve collected, and after the credits roll, Wario appears on a mode of transport. It could be a magic carpet, a blimp, or something more, totally dependent on how much treasure has been collected!
It’s a fun aspect to finish off the game, and could encourage you to try again to see what else Wario travels on.
Ask The Escapist
Did Nintendo ever try virtual reality after the Virtual Boy?
Although there have been modern attempts to bring Virtual Reality to the mainstream, like the Meta Quest and the PlayStation VR, Nintendo hasn’t returned to the format since the Virtual Boy. It did have great success with stereoscopic 3D, though, with the 3DS consoles.
Does Wario remain relevant to Nintendo after the Virtual Boy’s failure?
Wario has never eclipsed Mario in terms of popularity, but he remains a favorite of Nintendo players, especially thanks to the bizarre yet wonderful WarioWare series. Although he’s not had a platformer outing since 2008’s Wario Land: Shake It!
The Escapist is supported by our audience. When you purchase through links on our site, we may earn a small affiliate commission. Learn more about our Affiliate Policy
So the general setup is as follows. Left hand opponent opens the bidding with 1 NT (strong, balanced, 15-17 HCP), partner doubles (for penalty, promising 16+ HCP), right hand opponent passes. Which kind of hands should make any non pass bid now?
Note that at least 31 HCP are already accounted for, so own hands is guaranteed to be fairly low in HCP and partner didn’t provide any information about shape or suit preferences.
Background, I recently played a hand on bridgebase where I did the doubling and my robot partner bid 2 hearts. I was fairly clueless what I should expect from partner there.
In previous installments of this series we spent a lot of time on how the game works on the tactical scale, from the Dynamic Hexes and Counters and the Simple Structure of the action system, to how the opposition bot uses Contact to Contest Control. We began bridging the gap between the tactical and operational scales in our discussion of how Roguelikes and the OODA Loop influenced the campaign model. The game has been designed to provide a unique and challenging experience for players across the individual scenarios, while also modeling the relationship between those tactical engagements and the broader operational picture.
One of the reasons the Battle of Ortona was a perfect first entry into the system is because it is a fairly isolated battle. A single allied division against two axis divisions (one replacing the other), with clear territorial starting and ending positions and a linear timeline of the progress across the whole operation. There are records from both military and civilian sources that allow for quantitative and qualitative views into the battle, which inform how the dynamics are represented in the game.
The Canadian First Infantry Division Organizational Sheet with the HQ counters from division down to brigade to regiment. This tracks their casualties to reflect effective strength alongside the estimated casualties inflicted on the Germans.
At no time during the Battle of Ortona was the whole division engaged with the enemy. Individual engagements only grew larger than company sized with reinforcements. At the operational scale the game is about managing the logistics so that those company platoons engage and defend with the support and positional advantages needed to take and hold their territorial objectives.
The logistics are challenging. Getting armor across the Moro River when the Germans have already hit the bridges with artillery fire. Not stretching too far too fast to avoid falling out of range of friendly artillery support. Rotating formations so as not to push any of them past their breaking point. These dynamics are modeled into the mechanics of the operational system, such that the full campaign could be played through. without pulling out an engagement map. and still provide engaging play with a strong level of historical tension. As soon as the campaign rules were in a strong place, I put that theory to the test and was pleased to find that the model held together exceptionally.
The game comes with two point to point operational maps, one is of the Regional area just outside the town, while the other is the Urban area in the town itself. Many of the point-to-point positions on these maps correspond to the locations on the engagement maps. During the full campaign game players can choose to play a single engagement on each map based on the operational positions of units when they make that decision. Action between those engagements are resolved with a system that compliments the action system of the tactical engagements.
The operational maps use HQ and Formation counters to represent forces on both sides. The player deploys formations from Regiment HQ’s, deployed from Brigade HQ’s, deployed from the Canadian First Infantry Division HQ. This forms a logistical supply chain as players try to move first across the regional approach, to finally take Ortona proper. It is up to the player to move the formations and their support into positions that provide the advantage needed to complete objectives. Of course the enemy gets a turn as well, and may disrupt those plans.
PLAYTEST ART NOT FINAL: The point-to-point operational maps. On the left is the regional map showing HQs from the Canadian 1st Infantry Division opposing the unknown forces from the German 90th Panzergrenadierdivision across the Moro river. On the right is the urban map in the town of Ortona where the first Canadian infantry are just entering the town as defended by the German 1st Fallschirmjägerdivision.
Most of the mechanics for operational play are very similar to those in the tactical engagement. Both sides have activation phases which are played in an order determined by initiative, using the same Resolve Roll of 1d6 and 2d8 from the tactical rules. Where turns for the tactical engagements are measured in minutes of time, turns for the operational campaign cover a half a day of activities across the whole front. Limits on activations will determine how much of that front will be able to use the initiative to act. The player uses those activations to activate locations and take an action that moves formations and/or attacks adjacent enemies. There is also the opportunity to use artillery fire on locations in range. The Germans have their own guns which will target deployed units, as will their formations which use a hidden movement mechanic that does not reveal their strength until the time of engagement.
PLAYTEST ART NOT FINAL: Division Sheet from mid campaign showing the status of the Regiments. Single slashes represent deployed units, while x’s indicate the casualties suffered. HQ markers on the sheet are considered in the rear while the missing ones are deployed on the map. On the left are tracking of available replacements and approximate German casualties. Filled like this means that the Canadians just pushed the 90th Panzergrenadierdivision to their break point and they are about to be reinforced.
“I shall always regret deeply, very deeply, there ever had to be casualties. Casualties cannot be separated from battles. A commander at any level cannot shirk unpleasant decisions, whether he be corporal or general or any rank in between. If he does shirk such decisions, he is unfit to command in battle.”
– Major General Christopher Vokes 1st Canadian Division
A crucial part of the design for the campaign are casualties. Casualties are tracked across the campaign as a measure of effectiveness for the division and the individual regiments. There is a lot of ground to be covered and sustaining combat effectiveness for the full campaign is necessary to achieve success. German casualties are tracked as well, making it possible to shatter the opposing divisions through attrition. Indeed the Germans will replace their initial division if the allies are able to render them ineffective. If they do the same to the replacement division fast enough they could force a full withdrawal which would represent the highest level victory. The risk in attempting this however is that engaging the enemy too aggressively puts your own units at risk of taking heavy casualties themselves. The player has to be smart about when and how they choose to engage, never losing sight of the big picture.
PLAYTEST ART NOT FINAL: December 10 and 13 on the regional maps of the campaign as the Canadian 1st Infantry Division first works to secure their positions across the Moro then prepares to face off at The Gully.PLAYTEST ART NOT FINAL: December 15-16. Note how far the Canadian HQ’s are from the town (upper right corner) as the German 1st Fallschirmjägerdivision takes over the area, contesting Canadian positions near The Gully. They hold the Canadians off for three days of intense fighting before pulling back to prepare to defend the town.
A recent play of the campaign highlighted the challenge the campaign presents. While the German resistance on the regional map was strong I was able to coordinate the strength to push them back into the town ahead of the historical date. In the turns leading up to this however, I was so focused on the fighting at the front, I failed to take the time to coordinate the positions of my HQs in reserve and support formations (armor and artillery). It wasn’t until two days after the first infantry arrived in Ortona proper, that the armor support was able to reach the town limits. This slowed the infantry momentum down and allowed the Germans to continue to build defenses. Those defenses were able to delay the Canadians long enough to prevent them from progressing to the north end of the town in the historical timeframe.
PLAYTEST ART NOT FINAL: It isn’t until Christmas Eve that proper armor support is able to make it into the town proper, and even with that support by December 27th they have not made it to the Cathedral in the north. German armor and anti-tank defenses were able to slow the progress.PLAYTEST ART NOT FINAL: The Division Sheet on December 28th, showing the heavy casualties suffered by the Canadians. The 48th Highlander and Carlton & York Regiments have lost over a third of their effective strength each. While the Germans have yet to reach their breaking point.
The story of this play can be seen in the Division Sheet. Canadians suffered casualties that seriously hampered multiple regiments. The Germans took their share of casualties as well, but critically their defenses held when they needed to. The play was full of drama and tension even without playing out any full engagements. Having tested the range of historical results from individual engagements, combined with what is being reflected at the operational scale, players will be able to play through the complete Battle of Ortona and face both the tactical and operational challenges exhibited by the history.
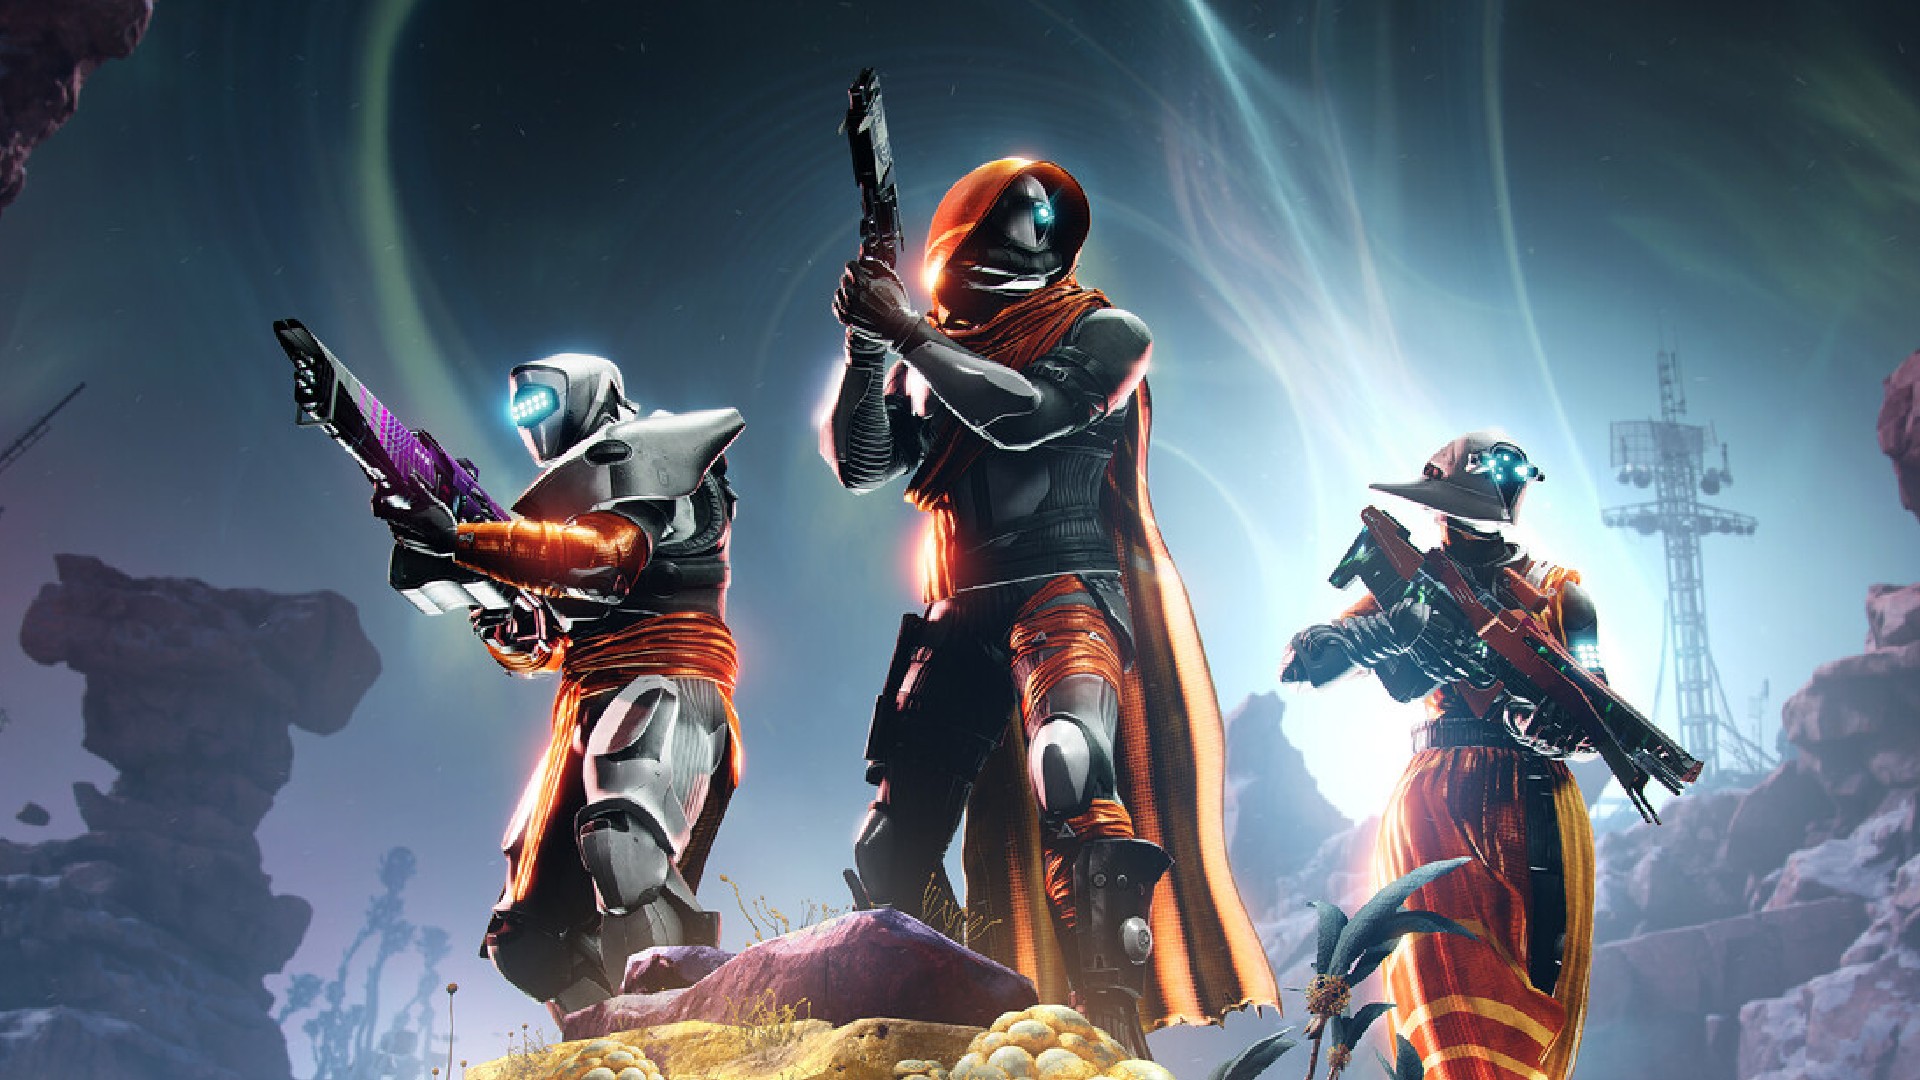
Oh, Destiny 2, my beloved. Like a toxic relationship, it keeps me coming back for more. While I’m not huge on the seasonal content between each major expansion, ever since Destiny’s original release back in 2014, I’ve been in love with the world. After the explosive finale of the Light and Darkness Saga, Destiny 2’s Edge of Fate is bringing us into a new era – one that you can already grab on sale.
The Final Shape, which was the last expansion of the previous saga, cemented Destiny 2 as one of my favorite FPS games, but I can’t deny and pretend that I wasn’t disinterested in the epilogue. The three seasons, Echoes, Revenant, and Heresy, looked great, but after such an incredible end to a decade-long saga, I took a break.
However, I can feel the call of the Traveler pulling me back, and with The Fate Saga opening up Destiny’s universe even more, I’m excited. For one, Destiny 2’s builds have changed with the introduction of Armor 3.0, as well as the new gear tier system, something that delivers major changes to the game for new and veteran players.
However, those are both free updates. Edge of Fate is the paid expansion, and despite Destiny’s overarching universe being massive in lore, we’re only just seeing the edge of our home’s solar system. The DLC delivers a new story, giving you the first taste of Destiny 2’s latest saga, alongside an interesting area to visit, as well as fresh gear to unlock.
If you’re keen to play Destiny 2 Edge of Fate, you can grab it for just $34.79 / £30.44 at Fanatical, a 13% discount on the typical price. You don’t need to wait around for a Steam sale to grab a bargain.
Alternatively, if you’re a Destiny 2 diehard like me, you can always opt for the Destiny 2 Year of Prophecy Ultimate Edition, which includes Edge of Fate, the upcoming Renegades DLC, and a bunch of other goodies like Star Wars-inspired armor sets. That’s just $86.99 / £73.94 at Fanatical right now, which also works out at 13% off.
Before setting off into Destiny 2 Edge of Fate, you should get a reminder on the Destiny 2 classes. Personally, I’m sticking with my Warlock for my first playthrough. Also, now’s your chance to finally spend time optimizing your game, so check our Destiny 2 best settings guide.
You can follow us on Google News for daily PC games news, reviews, and guides. We’ve also got a vibrant community Discord server, where you can chat about this story with members of the team and fellow readers.
Welcome to Ludology, an analytical discussion of the hows and whys of the world of board games. Rather than news and reviews, Ludology explores a variety of topics about games from a wider lens, as well as discuss game history, game design and game players.
We post a new Ludology episode every other week. In these episodes, hosts Erica Bouyouris and Sen-Foong Lim deep-dive into a single topic within game design, often with a well-regarded guest from the game industry. We generally focus on tabletop game design (mainly board games and RPGs), but we often pull in experts from all forms of games, from video games to escape rooms to slot machines.
On weeks where there is no flagship Ludology episode, we will alternate between two smaller mini-sodes. Erica and Sen are happy to announce that Sarah Shipp of Shippboard Games and Stephanie Campbell of TTRPGKids will be joining us for the next year, providing additional content between our longer episodes.
Sarah’s segment, Thinking Beyond Mechanisms, is a monthly feature that dives deeper into the other aspects of games beyond the dice and cards we’re all familiar with.
Stephanie’s segment, TTRPGKids, explores how parents and teachers can use role playing games with children in the home and in the classroom.
We hope you enjoy the additional content!
Our History
We aim for most Ludology episodes to be timeless, so you are welcome to explore our entire catalog. Most of it should age quite well. The podcast was started in 2011 by Geoff Engelstein and Ryan Sturm, with Mike Fitzgerald taking over for Ryan in 2015. Gil and Scott joined the show in 2017 when Mike stepped aside, and Emma joined in 2019 when Geoff ended his tenure as host. Emma left in 2021, and Erica and Sen joined us. Since then, Scott stepped down in 2022 and Gil will be hanging up his mic in 2023, leaving Erica and Sen to carry on this amazing legacy.
Erica and Sen are working to bring new voices to Ludology and have some great things to announce as gaming expands to include even more people!
Contact Us
Have your own thoughts about our topics? We encourage you to visit us at our guild on Boardgamegeek to get involved in a continuing discussion.
If you have questions that you’d like answered on Ludology, let us know by filling out this Google Form; you can also leave an audio question that we can use on the show, if you wish!
You can also make a one-time or monthly donation here. The link will take you to Erica’s account. People who donate in this way will not have access to the Patreon page – sorry!
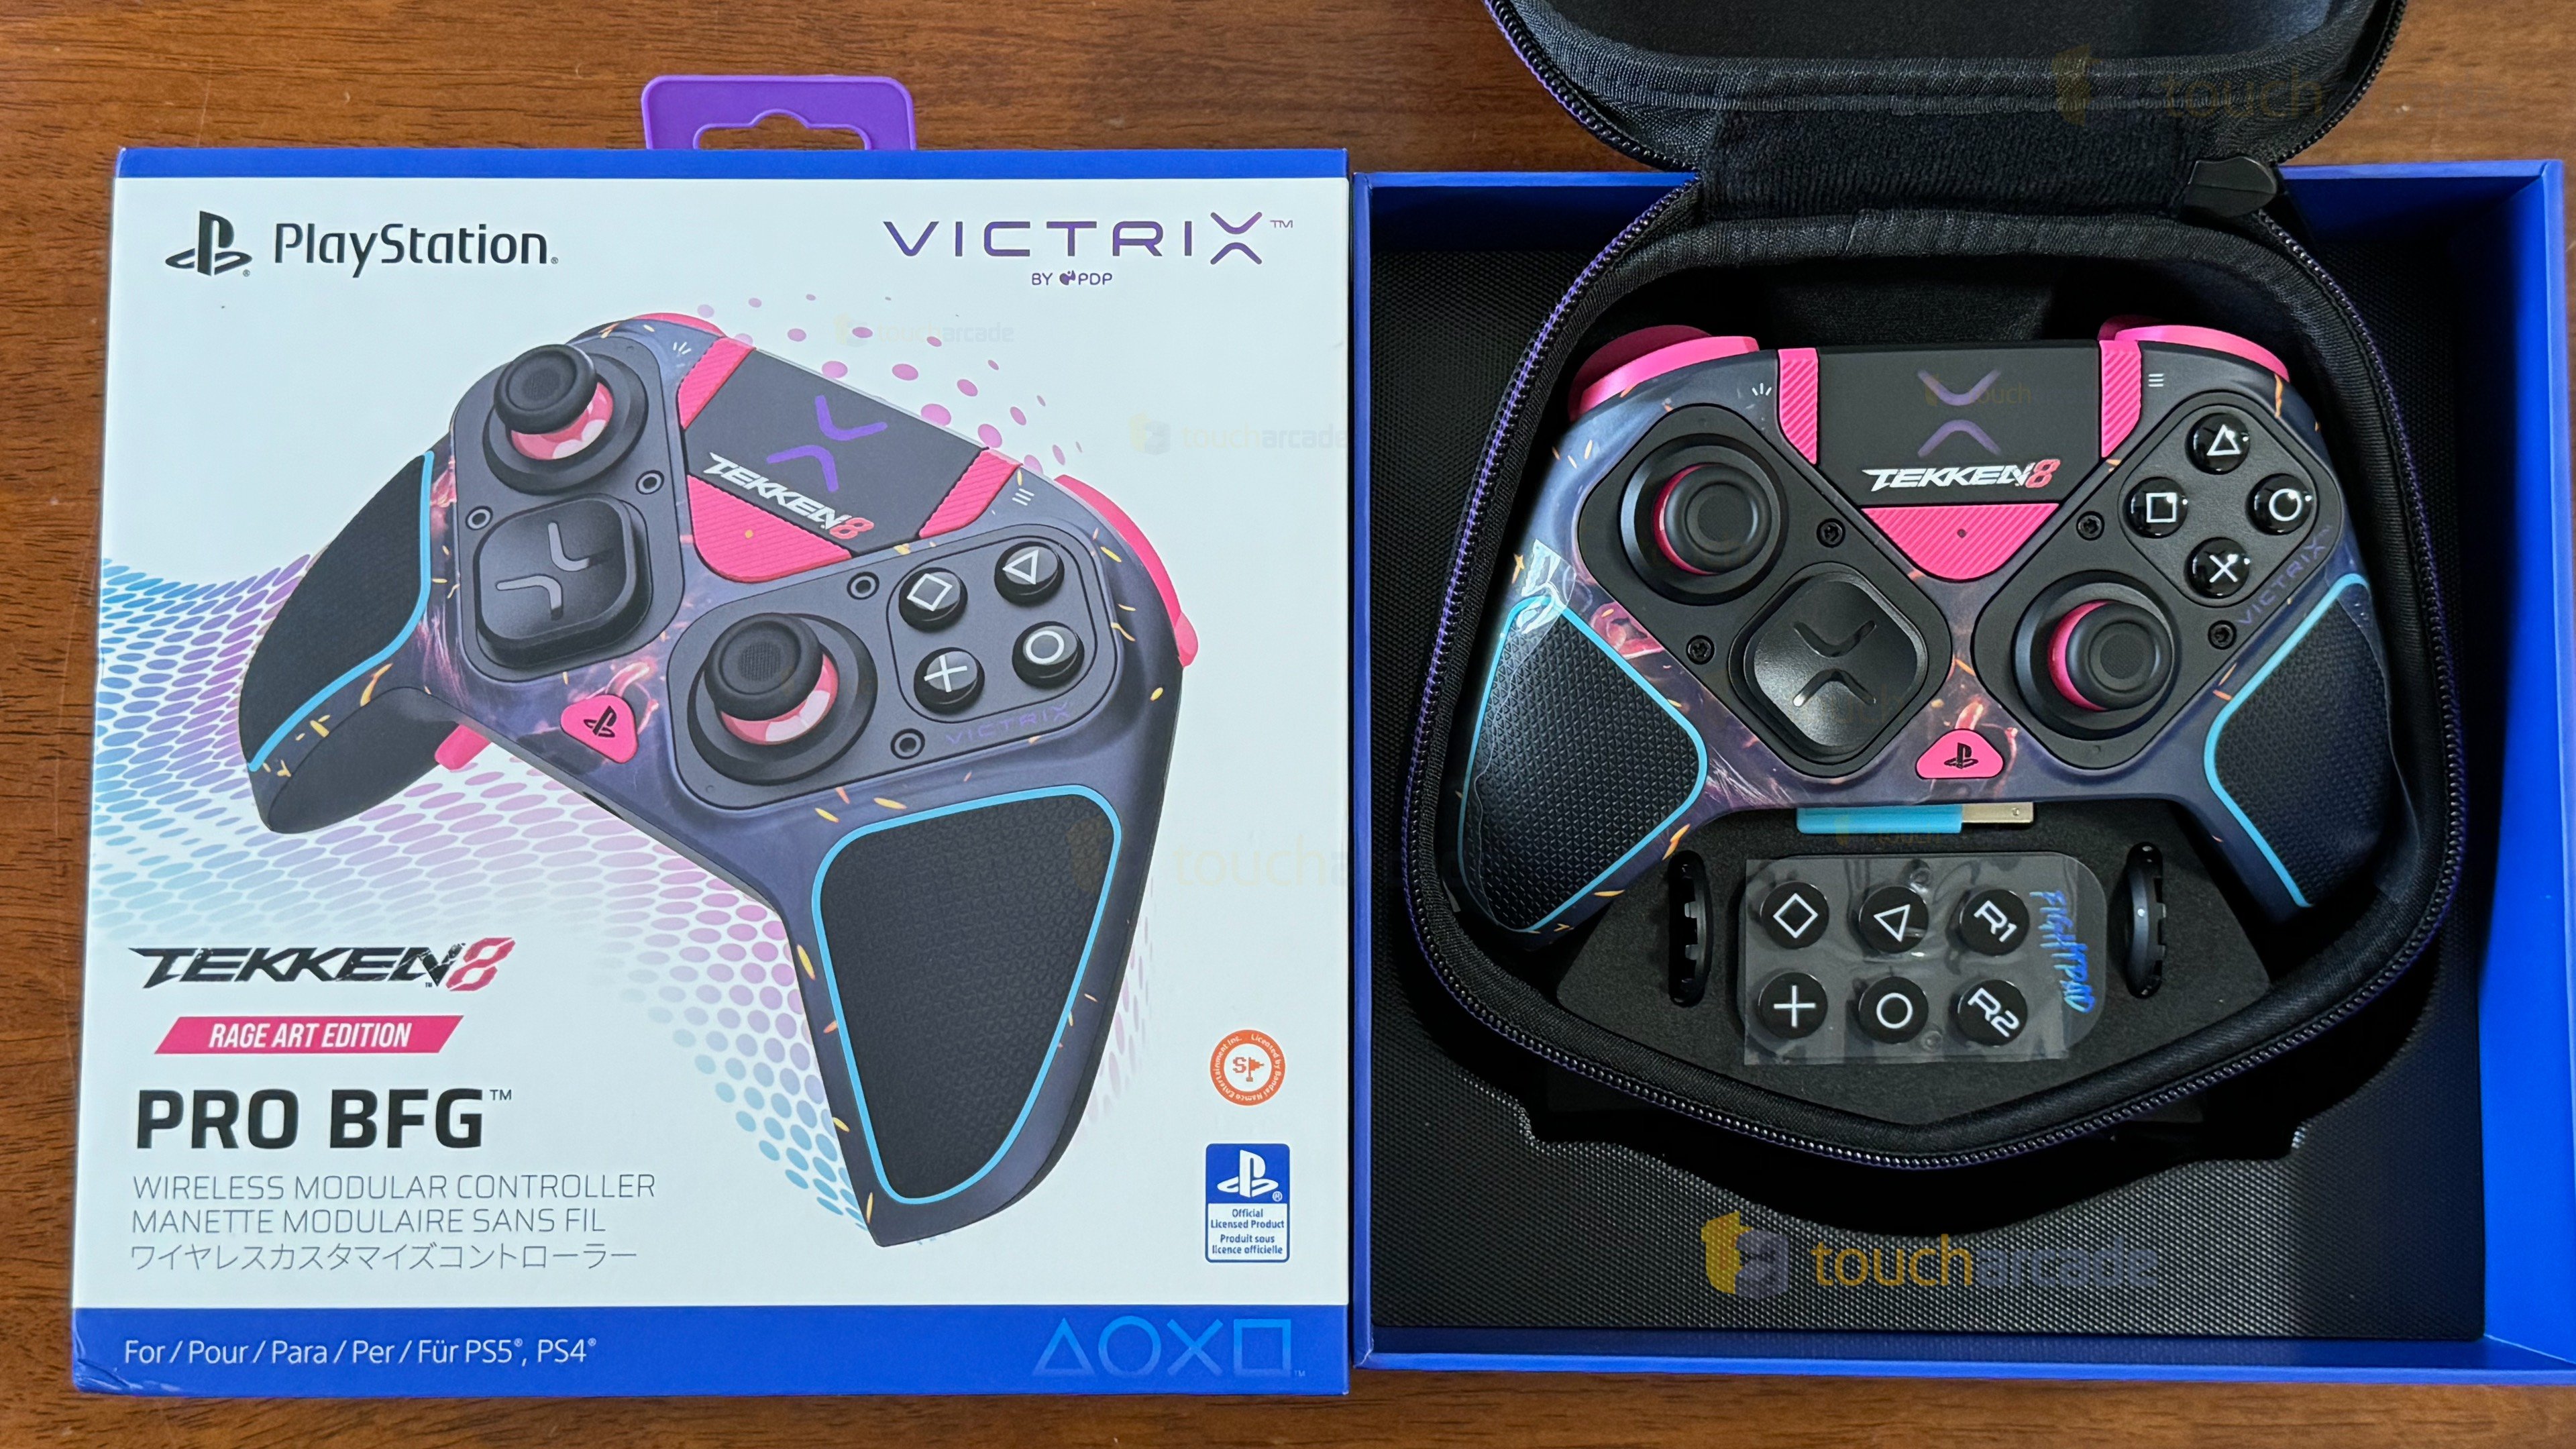
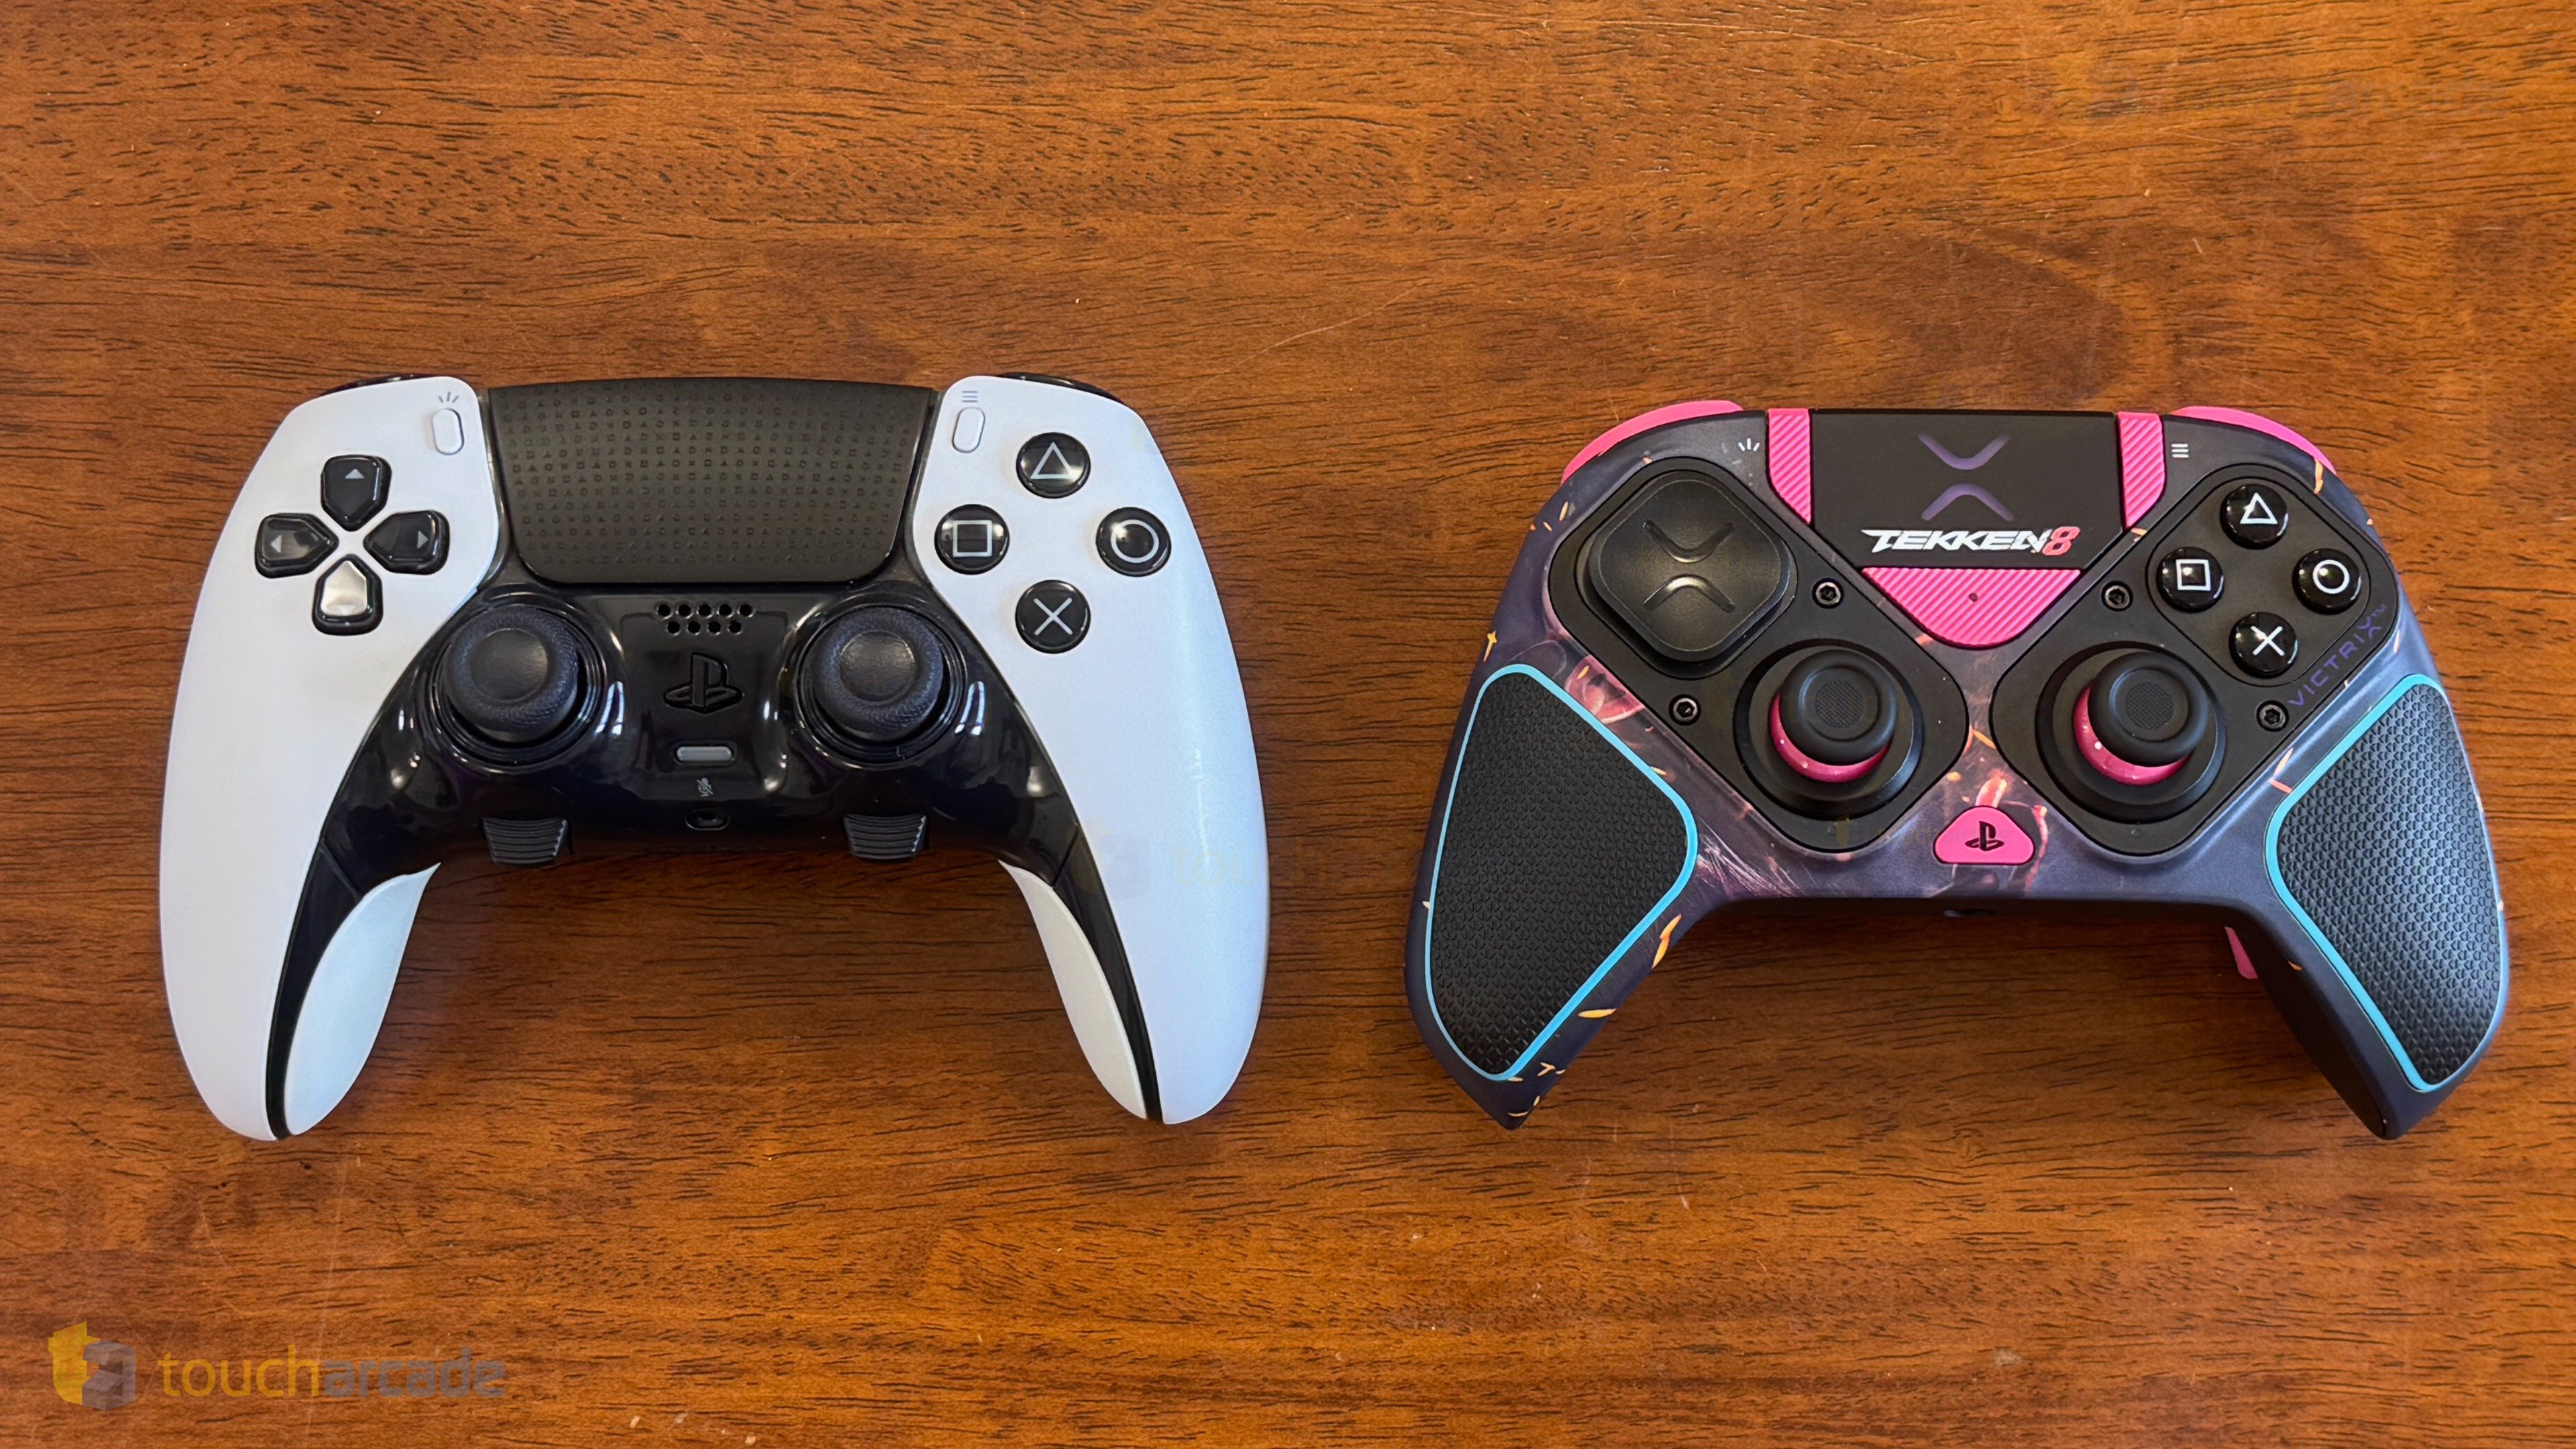
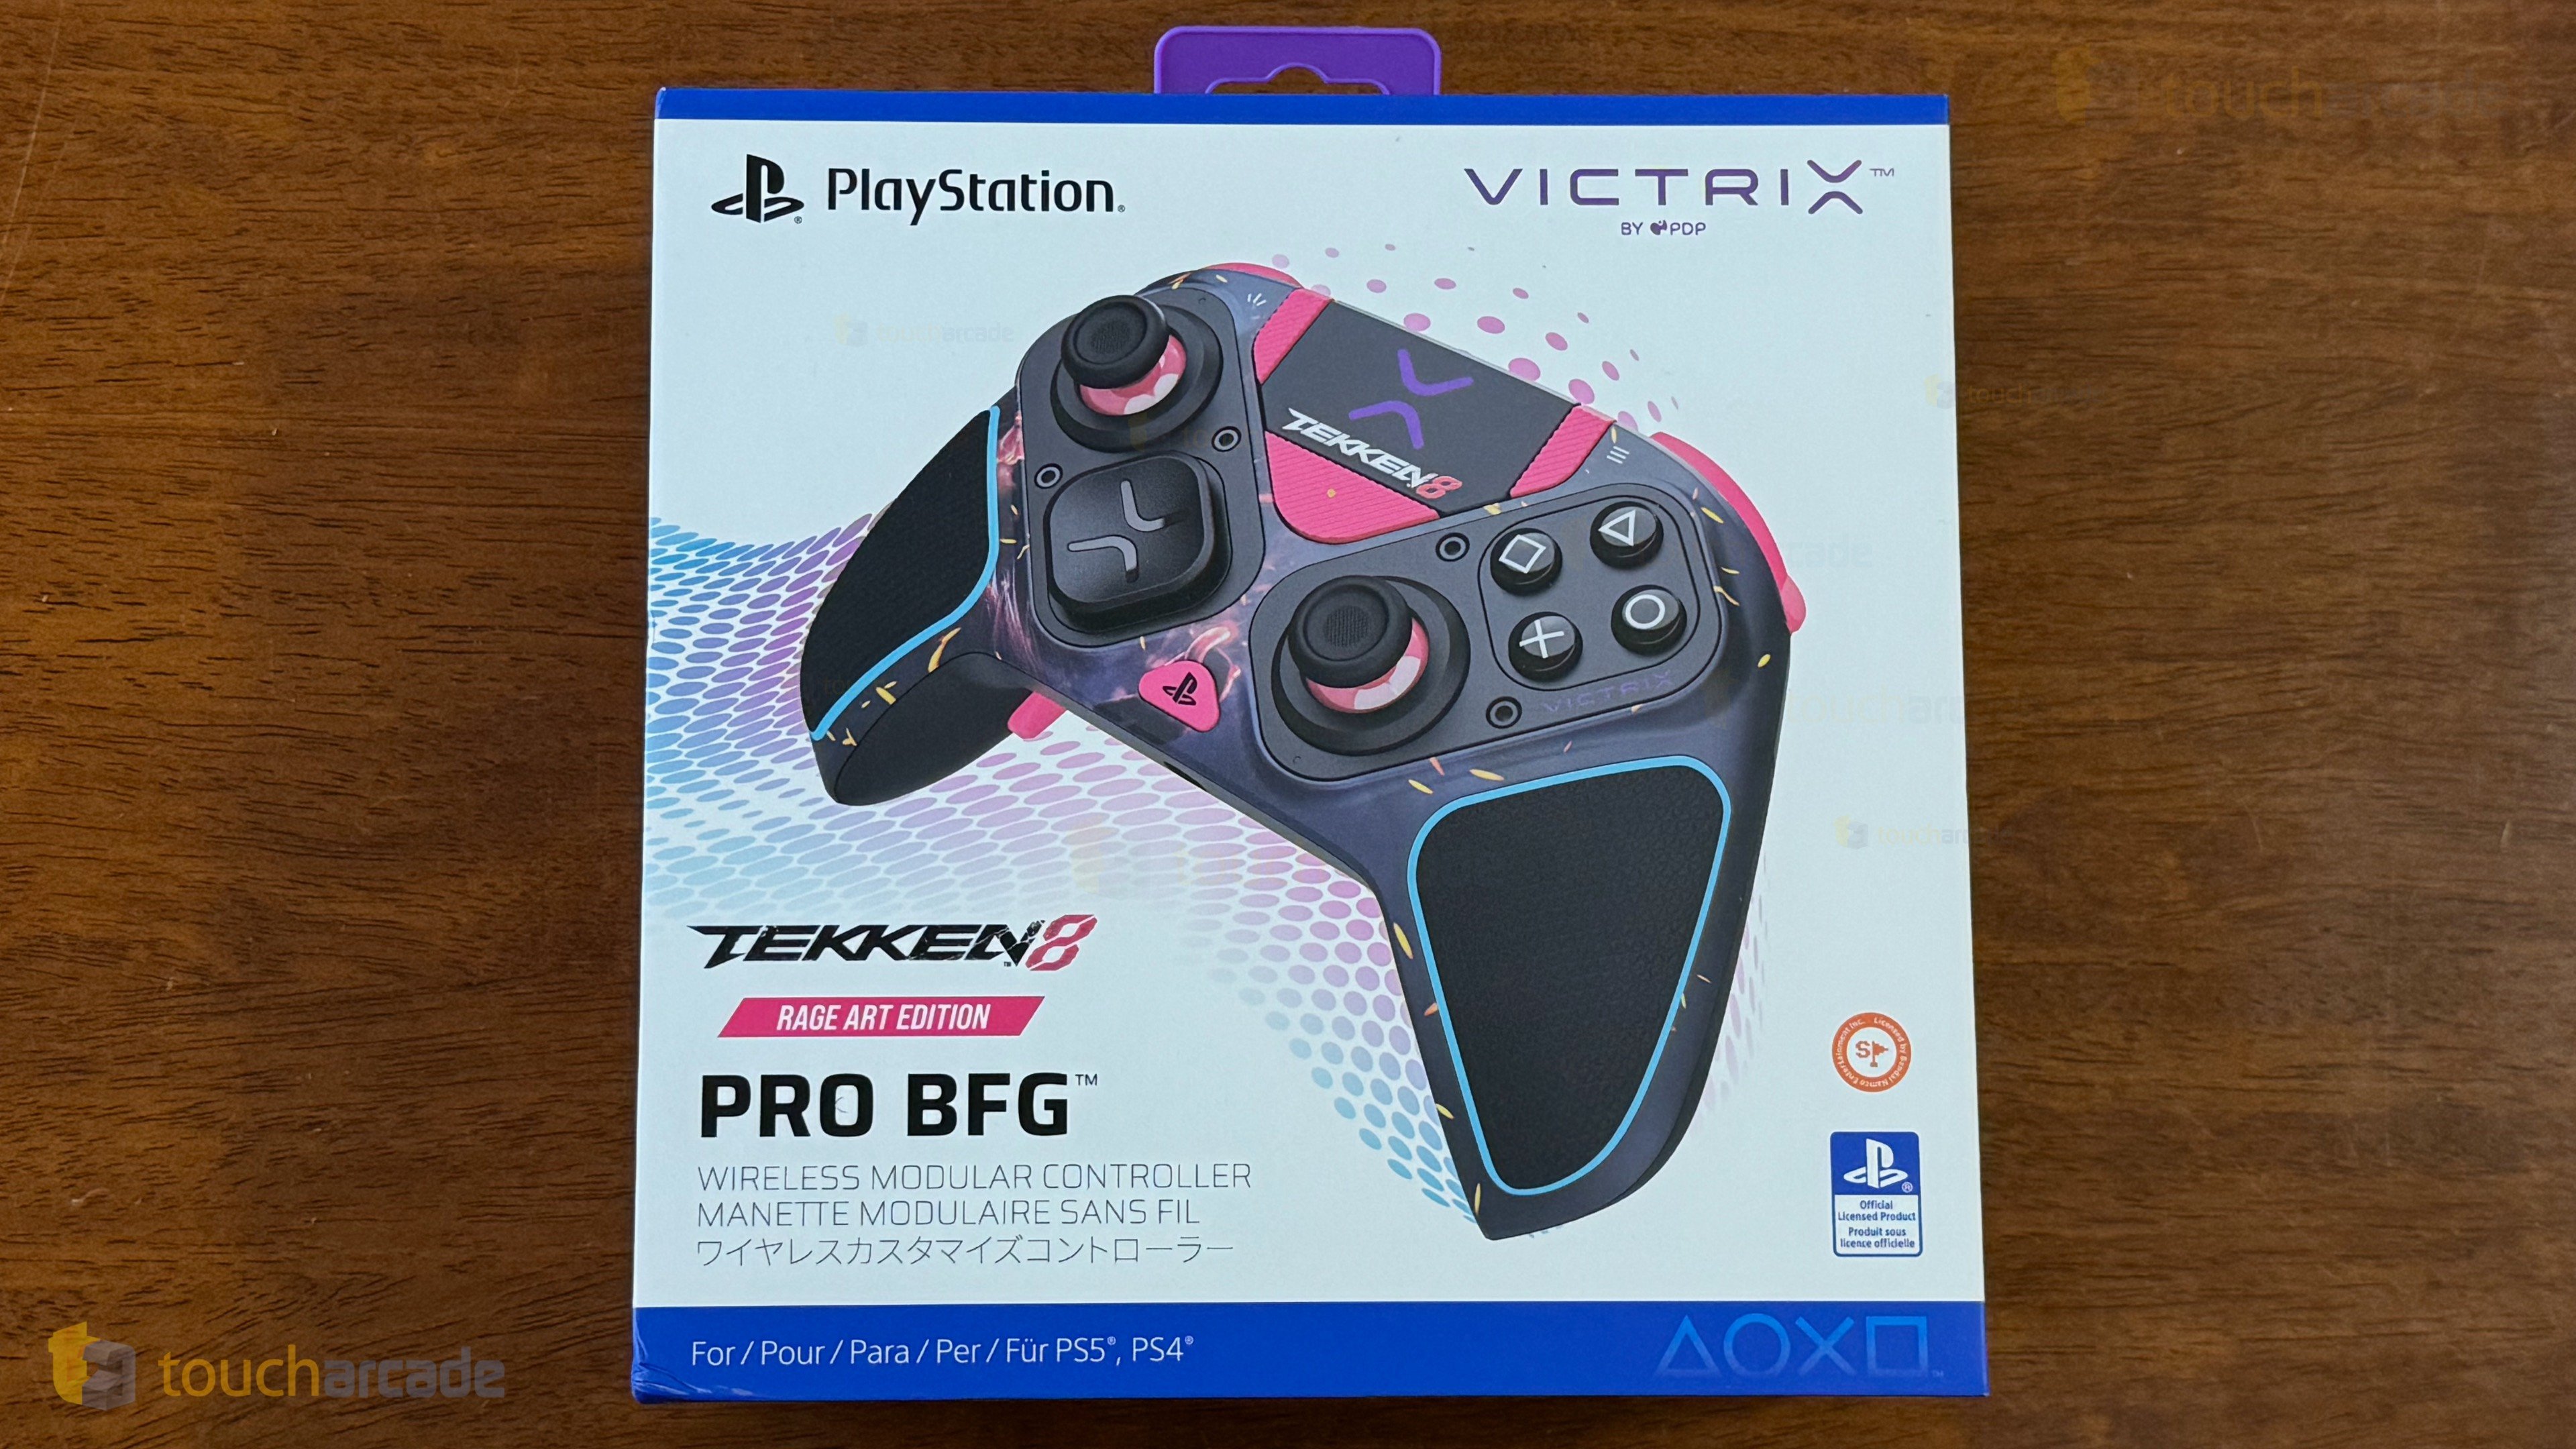
For our last full controller review on TouchArcade, I’ve been using the Victrix Pro BFG Tekken 8 Rage Art Edition for PC and PlayStation across my Steam Deck, PS5, and PS4 Pro for over a month now. Before I interviewed PDP Victrix about the controller and arcade sticks, I was very curious about the controller for its modular nature and also because I’ve wanted to try out another “Pro” controller after adoring the Xbox Elite (1st generation) and DualSense Edge over the years.
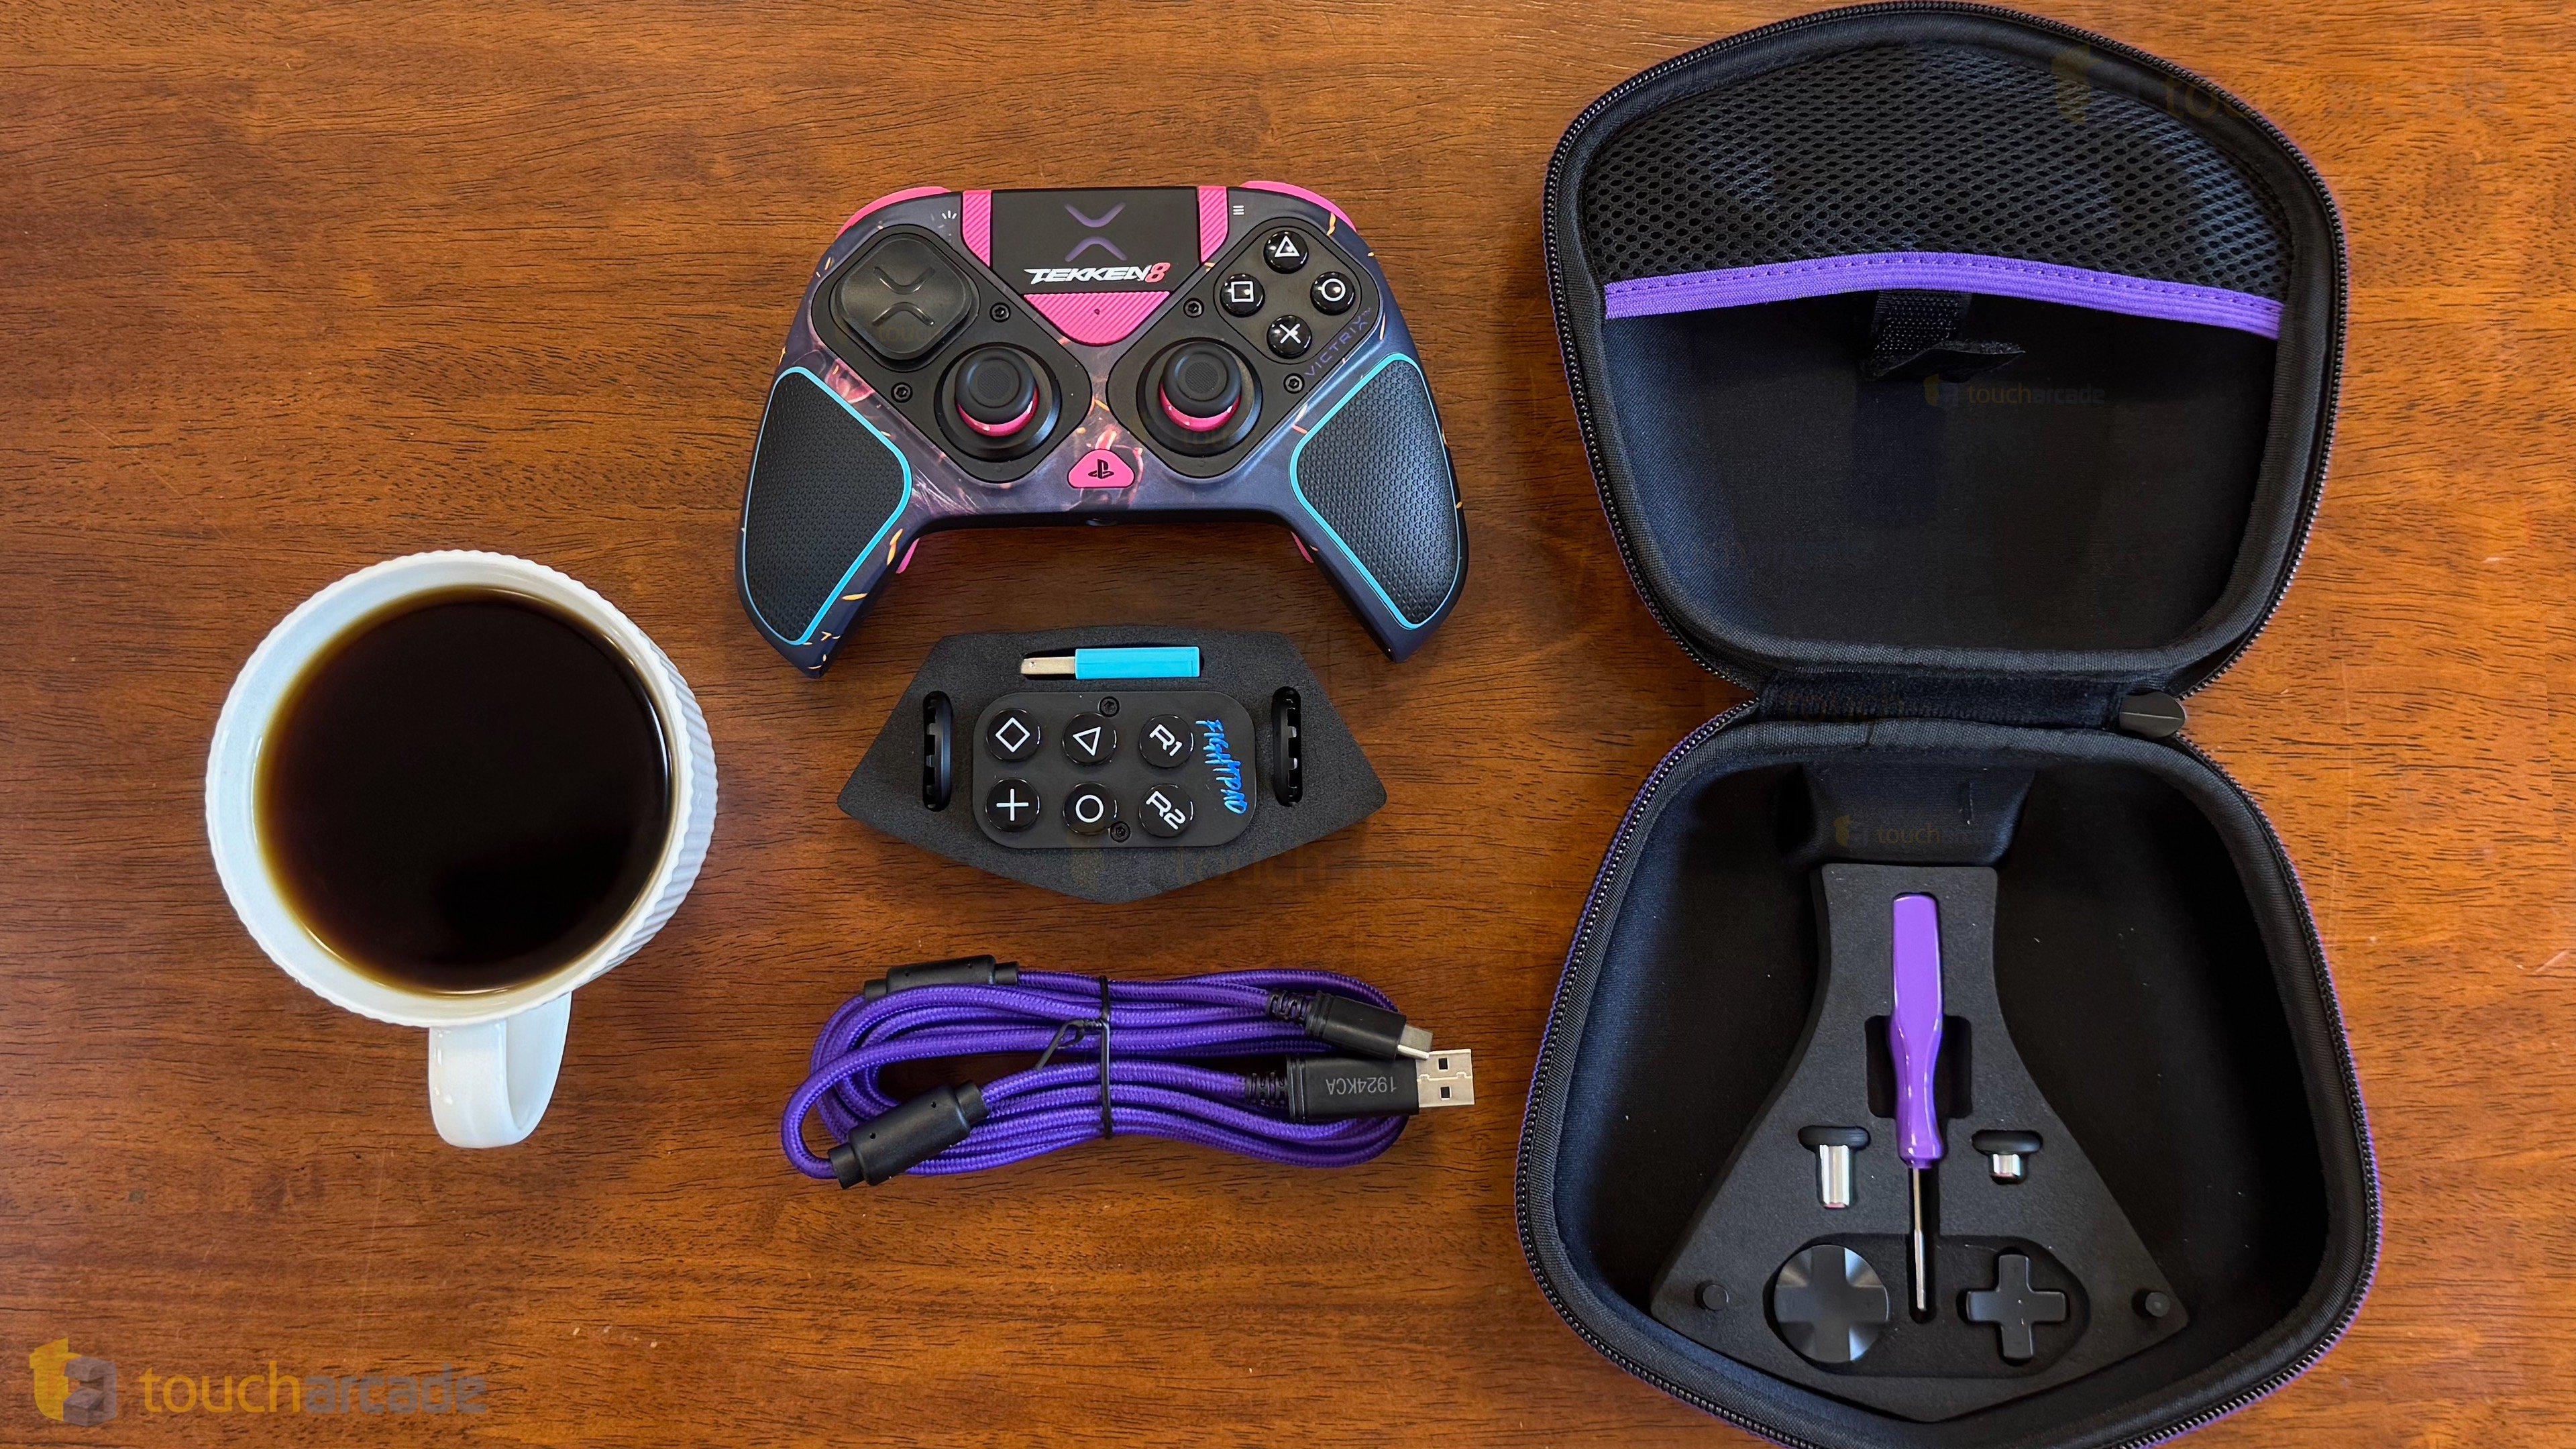
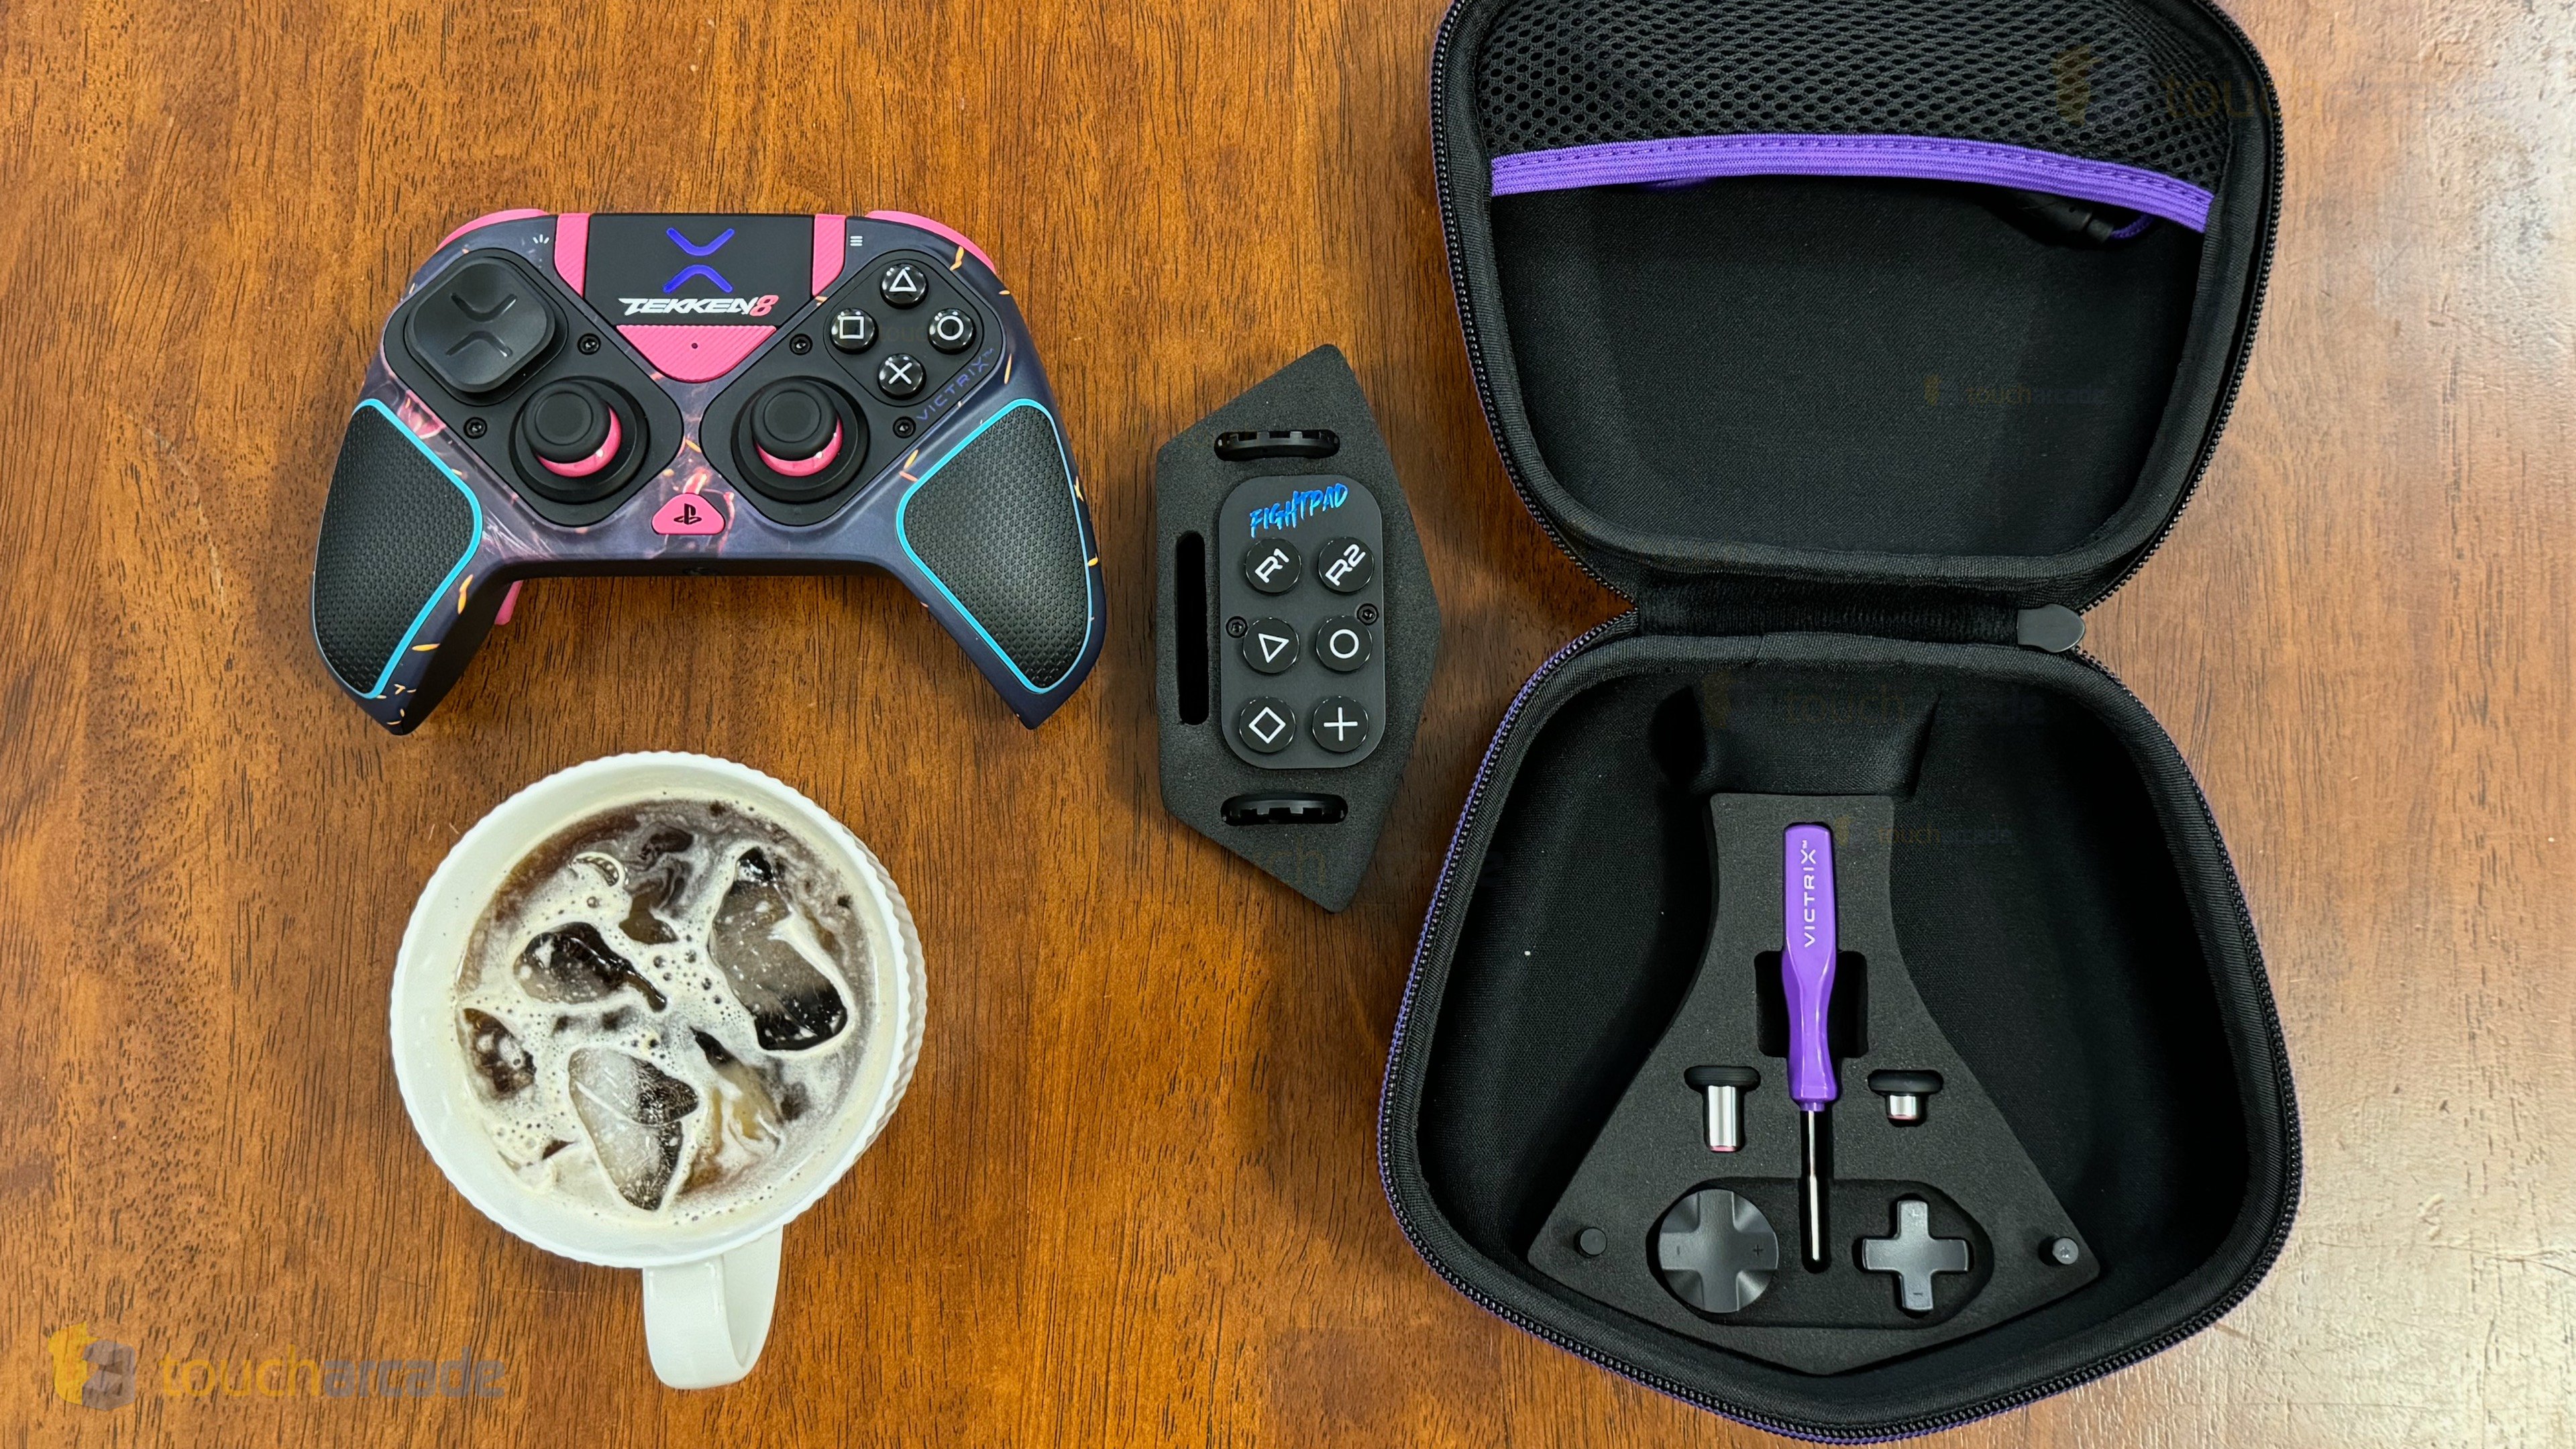
Victrix Pro BFG Tekken 8 Rage Art Edition Controller – what’s in the box
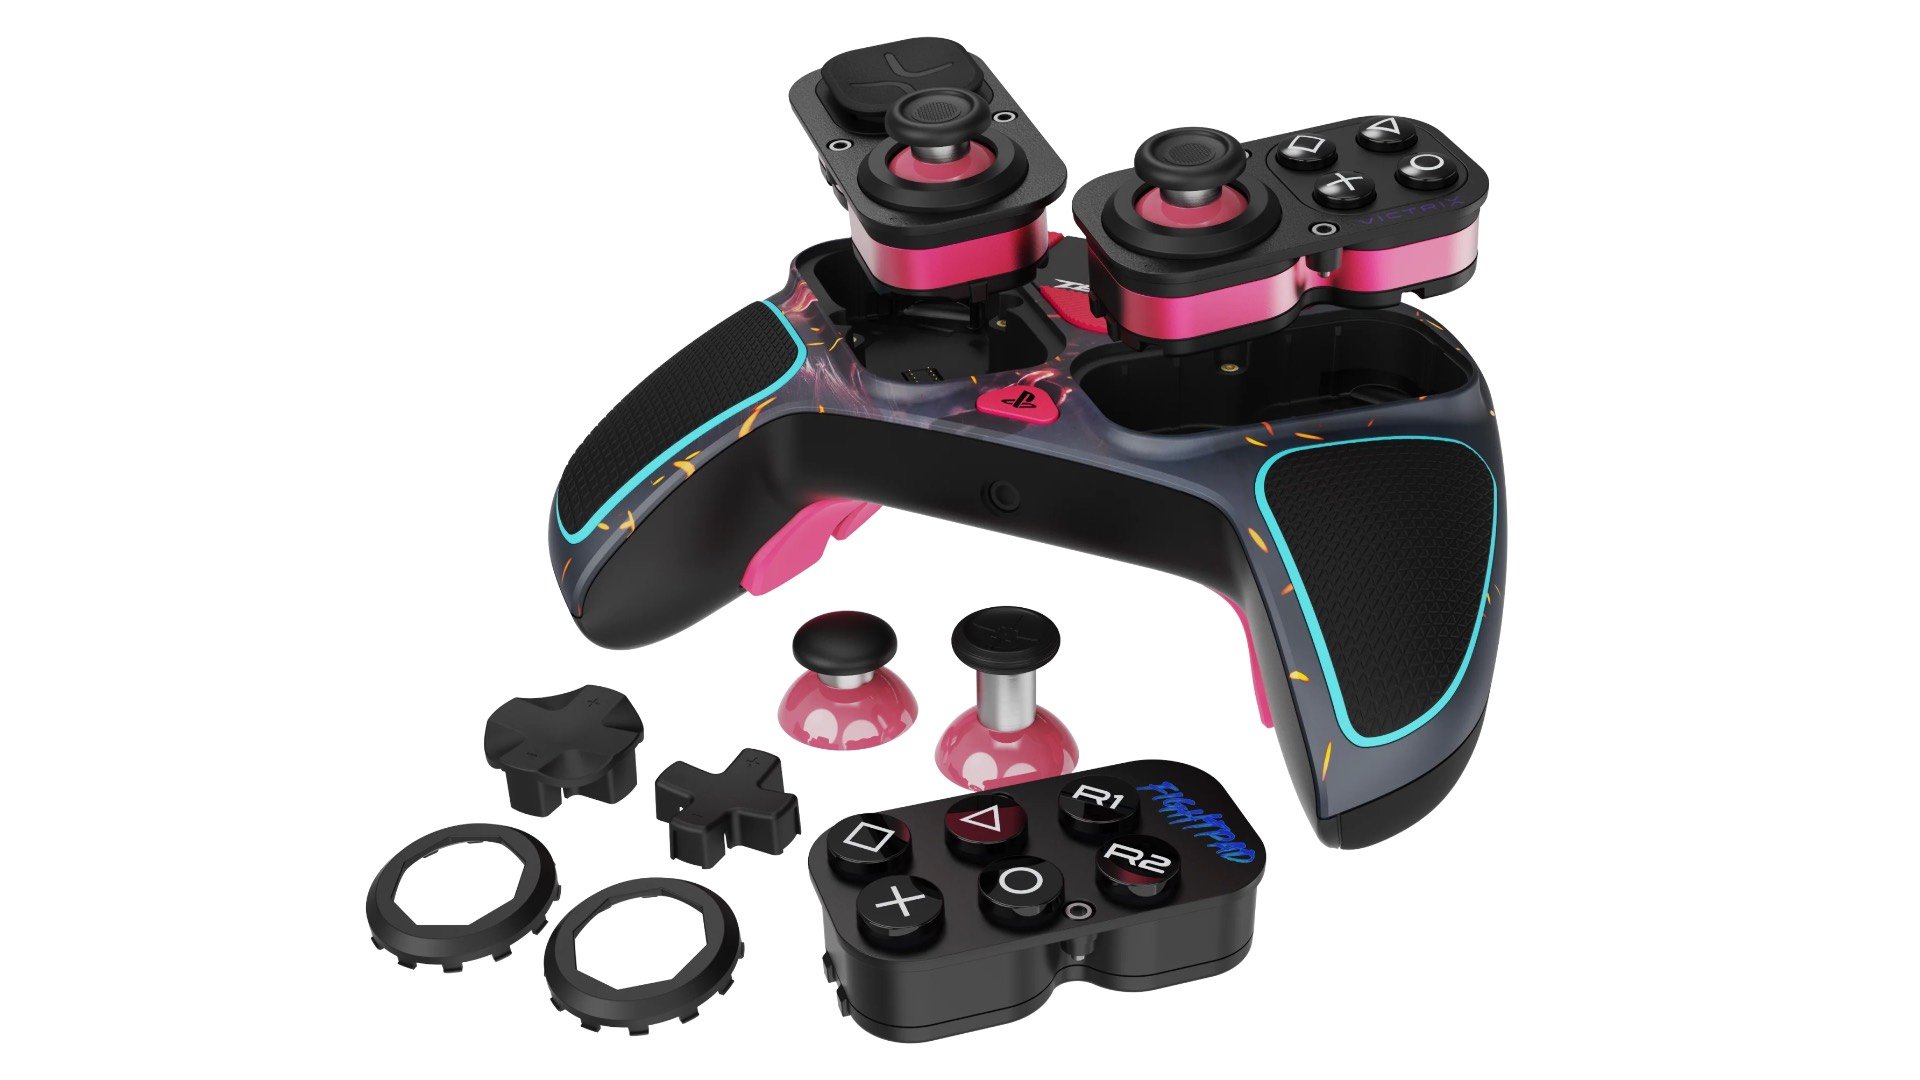
Usually, controllers just ship with a cable and sometimes a charging stand. In the case of the Victrix Pro BFG Tekken 8 Rage Art Edition, you get the controller, a braided cable, a high quality protective case to house the controller and everything else it ships with, a replacement fightpad module with a six button layout for fighting games, two gates, two replacement analog stick caps, two d-pad caps, a screwdriver for use with the controller, and a blue wireless USB dongle.
The items are all neatly placed within the case which is very good quality on its own. Unlike the normal Victrix Pro BFG controller, some of the items with this one are themed to match the new Tekken 8 Rage Art Edition aesthetic. Keep this in mind as I don’t see replacements available officially for this, but I hope they start selling them soon.
Victrix Pro BFG Tekken 8 Rage Art Edition Controller compatibility
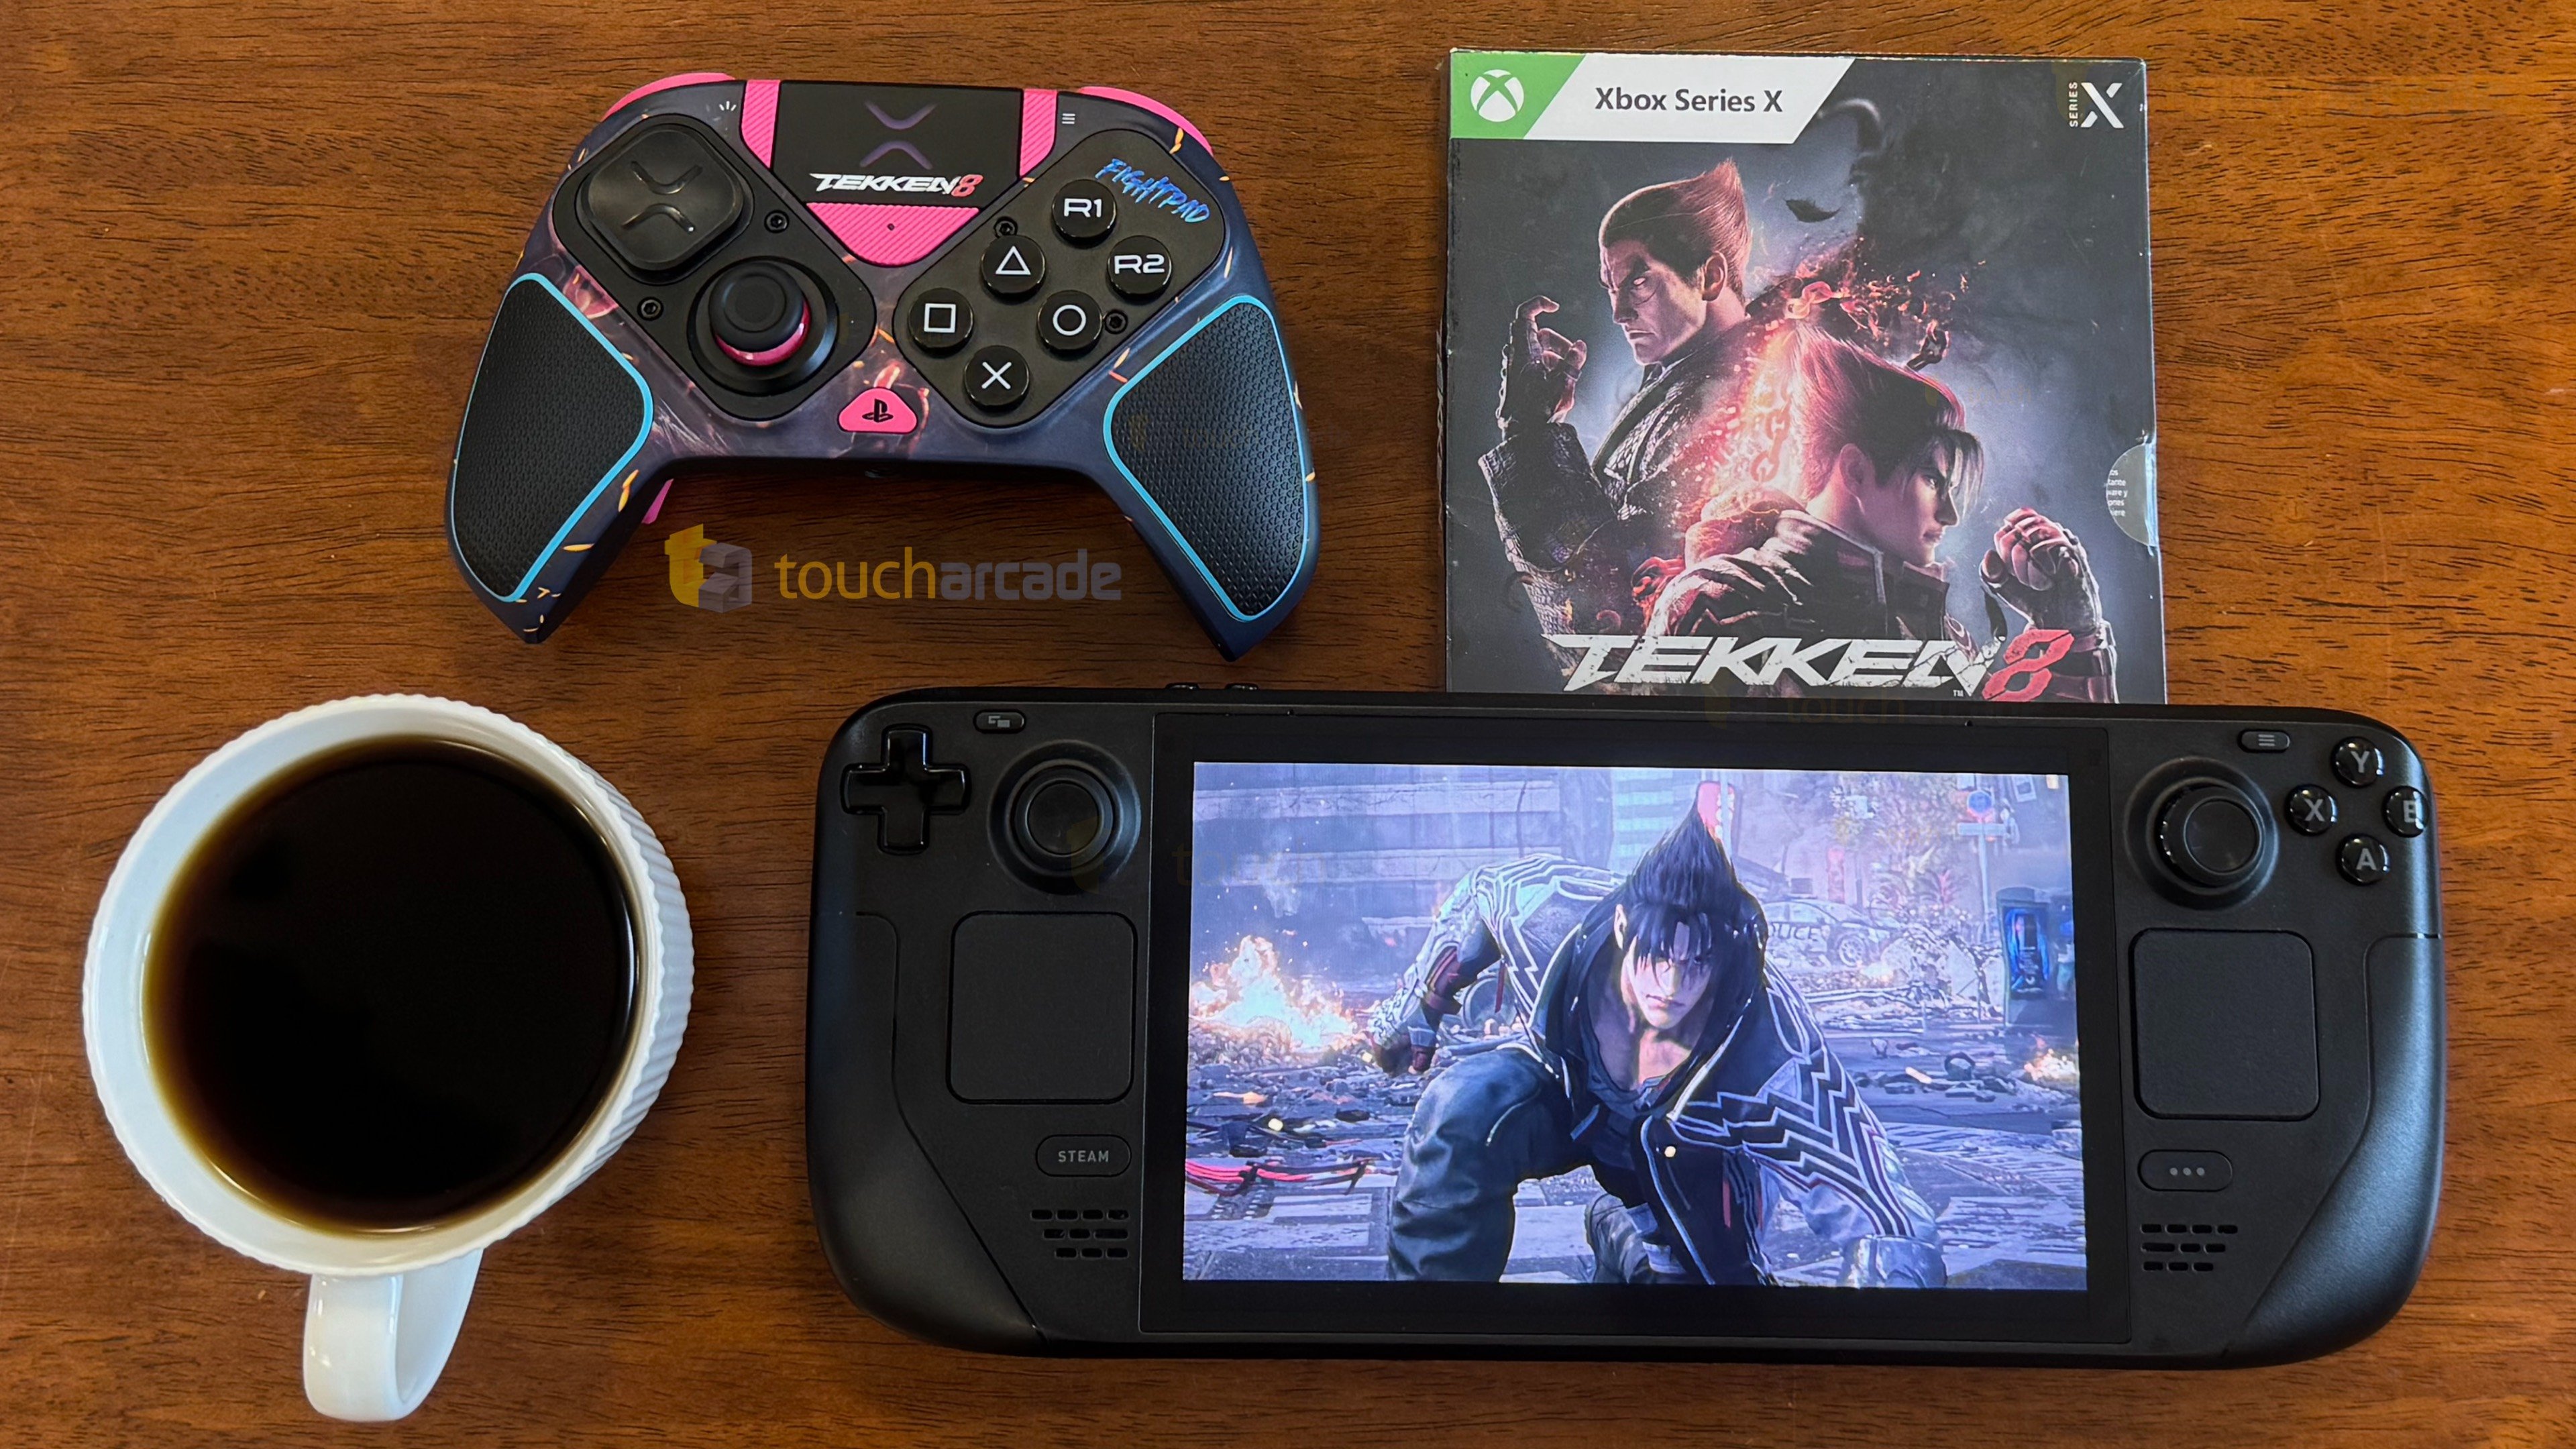
On paper, the Victrix Pro BFG Tekken 8 Rage Art Edition Controller supports PS5, PS4, and PC. I don’t use Windows anymore, so I was curious if this would work on Steam Deck out of the box. Since I prefer the PlayStation button prompts in games, I set it to PS5 and plugged in the dongle into my Steam Deck Docking Station. It worked without issue and without needing any update.
On the console side, if you want to play wirelessly, you need the same dongle and to set the toggle to PS4 or PS5. I had no issues playing with it on my PS4 Pro in PS4 mode and on my PS5 in PS5 mode. In fact, since I don’t have any PS4 controller that works outside of arcade sticks with PS4 support, this is a very good bonus to have for when I want to test something on PS4 to compare with PS5.
Victrix Pro BFG Tekken 8 Rage Art Edition Controller features
The big draw of the Victrix Pro BFG controller is the modular nature letting you work with a symmetric stick layout, asymmetric stick layout, change things up for fighting games with the fightpad, adjust the triggers, thumbsticks, and also the d-pads. The aim with this design was to allow you to adjust the controller depending on the game you’re playing. As an example, I’d use the symmetric stick layout when playing Katamari Damacy Reroll, but I might swap to the Xbox-style asymmetric layout while playing DOOM Eternal.
Being able to adjust the trigger stop is also great as I can change that when playing a racing game with analog trigger support and also go for the shortest stop when playing a game with digital trigger support. Beyond that, the multiple d-pad options are very nice, but I’ve been trying to stick to the default diamond shape one to get used to it, and I like it a lot. I wouldn’t use it for platformers though, but the other d-pad options work well here.
Since this is an official PS5 and PS4 licensed controller, it is worth noting that this has no rumble, no haptic feedback, no adaptive trigger support, and no gyro/motion control support. I don’t care about gyro much, but no rumble at all is disappointing since you have sub $30 controllers now offering decent rumble, though they aren’t PS5 compatible. I’ve been informed that third party wireless controllers for PS5 might have restrictions for rumble as well, and I’ve seen more reports from folks using other third party controllers here. Either way, this is disappointing.
The Victrix Pro BFG Tekken 8 Rage Art Edition ships with 4 paddles or well paddle-like buttons. I wish there were proper paddles you could remove though. I mapped two of them to L3 and R3 and the ones above to L1 and R1 since I use those the most in games like Monster Hunter World and also hate pressing the sticks. Having four buttons here is very good though.
Victrix Pro BFG Tekken 8 Rage Art Edition Controller look and feel
Visually, I love the gorgeous and bright highlights and colors used on the Victrix Pro BFG Tekken 8 Rage Art Edition. It isn’t as elegant as the default black model with purple highlights, but for a themed controller it looks very good with its light blue, pink, purple, and Tekken 8 branding.
The Victrix Pro BFG Tekken 8 Rage Art Edition feels very comfortable, but it is a bit too light for my liking. The material on the main controller body ranges from feeling premium to just fine. It is a far cry from the premium feeling DualSense Edge, but that controller has that ugly glossy front plate that ruins things. The grip on this controller makes a big difference, and I’ve had 8 hour sessions with the controller wired without getting tired of holding it. It being light pays off here.
Victrix Pro BFG Tekken 8 Rage Art Edition Controller on PS5
On PS5, there are a few things to keep in mind. This is an officially licensed controller, but you can’t turn on your PS5 with it. This seems like a limitation for 3rd party controllers on PS5, but is an annoyance to keep in mind. Beyond that, haptic feedback, adaptive triggers, and gyro are not available here. Aside from that, it has touchpad support and all the buttons I use on a DualSense controller including the share button.
Victrix Pro BFG on Steam Deck
Like I mentioned above, the Victrix Pro BFG Tekken 8 Rage Art Edition works out of the box on Steam Deck with the dongle plugged into the official Docking Station I use. It even correctly is recognized as a PS5 Victrix controller with the share button working for capturing screenshots and the touchpad working as it should in PC games that have PlayStation controller support. This was great to see as some games don’t even recognize my DualSense correctly.
Victrix Pro BFG Tekken 8 Rage Art Edition Controller battery life
The huge advantage the Victrix Pro BFG Tekken 8 Rage Art Edition Controller or the normal one has over the DualSense and DualSense Edge is the battery life. It lasts multiple times longer than the DualSense and the DualSense Edge on a single charge. It also helps that the logo on the touchpad indicates when the battery is low. This is good for playing on Steam Deck as other controllers don’t really visually indicate when the battery is low.
Victrix Pro BFG Tekken 8 Rage Art Edition Controller software
The software is something I couldn’t test as it is only available on the Microsoft Store and I don’t use Windows anymore. Thankfully, it works out of the box with Steam Deck, PS5, and PS4. The one thing I was hoping to see is if the controller would work on iOS. I tested wirelessly with the dongle on my iPad, wired on my iPhone 15 Pro, and also wired on my iPad Pro with no luck.
Victrix Pro BFG Tekken 8 Rage Art Edition Controller negatives
Right now, it has a few big negatives. These include no rumble, the low polling rate, not shipping with the Hall Effect sensors, and it requires a dongle for wireless, at least for the model I have. The lack of rumble might not be an issue for some, but for a “Pro” controller, the polling rate is disappointing. There are multiple videos on YouTube showcasing this and why it is a problem as well. Comparatively, the DualSense Edge wired is massively better with its response.
As for the Hall Effect sensors, I’m glad Victrix now sells the new modules, but why do new purchases of the controller not just ship with those in the first place? Also if I were to buy either of the module color options available for my Victrix Pro BFG Tekken 8 Rage Art Edition Controller, it wouldn’t fit with the aesthetic and will not have PS5 face buttons.
Victrix Pro BFG Tekken 8 Rage Art Edition Controller Review
Having gotten well over a hundred hours of use out of the controller per platform across games like UFO 50, Street Fighter 6, Tekken 8, Persona 3 Reload, and many more, I can safely say that I love using the controller, but the few issues are annoying to see given its price point. In a lot of ways, the Victrix Pro BFG Tekken 8 Rage Art Edition has the potential to be one of the best controllers in years if it sees some fixes and changes for a potential successor. Right now, there are a few too many caveats involved for its high asking price that make sure it is very good, but not amazing. The big issues holding it back right now are the lack of rumble (which seems like a restriction from Sony), dongle requirement, additional cost involved for Hall Effect sticks, and the polling rate. These might not matter to some folks, but for a “Pro” controller priced at $200, I expected a bit more.
Victrix Pro BFG Tekken 8 Rage Art Edition Review Score: 4/5
Update: Added more information for the lack of a rumble feature.


Published: Jul 17, 2025 12:45 pm