A House Divided now includes event cards, one of which is drawn each turn, and there are unique decks for each of the years of the war after 1861. Every card is drawn and played once, and so every one of the historic events portrayed by the card occur, but players are unsure in what order within the year they will happen.
Work in Progress Event Card Samples (not final artwork)
One of the functions of the cards is to add weather effects to the game. There are three weather cards in each full year of the game, and their main effect is to have that turn represent the passage of two months instead of one. This shortens each game year from 12 turns to 9, because game length, particularly when playing the historical campaign, was an issue in the original game.
But most of the weather cards also have an additional effect, and they are all tied to historical events. Here are the weather events represented in the game.
January/February 1862: STORMS (advance turn marker one additional month)
January of 1862 was particularly cold and snowy in the east and very wet further west.
August/September 1862: DROUGHT (advance turn marker one additional month, no cavalry jump moves allowed, Confederate player removes one unit to recruitment or promotion pool)
The heat and drought in the summer of 1862 severely restricted army movement. The widespread Southern crop failures also caused unrest and much desertion, as men went home to help their struggling families.
November/December 1862: STORMS (advance turn marker one additional month, no naval invasions of naval jump moves)
Heavy rains and flooding in the last months of 1862 severely limited Union efforts to drive down the Mississippi. Offshore storms disrupted the Union fleet at Port Royal and sank the US ironclad Monitor on its return voyage north.
January/February 1863: STORMS (advance turn marker one additional month)
January of 1863 was particularly wet, and the Union attempt to launch an early campaign turned into a fiasco, Burnsides’s famous “Mud March.”
August/September 1863: DROUGHT (advance turn marker one additional month, no cavalry jump moves allowed)
The heat and drought in the summer of 1863 again caused widespread crop failures and restricted army movement.
October/November 1863: STORMS (advance turn marker one additional month, no naval invasions or jump moves, no unit can take more than one march)
Heavy rains, cold, and snow in the last months of 1862 limited army maneuvers.
January/February 1864: STORMS (advance turn marker one additional month, no naval jump moves)
May/June 1864: INTENSE HEAT (advance turn marker one additional month, no cavalry jump moves, both players remove one active infantry unit to the recruiting or promotion pool)
The early hot weather in May of 1864 during the Wilderness Campaign restricted movement and increased casualties from heat exhaustion and forest fires started by small arms fire.
November/December 1864: STORMS (advance turn marker one additional month, no naval jump moves)
Fierce winter weather toward the end of 1864 effectively ended Hood’s campaign in Tennessee.
January/February 1865: STORMS (advance turn marker one additional month, no naval jump moves)
Heavy rains in the spring of 1865 slowed most armies but did not keep Sherman from pushing on toward the sea.
The Persians have the bulk of their Light Cavalry across the Pinarus and poised for an assault on the rather disorganized Macedonian left flank. Meanwhile on the Macedonian right flank, the Macedonians have cleared the skirmishers guarding the “easy” Pinarus crossing and have a portion of the Companion cavalry on the Persian side of the river. In the area right of center, the Macedonians have a couple of peltasts across the river having dispersed the skirmishers manning the abatis along the riverbank.
As with the first Game Turn, Alexander will have the first Player Turn due to the Elite Initiative Orders phase. The next three Player Turns will go Rheomithres, Aristodemus and Darius with the Persians choice as to the order. Thymondas has the next Player Turn followed by Nazarenes. The Macedonians follow with Player Turns for Parmenion and Craterus, Macedonians choice as to the order. Alexnader will have the last Player Turn.
Elite Commander Initiative
Movement and Missile Fire Segment
Alexander takes the EIO Player Turn (neither subordinate is in command range anyway) so he can get the balance of his cavalry over the river and begin the process of regrouping his wing in preparation for his drive against the Persian left wing. He will need to move to put the three cavalry units already across the river into command range. His first of seven orders goes to move himself 4 MP to hex 4411. That position keeps his Hypaspists in range along with his cavalry and coverage for the area across the river where some of his cavalry will be at the end of this Orders Phase.
His second is a Move order to Companion 4 (4608) which changes facing due east and moves across the river to 5007, incurring 3 Hits (1 river, 2 up slopes). His third is a Move order to the Agema (4609) which follows the same path across river ending in 4907 facing northeast, incurring 2 Hits (river, up slope). Order four moves Companion 3 (4610) along that same tried and true path into hex 4808 facing northeast, garnering the same 2 Hits as its predecessor. With no room on the other side of the river, Alexander leaves the Paeonians where they are and uses his remaining three orders to recover 2 Hits each from Companion 2, Companion 1, and the Prodromoi.
Since there is a crowd of units just over the river, I flipped the three Companions to their Moved side as a memory aid. This concludes the EIO Orders Phase.
Rheomithres
Movement and Missile Fire Segment
Play now proceeds in Initiative order starting with one of the Persian 3-rated leaders. The three leaders are spread out over the battlefield so any one leader’s actions will have no effect on the other. So once again the Persians start the Game Turn with Rheomithres.
Rheomithres’ first order removes the 2 Hits on Asia Levy in 5018. He will need to move to be able to rally the routed Asia Levy in 5210. With his second order, he moves 6 MP into hex 5114 and stops there (the extra MP cost for Woods and slopes adds up fast). His last order goes to Rally the routed Asia Levy, and he succeeds (barely, 4 DR). However, the 6 DR on the Rally Table undoes this and the Asian Levy must rout move two hexes, first into 5209. The Sheer slope is impassable to infantry and prevents the unit from moving directly toward the Retreat Edge. The Asian Levy adjusts its facing and sidesteps into hex 5109.
Decision time for the Persians. During Game Turn 1, the Persians were reluctant to attempt Momentum with the expectation that the Macedonians would jump at the chance to deny any further Momentum attempts by the Persians. On Game Turn 1, guaranteeing a Momentum chance for Nabarzanes, who is leading the Persian offensive, made sense. But are the Macedonians keen on taking the risk of a failed Trump? Losing the opportunity to act at all in the Game Turn can be critical. To quote the Design Note from The Trump Option section (Alexander, 5.4) “… The non-Macedonian player will often find that, for him, its best application is when it backfires on the Macedonian player. For that reason, players should be aware that this option should not be used indiscriminately.”
Given that Alexander was a bit careless in leaving himself alone in a hex, it’s time to test the Macedonian’s resolve and the prowess of Alexander with some potential Personal Combat (Alexander, 9.2). Rheomithres makes a Momentum attempt … and succeeds (2 DR)! Decision time for the Macedonians. It seems clear that Rheomithres will take his chances with Personal Combat. A successful Trump by any of the Macedonian leaders will put a stop to such heroics but risks losing a Player Turn, and depending on who makes the attempt, the potential for Momentum, should the Trump attempt succeed. Alexander is not backing away from a fight, so no Trump.
Momentum Orders Phase
Rheomithres’ first order is another Rally attempt for the routed Asian Levy … but a 7 DR eliminates the unit. Here I mistakenly violated the Rally rule (Alexander, 10.27), in that a given leader is allowed only one Rally attempt per unit per Game Turn, one of those nuances in the rules that are often overlooked. Rheomithres’ second order moves him to hex 4511 (7 MP), staying at the same elevation. Why not issue an order to one the two remaining Asian Levy units first? His last order is kept in reserve should he survive the Personal Combat. He has 2 MP left which would allow him to move away, and should he have a second Momentum Orders Phase, move adjacent to Alexander again and force another Personal Combat.
The Personal Combat mechanics, which aren’t present most other GBoH games, are straightforward; each side rolls a die and adds the result to the respective leader’s Personal Combat rating. High total is the “winner”, insomuch as that the winner is unaffected while his opponent suffers the adverse effects. The difference between the two totals is used in conjunction with the Leader Casualty Table to determine the extent of the adverse effects. In our case, both sides rolled a 7, Alexander wins due to his 7 PC rating (Rheomithres has a 3 PC rating), the differential is four so Rheomithres is Wounded (Ratings reduced by 1) and Finished.
Aristomedes
Aristomedes job is to shore up the Persian left flank so will go next. He orders the Sittaceni Archers 6, 5, and 4 in that order to hexes 4501, 4403, and 4203. These Skirmishers will serve as a screen and speed bump to slow the Macedonian advance. It will take some time to coax those cumbersome Cardaces into a defensive line, so Aristomedes will go for Momentum. A 5 DR doesn’t cut it; Aristomedes is Finished.
Darius
Now to Darius. His generous eight hex command range makes him an asset in a support role in that he often need not expend an order to move into range. He will let Thymondas handle the pesky Peltasts. Order one tries to rally Persia 1, but an 8 DR sends the unit off the field – eliminated. Orders two and three remove the Hits on the Syrian Archers (2213) and Cardaces 1 (2115-2016). Note that there is no requirement that the entire two-hex counter be in command range to receive an order. None of the other in-range Persian units with Hits qualify for recovery.
Time for a Momentum decision. The Macedonian left has issues. Parmenion’s “crisis” left a gap between the left wing and center that is beckoning Nabarzanes’ cavalry to exploit. Sensing that the Macedonians are looking for chance to have Parmenion go before Nabarzanes, Darius decides to pass on the Momentum attempt. Aristomedes failure was perhaps a blessing.
Thymondas
Thymondas, the only 4-rated leader, is next in Initiative order. The two Thracian Peltasts on the Persian side of the river are within one Hit of routing, so Thymondas will use his Skirmishers to see if they can be driven off with missile fire.
His first of four orders is a Fire order to the Arabian Archers in 2714 who fire at the adjacent Thrace 1 (recall the Skirmishers can fire through a flank hex) and hits. Thrace 1 faces the Macedonian retreat edge and rout moves into hex 2617. So far so good for Thymondas. There are no other shots, so a Skirmisher will need to move into position to take one. Although the rules allow for firing over a friendly unit (Alexander, 8.14), the “blocking” friendly needs to be closer (not halfway) to the firing unit, so firing over a friendly at an opposing unit adjacent to that friendly is not possible. The hex with the abatis (2416) is open, so Thymondas issues a Move order to Syria 4 which proceeds into 2416 passing through Cardaces 3. There is no penalty when Skirmishers move through other friendly units (Alexander, Stacking Chart). Entering the abatis does cost a Hit (I’ll play this as written, though I suspect that the penalty was directed at the Macedonians). Unlike its compatriots, Thrace 3 has missiles, so it uses Entry Reaction Fire and hits (4 DR). The Syrians ignore Thrace 3 and shoot at Thrace 2 (love those flank shots) and hit (0 DR, +1 for moving). Thrace 2 faces toward its retreat edge and rout moves into 2517 moving through Thrace 3 (an enemy ZOC does not block the path if occupied by friendly unit). Thrace 3 passes its “moving through” TQ check, incurring the minimum 1 Hit (now has 4 Hits). Order three goes to Syria 1 (2412) which moves into 2515. Thrace 3 reacts again and hits again (2 DR). Syria 1 shoots and misses (7 DR, +1 moving), ending Thymondas’ hot streak.
Unfortunately, Syria 3 (2213) is just out of range, so Thymondas is unable to use it to occupy hex 2615 (and, no I am not going to move the Royal Guard HC there). His last order removes the Hit on Cardaces 3. Thymondas declines the Momentum opportunity to ensure that Nabarzanes goes next.
I flipped none of the Skirmishes that moved not by choice but based on an exception often overlooked. Skirmisher units do not incur a Hit for moving again during the Game Turn (Alexander, 6.13).
Nabarzanes
Movement and Missile Fire Segment
Nabarzanes has eight LC within three hexes (his Line Command range) so issues a Line Command with Move orders to the group (as Wing Commander, using a Line Command is automatic in his initial Orders Phase). His primary targets are the Amyntas and Ptolemy Phalanxes that have exposed flanks and the nearby damaged Thessalians and Thracians. Although some players may be tempted to use those horse archers to do away with the nearby routed Thracians, they would be doing away with some valuable assets. Routed units are as good as “eliminated” unless orders are expended to save them, and as happened with Parmenion’s rally attempts, a success is not a guaranteed outcome. Moreover, while they are headed for home, they can inflict Hits on their brethren on the way there. So why expend orders to help your opponent out unless you have nothing better to do with them?
Here are the moves and fires in order:
Persia 5 (2219) moves to hex 2223, facing the two Macedonian units. The Thracians reaction fires and hits. Technically, I should hold off on the shots until after everyone moves (Alexander, 8.21), but since this is the only reaction shot there is no point in complying. Persia 5 is not Shock capable, so sitting astride Thessaly 4’s flank is not worth the hit to react. However, facing in the other direction could possibly block infiltration around Thessaly 4, but in doing so present a flank in the direction of the enemy. Thessaly 4 rotates to the west to block the infiltration, passes its TQ check and incurs the mandatory 1 Hit penalty. The archers fire at the Thessalians scoring a hit. Thessaly 4 closed the path to the flanks of the Thracian Peltasts and the Amyntas Phalanx
Hycarnia 1 (1719) moves to hex 1925 (7 MP); Thessaly 2 changes facing, passes its check, and incurs the mandatory 1 Hit; The Hyrcanians fire and miss; Missile Low. Shock Must Check TQ placed
Hycarnia 3 (2020) moves to hex 2521, facing east (6 MP); fires at the Ptolemy Phalanx and misses, Missile Low . Shock Must Check TQ marker placed
Hyrcania 4 (1920) moves to 2522, facing Thessaly 5 (8 MP); fires and misses; Missile Low. Shock Must Check TQ marker placed
Hycarnia 2 (1820) moves to hex 2025, facing east (6 MP); fires at Thessaly 1 and misses ; Shock Must Check TQ marker placed
Media 1 (1918) moves to hex 2122 (5MP); fires at Thessaly 4 and hits ; Shock Must Check TQ marker placed
Nabarzanes has two horse archers and himself yet to move.
Media 5 (2019) moves to hex 2423 (7MP); fires at Thessaly 5 and misses. The hex chosen pins the Amyntas Phalanx.
Hyrcania 5 (2218) moves around the Thracian ZOC to hex 2419, facing the Thracians (7 MP). The archers are not Shock capable so making a facing change with a +3 DRM to the TQ check would be reckless. Hyrcania 5 fires and hits.
Nabarzanes (1919) has all units except for the two Media LC on the other side of the river in range, so remains where he is.
Shock Combat Segment
There are five Shock combats. Starting from the left side of the map, the Pre-Shock checks go as follows:
Hyrcania 1/Thessaly 2 – both pass
Hyrcania 2/Thessaly 1 – both pass
Media 1/Thessaly 4 – both pass
Hyrcania 3/ Ptolemy – both pass
Hyrcania 4/Thessaly 5 -Hyrcania 4 incurs 1 Hit
Rather uneventful, but not overly surprising when good quality units are involved. As my usual practice, I will resolve steps 9.14 through 9.16 together for each combat. There are no leaders involved, so that step can be ignored.
The Hyrcania 1 has a frontal attack on Thessaly 2. The combat is resolved on Shock CRT Column 5 (LC vs. HC, no SRD or terrain shift) with no adjustment for superiority. The result is 2(2). Hyrcania 1 (4 Hits), Thessaly 2 (3 Hits). The Hyrcania 2/Thessaly 1 combat is resolved on the same Column 5 with no adjustment for superiority, and with the same 2(2) result. Hyrcania 2 (3 Hits), Thessaly 1 (2 Hits).
The Media 1 has a flank attack on Thessaly 4. The combat is resolved on Shock CRT Column 6 (there are no shifts). Media 1 has Position Superiority due to the flank attack and thus is Attack Superior (AS). Note that when cavalry fight cavalry, flank/rear attacks don’t move the Shock CRT column much. The result is another 2(2), adjusted to 2(4) for the AS. Media 1 (3 hits), Thessaly 4 (10 Hits). Here we have a Breakthrough situation; Thessaly 4 incurs 2 more Hits which is irrelevant in this circumstance.
Hyrcania 3 has a flank attack on the Ptolemy Phalanx. The base Shock CRT Column is 5 which will shift to Column 2 due to the Size Ratio Difference (SRD) and the slope. Note since the Hyrcanians move to the attack, the ratio is rounded in their favor. The Hyrcanians have Position Superiority and so are AS, but the doubling of hits is halved when an LC attacks a Phalanx. The result is 3(2) with no adjustment (8 DR). Hyrcania 3 (3 Hits), Ptolemy (3 Hits)
Last combat. Hyrcania 4 has a frontal attack on Thessaly 5. We are back on Shock CRT Column 5 with no adjustments and another 2(2) outcome. Hyrcania 4 (3 Hits), Thessaly 5 (5 Hits).
For the Collapse step there is one rout. Thessaly 4 faces south and rout moves to hex 2125. None of the other combatants are within 1 Hit of a rout, so no TQ checks. Media 1 advances into 2123, where the Thracians take an entry reaction shot and hit – Media 1 (4 Hits).
Without hesitation, Nabarzanes will go for a Momentum Phase … and succeeds. A timely success. Nabarzanes is in position for another round of mostly survivable Shock combats. The intent here is to inflict another couple of Hits on each of the engaged Macedonians before the inevitable counterattack, which in most cases would be Attack Superior, enough to rout most of the Persian engaged cavalry even if they did not attack. The shock attacks require no orders, so those orders can be used instead to bring the Bactrians across the river and into a position to finish off the weakened Macedonians.
Trump decision time for the Macedonians. Parmenion cannot afford to lose a Player Turn so won’t make the attempt. Craterus has no better chance of succeeding and will be needed to help put out any fires on the left flank. Alexander has the best chance to succeed but at the possible cost of a delay on his wing and the loss of Momentum opportunities for both Craterus and Parmenion. Alexander will Trump …and succeeds (barely with a 7 DR). Nabarzanes is Finished.
Alexander
Movement and Missile Fire Segment
Alexander uses six of his seven orders to remove Hits from the six cavalry units across the Pinarus: Companion 1 (1 Hit), Companion 2 (2 Hits), Companion 3 (None), Companion 4 (1 Hit), the Agema (None), and the Prodromoi (2 Hits). Order seven is a Move order to Agriania 1 (4311) who has been loitering on the high ground since the start of the battle. The Agrianians face east and start to move toward Rheomithres who withdraws 3 MP to hex 4712. The Agrianians move into hex 4411 to keep Alexander company. No reason to risk another Personal Combat.
Momentum Orders Phase
Alexander succeeds in his Momentum attempt. Since he will have the first Orders Phase next Game Turn, there is no need to move the Companions now since some are already within striking distance of the Persians. Rather, Alexander uses four orders to remove the Hits from Companions 1, 2, 4 and the Prodromoi. At some point, Alexander will need to cross the Pinarus since the Steep/Sheer slopes are impassible to leaders and thus obstruct the tracing of command range (Alexander, 4.21). That can wait till his next Orders Phase. His remaining three orders will go to move his Hypaspists in the following order.
Agema (3912) moves to 3511, 1 Hit for the slope – 2 Hits total
Hypaspist 2 (3813) moves to 3412, 1 Hit for the slope – 1 Hit total
Hypaspist 3 (3713) moves to 3413, 1 Hit for the slope – 1 Hit total
The Hypaspist are positioned outside Slinger range and within Move distance for an assault on the Greek Hoplites. Alexander is Finished.
Parmenion
Movement and Missile Fire Segment
The Macedonian player has the choice of either Parmenion or Craterus for this Player Turn. Knowing how Parmenion fares will determine what Craterus will do, so Parmenion goes next. And Parmenion’s options are limited since has only three units in command range that could receive a useful order. There is no benefit in having the Amyntas Phalanx wheel and incur the Hit(s) (Alexander, 6.45) since its attack would remain frontal (Alexander, 9.15).
His first order is to move Thessaly 3 (2126) to 2124 (5 MP). Media 1 fires in reaction and hits. Shock Must Check TQ marker placed. With his second order, he has Thrace 6 fire at Persia 5 and hits. Persia 5 uses Return Fire (Alexander, 8.23) and misses. Order three is a Rally to Thrace 5. A 5 DR does the trick and breaks Parmenion’s Rally losing streak. A 9 DR on the Rally Tables leaves the Thracians with 3 Hits. The Thracians face north and receive a Missile No marker (Alexander, 10.27).
Order four sees Parmenion move to 2325 placing the routed Mercenary Peltasts (3022) in range. His last order is a Rally order to that same unit and again Parmenion gets the job done (3 DR). Mercenary 5 ends up with 3 Hits from the Rally Table, then faces west, and receives Missile No marker.
Shock Combat Segment
Now for some additional Shock combats. Shock No TQ markers go on Thessaly 2 and Thessaly 1 which attack Hyrcania 1 and Hyrcania 2 respectively. Shock No TQ markers are also placed on Thrace 6, Amyntas, and Thessaly 5 which attack Persia 5, Media 5, and Hyrcania 4.
Thessaly 4 must shock Media 1 which is the only Pre-Shock TQ check situation. The Thessalians pass, but the Medians incur 1 Hit (5 total).
The attack by Thessaly 2 is resolved on Shock CRT Column 9 (Sizes are the same, no terrain effects). HC are Attack Superior against LC. The result is 2(3) adjusted to 2(6) for the superiority. Thessaly 2 (5 Hits); Hyrcania 1 (10 Hits). The attack by Thessaly 1 is resolved the same way with the same 2(3) result adjusted to 2(6). Thessaly 1 (4 Hits); Hyrcania 2 (9 Hits). Thessaly 3’s attack breaks the pattern with a 2(2) result adjusted to 2(4). Thessaly 3 (3 Hits); Media 1 (9 Hits) – breakthrough is irrelevant.
Thrace 6’s attack is resolved on Shock CRT Column 8 with no shifts or adjustments and a 3(2) result. Both Thrace 6 and Persia 5 have 5 Hits. The Amyntas’ attack is resolved on Shock CRT Column 12 which includes the shift for the SRD but there is no superiority. The result is a 2(3). The Amyntas (4 Hits); Media 5 (4 Hits). For Thessaly 3’s attack it is back to Column 9, Attack Superior for a 2(2) result adjusted to 2(4). Thessaly 3 (7 Hits); Hyrcania 4 (7 Hits).
Now the Collapse step. Hyrcania 1, Hyrcania 2, and Media 1 face northeast and rout move to 1923, 2023, and 2121 respectively. Both Thrace 6 and Persia 5 are right at their break point. A Thrace 6 advance would not cause any terrain hits, so by the tie breaker rule (Alexander, 10.15) Persia 5 (the defender) routs, while Thrace 6’s Hits are reset to 4. Persia 5 daces northwest and rout moves to 2221. There is a similar situation with Thessaly 5 and Hyrcania 4, both are at or over their break points, but Hyrcania 4 is over, so it routs, and Thessaly 5 has its Hits reset to 6. Hyrcania 4 faces northwest and rout moves first to 2521, passing through Hyrcania 3 which incurs 1 Hit, and moving to 2421, avoiding Ptolemy’s ZOC.
Media 5 is within one Hit of its TQ and in an enemy ZOC so must make a TQ check (Alexander 9.18 #2). It passes and has its hits reduced to 3.
The victorious Macedonians advance: Thessaly 2 into 1925, Thessaly 1 into 2025, Thessaly 3 into 2123, and Thrace 6 into 2223 now Missile No. No facing changes. Thessaly 5 advances into 2522 where Hyrcania 3 reacts by changing facing, passes its TQ check incurring 1 Hit, fires (now Missile No) and hits, routing the Thessalians! Thessaly 5 changes its facing, and rout moves into 2624 avoiding Media 5’s ZOC.
Aside from Thessaly 5’s rout, a successful counterattack though not unexpected given the heavy cavalry’s superiority. Parmenion is Finished – the price the Macedonians paid for the Alexander’s successful Trump.
Craterus
Craterus is next with the final Orders Phase of the Game Turn. Should he support Parmenion or recover Hits on the Hypaspists and position himself to assault the Persian Hoplites next turn? He cannot rally the Thracians next to the river or the nearby Thessaly HC since they are in Persian missile range and LOS. He can reach (barely) Thessaly 4 for a rally attempt and be able to recover Hits on two other units but then would be too far to put all the Hypaspists in range next turn – he does not have a Momentum opportunity. Given the Persian disarray and the distance from the fresh Bactrians, Parmenion should have time to recover and reform his flank, so Craterus will take command of the Hypaspists.
Craterus’ first of five orders recovers the Hits on the Meleager Phalanx. With his second order, he moves himself to hex 3515 (3 MP) placing all the Hypaspists in range along with several Peltasts. His remaining three orders recover the hits on the three Hypaspists. Ineligible for Momentum, Craterus is Finished.
Rout and Reload Phase
On to the Rout and Reload Phase. The first step is to remove the Rallied markers from Thrace 5 and Mercenary 5. Next come the rout moves. Moving from left to right across the map, Persia 2 (1718) rout moves to 1708. Persia 4 (1814) follows suit and rout moves to (1806). Hyrcania 1 (1923) rout moves through Nabarzanes to hex 1915, followed by Hyrcania 2 (2023) which passes through Cardaces 1 into 2015. The latter passes its TQ check incurring the minimum 1 Hit. Media 1 (2121) and Thessaly 4 (2125) are in the same hex row. The Medians are furthest from the bottom edge so they will go first, not that it matters in this situation. Media 1 rout moves through Cardaces 1 and stops in Syria 2’s hex where it must move one more hex to 2112 (Alexander, Stacking Chart). Cardaces 1 fails its TQ by one, so it still incurs only 1 Hit. The Syrians fail their check by two so incur 2 Hits.
Thessaly 4 rout moves off the map and is eliminated. Persia 5 (2121) rout moves through Cardaces 2, stopping atop Syria 3 and moves one more hex to 2212. Cardaces 2 passes its TQ check and incurs 1 Hit while Syria 3 fails and incurs 3 Hits. Hyrcania 4 (2421) rout moves through Hyrcania 5, goes west to avoid Thrace 4’s ZOC and ends up in 2716. Keep in mind that routing units pay the MP costs for terrain. Hyrcania 5 pass its TQ check and incurs 1 Hit,
Thrace 2 (2517) is next, and rout moves around two different Persian ZOCs onto hex 2721. Ptolemy passes its TQ check and incurs 1 Hit. Thrace 1 rout moves through Ptolemy and skirting the Persia ZOC lands atop Thrace 2. Time to check the Stacking Chart. Thrace 1 moves one more hex to 2722. Ptolemy once again passes and incurs a hit. Thrace 2 is eliminated. Thessaly 5 (2623) rout moves through the recently rallied Thrace 5, exits the map, and is eliminated. Thrace 5 fails its TQ check by three causing it to rout and move its two hexes off the map where it is eliminated. If by chance it stayed on the map, it would then rout move its full MA. That the unit routed in this phase does not exempt it from the rout moving (Alexander, 10.22).
This segment was a bit messy, so here is a summary of the Hit count of those units impacted during this segment.
Macedonians: Ptolemy (5 Hits) … and two Peltasts eliminated.
Withdrawal Phase
The Macedonians lost the two Thessaly HC (14 RP) and two Thrace LP (10 RP) for 24 RP this turn. Added to the 12 RP from the last turn the Macedonians have lost 36 RP.
The Persians lost another Asia Levy (3 RP) and Persian LC (6 RP) for 9 RP. Added to the 17 RP from last turn the Persians have lost 26 RP.
All somewhat misleading since the Macedonians have only one routed unit on the map due the nearness of their retreat edge while the Persians have seven.
End of Game Turn Commentary
Although the Persian Light Cavalry onslaught on the right flank was repulsed (five routed units), the damage to the Macedonian wing was significant with four eliminated units, one routed, and the remainder with three or more Hits. Aleander’s Trump prevented a follow up set of favorable Persian shock combats, but more importantly it denied the Persians the opportunity to bring the fresh Bactrian cavalry across the river and in range for another assault.
On other fronts, the Persian skirmishers were able to drive off the peltasts that crossed the river, positioned more units to protect the Persian left flank, and the daring Rheomithres exploited a bit of Macedonian carelessness to engage Alexander in Personal Combat, coming out on the losing end.
For the Macedonians, Alexnader’s Trump blunted the Persian momentum on the Macedonian left allowing Parmenion the opportunity to counterattack and send most of the Persians lights toward their side of the field. The Trump prevented any follow-up. On the Macedonian right, Alexander moved all his Companions and the Prodromoi across the river in striking distance of the Persian line and importantly removed all the hits incurred in the river crossing and combats. With the Macedonian left temporarily stabilized, Craterus recovers the Hits on the Hypaspists, preparing them for cross river assault against the Greek Hoplites.
Both sides continued to pursue their overall battle plan. The Macedonian Trump was effective in minimizing the impact of the Persian assault without preventing the Macedonians from getting their right wing in order for offensive operations.
Introduction by Ancient Civilizations of the Middle East’s Game Developer, Fred Schachter: When ACME Designers Chris & Mark, as well as myself, first read in BGG James Lowry’s entertaining ACME Game After Action Report, we thought “Wow, wouldn’t this, with a bit of editing, be grand to share with InsideGMT’s audience?!?” and so this article came to be.
Hopefully, readers will enjoy the Ancient Civilizations of the Middle East gaming experiences of James and his three fellow ACME adventurers as they seek victory to become “The King of the Fertile Crescent”. What’s remarkable is that this was their first time playing the game! James has a wonderful blog covering gaming as well as a range of other topics of interest to gamers, so if you enjoy his ACME presentation, there’s more, much more, available at: www.rindis.com/blog
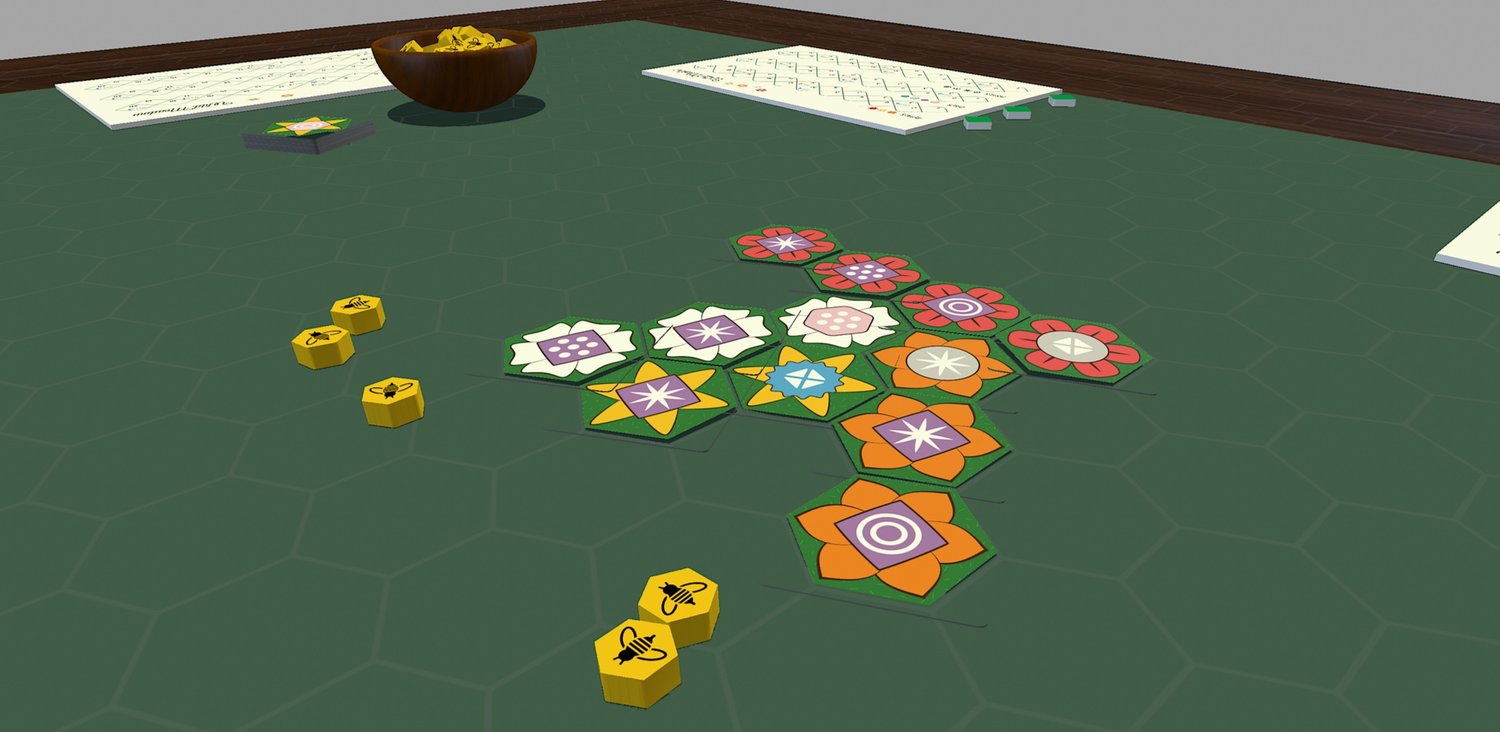
Back on the 25th of May (the day before Memorial Day), I had some people over to my home for FtF gaming. Patch was originally scheduled to attend so we could have a five-player game, but he couldn’t make it, thereby leaving me, Dave, Mark, and Jason to learn the rules for a four-player game of Ancient Civilizations of the Middle East.
It has been a while, but our group has played its brother game, Ancient Civilizations of the Inner Sea a few times and enjoyed it, so I figured this would be easy for us to get into. I panicked when I looked at the rules before everyone arrived that morning and realized I didn’t remember nearly as much as I thought I did. But once we were looking at the actual game spread out on the table, everything started coming back. Short of the new rules, we just needed to go through the details of conflict (again) and follow the sequence of play on the aid cards.
Mark and I had gone over the ACME Playbook ahead of time, and we decided upon the “Cyrus the Great” scenario as the only historical four-player scenario utilizing the full map. In hindsight, a more compact scenario would have been better, as we needed a bit of the board to save table space; notably my smallish table held the main board and our supplies of tokens fine enough, but we didn’t have a good place for the cards of available deities. The random draws for civilizations gave me the bullseye—I mean Babylon.
The scenario’s other civilizations use the game’s standard, somewhat compact, setups, but this scenario’s special rules grant Babylon the entire Fertile Crescent at the start of the game. The real changes in ACME from its ACIS predecessor are the terrain rules, and the game board’s green fertile areas are powerful, as instead of only growing with two-disk settlements, you can just have single disk camps and grow, or, best of all, have three disk cities to get VPs and growth disks.
With that setup, my initial growth was phenomenal, and only stalled later for a single turn, when a horde of barbarians came storming out of the deserts which kept me from having control of a bunch of fertile areas. After that, they were largely cleared out and my growth resumed to put me back from a poor board position to max out the number of disks in use. (Each civilization has fifty disks available for board position and growth, which then get sent back to stock by events played against you and competition. It’s very much like the stock in Tresham’s classic Civilization board game.)
Mark had the Medes & Persians to Babylon’s east and was a constant thorn in my side (as he should be). But I didn’t have a lot of other troubles, so while he got more powerful as the game went on, he could never really challenge me in the Fertile Crescent for longer than a turn at a time but progressively took control of areas just east of there. He also refused to join in on the initial rush to acquire a deity, so he didn’t get VPs that way, and at the end of Epoch III (which the scenario starts in), he was trailing well behind in points.
Dave had the Lydian Kingdom of the board’s northwest, and Jason Egypt, safely tucked in the board’s southeast with the Nile—the board’s other fertile area (but only five areas to the Tigris and Euphrates’ thirteen). To my relief, the two of them largely focused on each other, partially powered by Dave’s aggressively sea-oriented offensive strategy as he strove to gain a foothold on Egypt’s Mediterranean coast. I was more focused on pure growth and managing my frontiers at first, so Dave also took a lead in cities, followed closely by Jason, and I slipped into third place in VPs.
We broke for a late-ish lunch at the end of Epoch III, and Epoch IV saw the earlier conflicts come into ever-sharper focus. Mark was getting his act together and caught up to me in points (fueled by that bad turn with the barbarian invasion), and he started catching up to the other Civilizations as well. I swept away the Fertile Crescent’s barbarian invaders and concentrated on cities (and growth!) for a revival during the game’s last two turns that put me near the VP lead again, but I didn’t quite catch up to my rivals.
Both Epochs ended after three turns (it varies from two to four), and IV concluded with a Lydian (Dave -Blue disks) win with 36 VPs, followed by Egypt (Jason – Green Disks) at 34, Babylon (me – Light Colored Tan Disks) at 33, and the Medes & Persians (Mark – Red Disks) at 27 VP.
Presumably, a fourth turn could have favored me for a win, but the VP gain caused by twelve cities caught everyone’s attention, and with the borders of Egypt and the Lydians now truly at my doorstep in the west, I was looking at a lot of negative attention at that point. (On the other hand, you can see in the photo below that Dave was still dealing with the aftermath of two rounds of barbarians.) I had actually gambled on this turn to build as many cities as I could (and since my cities could generate growth and VPs it’s not the serious decision it is for everyone else) to get back in the lead. Sadly, I didn’t quite make it, and didn’t have the extra turn to carry the momentum forward.
I think I like the long, skinny map set up of ACIS better, and I don’t see enough difference between the wonder and deity mechanics for it to matter all that much save that an ACME civilization can have but a single deity. But the terrain mechanics (including desert and mountain, which are also important) really make ACME the better game in my view.
Certainly, all of us have enjoyed both “brothers”, ACIS and Ancient Civilizations of the Middle East, and they will see the table again. ACME has a wealth of scenarios and seventeen different civilizations, each with their own unique abilities (we didn’t leverage ours very well; too busy getting used to the flow of the game), and options for putting together any mix of them in non-historic scenarios. We’re really still just in the wading section of this game. Thanks for this gem of a game GMT!
Our Ancient Civilizations of the Middle East’s gameboard at the end of Epoch IV’s Turn 3. Note how red, the Medes & Persians, had established a city in the Fertile Crescent next to my homeland (the big tan square block). This was his third, and most successful, incursion into fertile terrain, and I’d been too busy to push him out. A theoretical turn four would have turned into a big fight in there. We’d had comparatively few barbarians this game, but two turns of them in Anatolia had taken a severe toll on blue’s, Lydian home, which had been full of cities for almost all of Epoch III. Perhaps the most surprising board position is the VP markers. Nine VPs from first to last isn’t much, and I was surprised at how much the “pack” stayed together for the entire game.
Designing a game with the scope of Combat Commander: Vietnam requires a lot of testing. Before the game is opened up for broader playtesting, the core design team has to ensure that all of the pieces of the design are working to provide the play experience we want. In the previous article we discussed how the Random Scenario Generator (RSG) and the data behind it is the anchor for the whole system. Indeed the RSG data serves as a validator for all 24 of the designed scenarios that will come with the base game.
Scenario design for the Combat Commander series is very delicate when looking at specific historic engagements, and perhaps even more for generalized engagements. Data models trend towards the average, so the RSG system uses player agency to tilt the odds with their choices. In written scenarios, the designer is the one that tilts the odds, often to align with the historical record. Without these little tweaks the scenario might feel too generic, but tweaked too much and things can end up on the rails.
The scenarios for the base game of Combat Commander: Vietnam are pulled from the archival records of the participants. The maps are drawn from 1:50,000 scale maps from the period, zoomed in to match the scale of Combat Commander. The scenarios designed for these maps fit the details we know historically into the framing of the game. The goal is for the core system rules to cover 85% or more of any scenario. Adjustments are then made with a few special rules to bridge the gaps between historicity and playability.
What follows is an After Action Report from a recent playtest of scenario #9, “Brown Water Brawl”. This is a key scenario in the base game because it introduces Amphibious Assault rules. Amphibious and Air Assaults are among the many things we’ve heard fans say they want to see in the system. This was a playtest to see how the rules affect gameplay for both attackers and defenders.
SITUATION REPORT:
Rach Ruong Canal, IV Corps, South Vietnam, December, 1967 – Although initially blocked from deploying forces to the Mekong Delta due to opposition from the South Vietnamese Government, in 1967, the Mobile Riverine Force (MRF) became America’s force in the Delta. Pairing the 2nd Brigade of the 9th Division with Navy brown water assault craft, the MRF sought out NLF forces along the many rivers and canals of the Delta.
After receiving rocket fire from the west bank, a company of the MRF lands with support from Monitor assault crafts to engage elements of the NLF’s 502nd Local Force Battalion.
Information display showing the scenario year, victory points, and other details (playtest graphics)
The NLF gets to set up its detachment first with three bunkers provided by the scenario rules. One of the bunkers is set up forward to contest the coastline where the MRF will land. The other two bunkers are placed in the open, one to cover the forward treeline, while the other defends the treeline in the rear. A few squads are also placed forward in order to contest the Americans before they get off the coast and toward the open area.
Gray NLF units set up to resist the American landing and hold key positions (playtest graphics)
As an Amphibious Assault, the Americans will have three waves of platoons enter the map from the water in the northeast, one per turn. The first wave picks the landing zone which will be used by all subsequent waves. The Amphibious Assault rules provide the defender with the ability to contest the landing zone after the first wave has deployed. One of the things that came out of this play was the need to encourage aggressive play from the NLF to actually contest the landing zone. As it is, that possibility does not come up in this playthrough.
While the landing zone is not really contested, the landing parties can be, which leads to the other key part of the amphibious rules that allow the landing craft free attacks during each deployment. Recognizing this is one of the reasons the NLF play it safe with their setup, but playing it safe does not prevent them from taking fire.
Victory in scenarios is measured by VP which are scored in a number of ways. The clearest is combat attrition. Both sides earn 1-4 VP for eliminating opposing units. Additionally for Attacker Defender scenarios VP are scored at each time check for any held objectives. Because the defender starts in control of the objectives, it is on the attacker to take those objectives as quickly as possible to keep the defender from scoring them.
Finally each side holds a secret objective which is only revealed and scored at the end of the game. The end game is triggered either on turn 8, by one side choosing to Break Contact after the Time marker reaches the Support marker, or one side having to Break Contact the Time Check after their casualties are equal or greater than their Break Point level (we will save the discussion of Break Contact and the other new mechanics which support it for a future article).
Time 0
VP: 0
US Casualties: 0
NLF Casualties: 0
Support Marker: 5
The Americans start by picking their landing zone. They choose a spot whose line of sight is blocked by huts, to allow some of the units to deploy into cover. On landing, the platoon leader spots the forward NLF bunker for the assault craft to perform its free attack. The bunker makes for strong cover, protecting the units inside whose return fire suppresses the leader. One of the squads outside of the bunker however, does take a hit from the bombardment.
The NLF in the bunker continue firing, their recoilless rifle wounding the leader while small arms fire suppresses the machine gun team with him. Two American squads and the other machine gun team use the vollying fire to screen their movement in the opposite direction, where they find cover in the huts to the south behind the treeline. The platoon leader at the landing zone targets the bunker with mortar fire, failing to break the units inside but giving the units with him a little time to recover.
The lead squad to the south, hearing rustling ahead, moves into the treeline guns at the ready to assault fire as they make contact. The NLF local force squad there is slow to react and takes a hit.
The American group by the landing zone spray fires at the bunker and the squad hiding in the woods next to it. The bullets do nothing to the bunker but are able to hit the units in the woods.
The wounded NLF to the south are able to rally before moving out of sight of the Americans. Another NLF squad reacts to the gunfire and moves to flank the squad in the woods, but have to slow to cross the canal which is particularly high for this time of year.
The Americans by the landing zone all fire into the woods by the bunker and are able to eliminate the NLF squad there. The American squad in the southern woods continues to close on the retreating NLF squad, suppressing them with their assault fire.
Time 1
VP: NLF 1
US Casualties: 0
NLF Casualties: 1
Support Marker: 5
As the second American platoon arrives at the landing zone, the assault craft targets the bunker again, this time breaking the NLF squad inside, through the cover. An American squad in the south closes in to flank the retreating NLF unit in the woods. The other NLF squad makes its way across the canal to assault fire the initial American squad, but the Americans manage to use the cover of the woods to their advantage.
The other suppressed NLF squad moves back through the rice paddies to avoid being attacked. The American squad on the treeline counters the NLF that assaulted from the canal before they can pull back. The ambush breaks the NLF unit before they are eliminated in the ensuing melee.
With the woods to the south now clear, the Riverine forces move the arriving platoon in from the south avoiding the forward bunker all together. Another call is made from the first platoon leader for Fire Support. The NLF uses the opportunity to rally the squad in the bunker, then the recoilless rifle lands a shot at the group hiding in the huts, eliminating the leader.
Down a leader, the Americans try to regroup. More NLF emerge from hiding near the bunker on the other side of the canal, preparing for a stronger defense against the attackers coming from the treeline. The NLF recoilless rifle continues firing at the coastal huts, breaking the remaining units there. The broken units try to immediately recover but instead end up suppressed. One of the American squads on the treeline opens fire at the NLF units by the bunker, breaking them before they counterattack.
Time 2
VP: NLF 3
US Casualties: 1
NLF Casualties: 2
Support Marker: 5
The final wave of the Riverine Force arrives at the landing zone with their platoon leader joining the units in the huts to spot for the assault craft, but it cannot find the target. Instead of returning fire, the local force leader calls in for Fire Support. The NLF squad in the paddies recovered, then heads back into the woods to contest the approaching Americans.
The last platoon leader helps rally the team in the huts by the landing zone, while the Americans at the treeline keep firing at the broken NLF squad in the clear across the canal until they are eliminated.
Time 3
VP: NLF 4
US Casualties: 1
NLF Casualties: 3
Support Marker: 5
The other American squad in the woods moves to assault fire the NLF squad at the treeline, suppressing them. The second platoon leader by the canal calls in a request to delay the rear support as he prepares his men. The NLF at the treeline again retreats back to the paddies before it can be attacked.
The second platoon leader makes the call and the Americans move into positions along the treelines on both sides of the canal. The squad already there makes a dash through the clear past the suppressed NLF to secure the objective at the turn in the canal.
Unable to recover from their wounds the broken American squad from the first wave is sent back to the landing zone while the freshly landed platoon uses the activity in the woods to make their move north. The lead squad manages to avoid taking fire from the group in the forward bunker and surprise the NLF unit in the woods off the path with an assault that breaks them. Some of the platoon follow behind into the huts off the path in the north, while the remaining squads go to reinforce the groups in the trees across from the bunker.
The broken NLF squad in the north pulls back through the clear behind the trees and out of line of sight. They warn the other broken squad there about the coming wave, so they can make their way into the trees for cover. The Americas charge in before the warning NLF squad can follow, leaving them extremely vulnerable in the open.
The second American platoon leader makes another call back for Fire Support as a squad in the rear moves towards the action in the south. The squad on the canal objective tries to fire at the suppressed NLF unit through the hinderance of the paddies but can’t hit the target. The NLF leader from the bunker in the open calls back for their own fire support.
In the north, the broken NLF squad tries to fall back through the paddies. The Americans open fire but are unable to land any shots on the retreating unit. The NLF squad in the south also falls back through the paddies without taking any opportunity fire.
At that moment the second platoon leader gets confirmation on their approaching close air support and helps them spot the bunker across the canal. Napalm comes down on target forcing all of the units in the bunker, and the one behind it, out before the bunkers are destroyed by the blaze. All of the NLF units break from the attack as they run into the clear. In the midst of this an NLF sniper manages to hit an American squad still by the landing zone.
One American squad on the southern treeline jumps the gun and rushes across the canal to assault fire the NLF trying to escape the napalm fire managing to suppress the squad and the leader. The NLF try to rally but only the leader manages to do so.
Time 4
VP: NLF 5
US Casualties: 1
NLF Casualties: 3
Support Marker: 6
The NLF leader escaping the flaming bunker urges the other units to withdraw but the Americans don’t hesitate to fire on their retreat, eliminating the squad with the mortar and the team with the recoilless rifle. Now alone in the open the leader takes fire from the American squad on the objective and the one that crossed the canal, but manages to avoid taking hits. With the air support still in the area the third platoon leader calls in another strike on the forward bunker. The spotting is off this time, missing the NLF with its package of more conventional bombs.
The NLF leader in the bunker finally connects with their Fire Support and calls in mortar fire that drifts south to break the Americans that crossed the canal and suppress the leader at the treeline. Understanding the reality of the situation the NLF leader then tells the group with them to start falling back. The squads creep through the smoke from the American bombardment but the leader stays with the recoilless rifle team hoping to eliminate more Americans before pulling back.
While the Americans in the south rally, the fire group in the north opens fire through the hindrance of the paddies to eliminate the remaining broken NLF unit. More Americans start pushing out from the treeline as the NLF squad in the southern paddies crosses the canal to link up with the leader from the bunker.
The Americans in the north rush the forward bunker to surround and cut off the retreat. The NLF in the south pull back even further. Then the Americans converge on the last bunker going into melee.
Time 5
VP: US 1
US Casualties: 2
NLF Casualties: 6
Support Marker: 6
An ambush breaks a US squad but they still manage to eliminate all of the units in the bunker, hitting the NLF break point.
The surviving group in the south continues to withdraw without taking fire until they are behind the flames of the napalm. Everyone still alive manages to Break Contact, except the NLF leader that gets captured when the Americans secure the area.
Endgame
VP: US 4
US Casualties: 2
NLF Casualties: 9
Support Marker: 6
An ambush breaks a US squad but they still manage to eliminate all of the units in the bunker, hitting the NLF break point.
The surviving group in the south continues to withdraw without taking fire until they are behind the flames of the napalm. Everyone still alive manages to Break Contact, except the NLF leader that gets captured when the Americans secure the area.
We reach out to those games’ designers and arrange a playtest. These playtests are usually with the designer on TTS, although I have been sent physical prototypes to test on our own.
Pine Island Playtesters
A relatively new addition to our community is our Pine Island Playtesters. These are insiders from the mailing list, discord, or Kickstarter who’ve expressed an interest in being more involved with the company.
We loop in our playtesters for the handful of games that we are seriously considering signing.
We usually have specific questions for our playtesters about game mechanisms, and how they view the game versus other games in the genre.
There is still room for improvement in our process. But, it’s come a long way, and it couldn’t be what it is, and we wouldn’t have the opportunities we have, without this amazing community.
If you’d like to be Pine Island Playtester and get a front row seat as we look at games to license, shoot me an email at jasper@pineislandgames.com.
We’re also trying to sort out a super-premium tier offering with a lacquer wooden game box – although we haven’t puzzled out economic manufacturing.
Having options, add-ons, and premium upgrades adds value for your customers.
Price Discrimination
Despite the nefarious sounding name, price discrimination is about allowing consumers to pay what they want for the goods that they want.
It is the other side of the coin to offering consumers more options. They will self-discriminate based on their preferences. For instance, consumers who can afford more premium options, and find value in them, will spend more money on those items.
When some portion of backers pledge for higher tier levels, or add-ons, it raises the average revenue and (ideally) profit per backer. This allows for faster funding velocity, but also aids in a number of areas such as making advertising more profitable (and so a campaign can afford higher costs per click).
Discoverability & Momentum
It’s important not to underestimate the power of Kickstarter’s algorithm – we found that 52% of backers discover our Nut Hunt campaign through Kickstarter, versus 43% through organic or direct non-Kickstarter sources.
A task becoming more prescriptive doesn’t mean that it’s less creative. Even though I now have more frameworks around sourcing illustration or graphic design – they are still creative processes. It’s just that I now know how to approach those tasks.
By the same token, a lot of tasks are iterative. But having a framework for how to approach tasks helps us iterate more efficiently and come up with better products.
I like this way of thinking about and framing the business. It makes it easier to approach less-well-defined problems, knowing that working through them will help me learn and level up my games publishing craft.
The next time they crop up they won’t be nearly as scary.
Passing it On
My hope is that Pine Island Games will grow as a company, and that some day we’ll have in house partners who benefit from the experience I’m building now.
It’s also why I write this blog.
I want to help other indie publishers learn processes and methods that help them on their journeys. It’s my way of giving back to this community, which I owe so much to.
A lot of articles are like this, a little more philosophical and less full of specific device, but I also try and provide some real concrete advice.
Our Nuts & Bolts series is for instance bite sized prescriptive advice on tackling specific publishing problems. I recommend checking them out:
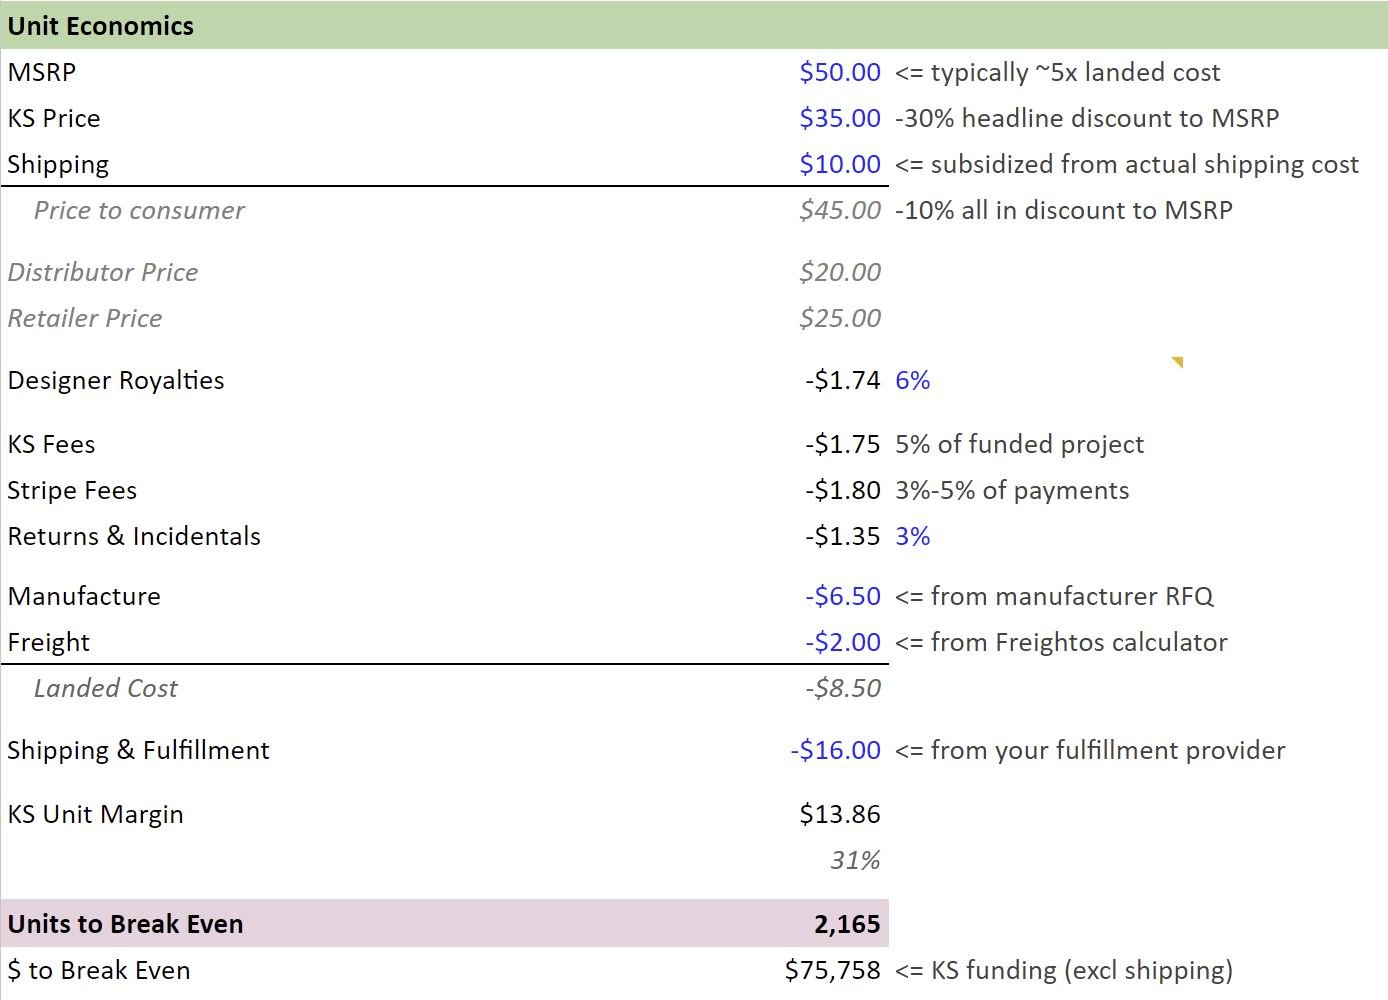
I wanted to re-share it here along with some linked resources in the model.
The basic idea is that you can input your development costs (to market costs), along with unit economics (manufacture cost per game, freight, shipping, etc), and see how many games you need to sell to break even, along with your P&L for any given number of games sold.
This tool is inspired by Crowdfunding Nerd’s e-mail list tool “Kickstarter Success Calculator”, but it has some material differences. It also goes farther with a section to calculate your return on ad spend (ROAS) not just for a paid advertising campaign, but also for a review & preview campaign.
They will be able to provide shipping rates by geography – like this shipping estimate for Sigil from Fulfillrite. Most will break down their picking fees, the cost of packaging, and postage costs.
Key Considerations
Price isn’t the most important consideration when finding your fulfillment partner.
Reputation: Reputation and surety that they will get the job done smoothly, and without undue product damage, is far more important than a dollar or two savings on picking and packing. I recommend asking around in game design and publishing forums for peoples’ experiences with your with your most competitive.
Ease of Communication: You’ll need a good relationship with your sales rep to smooth the freight delivery process, and address any hiccups that come up during fulfillment. Make sure your sales rep is responsive and can help you workshop your fulfillment options.
Technology: My favorite thing about Fulfillrite is their tech platform. They have a dashboard where I can manage inventory, upload shipping details, and best of all, it automatically ties into our Shopify storefront.
A couple of months ago I wrote up a pretty comprehensive guide on How to Structure a Kickstarter page. We’re still deep in the weeds putting together our Kickstarter for Sigil (launching 05/16!!), and I wanted to share some more tips and tricks that for taking your page to the next level.
Dead Space & Boarders
Kickstarter automatically inserts line spacing between images (the cannot abut against eachother). This means that when create assets for the page you need to take into account that there will be dead white space between them. There are a few ways to deal with this.
1. Combine Assets into Large Images
This is a trick we are doing for our Sigil Kickstarter. Instead of having a headline image, quote, and then what’s in the box image each separately, we are combining them into one master image. We have more control over the flow of the page, and can seamlessly have assets flow into each other without dead space.
You do need to break images (and have dead space) when you want to insert a link, a button or a video. So, eventually you’ll need to plan for the image to end, and how it will transition to dead space or your next graphic.
2. Fade Images into the Negative Space
A good example of this approach is the Elden Ring board game campaign. The IP includes a lot of mist effects which the creators incorporated to allow their images to blead into the negative space that Kickstarter forces between images.